You’ve likely seen the “Page Not Found” error before. Unfortunately, if you operate a website of any sort (WordPress or not), the day will probably come when you see the message on one of your own pages.
Fortunately, like many common WordPress errors, 404s are relatively easy to troubleshoot and fix. The solution usually involves restoring your site’s permalink structure — something you can do in just a few minutes.
In this article, we’ll explain just what a 404 error is and what can cause one on your site. Then we’ll walk you through how to fix it in four simple steps. Let’s get started!
An Overview of the WordPress 404 Error
A 404 error, also known as a “Page Not Found” error, indicates that your browser can’t locate the page you’re trying to access. The exact message can look a bit different depending on the browser you’re using, but it will generally always contain either the “404” code or a “page not found” message of some kind.
Websites can also create their own custom 404 pages.
Seeing this notification (or any other error message) when you’re trying to access your site can be frustrating. While there is a chance that your post has actually gone missing, the vast majority of the time, there’s a more benign cause.
Some common reasons that WordPress posts might return 404 errors include:
A mistyped URL. It could simply be attributed to a typo in the URL. This is the most common cause.
An issue with your Domain Name System (DNS) settings. If you’ve recently updated any of your DNS information and you’re seeing this error, it could be because the changes haven’t propagated fully. It can take up to 48 hours for this process to complete.
Problems with thepermalink structure of your site.Permalink problems can be caused by a missing, broken, or corrupted .htaccess file. Compatibility issues with WordPress components such as plugins and themes could also be the culprit.
Regardless of the cause, this error prevents access to your site, so it needs to be resolved as quickly as possible. We’ll look at troubleshooting and resolving the problem shortly.
Skip the Stress
Avoid troubleshooting when you sign up for DreamPress. Our friendly WordPress experts are available 24/7 to help solve website problems — big or small.
404 errors pose several problems for a website, beyond simply preventing you from accessing pages. First, they create a poor User Experience (UX).
If there are many of these errors on your site, and they aren’t resolved quickly, they could eventually turn users away. In the worst-case scenario, those visitors could land on a competing website instead, costing you business.
404 errors can also hurt your Search Engine Optimization (SEO). Search engine crawlers won’t index a page that returns a 404 because they think it doesn’t exist.
What to Do Before Troubleshooting the WordPress 404 Error
Before changing your permalink settings or .htaccess file, it’s a smart idea to create a backup of your website and database. This way, if you accidentally make something worse, you can easily restore your site to a functioning state.
If your website is hosted with DreamPress, backups couldn’t be easier. DreamPress automatically backs up your entire site every day, so you always have a fresh copy to access. You can also create a manual backup with just a few clicks.
How to Fix WordPress Posts Returning 404 Error (In 4 Steps)
With a fresh backup of your site in hand, it’s time to get to work. You’ll want to follow these steps in order and check if the error has been resolved after each one.
Step 1: Reset Your WordPress Permalinks
The first step to try is resetting your permalinks. Head to your WordPress dashboard and navigate to Settings > Permalinks.
From here, just click on Save Changes. That’s right — you don’t actually need to edit anything. Clicking that button will update the permalink settings even if you don’t make any changes. This is important because it also refreshes the rewrite rules used for “pretty permalinks.”
With this done, go ahead and reload the pages you were trying to access. If everything works, you’re all done. If you still get a 404 error, head to the next step.
Step 2: Restore Your .htaccess File
If resetting your permalinks didn’t work, the next strategy is restoring your .htaccess file. This controls how WordPress interacts with the server and how it generates permalinks for your pages. Restoring it to the default settings can fix sudden 404 errors.
To restore the .htaccess file, you’ll first need a way to access it. If you’re using DreamPress hosting, you can use the built-in file manager found in the DreamHost control panel. Most other web hosts offer a similar feature, or you can use a Secure File Transfer Protocol (SFTP) client such as FileZilla. We have detailed instructions for connecting via SFTP if you need help.
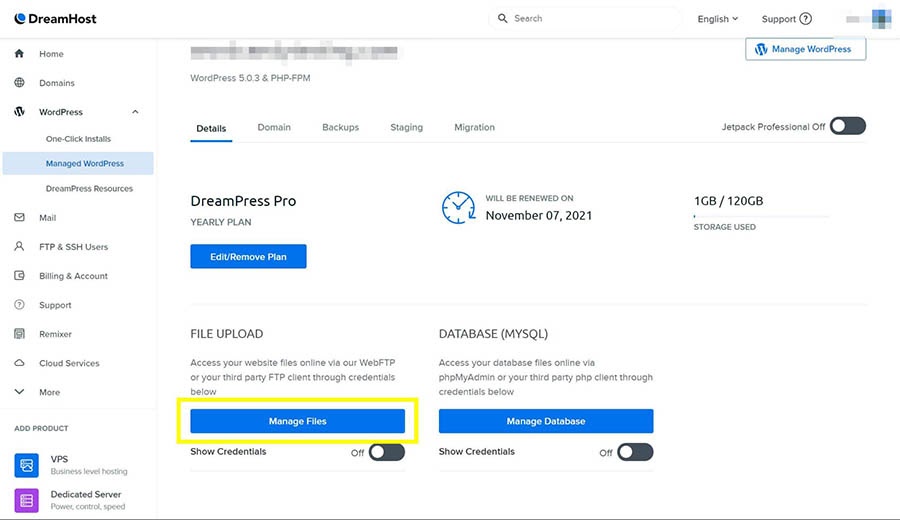
For this example, we’ll use the DreamHost file manager. Head to your DreamHost panel and navigate to WordPress > Managed WordPress in the sidebar.
Find the domain you’re having trouble with and click on the blue Manage button. On the next page, make sure the Details tab is selected at the top, and then click on Manage Files.
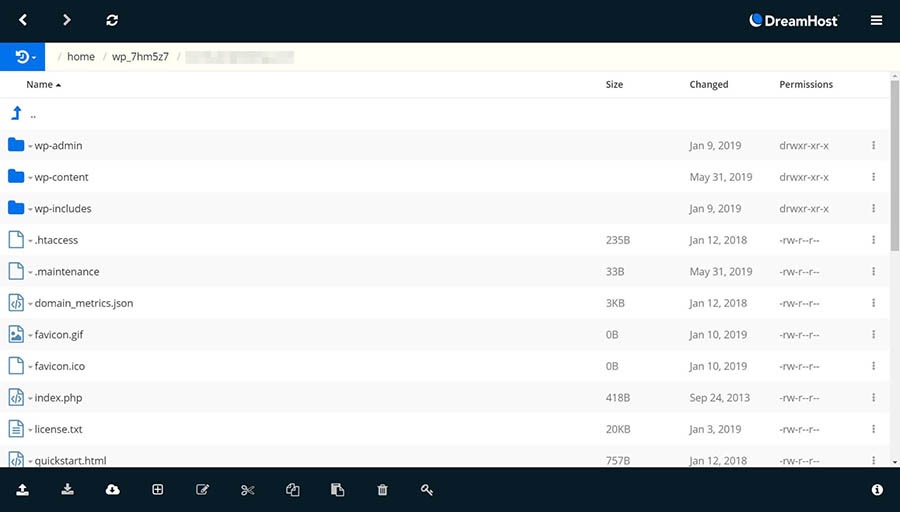
This will open the file manager in a new tab. Locate and click on the folder that corresponds to your domain name. You’ll find the .htaccess file in this directory (it’s the same one that contains items such as wp-content).
Next, click on the file name and select Edit from the list of options. You can copy the current contents of the file and paste them somewhere for safekeeping. For now, you’ll want to replace the contents with the following:
# BEGIN WordPress

<IfModule mod_rewrite.c>

RewriteEngine On

RewriteBase /

RewriteRule ^index.php$ - [L]

RewriteCond %{REQUEST_FILENAME} !-f

RewriteCond %{REQUEST_FILENAME} !-d

RewriteRule . /index.php [L]

</IfModule>

# END WordPress
This is the default .htaccess file for WordPress. When you’ve pasted this in, go ahead and save the file.
Restoring this file will also reset the permalink settings for your WordPress site. Therefore, if you’re using a custom permalink structure (or have changed it at all from the default), you’ll need to restore that setting too.
To do so, head back to your WordPress dashboard and navigate to Settings > Permalinks (just like Step 1 above). You can change it to whatever you were using before and then save it.
Finally, refresh your website and attempt to load the pages that were returning 404 errors. If everything works now, congratulations! If not, proceed to the next step.
Step 3: Disable All of Your WordPress Plugins and Theme
If you’ve reset your permalinks and .htaccess file, but you’re still seeing 404 errors on your site, the next step is to check your plugins and theme. Plugins, in particular, can sometimes have bugs or compatibility issues that prevent a site from loading.
Let’s start there. The basic idea is to disable them one by one and then check your website. If the error persists, turn it back on and move to the next one.
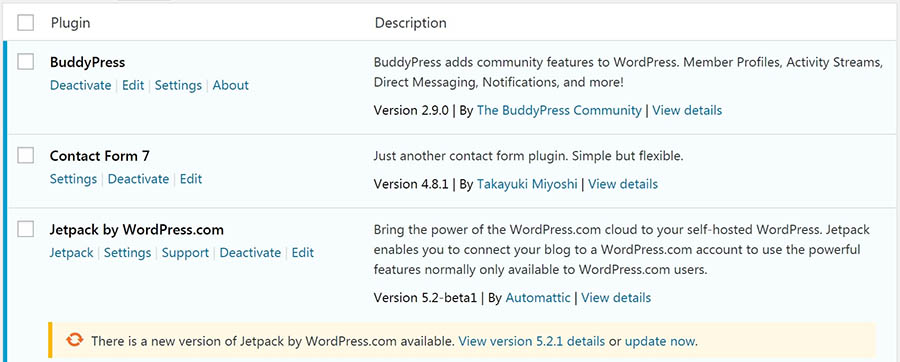
To get started, head to your WordPress dashboard and navigate to Plugins > Installed Plugins.
Locate and click on the Deactivate button below the first plugin. You can see that active plugins are shaded blue, while those that are off are white (as you can see with Akismet in the screenshot above). Now, refresh your site and see if the 404 error is still occurring.
If you get the error message, head back to the plugins screen, re-activate the plugin you just tried, and move to the next one in the list. If you find one that resolves the issue, you can check for updates that may resolve the problem or find an alternative with similar functionality.
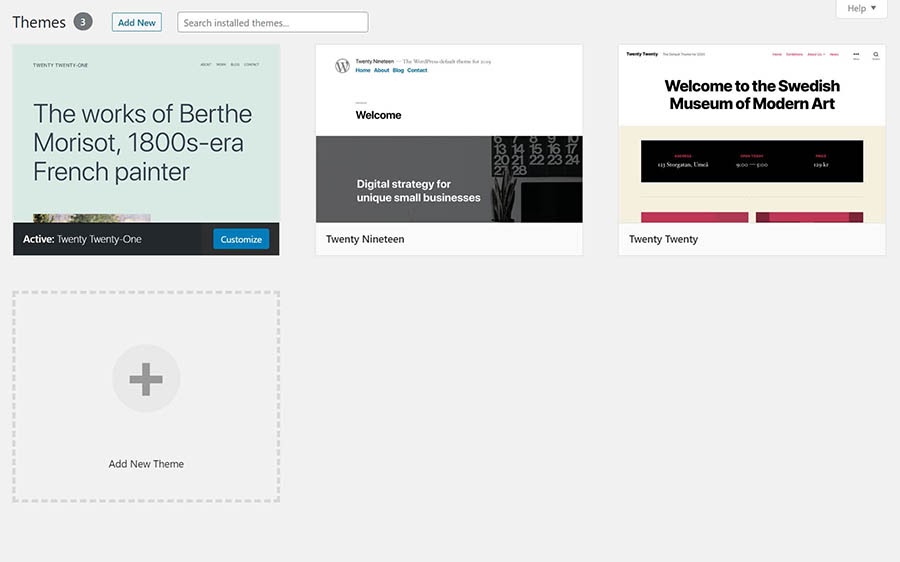
If none of the plugins prove to be the issue, it’s time to try changing your theme. Head to Appearance > Themes.
Your currently-active theme is marked as such. Hover over one of the others and click on Activate. Then refresh your site and try to access the problematic page again.
Note that changing your theme can alter your site significantly. So if you find that your theme is the issue, you may need to spend some time finding one that provides a similar look and features.
Step 4: Set Up a 301 Redirect for Moved or Renamed Content
This one is a bit of a bonus step. If you do actually have content that’s been moved or renamed and thus doesn’t exist anymore at the URL you were using previously, you’ll want to set up some 301 redirects to point that old URL to the new one.
The easiest way to do this is with a WordPress plugin such as Redirection.
This tool will enable you to quickly set up the redirects you need. Plus, it’s free and user-friendly.
How to Create Your Own “Error 404 Not Found” Page
If you want to set up your own custom 404 error page, you can do so relatively easily. The process involves adding one line to the .htaccess file to point the error to a specific page and then creating that page. We have full instructions for setting up a custom error page to walk you through the process.
Take Your WordPress Website to the Next Level
Whether you need help navigating the WordPress dashboard, creating a custom 404 error page, or choosing a caching plugin, we can help! Subscribe to our monthly digest so you never miss an article.
Tools to Help You Monitor 404 Errors Moving Forward
Finally, if you want to keep an eye out for 404 errors in the future, you can use a few handy tools. The Google Search Console will show you crawl errors that the Google bots have come across as they index your site. This is a simple way to see all the issues Google is encountering.
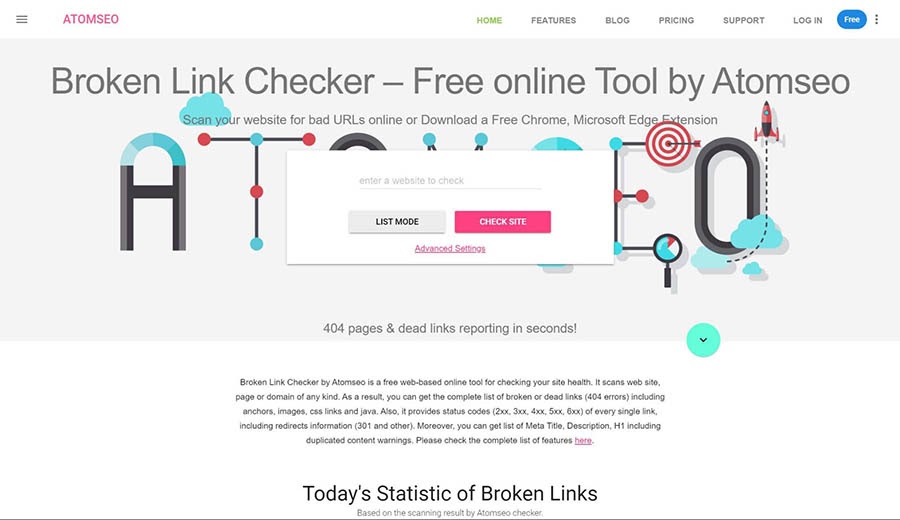
You can also enter your URL into a specialized tool such as theBroken Link Checker, which will scan your entire site for broken links and let you know if it finds a 404 page.
It’s free and easy to use. You can simply input your domain and then click on Check Site.
Ready to Find That Missing WordPress Post?
A 404 error can be frustrating — especially when it happens on your own site. These messages cause problems with SEO and ruin your site’s UX. Fortunately, they’re not too difficult to resolve.
Fixing 404 pages generally involves restoring your site’s permalink structure and setting up redirects for any posts that are actually gone. You can then use tools such as Google Search Console to monitor your site for future 404s.
If you want to spend less time dealing with errors, consider switching to DreamPress, our managed WordPress hosting service. We’ll take care of all the troubleshooting for you, so you can focus on what matters!
You’ve worked hard to create your website and likely spent a ton of time and effort maintaining it. Your site may even be vital to your livelihood — you need those sweet, dollar, dollar bills to keep your business afloat.
And that, friends, is why making your website as secure as possible isvitally important.
So let’s get real about security.
WordPress is an excellent,secure platformout of the box, but there’s more you can (and should!) do to keep your site safe from creepsters with malicious intent. Many of these security enhancements are easy to implement and can be performed manually in mere minutes. Others simply requireinstalling a particular plugin. In this article, I’ll guide you through 10 different strategies for upping the defenses on your WordPress fortress. But first, let’s go a little more into the weeds onwhywebsite security should matter to you.
Securing a WordPress Site? Partner with DreamHost
Leave migrating your site, installing WordPress, managing security and updates, and optimizing server performance to us. Now you can focus on what matters most: growing your website.
Why Taking Steps to Secure Your WordPress Site Is Vital
If you’re looking to create a secure site (an obvious “no duh”), choosing WordPress as your platform is an excellent way to start. It’s not only a flexible, powerful platform for building websites — it’s also remarkably secure out of the box. That’s because WordPress developerscare about securityand are dedicated to “hardening” the core platform as much as possible. Plus, they frequently releasesecurity-focused updates and patches, which will be automatically downloaded and installed on your site. This means your site will be well-equipped to deal with any new threats that pop up.
Of course, no platform can be 100% secure. Hackers are hard at work trying to find their way into even the most well-protected sites (if only they’d use their powers for good, amirite?) And since WordPress powers more than 30% of the web, it’s popular enough to bea constant target.
It should go without saying, but if baddiesdomanage to break into your site, they can cause a lot of damage.
For example, they can steal or otherwise compromise sensitive information, install malware, make changes to your site to suit their needs, or even bring it down entirely. This is harmful to both you and your users, and if you’re running a business, it can mean lost customers and revenue.
Not good at all. It’s vitally important to take additional steps to secure your WordPress website. You’ll want to put just as much time and effort into this endeavor as you spentdesigning your sitein the first place (if not more). Fortunately for you, dear reader, there are lots of simple, quick ways to improve your site’s security, as well as some more complex techniques you may want to employ.
10 Smart Ways to Effectively Secure Your WordPress Website
Hopefully, I’ve convinced you about the importance of maintaining a secure WordPress website. If not, I’m going to have to re-enroll in Persuasive Writing 101. Please don’t make me do that.
Glad you’re convinced (wink, wink).
Throughout the rest of this article, I’ll introduce 10 handy strategies for making your site safer and reducing the chances of it being compromised. Plus, I’ll point you in the right direction to get started with each technique. You don’t have to implement every suggestion on this list — although you certainly can — but the more steps you take to secure your site, the lower your chances will be of encountering a disaster down the road.
1. Use a Quality Host
You can think of your web host as your website’s street on the Internet — it’s the place where your site “lives.”
Like a good school district matters to your kid’s future (so they say; I turned outfine), the quality of yourwebsite’s home basecounts in a lot of big ways.
A solid hosting provider can impact how well your site performs, how reliable it is, how large it can grow, and even how highly it ranks in search engines. The best hosts offer many useful features, excellent support, and a service tailored to your chosen platform.
As you’ve probably already guessed, your web host can also have a significant impact on your site’s security. There are several security benefits tochoosing a solid hosting service, including:
A quality host will constantly update its service, software, and tools to respond to the latest threats and eliminate potential security breaches.
Web hosts often offer various targeted security features, such as SSL/TLS certificates and DDoS protection. You should also get access to aWeb Application Firewall (WAF), which will help monitor and block serious threats to your site.
Your web host will most likely provide a way to back up your site (in some cases, even carrying it out for you), so if you’re hacked, you can easily revert to a stable, previous version.
If your host offers reliable, 24/7 support, you’ll always have someone to help you out if you do run into a security-related issue.
This list should give you a good starting point to work from when looking for a host for your new site, or even if you’re thinking about changing hosts. You’ll want to find one that offers all of the features and functionality you’ll need, plus has a reputation for reliability and excellent performance.
DreamPress is WordPress-specific hosting that’s fast, reliable, scalable, and, of course, secure. DreamPress includes a pre-installed SSL/TSL certificate and provides a dedicated WAF designed with rules built to protect WordPress sites and block hacking attempts. You’ll also get automated backups, 24/7 support from WordPress experts, andJetpack Premium— a plugin that can add many additional security features to your site — at no additional cost. With DreamPress, you’ll be able to rest easy knowing that your site is protected. Our hosting service even takes care of many of the following security-enhancing steps for you — although we still encourage you to read on to learn what extra measures you can take.
After all, safety first, kids!
Get More with DreamPress
DreamPress Plus and Pro users get access to Jetpack Professional (and 200+ premium WordPress themes) at no added cost!
Let’s talk more about anSSL/TLS certificate. This enables you to switch your site to HyperText Transfer Protocol Secure (HTTPS) — a more secure version of HTTP. These are important security concepts to understand but simple to grasp even if you’ve never heard of them before. HTTP is the protocol that transfers data between your website and any browser trying to access it. When a visitor clicks on your home page, all of your content, media, and website code are sent through this protocol to the visitor’s location.
While this is necessary, of course, it does introduce some potential security issues. Baddies can try to intercept the data while it is in transit and use it for their own nefarious purposes. HTTPS solves this problem! It does the same thing as HTTP but also encrypts your site’s data while it’s traveling from one point to another, so it can’t be easily accessed.
Initially, HTTPS was used mainly for sites handling sensitive customer information, such as credit card details. However, it’s becoming increasingly common for all sites, and big names such as WordPress and Google have beenpushing for its widespread implementation.
To switch your site over to HTTPS, you’ll first need an SSL/TLS certificate. This communicates to browsers that your site is legitimate and its data is properly encrypted. You can also get one for free from certain sites, such asLet’s Encrypt.
A quality host will typically provide an SSL/TLS certificate as part o your hosting package. In fact, at DreamHost, we offer Let’s Encrypt certificates for free with all of our hosting plans!
Once you have an SSL/TLS certificate installed on your site, you’ll simply need to implement HTTPS. Your host may take care of this for you, although it’s alsofairly easy to do yourself. If you’ve chosen to go with DreamPress, the stretch limo of hosting, your site will be created using HTTPS from the start. Roll out!
3. Create Secure Login Credentials
This one is a “no s***, Sherlock” suggestion, but folks, it’s reallyimportant to select your login credentials carefully. Like really,really important!
Why? This makes it harder for a sketchy weirdo to break into your site. You probably have plenty of experience choosing strong usernames and passwords for other accounts across the web — doing the same for your WordPress website is a big deal.
When you create your site, you’ll be given the opportunity to create a login username and password. The username will default toadmin, although you can change it if you’d like (and probably should). But since there are various ways for people to find out what your WordPress username is, you can stick with the default option if you want to.
Your password, however, is crucially important, and you’ll want to choose a strong one. There’s recently been aU-turn of sortson how to choose a strong password, with a recommendation of a simple four-word phrase trumping the classic mixture of random letters, numbers, and symbols. It’s a method that has been popular in some circlesfor a while.
If all the talk of choosing a password makes your head spin, we recommend sticking with WordPress’ own password generator as it automatically generates an (almost) ironclad password directly within the WordPress back end. Just be sure to record your credentials somewhere safe, like an encrypted password manager, so you don’t forget them.
If you’ve already created your site and chose less-than-ideal login credentials initially, you can still change them without too much trouble. You canalter your usernameby creating a new user, giving it the administrator role and attributing all your content to it, and then deleting your original account.
As for your password, you can simply go toUsers > All Usersfrom your WordPress admin dashboard, click on your username andenter a new passwordon theEdit Userscreen.
4. Enable a Web Application Firewall
You’re probably familiar with the concept of a firewall — a program that helps to block all sorts of unwanted attacks. Most likely, you have some kind of firewall on your computer. AWeb Application Firewall (WAF)is simply a firewall designed specifically for websites. It can protect servers, specific websites, or entire groups of sites. A WAF on your WordPress site will function as a barrier between your website and the rest of the web. A firewall monitors incoming activity, detects attacks, malware, and other unwanted events, and blocks anything it considers a risk. #winning
If you’ve opted for our DreamPress package, you can relax; you won’t need an additional firewall. DreamPress includes a built-in WAF that will monitor your site for threats and block malicious users and programs from gaining access. No action required on your part.
DreamHost also offers DreamShield, our in-house malware scanning service. When youenable DreamShield on your hosting account, we’ll scan your site weekly for malicious code. If we find anything suspicious, you’ll be notified immediately via email.
Protect Your Website with DreamShield
For just $3/month, our premium security add-on scans your site weekly to ensure it is free of malicious code.
Before we move on, there’s one more technique to address:two-factor authentication(which also goes by two-step authentication and a variety of other, similar names). The term refers to the two-step process you’ll need to follow when logging into your site. This takes a little more time on your end but goes a long way towards keeping hackers out. Two-factor authentication involves using a smartphone or other device to verify your login. First, you’ll visit your WordPress site and enter your username and password as usual. A unique code will then be sent to your mobile device, which you’ll need to provide to complete logging in. This enables you to prove your identity by showing you have access to something solely yours — such as a particular phone or tablet.
As with many WordPress features, two-factor authentication is easy to add with a dedicated plugin.Two Factor Authenticationis a solid choice — it’s created by reliable developers, compatible withGoogle Authenticator, and will enable you to add this functionality to your site without fuss.
Another choice is theTwo-Factor plugin, which is well known for its reliability and was built mainly by core WordPress developers. As with any plugin in this category, the learning curve is a little steep, but itwillget the job done and is very secure. If you’re willing to spend a little money, you can alsocheck out Jetpack’s Clef-like premium solution.
Whatever route you choose, make sure to plan ahead with your team if relevant, since you’ll need to gather their phone numbers and other information to get started. With that, your login page is now secured and ready to go.
6. Add New Plugins and Themes Carefully (And Update Them Often)
The ready availability of themes and plugins is one of the best things about using WordPress. With these handy tools, you can make your site look just right and add nearly any feature or functionality you can think of.
Not all plugins and themes are created equally, though.
Developers who aren’t careful or don’t have the right level of experience can create plugins that are unreliable or insecure — or, just downright sucky. They might use poor coding practices that leave holes hackers can easily exploit or unknowingly interfere with crucial functionality. This all means you need to bevery carefulabout the themes and plugins you choose to add to your site. Each one should be vetted to ensure it’s a solid option that won’t hurt your site or cause problems. There are many elements to keep in mind, but the following advice will help you select quality tools:
Check user ratings and reviews to learn whether other people have had a good experience with the plugin or theme in question.
Take a look at how recently the plugin or theme has been updated. If it’s been longer than six months, chances are it isn’t as secure as it could be.
Install new plugins and themes one at a time, so if anything goes wrong, you’ll know what the cause was. Also, be sure to back up your site before adding anything to it.
Finally, your work isn’t done once you’ve installed the plugins and themes you want to your site.
You’ll also need to keep them up to date to ensure they work well together and are secured against the latest threats. Fortunately,this is quite easy— you’ll simply need to go to your WordPress dashboard, look for the red notifications telling you there are themes and/or plugins with available updates, and click onupdate nownext to each one.
You can also update your plugins in a batch by selecting all of them and then hitting the update button, either here or in the WordPress panel. This is a quicker option, but keep in mind, updating all of them at once could make it more difficult to diagnose any problems that arise as a result of the updates. If you’re making sure to only choose reliable plugins and themes, however, this shouldn’t be a problem.
Before we move on, it’s worth mentioning that you should also keep WordPress itself up to date. Smaller patches and security updates will be added automatically, but you may need to implement major updates on your own (again, this isvery simple to do). This probably goes without saying at this point, but DreamHost handles these updates for you, so you won’t need to worry.
Remember: leaving WordPress or any of your themes and plugins out of date is a risk you don’t want to take.
A lot of the information, data, and content on your WordPress site is stored in a series of folders and files. These are organized into a hierarchical structure, and each one is given a permissions level. The permissions on a WordPress file or folder determine who can view and edit it and may be set to allow access to anyone, only to you, or almost anything in between. File permissions are represented by a three-digit number in WordPress, and each digit has a meaning. The first digit stands for an individual user (the site’s owner), the second digit for the group (for example, members of your site), and the third for everyone in the world. The number itself means that the user, group, or world:
0:Has no access to the file.
1:Can only execute the file.
2:Can edit the file.
3:Can edit and execute the file.
4:Can read the file.
5:Can read and execute the file.
6:Can read and edit the file.
7:Can read, edit, and execute the file.
So if a file is given a permissions level of 640, for example, it means the primary user can read and edit the file, the group can read the file but not edit it, and everyone else cannot access it. This may seem overly complicated, but it’s important to ensure that each person only has the level of access to your site’s files and folders you want them to have.
WordPress recommendssetting folders to a permissions level of 755 and files to 644. You’re pretty safe sticking to these guidelines, although you canset up any combinationyou’d like. Just remember that it’s best not to give anyone more access than they absolutely need, especially to core files.
You’ll also want to keep in mind that the ideal permissions settings will depend somewhat on your hosting service, so you may want to find outwhat your host recommends.
Note: You should be very careful when making changes to your permissions levels — choosing the wrong values (likethe dreaded 777) can make your site inaccessible.
8. Keep the Number of Users on Your Site Low
If you’re running your WordPress site solo, you don’t need to worry about this step. Just don’t give anyone else an account on your site, and you’ll be the only person who can make changes.
However, many humans like other people and doeventuallyadd more than one user to their website. You may want to let other authors contribute content, or you might need people to help edit that content and manage your site. It’s even likely you’ll find yourself with an entire team of users who’ll regularly access your WordPress site and make their own changes. This can be beneficial in many ways and is sometimes even necessary. However, it’s also a potential security risk.
The more people you let into your site, the higher the chance that someone will make a fat-finger mistake or that a user will cause problems just to be a putz. For this reason, it’s smart to keep the user count on your site as low as possible while not hampering its ability to grow. In particular, try to limit the number of administrators and otheruser roles with high privileges.
Here are a few more suggestions:
Limit each user to only what permissions are necessary for them to do their job. Obvs.
Encourage users to use strong passwords (remember No. 3?).
Try to stick with one administrator, if possible, and a small group of editors.
Give users who have left the site or no longer need access the boot.
Consider downloading a plugin, such asMembers, which provides a user interface for WordPress’role and capabilitiessystem.
9. Track Your Admin Area Activity
If you’ve got multiple users, it can be a good idea to keep tabs on what they’re all doing on the site. Tracking activity in your WordPress admin area will help you spot when other users are doing things they shouldn’t and can indicate whether unauthorized users have gained access.
When a weird change has been made or something suspicious installed, you’ll want to be able to find out who was behind the activity. Plugins got you covered.
Most larger security plugins don’t provide this functionality out of the box, so you’ll want to find a dedicated solution. If you’d like to take a hands-off approach,Simple Historylives up to its name by creating a streamlined, easy-to-understand log of important changes and events on your site.
For more involved tracking features, you can also check outWP Security Audit Log, which keeps an eye on just about everything that happens on your site and offers many useful,premium add-ons.
Once you have a suitable plugin installed, it’s a smart idea to check the log periodically for anything out of the ordinary. If something happens on your site that you weren’t expecting or bugs suddenly pop up, look through the most recent activity.
I’d be lying if I said there was a magic solution for protecting your website from all threats. Even if you implement every suggestion on this list, there’s still a chance you may experience a security breach on your site.
Hackers are good at what they do.
You’ve just got to beat them at their game. A comprehensive security plan means preparing for what you’ll do if the worst happens, even while you’re trying to ensure it never does. Backing up your siteon a regular basis is the simplest and best way to safeguard it in the event of a disaster. If you have a recent backup handy, you can restore your site to the way it was before it was hacked or otherwise harmed. This will help you fix the issue and move on as quickly as possible.
Of course, you’ll want to be smart about the way you create and use your backups. The following tips are a good start:
Keep more than one backup. A good rule of thumb is to have at least three recent backups on hand at all times since it’s possible your most recent backup could have issues you haven’t yet noticed.
Save your backups in multiple external locations, such as cloud storage and physical hard drives.
Set up and stick to a consistent backup schedule. The frequency and timing are up to you, although there areplenty of solid recommendationsyou can follow.
In addition to your regular backup schedule, it’s always smart to create an extra backup of your site before making any changes to it. So (nudge, nudge) before implementing any of these security-boosting techniques, make sure you have a recent backup ready to go.
Ready to Tackle WordPress Security Issues?
Whether you need help navigating the WordPress dashboard, fixing incorrect database credentials, or dealing with a brute force attack, we can help! Subscribe to our monthly digest so you never miss an article.
True fact: if your website is hacked, you’ll spend hours (even days!) trying to repair the damage. You may permanently lose data or see your personal information compromised — or worse, your clients’ data.
That’s why you’ve got to put a whole lotta time and energy into making sure that situation never occurs. Otherwise, you’re likely to lose valuable business and income while trying to repair the damage.
These 10 WordPress security tips should help. Some are simple tweaks. Others affect your entire site, such asswitching to HTTPSoradding an SSL certificate. Of course, you’ll also want to make sure your site runs on a secured WordPress host.
OurDreamPress hosting(with free WordPress migration) is specifically designed for the WordPress environment. Plus, if you ever do encounter a security issue, we’ve got you covered with automatic daily backups, a weekly malware scan, and our support team of WordPress experts!
Minecraft is a rare game with the longevity to still be wildly popular over nine years after its initial release, boasting126 million monthly players. However, if you’ve ever wanted your own block kingdom, the technical aspects of making a Minecraft server may make it seem like you’re dealing with a real-life Enderman.
Fortunately, there are ways to make the process fast and easy.
DreamComputeis our cloud computing service that can help you set up your own Minecraft server. With just a few simple steps, you’ll be ready to launch your Minecraft world.
In this article, we’ll discuss some of the reasons you might want to make your own Minecraft server and cover the technical aspects of the process. Then we’ll provide you with three easy steps to get it up and running with DreamHost. Let’s go!
The Benefits of Making Your Own Minecraft Server
Minecraft servers let you play the game either online or in a local network. It’s like a subset within the larger game that is yours to customize as you see fit. You’re free to build inside of it on your terms.
There are lots of benefits to making your own server. For one, you have full control. You can use any mods you want to customize your gameplay. Creating a unique environment with these tools can be advantageous if you’re looking tostart your own YouTube channel.
It doesn’t have to be just you, either. Having your own server enables you to build a community. You can invite people you want to join you in-game for a multiplayer adventure. If you’d rather keep to yourself, you can still share your custom designs with the world.
To top it all off, creating your own Minecraft server can be a pretty painless experience. You might be surprised by how accessible the process can be. With a little bit of guidance, you’ll have your own space up and running in no time.
Why You Should Use DreamCompute for Your Minecraft Server
You probably have a few options when it comes to server hosts. They might seem similar at first glance, especially if you’re just starting out. However, there are some important differences to be aware of before you make your choice.
The first thing to look for in a host is whether it offers a cloud-based server. These are generally a better choice than more traditional local servers, as they don’t directly tax your computer’s resources. Typically, this translates to smoother, improved gameplay.
Tech support might also have an easier time navigating a cloud server than a local server if you run into any trouble. Plus, having a cloud server means you won’t have to worry about keeping your computer running at all times for other server members who want access to it.
Our DreamCompute service offers cloud servers for Minecraft with competitive features. It’s suitable for both simple and complex configurations, offering impressive speeds for all users. It also has a straightforward and predictable billing system to prevent any nasty surprises at the end of the month.
Further, it’s flexible enough to grow with if you need to change any aspect of your account. Rest assured that any alterations you need to make will get the support they need.
If you already know you’re looking for premium performance and control, you might want to check out DreamHost’sdedicated serveroption. It offers impressive benefits, such as fully-managed, cross-platform cooperative play. However, if you’re just looking for a basic server setup, we’ve got you covered there too.
Get Minecraft Hosting That Scales
DreamCompute is the ideal solution for Minecraft servers that require fast speeds and consistent uptime.
There are a couple of tools you’ll need to get started. First, make sure you have a downloaded copy ofMinecraftready. You’ll also need to set up aDreamCompute account.
You also might find some knowledge of servers to be informative since it will help you understand exactly what’s going on in each step. However, if you’re a beginner, don’t fret! The process is very accessible, and our guide is here to help.
How to Make Your Own Minecraft Server with DreamCompute (In 3 Steps)
Once you have all the resources you need, just follow these three simple steps to create your own Minecraft server.
Step 1: Create a Security Group
The first thing you’ll want to do is create asecurity group. This is a set of rules that define network access and will allow or prevent traffic into your Minecraft server according to your preferences. All you need to do is adjust some settings.
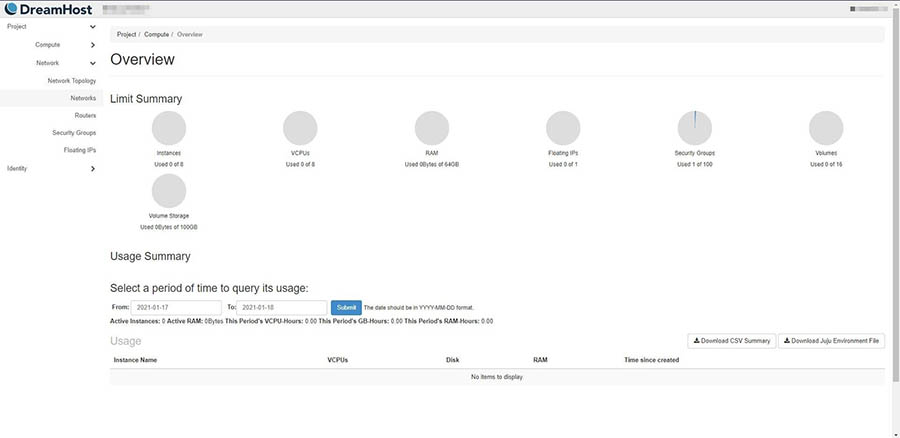
To get this started, navigate to your DreamCompute dashboard and click to expand theNetworkoption on the left-hand side.
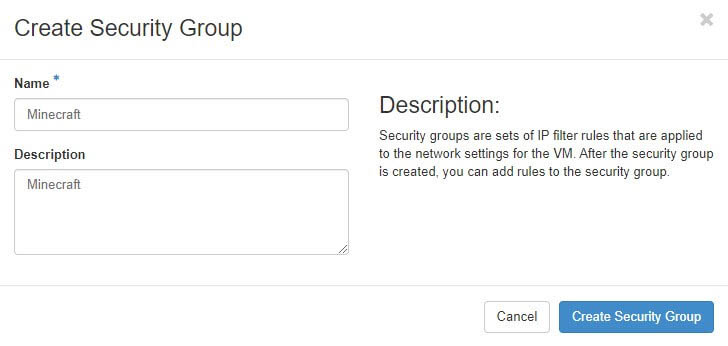
Next, you can click theSecurity Groupsbutton and then selectCreate Security Group. This will bring up a window where you can add a name and description. We’ll be using “Minecraft” for both in this walkthrough, but feel free to get creative with yours.
Once you’ve finished filling in those fields, click onCreate Security Groupto move on to the next step. You’ll then be presented with the options to create rules for this new group.
Step 2: Manage Your Rules
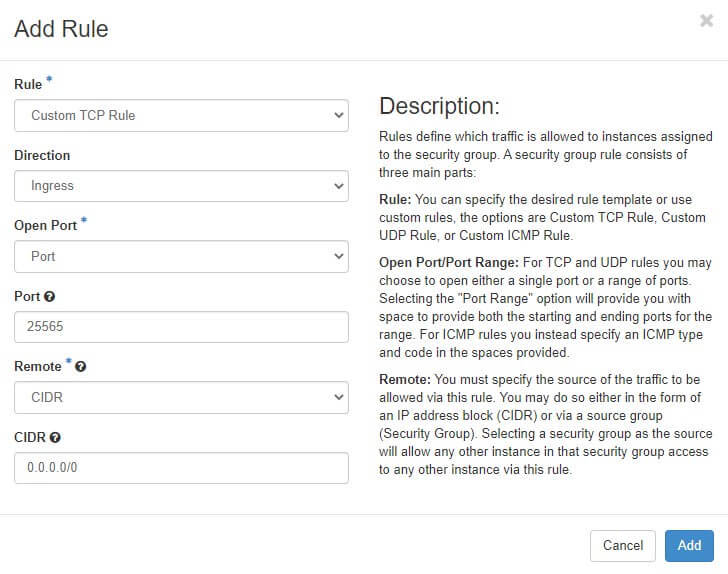
In the new group, click on theManage Rulesbutton on the far right. Next, selectAdd Ruleto bring up the following screen.
There are a lot of options on this page, but you don’t have to worry about them too much. If you’re looking to quick-start your server, you can just fill it in the same way we did above.
Specifically, we suggest selectingCustom TCP Rulein the first field, Ingressin the second, andPortin the third. UnderPort, enter the number “25565”; this is the default port for Minecraft.
Next, make sure thebottom two fields are set toCIDRand “0.0.0.0/0” respectively. Once you’re ready, click on theAddbutton.
Step 3: Create a Virtual Machine (VM)
For the last step, you’llneed a Virtual Machine (VM). Anything with Java will suffice. We’ll beusing Ubuntu-14.04for this walkthrough, and we recommend using it if you’re unsure which solution to choose.
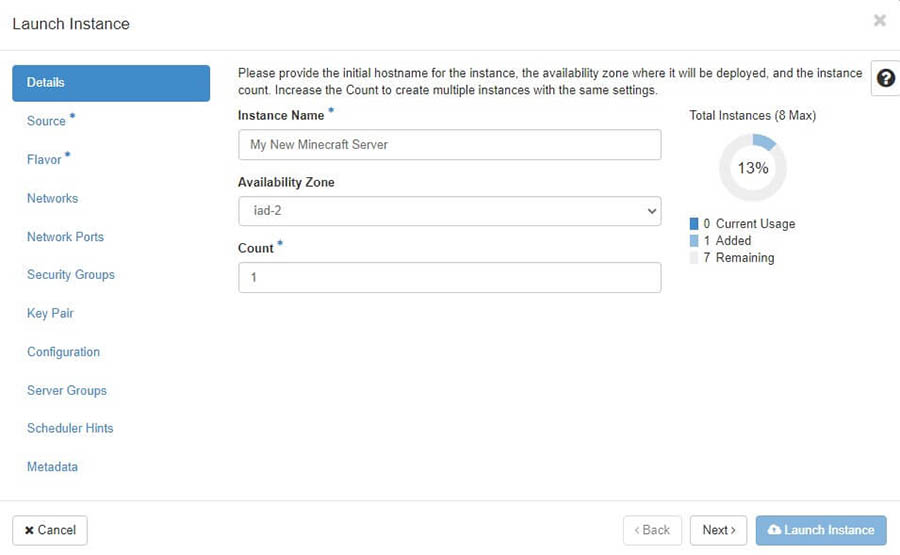
You can then navigate back to your DreamCompute dashboard, and under theComputemenu, click onInstances. Next, select theLaunch Instancebutton on the far right. This will bring up a screen that looks something like the following:
Try not to get overwhelmed by all the options! There are only a few that you’ll need to deal with. Start by naming your server in the top field underInstance Name. We used “My New Minecraft Server,” but you can name it anything you like.
ClickNextto move on.
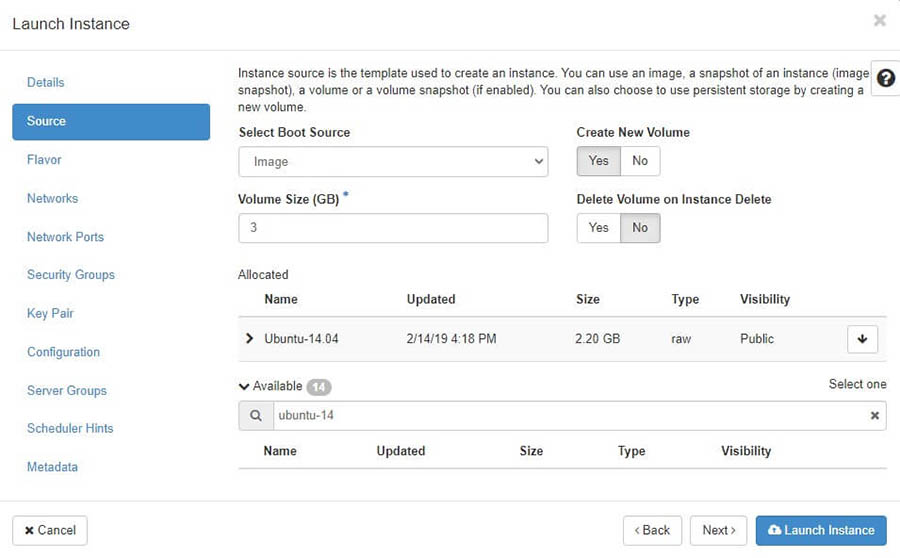
From the provided list, selectUbuntu-14.04.The search function can be helpful here if you’re having trouble finding it. Then you can click on the up arrow to move your selection into theAllocatedsection. To make sure that your instance does not immediately run out of disk / storage space, adjust the Volume Size (GB) to be 10 GB and then click onNextto browse to theFlavorsection.
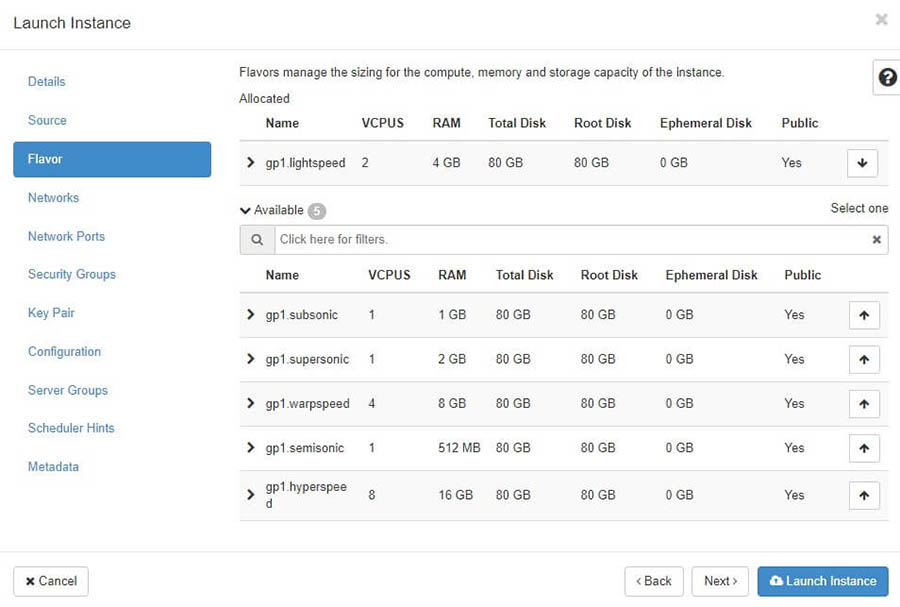
You can also use the search function here to find a specific ‘Flavor’ you’re looking for. If you’re not sure which is best for you, we recommend theLightspeedoption. It has 4GB of RAM, making it a solid choice for most users.
Next, select the up arrow next to your chosen Flavor to move it into theAllocatedcategory. Click onNextuntil you get to theSecurity Groupssection.
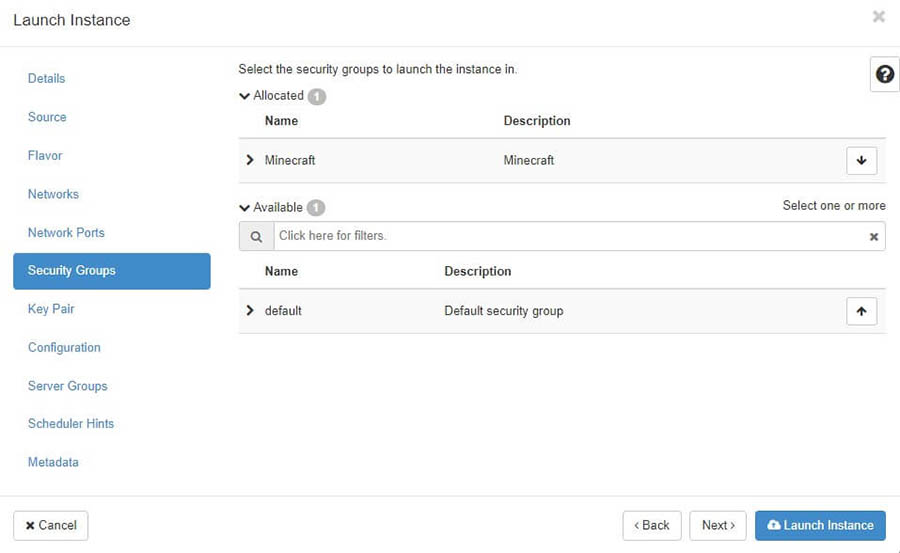
This section is an easy one. Simply click on the arrow next to theMinecraftsecurity group we created earlier, so it’s listed under theAllocatedcategory as shown above.
Click on Next to get to theKey Pairsection. If you’ve already imported a Key Pair into your DreamCompute project, use the arrow next to that key to assign it to your instance. Otherwise, use the “Create Key Pair” button to create a new Key Pair and then assign that Key Pair to your instance (this is used for emergency connections and for making additional adjustments to the MineCraft server).
That should be all you need to do before switching to theConfigurationsection.
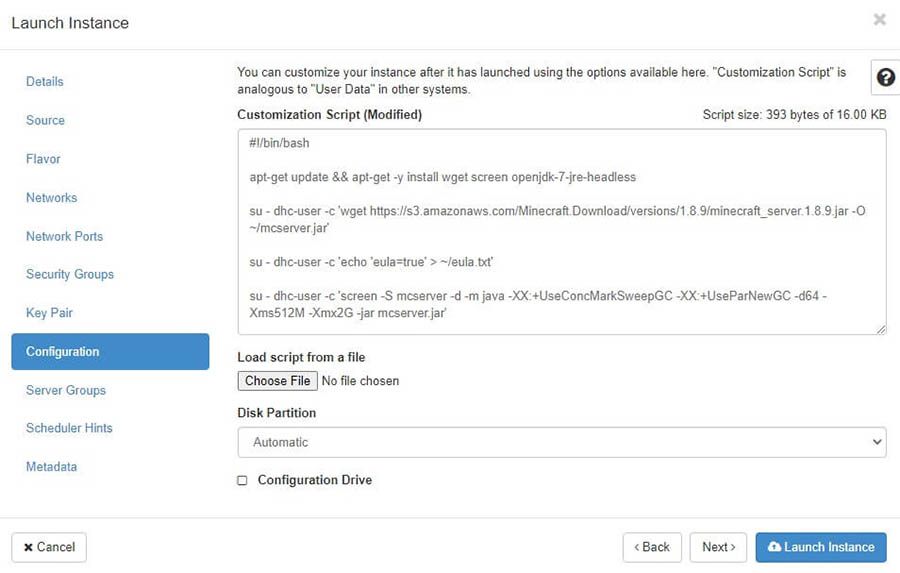
At this point, you’ll be brought to a page with a blank field titledCustomization Script. On it, you can copy and paste the below code:
You can also load the script from a file. However, you might find that the copy and paste method is quicker and easier.
Keep in mind that the-Xms512M -Xmx2Gpart of this code is what tells Java the minimum and maximum allowed memory for the Lightspeed flavor we chose earlier. As such, it may not be suitable for other Flavors.
After you’ve entered that code, click onLaunch Instance.Sit back, relax, and give your server a few minutes for the setup process to complete. Once that’s done, your server will be online and ready to go!
To add your new server to your client, you can open Minecraft and click onMultiplayer >Add Server.Name it whatever you’d like, and provide the IPv4 address of the VM you set up earlier.
If you want to modify the default server settings, you can log into your servervia Secure Shell (SSH)as “ubuntu.” This will give you access to aserver.propertiesfile where you can change the message of the day, spawn different creatures, adjust the maximum number of players, and more.
Be Awesome on the Internet
Join our monthly newsletter for tips and tricks to build your dream website!
Minecraft offers nearly endless opportunities for creative freedom. If you want to take full advantage of all it has to offer and elevate your game to the next level, making your own Minecraft server is the way to go.
In this article, we covered three simple steps for setting one up using DreamCompute:
Create a security group for your new server.
Adjust the network access rules.
Set up your VM to finish the process.
Can’t wait to create a world of your own?DreamComputecan help you set up your own Minecraft server in a matter of minutes. Get ready to grab your pickaxe and get out there!
Silicon Valley is struggling with a bit of an image problem. That image? Straight, white, male.
In 2018,women filled only 25%of all computing-related occupations — which is about the same percentage that we sawin the 1960s. For African-American and Hispanic populations, the representation in these fields is far below the national distribution.
And at the intersection of race and gender,the state of women in techis even bleaker: 65% of women in computing occupations are white, 19% are Asian/Pacific Islander, only 7% are African American, and 7% are Latina.
In 2021, computer programmers are meritocratic winners who wield considerable power in society. Engineers at Facebook — or more precisely, the algorithms they program — decide what news we see and what ads we get served.
(If you think that ads aren’t linked to economic opportunity,think again.)
Many formerly analog tasks — hailing a taxi, dimming the lights — now rely on code that only programmers can hope to understand fully. Ifwomen and minoritiesare left out of coding jobs now, that omission could have ramifications on the structure of our society for years to come.
What needs to be done? Let’s take a look at how to debug the diversity gap.
DreamHost Takes Inclusivity Seriously
We regularly report on diversity, accessibility, and representation in the tech workforce. Subscribe to our monthly newsletter so you never miss an article.
1. Give Every Student Access to Computer Science Classes
Early exposure to skills is crucial for securing a job in one of the best-paid and fastest-growing industries around. Yet,the majority of U.S. high schoolsare not teaching computer science classes.
Some schools in the U.S. are exposing young people to the basics of programming, which serves to improve their familiarity and comfort with these subjects. But to open the doors of the tech meritocracy to the underprivileged,coding needs to be taughtin public schools asearly as possible— even inelementary school.
As you’d expect, there are a lot of barriers to this.
Because the U.S. public education system depends heavily on local control, it’s impossible to design and implement sweeping changes to curricula in one fell swoop. National standards like Common Core and testing-focused federal programs like No Child Left Behind often leave little room for enrichment classes or electives.
In some cases, nonprofits and businesses are stepping in to fill the gap. For instance, Googlepledged$25 million tosupport programs that help Black and Latino studentsaccess computer science education. But a charity initiative here or there isn’t likely to create broad-based change.
We’ve certainly been entering theEra of the Nonprofitfor the past few years, and nonprofits that aim to teach coding to women and people of color abound. A few examples:
Lack of access to training isn’t the only issue these groups face. For instance, in the case of underprivileged youth, a major challenge is the limited access some of theseunderrepresented students have to computers.
But the hurdles extend beyond the physical, especially when it comes to connecting students with jobs that utilize their training. Limitations experienced in this realm — such as the absence of a professional network or an unfriendly corporate culture — can prevent any would-be software engineer or developer from thriving. Successful nonprofit coding programs will be those that succeed in the final stretch: job placement, hiring, and support during the transition.
It’s not just a lack ofcandidates in the pipelinethat’s keeping representation low; it’s also a lack of retention. Support needs to continue after coders become established in their careers. At 10 to 20 years into their tech careers,56% of womenleave the field — at a quit-rate double that of men.
Why are they leaving?
Onesmall studyfound that the most common reasons women leave tech jobs are a lack of opportunity for career growth, poor management, and the gender pay gap.Older researchcites poor workplaces including few opportunities for development and training, little support for outside-of-work responsibilities, and undermining bosses.
A 2019 study published inNaturefound thatnearly halfof women in science leave after having their first child, compared to 23% of men. Clearly, something needs to be done to better support parents in STEM fields, particularly working mothers.
There areanumber of waysto support and retain female and minority coders, starting with simply calling out their accomplishments and good ideas. Nonprofits that encourage professional networking, likeWomen Who Code, can certainly help women find their tribe in the industry. Still, in the end, it will be up to tech companies themselves to enactpolicies to retain female talent.
The tech industry is booming, which, in theory, should mean more demand for programming labor. But with barriers to intercontinental communication quickly vanishing, more and more programming and web-design jobs based in the U.S. are being outsourced to lower-paid workers in other countries.
In fact, computer programming jobs areprojected to decrease by 9%over the next eight years in the U.S., even as the computer technology industry is expected to grow by11%.
Whether computer programming serves to be an equalizer or perpetuator of inequality in the U.S. may depend on how fast minority groups can participate and get a “piece of the pie,” so to speak, before the available opportunities shrink.
The bad news is that it’s looking like underrepresented groups will still have to try twice as hard for a shot at the same jobs, which is truly unfair.
People aremore aware than everthat the diversity gap in tech (and beyond) is a real problem. Ultimately, the U.S. education system will adapt, nonprofits will grow, and more female and minority students will find — and stay in — careers in computing-related tasks.
After all, diverse teams are the only way companies will keep up with the changing demands of a world where computers are not going away.