It’s no secret that blogs have become a ubiquitous part of the online landscape. Just about everyone — from your next door neighbor to the majority of Fortune 500 companies — have one.
And for good reason. Blogs are a great way to build an audience, add value, create loyalty, and even earn money.
However, while starting a blog is easier than it’s ever been, creating content that draws traffic and can make you money requires both planning and effort.
In most cases, this investment is well worth it. A blog can be an extension of an existing marketing strategy. It can also be a lucrative method for making money online. Even if you don’t monetize your blog, it can be creatively and professionally useful for both individuals and businesses.
In this comprehensive, seven-step guide, we’re going to take you through all the steps required to create a successful blog using WordPress.
We’ll cover everything from installing your site to writing your first post and sharing it with others. There’s a lot of ground to cover, so let’s get started!
The Benefits of Blogging
Have something to say? Perhaps you have a cause you want to discuss with other people or a particular subject matter that you’re passionate about, such as health and fitness.
You might even just want an outlet to vent about your worries, which can help you clear your mind and promote progress in your everyday life.
A blog can also be an excellent opportunity to express yourself creatively. You could use it to publish your writing, including reviews, short stories, or even poems. This can motivate you to improve your writing and grow your audience. Some bloggers have even managed to turn their blogging into careers as published writers.
However, as we mentioned earlier, blogging is not only for personal or creative use. You probably won’t be surprised to hear that many businesses have their own company blogs. This includes big international corporations like Google, Facebook, and Starbucks. However, smaller businesses also use blogs to grow their audiences, post updates about their services, and provide value to their readers.
Of course, while we’re clearly fans of blogging, that doesn’t mean it’s free from potential problems and difficulties. For one, your blog requires a considerable investment of time and effort to be successful. There are also plenty of common blogging mistakes you’ll want to avoid, such as having an irregular posting schedule, using a site with long loading times, and most importantly, writing sub-par content.
Even so, these are almost all issues you can avoid. If you take the time to plan your content, create a well-performing site, and work on improving your writing, you’ll be well-equipped to run a blog that people will genuinely enjoy reading.
Get Content Delivered Straight to Your Inbox
Subscribe to our blog and receive great content just like this delivered straight to your inbox.
Before Getting Started
Before you create your own blog, there are a few things you’ll want to do. Careful research and planning can lead to a smoother process. Let’s take a look at some of the factors to consider before getting started.
Your Blog Niche
First and foremost, you’ll need to decide what your blog should be about. Chances are you already have a good idea of what the subject matter will be. However, it’s important to determine not only what general topics you’ll tackle, but also how and for whom. This will help define your blog’s identity and make it easier for you to tailor its content to your intended audience.
A perfect starting point is to consider your own interests. What kind of topics are you passionate about and feel you could write about insightfully? Perhaps you’re an artist looking to start a photography blog. However, there are already plenty of blogs on this subject, so you’ll need to think about how yours might differ. This includes deciding what your blog’s focus will be (such as portrait photography) and defining your target audience (professional photographers or beginners).
Doing some market research at this stage will be useful, as it can help you find a niche that may be underserved. For example, you might notice there are only a handful of blogs devoted to astrophotography or using a particular camera. These are both niches you could set out to fill. As a result, your blog will have a tighter focus and a stronger audience appeal.
A Blog Name
Naming your blog isn’t a task that should be taken lightly. After all, a name can help to brand your blog and make it more memorable.
Most blog names can be separated into two categories:
- Keyword-based. These are names that contain relevant keywords in order to describe the purpose or theme of the blog. Some examples include British Beauty Blogger and Car and Driver.
- Brand-based. These blog names focus on a brand and tend to be shorter and more memorable. A few examples are Kotaku and BMWBLOG.
If you feel stuck and need a bit of inspiration, you can use an online name generator. These provide potential names based on a word or phrase. One of our favorite tools is called Blog Name Generator:
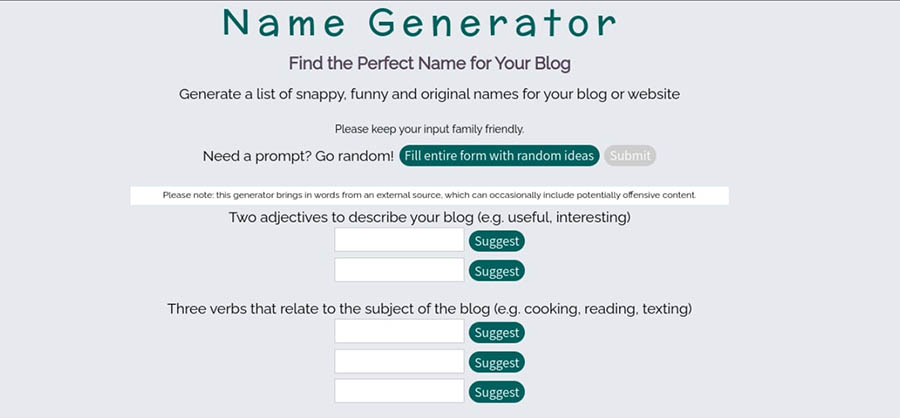
This site asks you to enter some information related to your blog, including its tone and subject matter. It then creates a series of names that you can use for inspiration.
For example, here are some of the results we got for a “funny” and “informative” blog about “texting, traveling, and painting” (we set the author as Elsa Cox from New York):
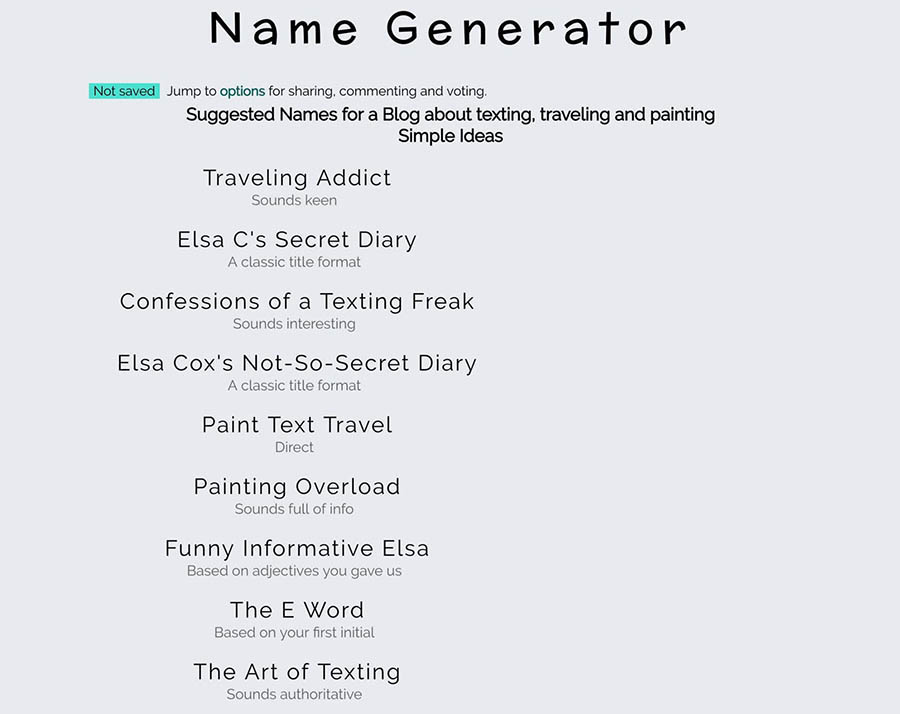 You can either select one of these options or use them as inspiration to come up with something unique. Either way, it’s essential that you search for your chosen blog name using Google to make sure that you don’t accidentally infringe on someone else’s brand.
Once you have these basic details ironed out, you’re ready to get to the fun part: creating your blog.
How to Start a Blog in 7 Easy Steps
In this tutorial, we’re going to take you through the entire process of setting up a blog with a step-by-step guide. Let’s get this blog on the road!
Step 1: Choose a Blogging Platform, Web Hosting, and Domain Name
First, you’ll need to choose a platform to build your blog on. You’ll also need to purchase a hosting plan and register a domain name. These tasks are all somewhat related and can usually be executed on one platform, such as DreamHost.
Pick a Blogging Platform
At this point, you’ll need to consider which platform you’ll use to build your blog. As we’ve previously discussed, there are numerous platforms available. For example, you can choose a dedicated blogging platform, such as Tumblr or Blogger, both of which are free.
However, we only recommend using these free blog solutions if you’re starting a personal blog, due to their limited functionality and customization options. Using a free blogging platform can also come across as cheap or unprofessional, especially if the blog is tied to a business.
Instead, we recommend that you use WordPress to create your blog:
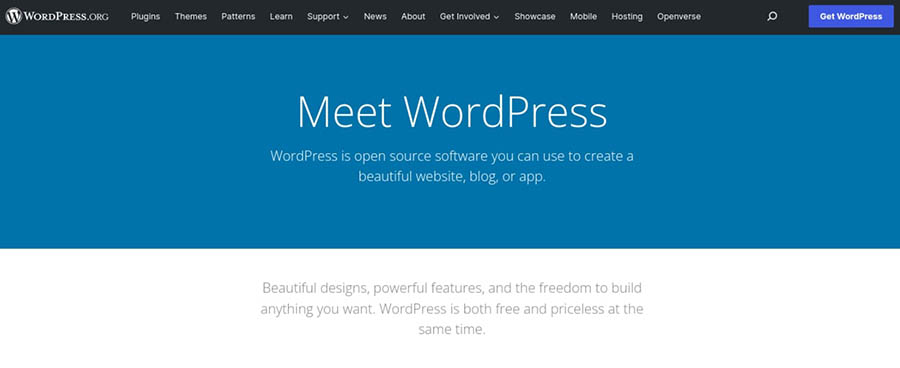
Not only is this open-source platform easy to use, but it offers more functionality. WordPress also lets you style your blog using themes and add new features via plugins. It also helps to make your blog more secure and perform better with minimal work required on your end.
As such, we’ll be using WordPress throughout the remainder of this article. If you’re unfamiliar with this Content Management System (CMS), we’ve written extensively about it over the years!
Here are a few articles to help you learn the ropes:
- What Is WordPress?
- The Essential Elements of a WordPress Site
- The Most Important WordPress Settings
- The Difference Between WordPress.com & WordPress.org (self-hosted WordPress)
- Best Online Resources to Learn How to Use WordPress
Feel free to use these guides to learn more about the platform and how you can use it to your advantage.
Purchase Web Hosting and Register Your Domain
You may have noticed our use of the term ‘self-hosted’ in the list above. This is because WordPress doesn’t provide hosting for your blog. Rather, it’s a CMS that you need to install on a server. Don’t worry — this is not as complex as it might seem.
All it means is that you will need to sign up for a web hosting plan if you want to get your site online. This will require some research to make sure you pick a host and plan that’s right for you.
To help you out, let’s look at the main types of hosting that are available:
- Shared hosting is the cheapest option for new bloggers (DreamHost plans start at $1.99/mo) but can be limiting in terms of performance. On this type of plan, you share a server and its resources with multiple other sites. Shared hosting is best suited for new sites with low traffic.
- Virtual Private Server (VPS) hosting is a version of shared hosting where each site has its own resources. It’s slightly more costly but provides improved performance. As such, this kind of hosting is recommended if you want to focus on growing your blog.
- Dedicated hosting is the most expensive and powerful option. As the name suggests, you’ll get an entire server that’s dedicated to your site alone. This is usually overkill for a blog, however, unless you want full control over your server or your site draws unusually large volumes of traffic.
In addition, you can decide whether or not you want managed hosting. When you have a managed plan, your web host will take care of several technical tasks required to keep your site running smoothly.
Of course, you don’t want to get your hosting and domain from just anywhere. Choosing the right hosting plan is crucial, as this will play a key role in your site’s performance, security, and other vital factors. It’s also smart to look for hosting companies that specialize in WordPress hosting specifically, as that means its services will be well-optimized for the platform.
Here at DreamHost, we offer a number of top-notch WordPress hosting plans to choose from.
These plans provide plenty of power for your site, along with tight security and fast performance. In addition, they come with handy features for WordPress users, such as pre-installed sites and automatic updates and backups. You’ll also get access to reliable and knowledgeable support via multiple channels. And if you sign up for certain annual plans, you can even get a free domain!
Our shared hosting plans are ideal for your brand-new blog. They start at just a few dollars per month and provide plenty of resources while your site is still small. Later on, when your blog begins to receive more traffic, you can upgrade to a more powerful option such as our WordPress managed hosting.
To purchase a shared hosting plan, simply select Sign Up Now on our plans page. Next, you’ll need to choose the billing term for your hosting account: monthly, annually, or every three years. The longer your term, the bigger your discount on hosting.
You’ll also be asked to select between DreamHost’s Starter Shared and Shared Unlimited packages:
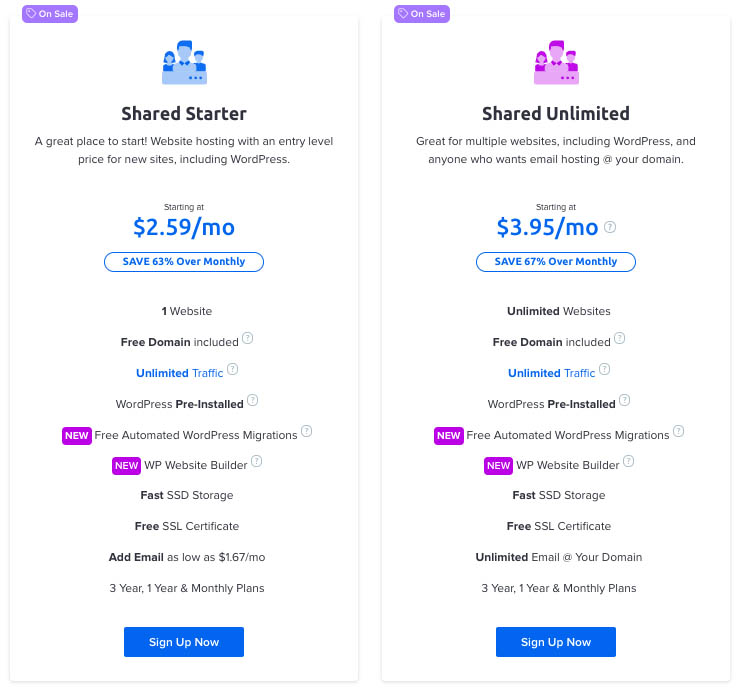
Starter Shared is the most cost-effective option, although you won’t get a professional email @yourdomain. For just a few dollars more each month, Shared Unlimited gives you everything you need to thrive online, including a specialized email address.
Register Your Domain Name
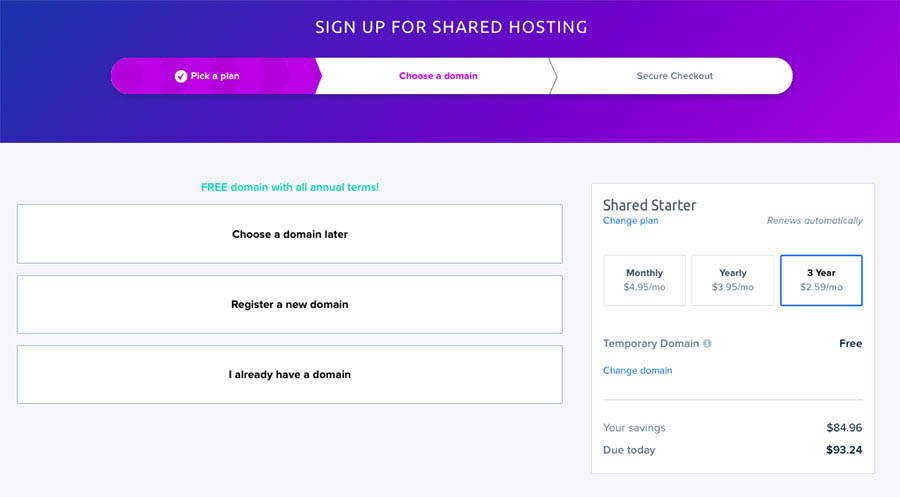
Next, you’ll be able to register a free domain (included with all annual terms) or enter a domain that you already own. Note: If you’re pressed for time or aren’t sure which Top-Level Domain (TLD) would be right for your site, you can easily add a domain at a later time:
Your domain name is the URL that will be used to access your blog. When it comes to creating a domain name, there are several things you’ll want to consider. One of the basic steps involves choosing which TLD you want to use, such as .com or .org. You’ll also need to make the domain name memorable.
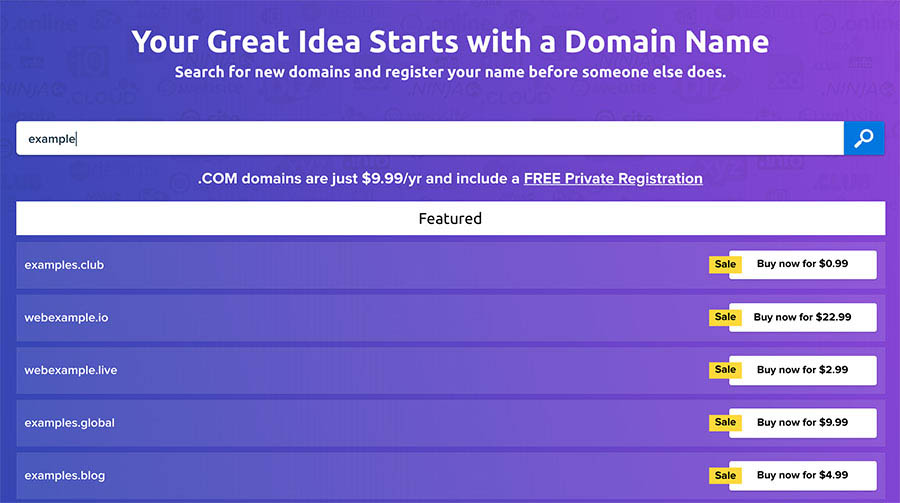
For this guide, we’ll assume that you want to register a new domain. Click on Register a new domain and type your proposed URL into the search box. We’ll pull up all the available domain names related to your search so you can select the ideal TLD for your site.
Remember to keep search engine best practices for domains in mind when making your decision:
We’re almost done with the setup. Next, you’ll add your billing info and review all the details about your hosting package. Make sure that the box next to Pre-Install WordPress is checked. This will get your site set up quickly and means you don’t have to worry about installing the CMS in the next step:
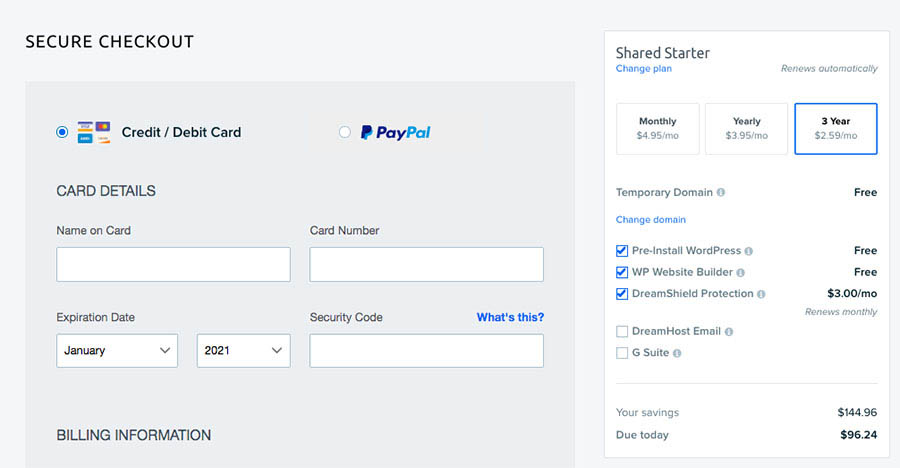
At this point, you can choose to add DreamShield, our in-house Malware Remover, to your hosting account. For $3 a month, DreamShield scans your site to identify malicious code, out-of-date software, and broken file permissions to help keep you safe online.
After you’ve made your account selections, you can decide on your payment method — DreamHost accepts all major credit cards and PayPal. Once you’ve entered your payment information, click on Submit Order at the bottom of the screen.
It will take a couple of minutes for the installation to complete. In the meantime, you’ll be sent an email with additional instructions on configuring your new WordPress software, including a link to create your WordPress password. If you run into any snags, help is just a click away.
Tips for Choosing a Domain
The domain name that you choose for your blog is critical. It can affect your SEO as well as how easily users are able to find and remember your URL.
There are a few tips to keep in mind when choosing your domain name. First, you’ll want to keep it short, sweet, and memorable. Of course, you’ll also want to ensure that it’s relevant to your niche.
We also recommend that you avoid using numbers or hyphens. Complicated domain names are not only harder to remember, but can also lead to typos that take users to the wrong site.
Finally, if you find that the domain name you want for your blog is already taken, you might consider using a different extension. Domain extensions are what come after the dot in the URL address. Popular domain extensions include “.com”, “.co”, and “.org”. However, you could also use different variations, such as “.name” or “.blog”.
If you already own a domain name but don’t have a live site attached to it, you might also want to consider transferring it to your blog. For assistance, you can follow our guide on how to transfer a domain to DreamHost.
It’s worth noting that your domain registrar and hosting provider do not necessarily need to be the same. For example, you can register a domain name with DreamHost even if you host your site with a different provider. You can also use DreamHost hosting and a third-party domain registrar such as Namecheap.
However, to simplify the process, we recommend getting both from the same place (such as DreamHost). It can help streamline the domain registration and CMS configuration process. You’ll also be able to manage your site and domain from the same account.
Install WordPress
As we mentioned earlier, we’ll be showing how to create a blog using WordPress. This platform is both user-friendly and intuitive, but it needs to be installed on your site before you can use it. If you checked the Pre-Install WordPress box during the sign-up process, you can move on to Step 2.
There are two main ways you can install WordPress:
- Manual installation. This requires you to manually upload and configure the WordPress software on your site. While the process is infamously quick, we only recommend this approach if you’re more technically savvy.
- One-click installation. This is an option offered by many web hosts, which enables you to install WordPress on your site almost instantly. As such, you don’t have to worry about configuration or manually installing any files.
If you install WordPress manually, you’ll need to download the latest version of WordPress and use an FTP tool such as FileZilla to upload it to your site. However, using a one-click installation tool can help simplify the process.
To install WordPress at DreamHost, log into your panel and use the sidebar to navigate to WordPress > One-Click Installs:
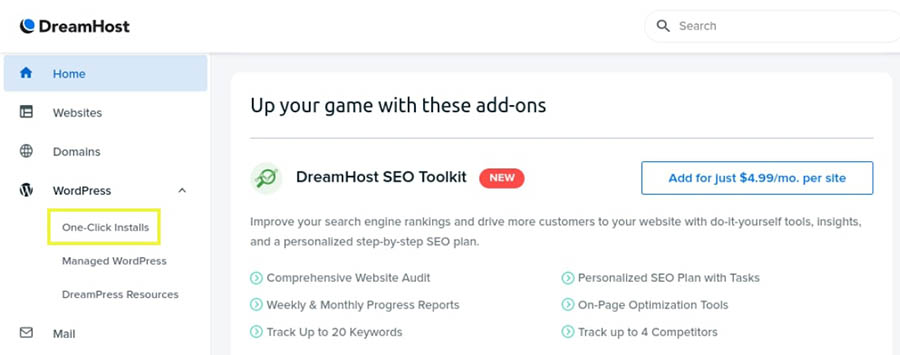
Here, you can see a WordPress one-click install option, which you can go ahead and select. This opens an overlay, where you can configure your installation:
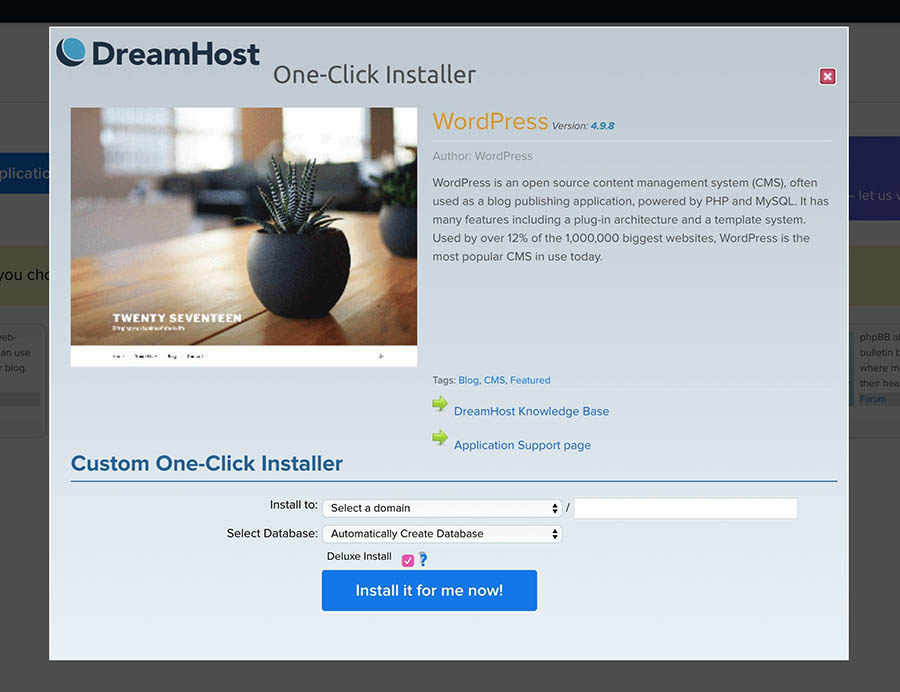
All you need to do here is select which of your domains you want to install WordPress on. In addition, you can pick an existing database to use for your new site. However, in most cases, you can just leave this set to Automatically Create Database.
The final option is Deluxe Install, which is selected by default. This provides a number of optional features beyond the basic WordPress installation. We recommend that you leave this checked, as it adds several useful tools for free.
Then, you can click on Install it for me now! to start the installation process. This can take several minutes. As soon as the installation is complete, you’ll receive an email containing the link and login information for your new WordPress site.
Step 2: Tweak Your Blog’s Appearance with a Theme
With WordPress up and running, it’s finally time to start putting together your blog. First of all, you’ll need to consider how you want your blog to look. You can easily change the appearance of your site with a WordPress theme.
A theme works like a template you can install on your site, which determines its layout and overall design. Some themes also include additional functionality, and they come in both free and premium varieties.
There’s a lot of ground to cover with themes, but for the time being you only need to worry about finding the one that fits your blog’s intended style. Picking the right theme can be a struggle if you don’t know where to look, but a good place to start is the official WordPress Theme Directory:
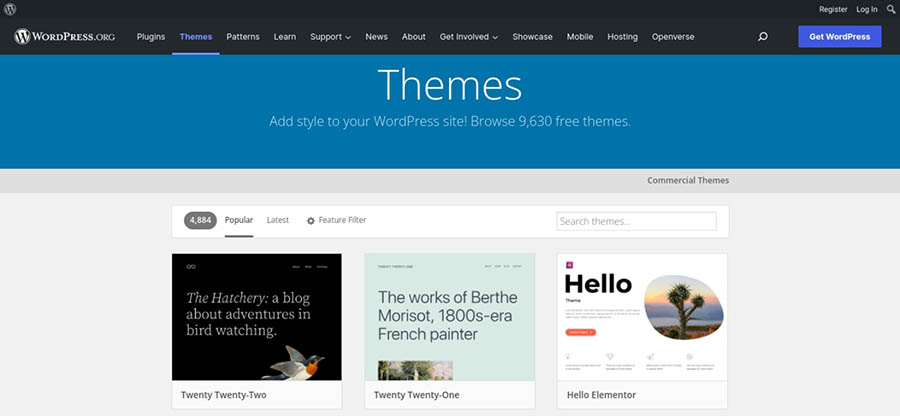
Here, you’ll find hundreds of free themes in several different categories. There are so many choices, in fact, that you’ll probably want to use the Feature Filter to narrow down the options:
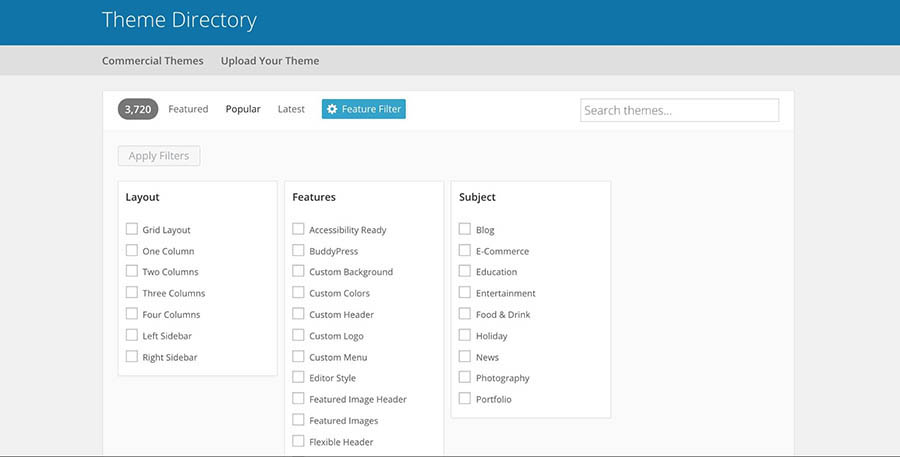
As you can see, there’s even a search filter called Blog. If you select this, you’ll be able to see all the themes specifically created with blogs in mind:
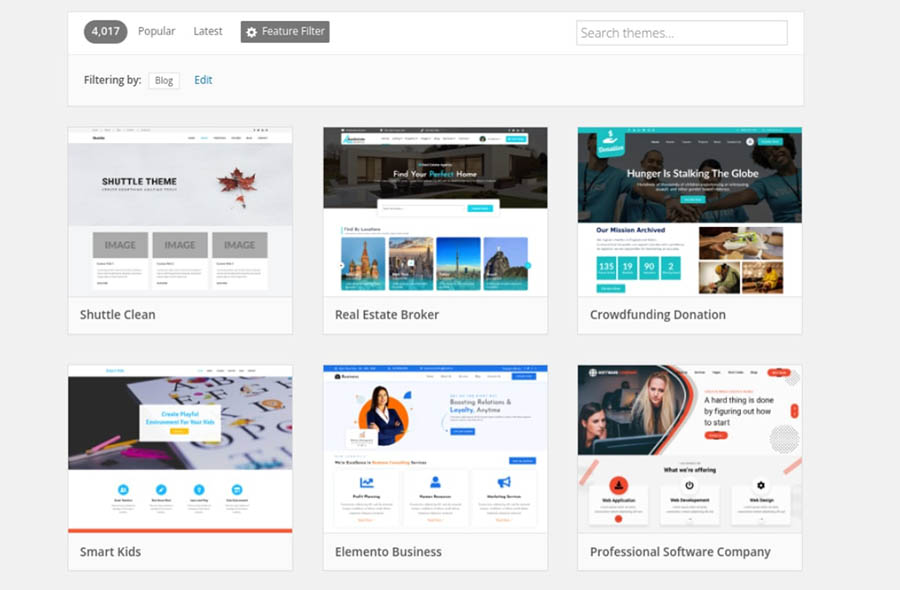
If you find a theme you want to use, you can download it here and then install it on your site. However, you can also do this through your WordPress dashboard by navigating to Appearance > Themes:

Here, you’ll see your currently installed themes. You can install new ones by clicking on Add New. This will open the Theme Directory again, letting you download and activate themes directly from this interface. Hover over your choice, and click on Install:
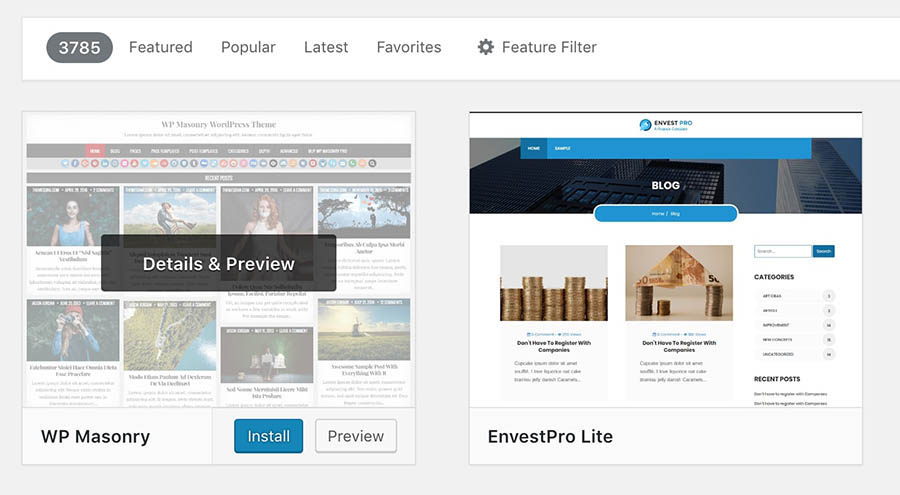
After the theme installs, you can select Activate to set it as the current theme for your site.
If you can’t find the perfect theme, you may be better off looking for premium alternatives through marketplaces such as ThemeForest. These will cost you some money, but they usually offer more options for customization and configuration.
Tips for Choosing a WordPress Blog Theme
If you’re having trouble deciding which theme to use, it may help to consider some important features. First and foremost, your theme should be compatible with the most recent version of WordPress. Additionally, it is important to choose a theme that is responsive, meaning that it will adjust to fit any screen size.
Furthermore, you’ll want to make sure that your theme includes all of the features and functionality that you need for your blog. For example, in addition to being SEO-friendly, it’s also wise to look for themes that include social media integration, as this can help you share your posts more easily.
It’s also helpful to find a theme that is easy to use and customize, especially if you’re new to WordPress. To further improve the User Experience (UX), we recommend looking for themes with fast loading speeds and support for multiple languages.
Outdated themes (and plugins) can also pose a security risk. Therefore, it’s essential to ensure the theme that you pick is regularly updated and maintained by its developers.
Finally, it is also important to consider the overall aesthetic of your theme. With these factors in mind, you should be able to find a WordPress blog theme that perfectly suits your needs.
Step 3: Customize Your Blog With Plugins
One of the reasons WordPress is so powerful is its built-in flexibility. You can add new functionality to your site by using plugins. In simple terms, plugins are add-ons that you can install to provide your blog with new features.
The process for finding and using plugins is very similar to how themes work. You simply need to download and install a plugin, at which point it will become active on your site. You can find lots of free options in the WordPress Plugin Directory:
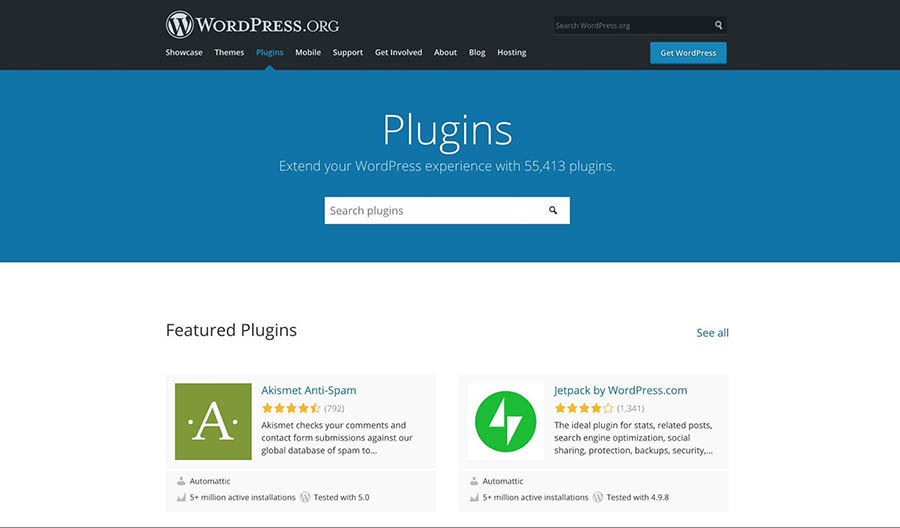
You can also access this directory from your admin dashboard by going to Plugins > Add New:

As before, all you need to add a plugin is to look for the one you want, then click on Install followed by Activate Plugin.
There are literally thousands of free and premium plugins at your disposal, many of which we’ve previously recommended:
- Plugins That You Need to Know About
- Plugins to Keep Your WordPress Site Safe
- Plugins to Drive More Conversions on Your Website
- Plugins for Improving Your Workflow
- Plugins to Maximize Lead Generation
However, when you’re first starting out, it’s best to stick to a few basic options. This will keep you from getting confused or cluttering up your site with unnecessary features.
With that in mind, let’s look at a few of the best plugins for blog owners.
Jetpack
You can think of Jetpack as several plugins in one, as it contains plenty of functionality in a single package:
 In fact, it’s such a feature-heavy plugin that we don’t have room to discuss everything it offers in this article.
However, to quickly summarize, Jetpack gives options for improving your site’s security, optimizing its performance, sharing your posts on social media, and much more. Best of all, Jetpack is totally free, although it offers premium plans that add even more features.
Akismet Anti-Spam
The next plugin deals with something that concerns all sites but is especially pertinent for blogs: spam. To help ensure that spambots can’t take over your site, you’ll need a plugin to deter them. The best option for the job is Akismet Anti-Spam:
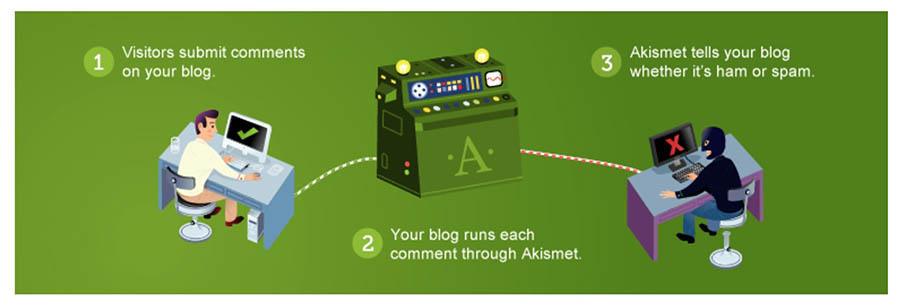
This plugin automatically detects and filters out spam from comments and contact form submissions. It also lets you manually specify which comments are spam, which helps the plugin improve its detection abilities for the future.
VaultPress
You’ll also want to consider a plugin like VaultPress:

This lets you create real-time backups, which are copies of your site. This can be incredibly useful if something goes wrong with your blog, such as if a hacker successfully attacks it or it breaks and you can’t access your content. In those situations, you can simply revert your blog to a previous backup to avoid losing data.
And deal alert: VaultPress is included for free with our DreamPress Plus and Pro plans.
Naturally, there are many more plugins that can help you out and we’ll discuss more of them later in this article. For the time being, however, these should get your site started on the right foot.
Step 4: Write Your First Blog Post
Next, it’s time to start thinking about your content. It’s usually smart to have at least a few posts ready to go when the blog launches.
You may already have a few ideas, but if you don’t, you’ll have to start brainstorming now. Naturally, you’ll want to focus on your blog’s niche. For instance, are there any recent events you can discuss? Alternatively, you might prefer to write a tutorial or a comprehensive guide about a particular topic.
The best way to find topics is to perform keyword research. You can use Google Keyword Planner for this, as it’s both comprehensive and free:
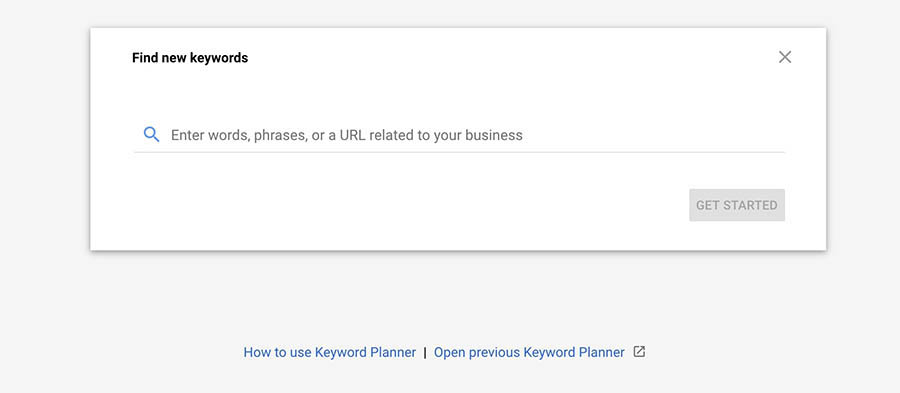
With this tool, you can search for keywords related to your blog to see what your audience is interested in. For example, if you enter the keyword “men’s fashion,” you’ll see that popular keywords include “stylish shirts for men” and “men’s summer clothes.”
You can then consider how to write blog posts that are optimized for these terms (something we’ll look more at later). Once you’ve found the right keywords, you can start writing your first post. However, you may want to familiarize yourself with Gutenberg first.
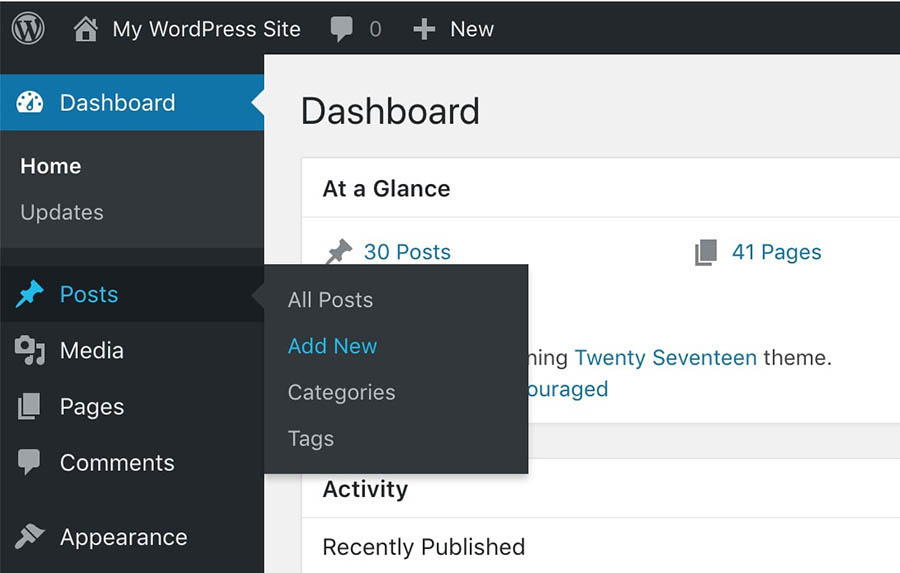
To get started, access your admin dashboard and click on Posts > Add New:
This will open the WordPress editor:
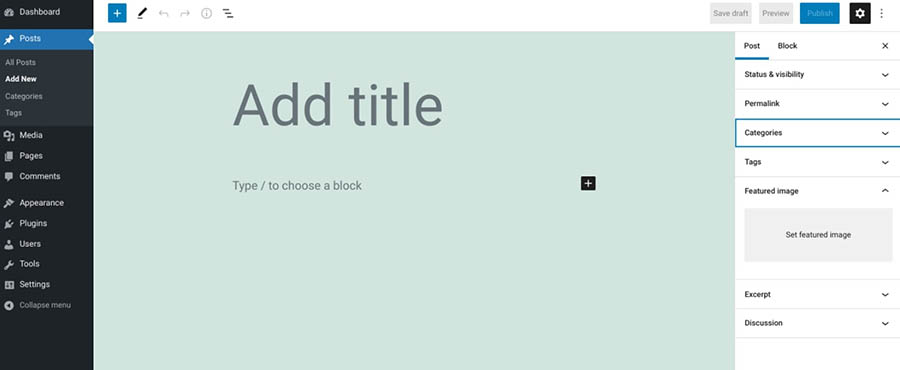
Here, you can start putting together your post. We’ve previously written a comprehensive guide to writing quality blog posts, so we recommend you check it out. We’ll go through some of the basics here as well.
First off, you’ll want to set an attention-grabbing post title. The key to creating a snappy headline is to make it informative and specific. You’ll want to describe the article’s contents while keeping it concise.
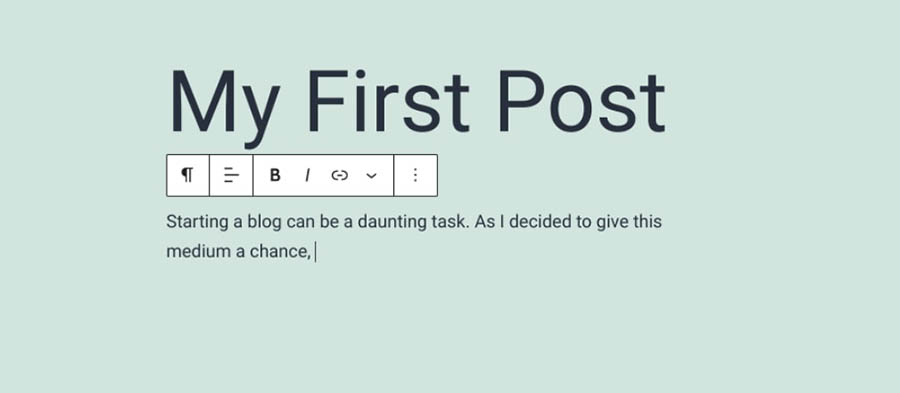
Next, you can start adding your body text by typing into the main paragraph block:
When you’re writing, you’ll find several relevant options in the right-hand sidebar:
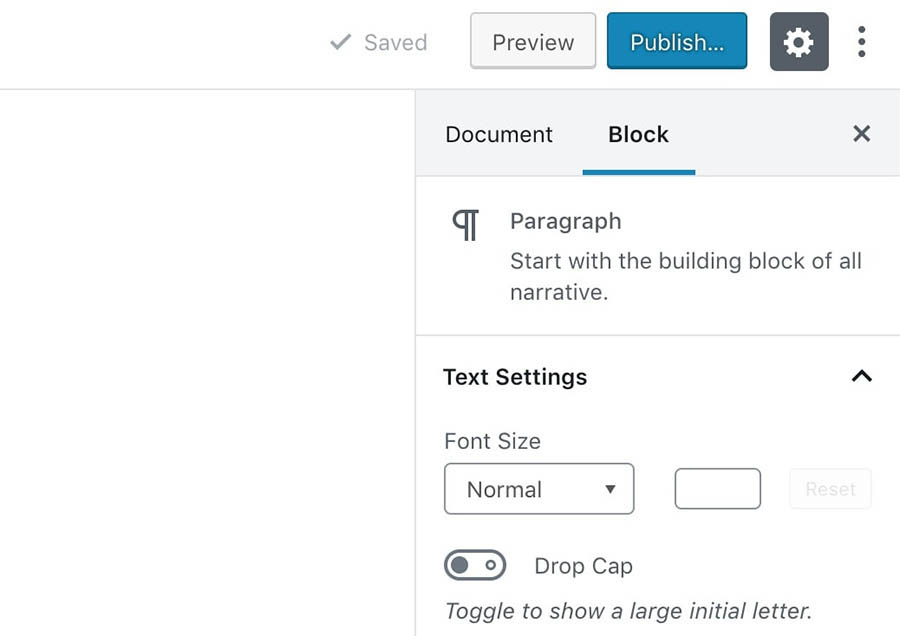
These settings will differ depending on the type of content you’re currently working on. You can add images and other media to your post by placing a dedicated block in the editor:
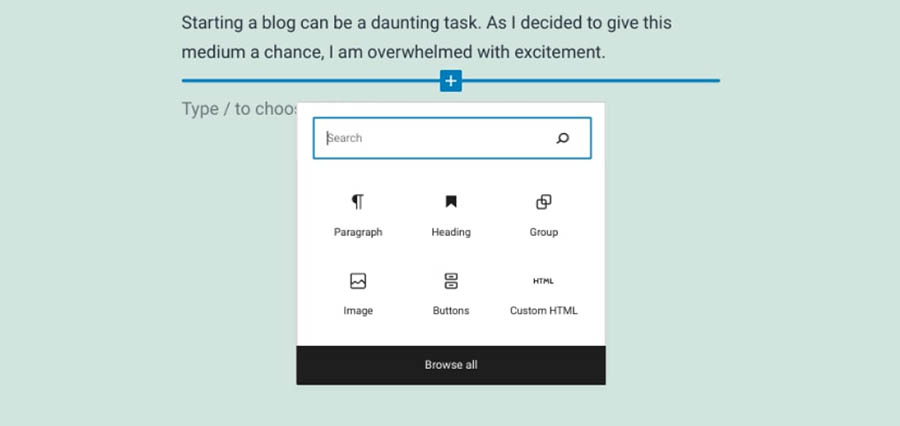
For example, selecting an Image block will let you upload a new image file or choose an existing one from your Media Library:
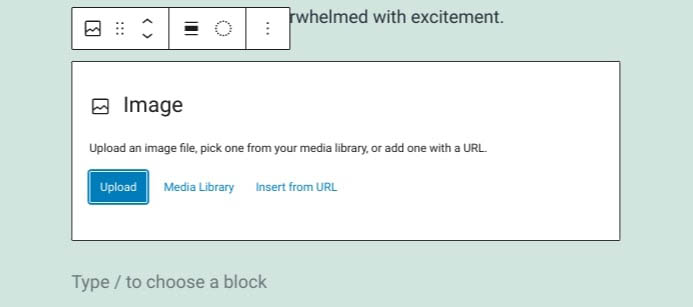
When you’ve completed your post, you can add the finishing touches. For instance, you can assign it one or more Categories and Tags. These help you organize each post based on its type and topic.
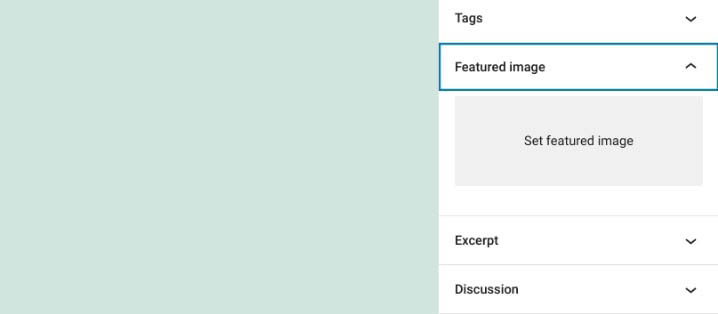
Finally, you can set a featured image for the post. The format of this image depends on your theme, but it’s usually featured on your blog’s homepage and at the top of the post. Select your headline and use the Featured Image option in the sidebar to choose a file:
Your post is now ready, so go ahead and click on the Publish button in the top-right corner to make it live:
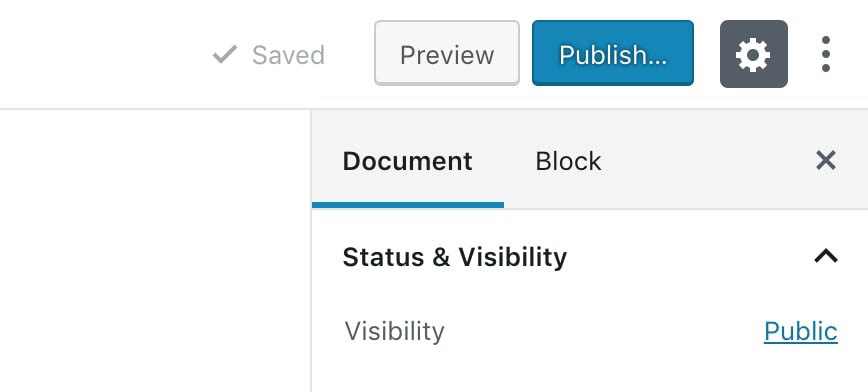
You can also set how and when you want the post to appear on your site, if you’d like to delay its publication. You can also choose its visibility, which determines who can see it, or simply save it as a draft to continue working on it later.
Tips for Writing Engaging Blog Posts
There are many ways that you can boost the success of your blog posts. As we mentioned earlier, it’s important to create engaging headlines. It’s also a good idea to incorporate images, video, and other media. This can help make your posts more interactive and interesting, as well as break up long blocks of text.
However, there are some additional strategies you can use to improve the readability of your posts. For example, consider incorporating bullet and number lists. People love lists! If you can structure your blog post in the form of a list, it will make it much easier to read and digest. Plus, it’s just another way to add some visual interest to your post.
It’s also a smart idea to choose topics that you’re passionate about. Your readers will be able to tell that you’re genuinely interested in the topic, and this can make them more engaged with your content.
Also, your readers want to get to know you, so don’t be afraid to be personal in your blog posts. Share your thoughts and feelings on the topic, and let your personality shine through. This can help build trust and add a human touch that resonates with your audiences in ways that might not otherwise be possible.
Step 5: Optimize Your Posts for Search Engines
There are a handful of measures you can take to help boost the success of your blog. Let’s explore some of the ways you can optimize your posts for visitors and search engines.
Install an SEO plugin
We previously discussed the importance of keyword research when it comes to finding topic ideas. Keywords are phrases that users enter into search engines to find what they’re looking for. By optimizing your posts for specific keywords, you can increase the likelihood that they’ll appear when users search for them.
This is also known as Search Engine Optimization (SEO) and is vital for increasing traffic and visibility for your blog. SEO involves a number of tasks, including (but not limited to) increasing your site’s speed and getting backlinks from other sites.
When it comes to your blog, the most important step is to optimize the posts themselves. There are several SEO tools that you can use to do this, but our recommended solution is Yoast SEO:
Yoast SEO is a freemium plugin that adds a new section to your WordPress editor:
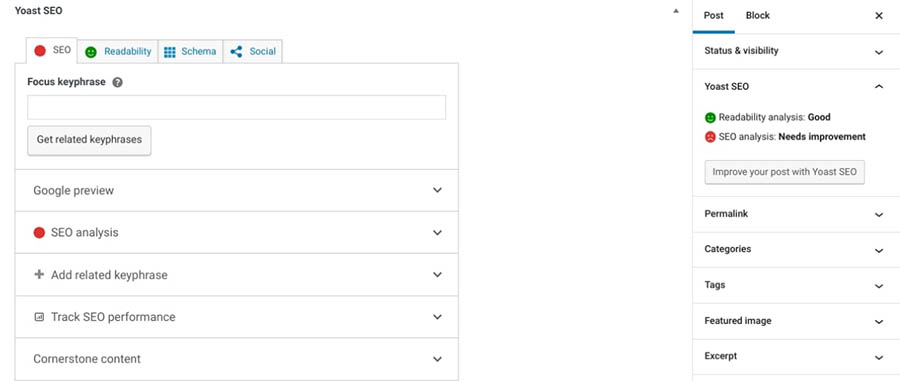
Here, you can set a ‘keyphrase’ for your post, which is the keyword you want to optimize it for. Once you’ve done that, Yoast will show you in real time how well-optimized the post is, giving you specific advice on how you can improve it:
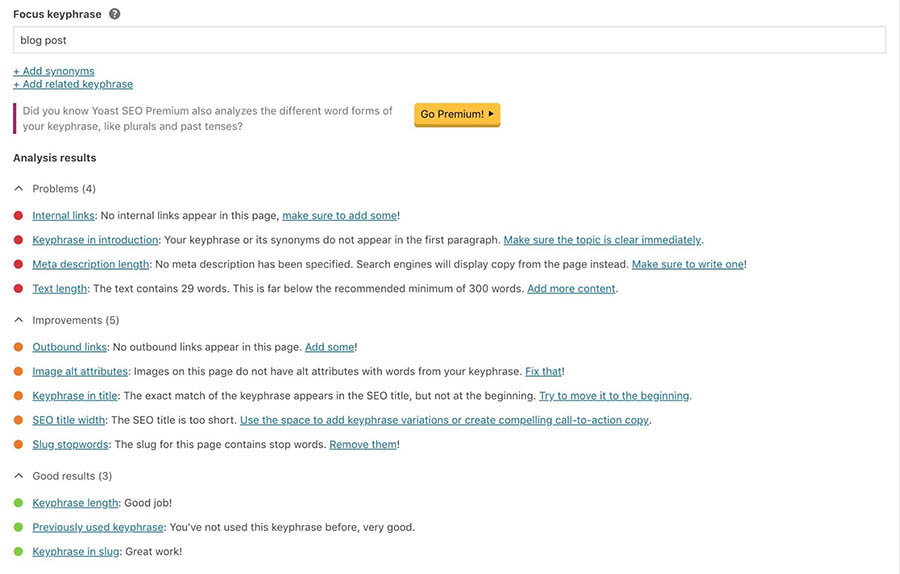
Yoast SEO also lets you add a meta description, which is a snippet of text that appears alongside the post in search results. By adding a description and following these guidelines, your posts will be likely to rank higher in relevant search results.
Set a Schedule (And Stick to It)
Google tends to favor sites that publish unique and relevant content on a consistent basis. It’s also important to publish posts to help boost readership.
To make sure that readers return to your blog, you’ll need to publish content regularly. When you offer new posts on a consistent schedule, your blog won’t go silent for long stretches of time, and your audience will be more likely to return.
There’s no perfect publishing schedule. How often you publish will depend on your availability and your blog’s subject matter. Regardless, it’s a smart move to set a strict schedule for yourself and make sure you follow it.
The good news is that there are tools you can use to help you stick to your schedule. One such solution is the Editorial Calendar plugin:
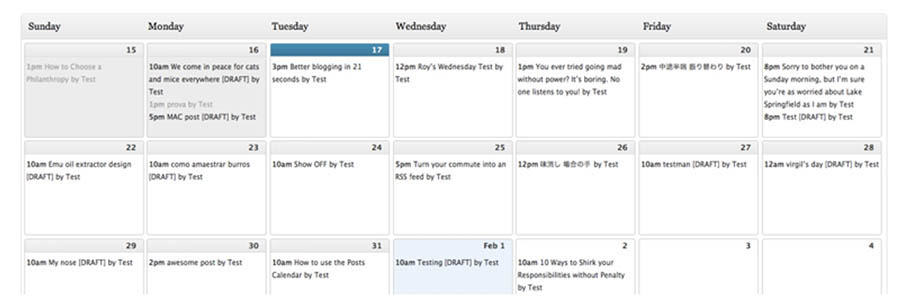
This tool lets you create a calendar for your posts and even schedule drafts to be published at a specific time and date. You can easily track upcoming deadlines and follow your schedule without slipping up.
Keep in mind that you can also change your posting schedule based on which days you get the most engagement. For instance, you can conduct research to determine the times that your target audience is most active, then structure your posting schedule accordingly.
When you first start out, it’s wise to keep a close eye on your analytics. The more frequently you publish new content, the easier it will be to track and monitor which posts perform the best. This will help you refine your content calendar and schedule.
Step 6: Create a Style Guide
Another helpful asset for any blogger is a style guide. As the name implies, this is a set of guidelines that determines how posts on your blog should be written and formatted. It helps you ensure that your content has a uniform tone and look, which in turn makes your blog appear more professional and authoritative:
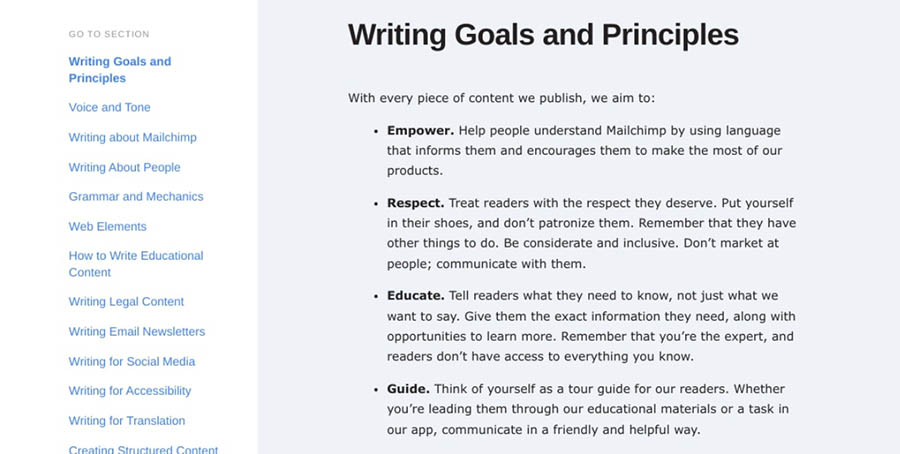
This style guide can help you maintain consistent branding and formatting across your blog posts. It can also be useful if you ever decide to bring on additional writers. They can refer to your guide to ensure that they follow the same practices.
Your style guide doesn’t need to be long or complicated. However, there are a few crucial elements to consider, including:
- Voice and tone. Is your blog laid-back or serious? Is the writing casual or professional?
- Language. For example, do you use British or American English?
- Punctuation and formatting. Do you use en dashes or em dashes? When do you use single or double quotation marks?
You can answer a few key questions about your brand, then provide some examples of how you want your content to look. Some additional questions to ask yourself include:
- What style of writing do you want to use? First person or third person? Active voice or passive voice?
- What topics do you want to write about?
- What kinds of posts do you want to publish? Interviews, roundups, listicles, how-tos, etc.
- What format do you want your posts to be in? Long form or short form? Include images or not?
- How frequently do you want to publish new content (daily, weekly, biweekly, monthly, etc.)?
Once you’ve answered these questions, you can start creating your style guide. Here are a few examples of what you might include:
- Your blog’s mission statement
- An overview of your target audience
- A list of topics you want to write about
- The tone and style you want to use in your writing
- Guidelines for formatting your posts (e.g., headline style, image placement, etc.)
- Any specific branding elements you want to use, like a certain color scheme or font
You can use an online tool like Canva to create your brand guide:
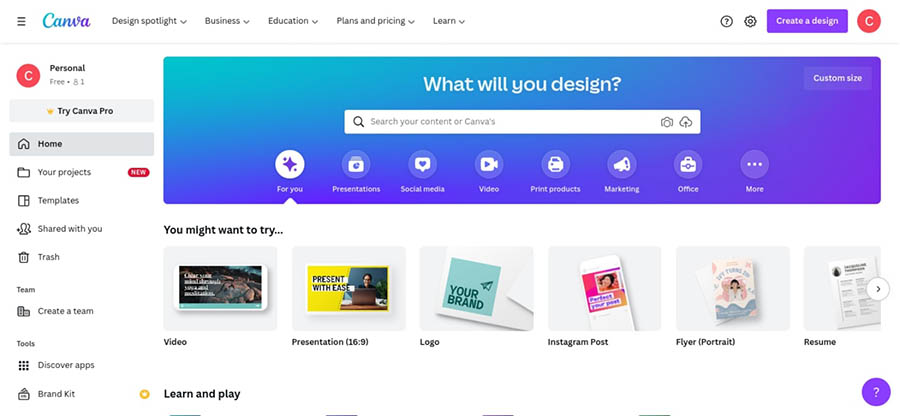
Canva is an online design tool that lets you choose from a variety of templates and customize the colors, fonts, and logo to match your brand. You can use Canva to create other marketing materials like business cards and flyers.
Naturally, a style guide will evolve as your blog grows and changes. As such, it’s best to think of it as a constant work-in-progress, rather than as unquestionable gospel.
Step 7: Market, Share, and Monetize Your Blog
Once you’ve published a few posts and settled into a groove of writing content, you might think you can relax. However, all your hard work thus far could effectively be for nothing if no one knows that your blog even exists.
This is why marketing your blog and posts is so critical. We’ve already discussed SEO, which is a key part of any online marketing strategy. Still, there are several other ways you can make sure you get more eyes on your new blog. Let’s take a look at some of them.
Market and Share Your Posts
Naturally, you’ll want to start by sharing your posts on social media. This will help you gain more exposure while encouraging those in your network to share your content with their own followers.
It’s also smart to make your posts easy to share right from your website. One way to do this is by adding social media buttons to your posts, which you can do using the Jetpack plugin:

This plugin enables you to add social media sharing buttons to your posts and integrates with the most popular platforms. Jetpack also includes a feature that automatically shares your post on social media.
If there are relevant groups or forums that discuss topics related to your blog post, you can share it there as well. This can help you generate more traffic and engagement.
Another strategy is to share your blog posts through your email newsletter. Email marketing can be a great way to keep your audience updated on your latest posts and drive more traffic to your site.
You might also consider partnering with other websites in your niche. If you have the opportunity to guest blog on another site, you can promote your blog post there as well. This can help you reach a new audience.
Another option to consider is paid advertising. This can help you get your post in front of more people and boost clicks and engagement. There are several options available, such as Google AdWords or Facebook Ads.
You’re likely wondering when you can expect to see results. There’s no easy answer to this question, as each blog is entirely different. It’s possible that you might see lots of traffic right away, which is more likely if you already have a strong online presence.
However, in most cases, it will take time for your blog to gain momentum. If you perform SEO, share your posts, and regularly publish high-quality content, you should see a gradual increase in readers. This is a sign that you’re on the right track. You can also keep a close eye on your site’s metrics with Google Analytics to see how well it’s performing.
Monetize Your Blog
Now let’s consider the options you have when it comes to monetizing your blog. After all, you’ve put a lot of work (and too much time) into creating your site, and you probably wouldn’t say no to making some money from your content. Let’s look at some effective ways to make money online.
You can start by selling products and services alongside your posts. For instance, you could write and sell an e-book or produce a course on a relevant topic.
Selling premium or membership content can add value to your blog. It can also help you generate more revenue from dedicated readers.
You could also get into affiliate marketing. This is a type of online marketing in which bloggers promote the products or services of another company in exchange for a commission on any sales made through affiliate links.
Affiliate marketing can help you generate income by promoting products or services that you love. Additionally, it can provide a way for you to build relationships with other companies and connect with their audiences.
Another option is crowdfunding. You can ask your loyal readers to donate directly, which eliminates the need to market any external products.
There are a handful of donation plugins that you can use, such as GiveWP:

This free tool lets you easily add a donation button to your blog. You can use it to accept online payments and create customizable donation forms.
You can also implement advertisements on your site in the form of links and banners. A popular and easy solution for doing this is Google AdSense. This automatically generates ads that are suitable for your blog and audience, so you can focus entirely on creating great content.
Start Writing Content and Earning Money
That’s it – you’re now ready to start blogging! You can write about topics that you’re passionate about, and monetize your content to make some money.
As we discussed in this post, you can start a blog in just a few simple steps. Once you choose a blogging platform such as WordPress and register your domain and hosting, you can customize your blog, optimize your content, and publish your first post.
Are you looking to create a professional blog? Check out our DreamHost Shared Hosting plans to learn how you can register your domain and install WordPress in just a few simple clicks!
Power Your Blog with DreamHost
We make sure your blog is fast, secure and always up so your visitors trust you. Plans start at $1.99/mo.

The post How to Start a Blog in 7 Easy Steps appeared first on Website Guides, Tips & Knowledge.
source https://www.dreamhost.com/blog/how-to-start-a-blog-2/
No comments:
Post a Comment