Wednesday, 17 February 2021

How to Create an Editorial Calendar for Your Blog

The majority of marketers use content marketing. Approximately 70% to be more precise. But is it working?

Not quite.

The Content Marketing Institute’s latest B2B content marketing report found that only 5% of marketers rate their efforts as “extremely successful.” A not insignificant 15% said they were “minimally successful,” and the majority — 58% — said they were merely “moderately successful.”

These numbers have changed little in recent years.

So what are we doing wrong? What can we do to get better results from our content marketing?

One way to start is to create (and use) an editorial calendar.

Why? Because CMI’s study also shows that the more strategic we are with our content marketing, the more likely we’ll hit our goals.

In this article, we’ll cover everything you need to know about creating a calendar to guide your content plan. If you’re looking for advice on a specific topic, feel free to jump ahead:

Ready to learn how to build the ultimate blog calendar? Let’s dive in!

What is Content Marketing?

Content is anything you create and make public across any channel that serves to educate or entertain, rather than directly selling a product.

This could be (but isn’t limited to):

  • Blog posts
  • Video
  • Tweets
  • Facebook posts
  • Web content
  • Instagram posts and stories
  • Webinars
  • Podcasts
  • White papers
  • Case studies

The list is almost endless.

Content marketing is when the content you create is used for the purpose of marketing. Indirect marketing, to be more precise. It’s used to drive website visits, get in front of new audiences, and generally increase brand awareness and loyalty.

It’s not to be confused with product marketing, which is used specifically to promote products.

What’s an Editorial Calendar?

When you have numerous channels to create, organize and publish content for, it can get complicated quickly.

This is where an editorial calendar can help.

In short, an editorial calendar is a document that helps you track and manage the content you’re creating and publishing. Traditionally it may consist of the following:

  • Content ideas
  • Content you’re working on
  • Publication dates
  • The channel the content is for
  • The name (or names) of the people working on said content

More advanced editorial calendars will also help you understand your content’s impact and its value on your business.

So you may also want to include:

  • The success of each content piece
  • Reports that break those successes down according to type of content
  • Visualized data for helping you make informed decisions based on past successes (and failures)

There is no one solution. Each business is going to require a different setup, depending on its strategy and business goals.

Take Your Blog Editorial Calendar to the Next Level

Whether you need help choosing a blogging platform, creating an editorial process, or developing a content strategy, we can help! Subscribe to our monthly digest so you never miss an article.

Why Do You Need an Editorial Calendar?

Now you know what an editorial calendar is, let’s look at some of its benefits.

An Editorial Calendar Helps You Keep Everything in Check

Consistency is key in content marketing. And it’s something most companies struggle with — especially when many people work on one project.

At any one time, your content team might comprise of a strategist, writer, editor, social media practitioner, designer, and potentially even a developer.

That’s a lot of plates to be spinning.

It Helps You Keep Your Publishing Frequency in Check

What does your posting schedule look like? One post a week? Two posts a week? Lots of companies publish multiple times a week. Many of those are publishing across multiple platforms.

It’s not hard to see how things can get messy fast.

An editorial calendar helps you create a publishing schedule. It also helps you — and your team — stick to that publishing schedule.

It Helps You Keep Track of the Type of Content You’re Publishing

When you’ve already invested in content marketing, it can be really tempting to just keep pressing publish across different platforms. Unfortunately, this strategy is far from helpful when it comes to what works, and what doesn’t.

Don’t just click publish and move on.

Use an editorial calendar so you can look back and analyze old content. By aligning this data with your KPIs and business goals, you can improve future content for a better chance of meeting your business goals and boosting your bottom line.

It Helps Multiple Team Members Work Towards the Same Goals

As mentioned earlier, content marketing is rarely delivered by one person — it’s usually a combined effort across a team of specialists.

Of course, while a cross-team approach tends to result in a higher output of better quality content, if mismanaged, that team can end up working in silos. All collaboration flies out the window.

An editorial calendar helps get the whole team invested in all stages of content production. It also makes it easier for them to view and track results.

Types of Editorial Calendars

There are two types of editorial calendars:

  1. Software-based calendars. These have the caveat of a subscription fee.
  2. An editorial calendar you create yourself, usually in a spreadsheet. That could be in Excel or Google Sheets.

Let’s look at some examples.

Software Editorial Calendar Tools

CoSchedule

CoSchedule is one of the biggest names in editorial calendars, and rightly so. They’re constantly improving their product and have been for many years.

Here are a few features that might interest you:

CoSchedule allows you to see everything in one place so you can get a complete overview of all content marketing activities. It also has an awesome UI. It’s simple, looks fantastic, and keeps things uncluttered, which is important if you have a busy schedule and lots of moving parts.

Types of CoSchedule projects.

CoSchedule also allows you to share your plans with stakeholders, whether that be a client, line manager, or CEO. You simply grab the sharing URL, and they’ll be able to see both planned and published content.
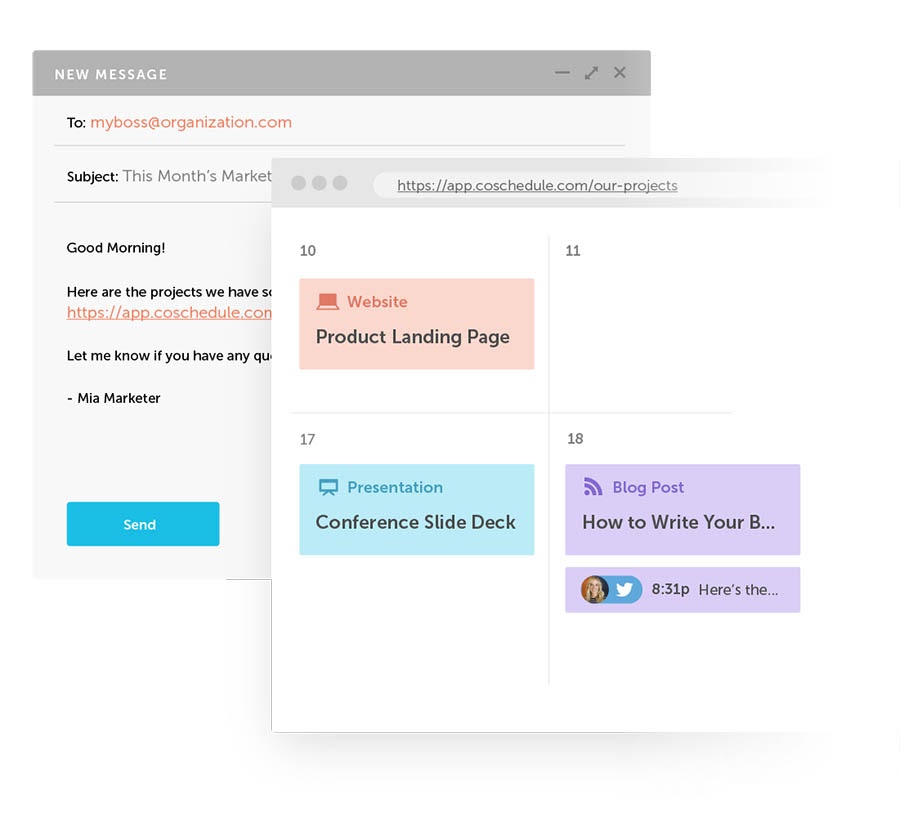
Sharing a project on CoSchedule.

It allows you to be flexible. No matter how well you plan, there will always be times when necessary to swap and change. Maybe something significant takes place in your industry that turns your original plan on its head (we’ve all had to pivot our businesses thanks to COVID-19). How can you get the necessary changes in motion without having to talk to everyone involved?

It is super simple with CoSchedule. They have a nifty drag-and-drop feature, which means you can change plans on the fly — and notify all relevant team members just as easily.
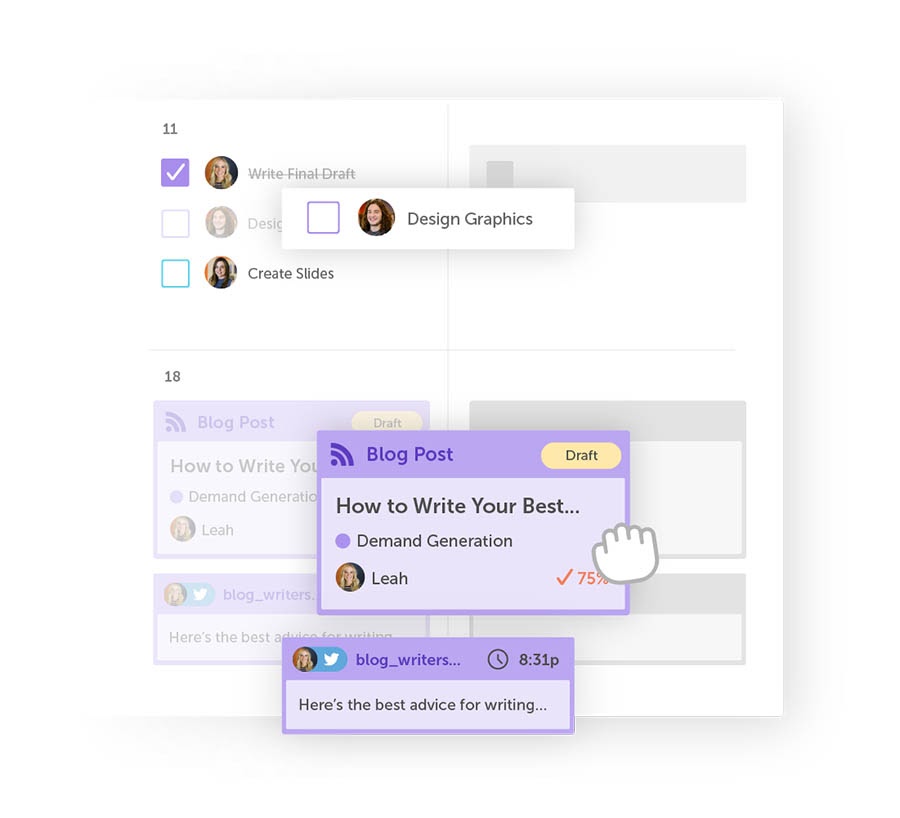
CoSchedule’s drag-and-drop feature

Trello

Odds are you’re at least somewhat familiar with Trello. Based on Kanban workflow management, it’s been on the scene for a number of years now. With index cards, you can create a workflow that has full transparency and cuts out unnecessary communication.

Trello isn’t a stand-alone content calendar, however — the software is so flexible it can be used for pretty much anything. So why use it as an editorial calendar?

Well, for one, it’s free!

While Trello has paid plans, there’s no cost to get started and you only need to upgrade to access specific features. The free version should more than suffice for small teams, while the first tier of the paid version is quite affordable if you need extra features.

You can also make it your own.

A lot of similar software forces you to use it as it comes — i.e., how the designers put it together. With Trello, you’re free to create an editorial calendar that suits your processes and your business.

Want to save time? Trello can help with that too.

Not only does it have its own gallery of templates, but other users can (and do) share their templates. You can then take one of these templates and use it as a base for your own calendar.
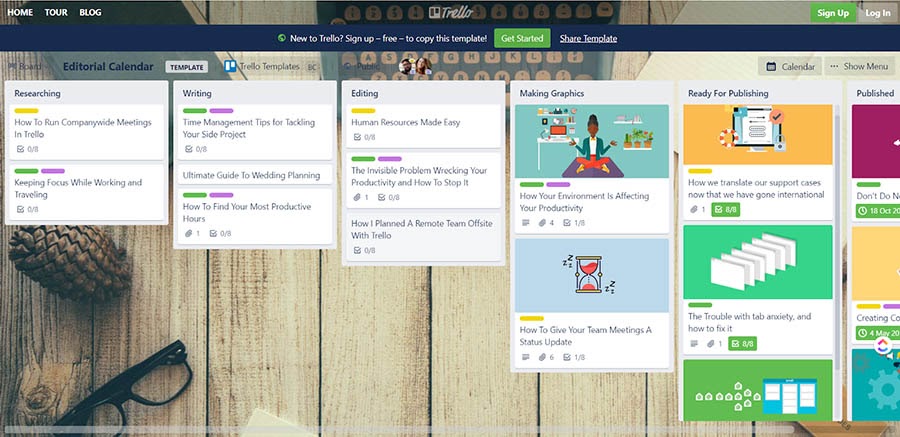
Example of Trello’s Editorial Calendar template.

Trello also boasts Google Docs and Dropbox integrations. This means you can view both drafted and completed content directly within the tool — no more digging around for the document that a team member created and accidentally popped into the wrong folder.

View of Trello integrations on a content calendar.

Contently

If your team needs more than what a tool like Trello can offer, Contently might be the answer. As you might suspect though, it comes at a price.

Contently has the standard calendar features you’d expect to see. It works similarly to CoSchedule and has an equally simple interface.
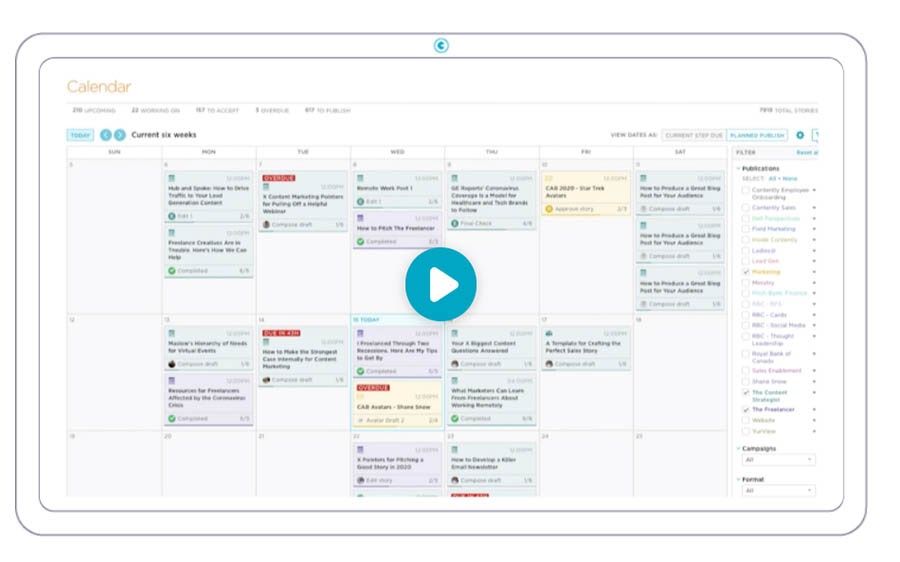
Example of Contently Editorial Calendar.

So why the hefty price tag?

It has features that you just don’t see in other software.

  • The ability to document content goals and audience personas
  • Track important SEO keywords
  • Search and social listening — allowing you to stay ahead of the competition and target trending topics
  • It allows for taxonomy and tagging — crucial when you have a ton of content being published
  • It includes performance analytics — you can see what’s performing well and adjust your strategy accordingly
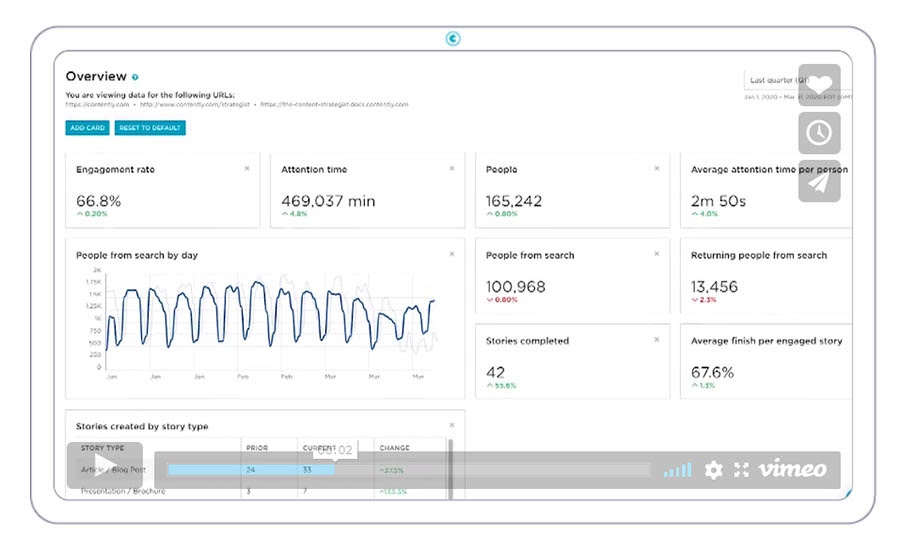
Example of Contently analytics overview.

For those running a big team, Contently is a great choice.

Pros of Software-Based Editorial Calendars

You Can Connect Them to Other Software

Publishing across multiple platforms can quickly get complicated. Things become easier when you use an editorial calendar that can connect with your other software. This might include (but isn’t limited to):

  • Facebook
  • Twitter
  • Instagram
  • WordPress
  • Mailchimp

The ability to publish directly from the software to the chosen channel is a massive time saver.

They Don’t Take Long to Set Up

Most online editorial calendars are a breeze to set up — unlike creating your own spreadsheet or document.

Usually, you just need to click a few times, and you’re ready to go. Most online calendars also have tours to help with onboarding — both for yourself and for your team.

Cons of Software-Based Calendars

They Can Be Expensive

As with anything that makes your life easier, it rarely comes for free. That said, when you’re deciding between software or spreadsheets, you need to take into account time saved and how much that time is worth to you.

Less time spent on admin = more time for content creation.

Spreadsheets

An alternative solution is to use a spreadsheet.

You can use Excel for this, but you may be better off opting for Google Sheets, as the real-time collaboration makes managing your calendar much more efficient.

Are there any spreadsheet templates you can use to get started? You bet!

Pros of Spreadsheet Based Editorial Calendars

They’re Flexible

Regardless of how your team operates, you can create an editorial calendar to fit your exact needs. You get to choose what’s in your calendar and how it functions.

They’re Free

A huge percentage of businesses in the world use Microsoft, so getting hold of it is super easy. And Google Sheets is free for everyone with a Google account, so you’ve got no excuses there.

Cons of Spreadsheet Based Calendars

Communication and Collaboration

Collaboration is tough, especially in Excel. We’d only recommend using Excel if you have a very small team or no other options.

With Google Sheets, collaboration is somewhat easier, but it’s still limited compared to what’s offered by most software content planning solutions.

Automation Can Be Tough

One of the key advantages of software solutions is that many admin tasks are automated — from notifying team members to collecting data.

It’s much trickier to introduce automation within spreadsheets.

You've Got a Blogging Schedule. Now Let's Talk Hosting

When you partner with us, your website is in good hands! Our services pair friendly expertise with top-notch technology to give you all you need to succeed on the web.

Editorial Calendar Templates

If you need some inspiration before creating your editorial calendar, then look no further. These examples should give you all the insights and inspiration that you need:

Editorial Calendar Strategies

Before you start getting stuck into creating your editorial calendar, here are a few more things to consider.

  • Understand capacity. You need to make sure your team isn’t over or underworked. This means knowing how long specific tasks take and how many hours your team members have available. This helps streamline processes and makes for happier employees.
  • Work towards goals. You need to set out your business goals before entering the first piece of content into your calendar. These goals need to be communicated to the wider team and referenced in tasks.
  • Know your content mix. Before you get cracking, establish which channels you’ll be using. Knowing which channels resonate best with your audience will help you focus effort in the right places.
  • Be detailed. The tasks in your content calendar MUST have detailed briefs. This assists with autonomous working and staying on track.
  • Understand consistency and tone. This is another thing you need to set out from the start in a brand style guide. You may find you need to change your tone for each channel you use. You can then reference these each time you add a task to your calendar.

Building Calendar-Based Workflows

Next, you need to look at the kind of workflow you want to build for your team. Here are a few things you need to be thinking about.

  • Ideas. You need a place within your calendar to store blog post ideas. Ideas can easily get lost or forgotten, so make sure to document each topic idea for future reference.
  • Deadlines. An editorial calendar relies on hard deadlines to keep it flowing. From the get-go, your team should understand how planning and deadlines work and that they need to stick to them.
  • Keyword research. It doesn’t matter whether you’re working on a blog post or writing tweets; keyword research is essential.
  • Review and sign off. How do you see this part of the process panning out? If it all takes place in the editorial calendar it improves workflow significantly. Plan it in from the start.
  • See it through. This might sound obvious, but you need a way to flag missed deadlines. And you need to know why so you can adjust the strategy moving forwards.
  • Review and start again. As well as tagging content that’s missed deadlines, you need to come up with a way of tagging successful and failed content right inside your calendar. This helps you learn from your successes and identify mistakes.

How to Manage Your Editorial Calendar

You should now be at the stage where you’ve chosen how to deliver your plan (software or spreadsheet). You should know how you are going to build the workflow and how to document everything.

Is there anything else?

Yes. How to get your team on board. Here’s some food for thought:

  • What’s the plan? Are you going to onboard the team together or do it one by one? How do you get buy-in from different departments? You need to set yourself a plan and document it so you can confidently communicate the plan to your team.
  • Is everyone in the know? This is easily forgotten. Your team will be in the know, but those that aren’t directly involved may need to be aware of what’s happening too. For example, the CEO may look at the process and calendar once and never again — but if they know how it works, it can help when it comes to reporting.
  • Communicate. This is key. Communication has to happen inside the calendar for optimum workflow. You need to stress this to the team.
  • Stick to the plan. You’ve set it out. You’ve added to the calendar. It’s now your job to make sure everyone sticks to it and uses the calendar in the way you intended.

Create Your Blog Content Calendar

When it comes to editorial calendars, there is no perfect solution. No one way of working that will suit every organization or team. What works best for you will depend on factors such as the size of your team, how much content you’re producing, the channels you use, and your budget.

You can invest in cheap or free editorial or project management software. You can upgrade to enterprise solutions. Or you can save money and create your own bespoke system using Google Sheets or Excel.

What does apply across the board is that you need a content calendar if you’re creating content. You’ll be fuelling better collaboration, improving efficiency, and helping you and your team track results to make smarter decisions moving forwards.

The post How to Create an Editorial Calendar for Your Blog appeared first on Website Guides, Tips & Knowledge.


source https://www.dreamhost.com/blog/how-to-create-editorial-calendar/

Friday, 12 February 2021

We Revamped the DreamHost Control Panel to Make Managing Sites Easier

Whether you manage one domain or one hundred of them, you’ve likely said to yourself, “Self, I wish there was a more attractive and intuitive way of managing my domains and website hosting options in the DreamHost control panel.” You’re not alone! We get that a lot.

Good news — things are changing!

Domain management — arguably the most important function of your control panel — has an all-new look today! Right now.

You may be wondering why we’re changing a core component of the hosting experience here at DreamHost after it has fulfilled its purpose for the better part of two decades. In short: Times have changed!

The control panel was originally designed by developers whose no-nonsense sensibilities were a perfect match for DreamHost’s customer base at the time (also mostly developers). It was the early-ish days of the internet, and the panel was an effective, efficient way to manage your sites.

Example of hosted domains in the Manage Domains section of the DreamHost panel.

Over time, as we’ve added new features and advanced functionality to the panel, its layout has become a bit . . . cluttered. With so many hosting options, settings, and services, it can be a lot to process when you’re a customer coming in with a great idea who simply wants to get online as quickly as possible.

The Wishlist

What we needed was a platform that would better serve the customers we have now, and one that would have plenty of room to grow as we provide more of the services and features they’re looking for. At the same time, modernizing the tech stack behind the DreamHost panel would allow us to deploy code and launch products more rapidly and recruit even more talented developers to the team.

And, well, that’s exactly what we built.

A Stunning New Way to Manage Your Sites

The new Grid View in the Websites section of the DreamHost panel.

Our first big update to the Websites control panel was Grid View, a beautiful new visual layout of all of the websites in your account. Grid View lets you browse your sites with a screenshot of their front page to quickly find and manage the one you’re looking for. You can see which features are enabled at a glance, so it’s easy to tell if email or malware protection is set up for a particular site.

“List View” of hosted websites in the Websites section of the DreamHost panel.

Along with Grid View, we’ve added a more compact List View that displays your sites in a condensed format without the screenshots. Additional details about your domains can be toggled on and off, making this view a powerful and flexible option for anyone managing a large number of sites on their account.

Advanced Features When You Need Them

The “Manage Your Site” feature in the Websites section of the DreamHost panel.

Of course, we didn’t want to cram everything about all your sites into a single view. Our second release introduced the new Domain Overview section — a detailed dashboard that contains more information and settings specific to each of your sites. From here, you can manage every aspect of your website, from email to PHP settings.

Room for Activities

Expandability was a must-have when designing the new control panel. And expand, it can. Our new WordPress migration service launched just in time to be the first live-action test of the panel’s new modular layout.

The new Automated WordPress Migration Plugin under the Migration tab in the Websites section of the panel.

What would have taken weeks to develop under the old interface was a much simpler matter of:

  • Create the API endpoint.
  • Design the page.
  • Celebrate.

This kind of flexibility was mind-boggling to the team and a welcome addition to our workflow. What’s most exciting? We aren’t limited to the current feature set and can expand to accommodate whatever our customers find useful — security, marketing, performance, and more!

Straightforward Site Setup

Setting up a website in the Websites section of the panel, starting with “Choose a Domain”.

Finally, we wanted to improve the experience for customers when adding a new website. The old setup flow was full of niche, technical features that the vast majority of our customers found more confusing than helpful. Rather than forcing users to scroll through all of that, we want to let you focus on decisions that matter. By reducing setup to a few simple steps, we can get your site up and running in minutes, so you can get to work!

We Really Do Read the Feedback!

Thank you to all of you who kicked the tires, clicked around, and submitted your comments and suggestions for Grid and List View while they were still just beta previews in the panel. Your real-time feedback made it into each new phase of the project and helped us stay focused on the features that make your web hosting experience a little quicker, easier, and nicer to look at.

The DreamHost feedback survey and prompt.

True story: One of the early versions of List View had missed the mark. We’d gotten a little carried away while decluttering the interface, and it was slowing people down, needing more clicks to get the same things done. Oh boy, did we hear about it, and we were so grateful for that feedback! We caught it quick, changed course, and even managed to host a handful of face-to-virtual-face interviews to learn more about how you’d like your control panel to look, feel, and function. It’s that kind of interaction that warms our hearts and keeps our to-do lists full.

There’s More in Store!

We’re excited to bring you all these updates with the new Websites panel and can’t wait to show you what’s coming up next. In the meantime, if you have any questions, comments, or moonshot suggestions for the panel, we’re still listening! The feedback form is built into the new dashboard, so let us know what you think!

The post We Revamped the DreamHost Control Panel to Make Managing Sites Easier appeared first on Website Guides, Tips & Knowledge.


source https://www.dreamhost.com/blog/new-dreamhost-control-panel/

Thursday, 11 February 2021

How to Fix the Error Establishing a Database Connection in WordPress

Few things are as frustrating as finding that your website is down — particularly if you rely on it for business. The Error Establishing a Database Connection message represents a serious issue and prevents all access to your site, so fixing it is a top priority. However, if you’re not familiar with how WordPress works, it can be a confusing problem.

Don’t fret. Although this error is serious, it’s also highly fixable. With a few troubleshooting steps, you can have your site back online in no time. Here’s what we’ll cover:

Let’s get started!

Got a WordPress Error? No Problem

You can skip troubleshooting if you sign up for DreamPress hosting. Our friendly WordPress experts are always standing by to solve your website problems — big or small.

Understanding the Error Establishing a Database Connection in WordPress

Before we dig too much into this particular error message, let’s have a brief lesson on how WordPress sites work. Nearly all website information — including post data, plugin settings, login credentials, and more — is stored and organized in a MySQL database.

When a visitor comes to your site, WordPress uses PHP to query the database and pull the correct information, which is then displayed as the complete page.

If, for whatever reason, WordPress can’t access your site’s database or it isn’t working properly, the result is an Error Establishing a Database Connection message.

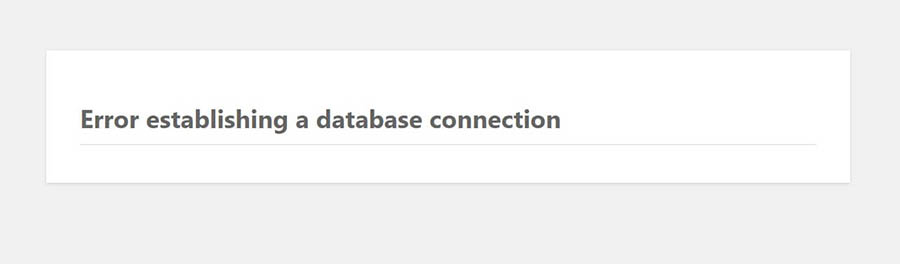
The Error Establishing a Database Connection message on a WordPress site.

This error prevents the entire page from loading. In fact, you won’t even be able to access the WordPress dashboard (your site’s back end).

If your site uses caching, visitors may still see stored copies of your pages. Therefore, if you catch the error early and resolve the problem before your site’s cache refreshes, you can avoid too many interruptions to your site and business.

Fortunately, as WordPress errors go, a database connection error is usually pretty simple to resolve. The most common cause, by far, is just a mismatch of login credentials for the database.

Common Causes of the Error Establishing a Database Connection

There are four typical causes of the database connection error:

  • Incorrect database login credentials. Possibly the most common cause of the Error Establishing a Database Connection is simply that WordPress has incorrect login credentials for your database. This could be either the database name, username, or password. Remember, these login details are different from the ones you use to access your site.
  • Database corruption. A WordPress MySQL database contains a lot of information. If any part is deleted or corrupted, the result can be the error in question. Corruption can result from manually tinkering with the database, but it can also just happen as a consequence of normal use. Although MySQL is quite robust, nothing is perfect, and errors do occur.
  • WordPress core file corruption. Similarly, corruption can occur in the core WordPress files that make up your site. Even though these files are outside the database, they may sometimes result in the same error.
  • Problems with the web server or hosting provider. If problems arise with your host or server (if you’re self-hosting) and WordPress can’t reach it to query the database, it will throw this error. These problems can include outages, data loss, and hardware failures.

As we said, incorrect credentials are the most common cause of the error, but any of these could be the culprit. For that reason, fixing the error can involve some troubleshooting.

How to Fix the Error Establishing a Database Connection in WordPress (In 4 Steps)

Although this is a serious error, it’s fortunately fairly easy to resolve. Below, you’ll find step-by-step instructions for troubleshooting and fixing the problem. Note that you should try each step in order, only moving to the next if one doesn’t work.

Step 1: Check Your WordPress Database Credentials

Since this is the most likely cause of the error, it should also be the first step in your troubleshooting. The first thing you’ll need to do is locate the credentials WordPress is currently using to access your database.

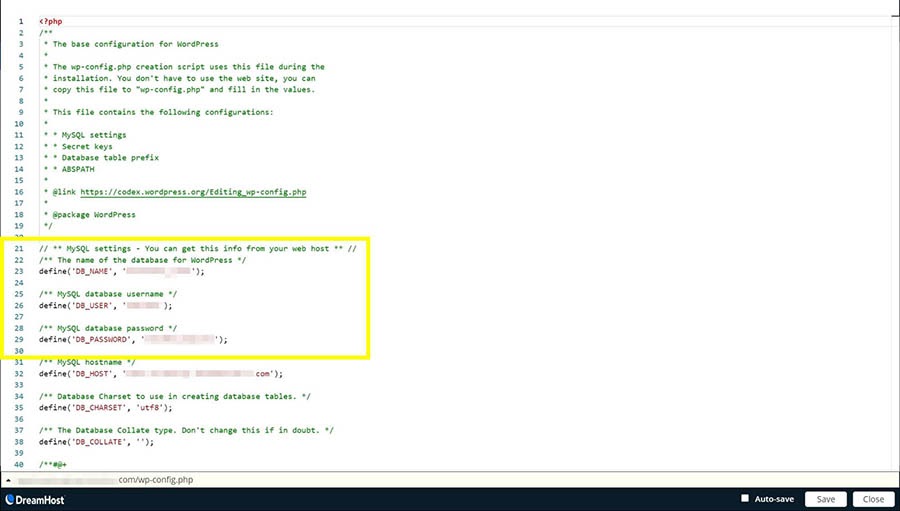
This information is stored in your site’s wp-config.php file. You can use a Secure File Transfer Protocol (SFTP) client to access it.

Alternatively, if your site is hosted with DreamHost, you can access the file system from the DreamHost Control Panel. To do so, sign in to your control panel and navigate to Domains > Websites. Hover the mouse over the domain you’d like to fix, then click ‘manage’ to see the folder icon. Then click on the file folder symbol next to the site that’s experiencing the error.

Inside the file browser, select the folder named after your website, then open wp-config.php. Here, look for three pieces of information — the database name, username, and password. They should be near the top of the file.

The database login credentials in the wp-config.php file.

With this information in hand, head to your DreamHost Panel and navigate to More > MySQL Databases. Look for the hostname that corresponds to your website’s name. It will be formatted as mysql.yoursitename.com, with “yoursitename” being the name of your website.

If the hostname isn’t on this page, skip down to Step 2 and come back here when you’re done adding it.

In the section called Database(s) on this server, make sure the database name matches the one you pulled from wp-config.php earlier. If it does, this isn’t the problem, and you can move on to the next step.

If it doesn’t match, go back to wp-config.php and update it with the correct database name.

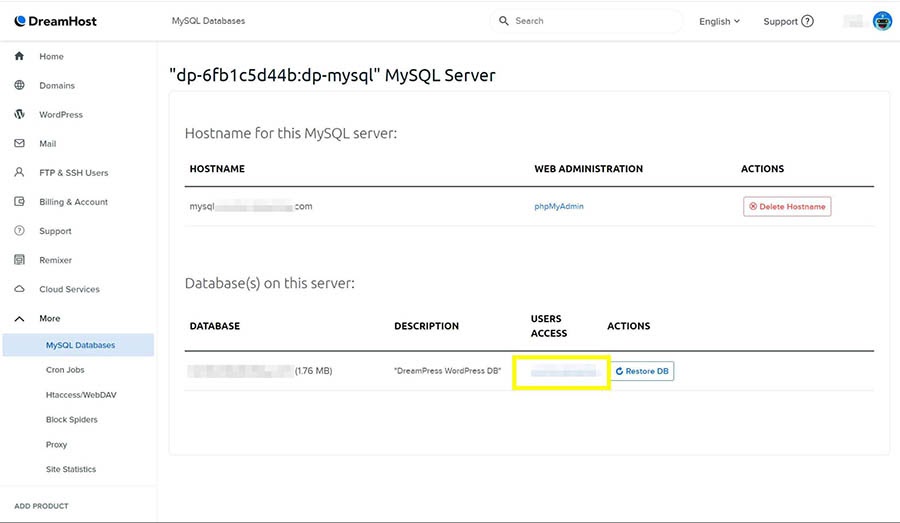
Next, you can find the usernames that have access to each database beside their names on the MySQL Databases page.

The usernames that have access to the database listed in the DreamHost Control Panel.

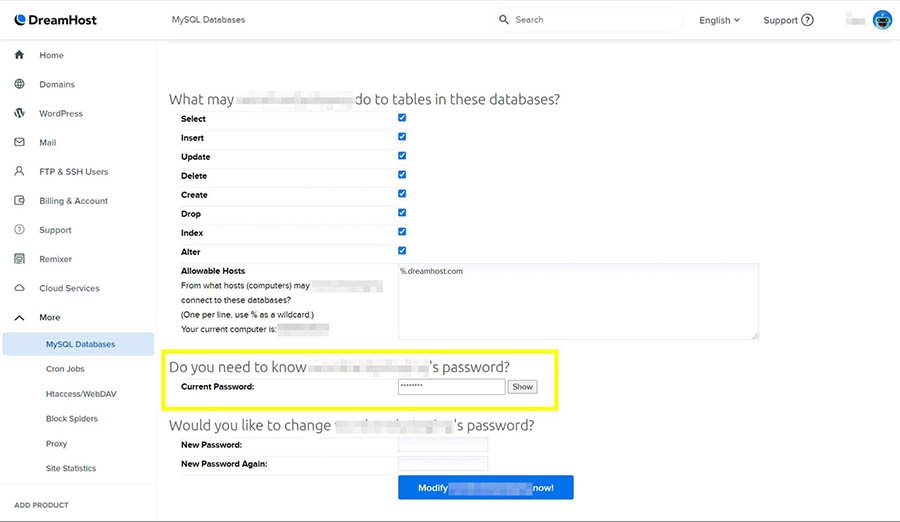
To view the password, click on the username. On the page that opens, scroll down to the Current Password field and click on Show.

The password options for a database user in the DreamHost Control Panel.

If the username or password doesn’t match your wp-config.php file, update it with the correct details. Alternatively, if the username matches but the password doesn’t, you could update the database password on the User Details screen.

Step 2: Check Your Database Host Information

If you’ve checked the database login credentials and fixed any errors, but you’re still getting the Error Establishing a Database Connection message, the next thing you should check is your database host information.

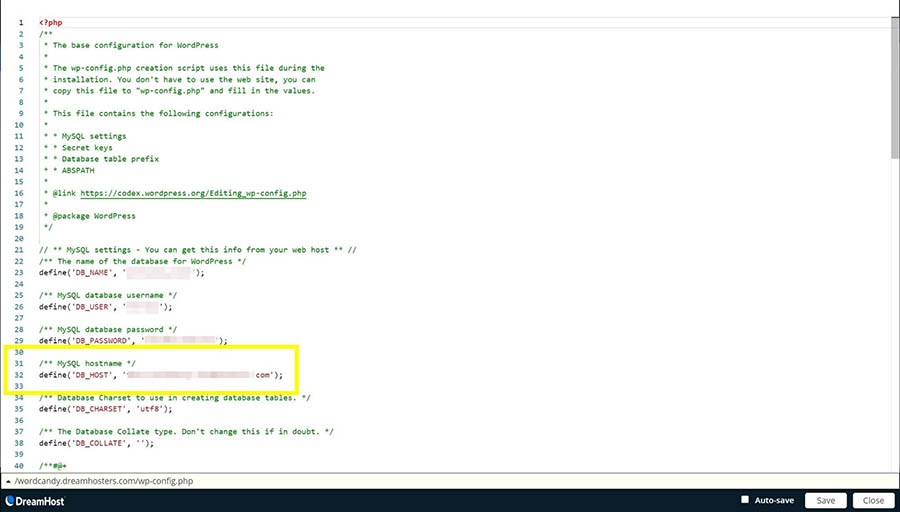
The hostname for your database can be found in wp-config.php, right alongside the database name and login credentials.

The MySQL database hostname in the wp-config.php file.

Note this information, then head back to your DreamHost Panel and navigate to More > MySQL Databases. This time, you’re looking to make sure the hostname in your wp-config.php file is listed on this page. If it’s not, you’ll need to add it.

To add a hostname, simply click on the Add New Hostname button. On the next page, enter the hostname you want to use and select the correct website domain from the dropdown.

When you’re finished, click on Create this MySQL hostname now! Note that it can take a few hours for this new hostname to propagate through the DNS, so feel free to take a break here. When some time has passed, come back and check if your site is working. If you’re still getting the database error message, proceed to the next step.

Step 3: Repair Your WordPress Database

If you’re still receiving the error message, you can try repairing the database to fix possible corruption. We recommend using the built-in WordPress database repair tool for this.

To access it, open up your wp-config.php file and add the following code at the end:

define('WP_ALLOW_REPAIR', true);

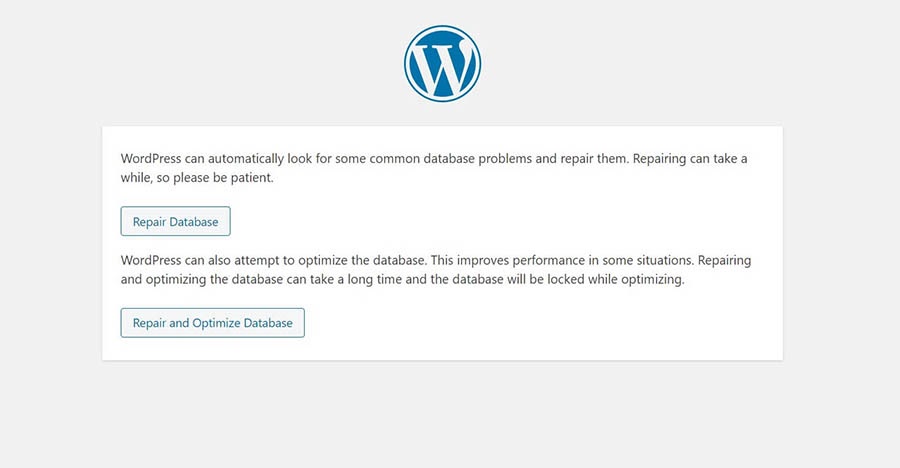
Next, open a new browser tab and navigate to https://yoursitename.com/wp-admin/maint/repair.php, replacing “yoursitename” with your website’s actual domain. This will bring up the database repair tool.

The WordPress database repair tool.

Click on Repair Database and let it do its thing. You can choose Repair and Optimize Database if you like, but it takes considerably longer. Either way, when the tool is finished, load your website again and check for the error. If it’s gone, then you’ll know a corrupted database was the cause.

However, if you’re still seeing the error message, head to the next step. Before you do, make sure to head back into wp-config.php and delete the code you added to turn on the tool. If you leave it there, someone with ill intentions could gain access to your site easily.

Step 4: Check if Your Database Server Is Down

If all the above steps have failed, one final possibility is that your database server has gone down. At this point, it’s a good idea to verify with your hosting provider that everything is working correctly.

There are a number of reasons why your database host or server might be experiencing issues:

  • Too many simultaneous connections to the database. Some providers have limits on how many connections a server can have at one time.
  • Problems with another site on your shared hosting server. If you’re on a shared hosting plan, you’re splitting resources with other sites. If one of them has problems, it can spill over to your site. This is one of the reasons dedicated or managed WordPress hosting plans can be beneficial.
  • Hardware troubles. Hardware eventually fails, and it’s possible that the server your database is stored on has done just that. Ideally, your host will have redundancies in place so that if one server goes down, there’s another copy of your data available, but this isn’t always the case — especially if you’re hosting your own database on a home or office server.

Your best bet here is to reach out to your web host and inquire about outages or other known issues. If there are none, you can report your problem and ask the support staff to look into it for you.

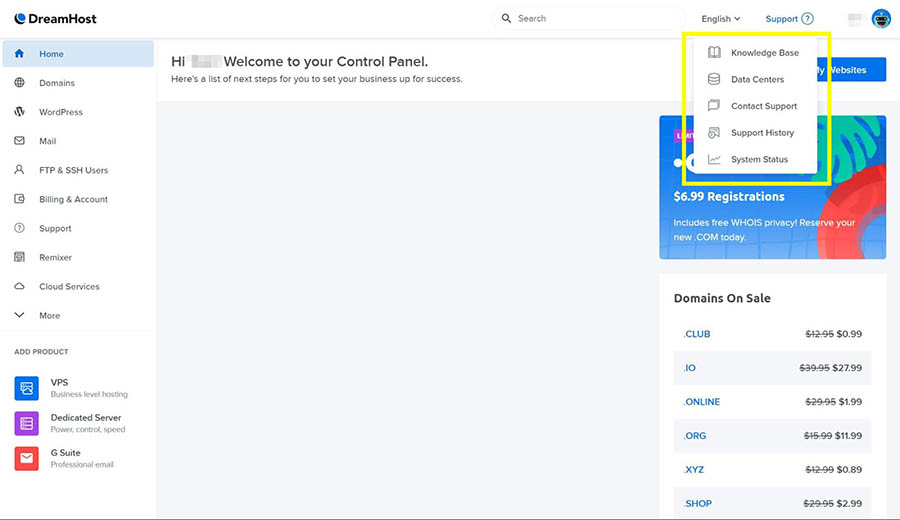
At DreamHost, you can always find your support options by clicking on the Support button in the top right corner of your control panel:

Support options in the DreamHost Control Panel.

DreamHost offers 24/7 support, so you can get help any time you need it.

Additional Tips and Solutions That Have Worked for Other Users

If you’ve tried all of the above tips and you’re still having trouble with the Error Establishing a Database Connection, there are a couple of other options that have worked for some users. You can try these either before or after going through the troubleshooting steps above:

  • Update your WordPress site URL. If you’ve recently moved your WordPress installation for any reason (such as moving to a new domain name or migrating to HTTPS), you may need to update your site URL in the database. You can find full instructions for doing so in our knowledge base.
  • Reboot your web server. This one might seem a little basic, but sometimes the simplest solutions are the most effective. If you host your database on your own server, try turning it off and back on. Computers are complex, and a simple reboot can fix all manner of odd problems you may be experiencing.
  • Ask for help. If you’re not comfortable doing your own troubleshooting, or you’ve tried everything and still can’t get rid of the Error Establishing a Database Connection message, there’s no shame in reaching out for help. You can get in touch with DreamHost support 24/7 by clicking the Support button in your DreamHost panel. You can also try searching on help forums such as Stack Exchange or Quora. Your question may have already been answered on one of these sites. If not, you can always ask.

At this point, you’ve hopefully resolved the issue and gotten your site back up and running.

Take Your WordPress Website to the Next Level

Whether you need help navigating the WordPress dashboard, fixing incorrect database credentials, or finding the plugins folder, we can help! Subscribe to our monthly digest so you never miss an article.

Further Reading

Want to learn more about fixing common WordPress errors? We’ve got you covered!

Ready to Fix a Database Connection Issue?

If you’ve gone to check on your website and found yourself greeted by the Error Establishing a Database Connection message, you’re not alone. It’s a common error with relatively simple fixes, so getting your site up and running again shouldn’t be too difficult.

You should follow these steps to troubleshoot a database connection error:

  1. Check your WordPress database credentials.
  2. Check your database host information.
  3. Repair your WordPress database.
  4. Check if your database server is down.

If you’d rather not have to deal with these types of problems in the future, consider upgrading to DreamPress, our managed WordPress hosting service. Then you can leave the troubleshooting to us!

The post How to Fix the Error Establishing a Database Connection in WordPress appeared first on Website Guides, Tips & Knowledge.


source https://www.dreamhost.com/blog/how-to-fix-wordpress-database-connection-error/

Tuesday, 9 February 2021

The Website Owner’s Guide to DNS Propagation

Unless you’re in the information technology field, it’s possible to go your whole life (blissfully) without hearing the words “DNS propagation”.

That is, unless you migrate your website to a new web hosting service. Only then do you learn that the lightning-fast internet you’re accustomed to has this thing called propagation, and it moves like a turtle.

The good news is that it’s really not that slow. DNS propagation isn’t instantaneous, but it has a lot of ground to cover. By understanding what’s involved in DNS and how propagation works, you’ll be able to use this knowledge to better secure your site and offer stronger performance for website visitors.

In this article, we’ll explain what DNS is, how it works, and most importantly, what it means for your website. We’ll also offer some tips to help you ensure DNS security for your site. Let’s get to it!

What Is DNS?

DNS is an acronym for Domain Name System. It’s the directory of every domain name used to access websites across the internet. DreamHost.com, YouTube.com, Wikipedia.org, and your own website’s URL are all stored in the Domain Name System.

It’s called a system because it involves a hierarchy of nameservers that work together. They ensure that when you type “dreamhost.com” in your browser, you’re served the content from our site and not from any other of the millions of websites out there.

When you type a domain name in your browser, DNS gets to work. It facilitates communication between your computer (or another connected device) and the server where the website is hosted. How does this happen? DNS matches domain names with IP addresses. Let’s take a closer look at that process.

Your Great Idea Starts with a Domain Name

Don’t let someone else register your URL. Search DreamHost’s 400+ TLDs to find the perfect fit for your website.

How DNS and IP Addresses Work Together

Each device connected to the internet has a unique Internet Protocol (IP) address, expressed as a numerical value. IP addresses help to route information requests over the internet. Queries (like typing a website’s name into a browser) are returned to the sending IP address – the device you’re using.

IP addresses are assigned by an Internet Service Provider (ISP) for each network device. IP addresses can be updated or changed too, so this makes keeping up with them an ongoing process.

For example, if you use your laptop at home, it’s assigned an IP address by your internet provider. If you take that same laptop to work and join the network there, your laptop will be assigned a different IP address by your employer’s internet provider.

Websites have IP addresses too, since they also are stored on computers connected to the internet. When you type in a domain name, it doesn’t know where the website is located. What you really need is the IP address for the site. Then you can send and receive information.

Rather than having to remember numeric strings (IPs) to designate website addresses (the servers where websites are stored), we use domain names. This makes it much easier to visit the many websites that we frequent. The process is similar to looking up a contact on your phone.

Instead of memorizing all the phone numbers listed in your contacts, you can use a series of lookups. Let’s say you wanted to find Joe’s number. To call him, you might:

  • Open your contacts.
  • Tap the letter “J” for Joe.
  • Scroll through all the “J” contacts until you find Joe.
  • Tap Joe’s name to open his contact card.
  • Tap the phone icon to call Joe.

DNS progresses through a series of lookups as well, until it finds the one unique number (IP address) for the website you’re looking for. In other words, DNS translates every domain name into its assigned IP address through a series of queries and servers.

DNS Lookup in Action

DNS lookup happens behind the scenes when you type a domain name into a web browser. The request is sent through a series of queries and servers. Namely:

  • DNS recursor (recursive resolver)
  • Root nameservers
  • Top-Level Domain (TLD) nameservers
  • Authoritative nameservers

The DNS Recursor (recursive resolver) handles the initial DNS query from the web browser. This is similar to tapping your contacts app to start your search for Joe’s phone number. You have a name, but you need a number.

For example, the nameservers for all of the domains managed by DreamHost, including ‘dreamhost.com’, are set up using the following:

  • ns1.dreamhost.com 162.159.26.24
  • ns2.dreamhost.com 162.159.27.142
  • ns3.dreamhost.com 162.159.27.84

Back to our phone example, if Joe’s name is saved in your Favorites, the search is over. You have his number in hand, and you don’t need to look it up in your contacts listing. The DNS resolver acts similarly.

Before your query is sent out to servers across the web, your DNS resolver checks for a “hosts” file on your computer, an index that isn’t often used now. Next, it will search your computer’s DNS cache to see if the IP address is stored in your browser.

When the DNS resolver exhausts its search through your computer, router cache, and internet provider’s nameservers, the query is then sent along to the appropriate root nameserver. There are 13 root zones for the global internet. Each of them has a root DNS server.

These root servers answer queries for the records contained in their zones. The root nameserver looks up the authoritative DNS server that contains the IP address for the domain name being queried. The root server knows where to send the query based on the Top Level Domain (TLD), such as .com, .org, or .net.

Authoritative nameservers index domain names based on TLDs. The root domain (the website name, plus the .com or other TLD extension) is located on the authoritative nameserver. Its corresponding IP address is returned to the sending IP address, your computer. Finally, you have Joe’s number.

What DNS Propagation Means (And How Long It Really Takes)

DNS propagation refers to the amount of time it takes for a DNS change to update across the internet. For instance, if you move your website to another host, your DNS settings will change because you’ll have a new IP address.

Your website has several different DNS records that might be updated, and you should be aware of these records and what they do:

  • A record: lists your website’s IP address
  • CNAME records: lists your subdomain or other aliases (can be used to point one domain to another)
  • MX records: specifies which mail server will handle your domain’s email
  • TXT records: attaches information to your domain, such as verification records

When a DNS change is made, propagation can take up to 72 hours. However, it usually takes less than a few hours. Some obstacles may delay complete propagation. Let’s look at a few of the most common factors involved.

  • Internet Service Providers (ISPs). Internet providers keep DNS information cached so they can provide faster page loads for their customers. Sometimes, they may ignore TTL settings and keep DNS information for several days.
  • Domain Name Registries. When you update your DNS information, the update is sent to your domain registrar. It then publishes your nameserver records to its root zone. Some domain registrars don’t publish DNS updates immediately.
  • Time to Live (TTL) settings. This setting determines how long DNS information is allowed to “live” on a computer or DNS server. A higher TTL saves lookup time by keeping the information cached. This helps deliver faster results to the user. The downside is that a higher TTL setting prevents the DNS resolver from getting the most up-to-date DNS information.

If you update your DNS records, a delay in propagation means that website visitors may be getting outdated information. You can check DNS propagation progress using an online tool, such as Google Admin Toolbox or DNS Checker.

How to Flush Your DNS Cache

Your DNS cache speeds requests by caching information locally, rather than relaying the requests through the DNS every time. When changes are made to a website’s DNS settings, your cache is not immediately updated, so your information may be outdated.

To solve this, you can flush your DNS cache by following the directions for your particular operating system below. If you’re using Chrome for browsing, check out these instructions to clear your cache.

Windows 8 & 10

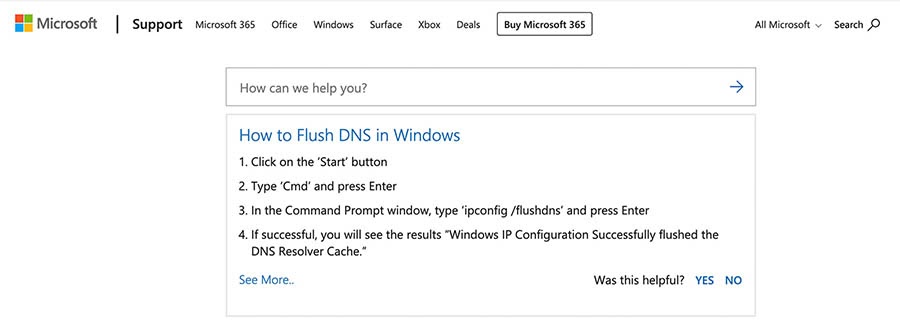
Click on Start, and when the Run box appears, type in Cmd and hit Enter. At the command prompt, enter ipconfig /flushdns as shown below.

Flushing the DNS cache in Windows.

After the command runs and returns the prompt, type Exit and press the Enter key to close the window. Instructions are also available for earlier versions of Windows.

MacOS X 12 (Sierra) and Later

First, navigate to Launchpad > Terminal, then type the following:

sudo killall -HUP mDNSResponder;sudo killall mDNSResponderHelper;sudo dscacheutil -flushcache
Flushing the DNS cache in MacOS.

That’s all you need to do!

OS X 11 (El Capitan)

You can start by going to Launchpad > Terminal. Then enter:

macbook$ sudo killall -HUP mDNSResponder

Alternately, you can find directions online for older versions of MacOS.

Linux

Linux currently doesn’t cache the same way as Windows and MacOS, so you’ll need to find out how your particular machine should be flushed.

What to Know About DNS Security

The Domain Name System is constantly assaulted by Distributed Denial of Service (DDoS) attacks. These target DNS servers and try to disrupt the system so that domain requests are denied.

There are several steps you can take to minimize your risk from these DDoS attacks. First, use a secure web host. This is your first line of defense, and your website host should proactively ensure tightened security.

Multi-Factor Authentication (MFA) significantly reduces the risk of unauthorized access to your site’s files by adding an extra layer of security. The first layer is using your secure username and password to log in. The second layer is provided by an authentication application, such as Google Authenticator. Many users also use YubiKey, a hardware authentication device.

You can also use a third-party security service like Cloudflare, a Content Delivery Network (CDN) that helps protect against malicious traffic and attacks. Cloudflare also speeds up your website. You can enable it through your DreamHost panel by going to Manage Domains.

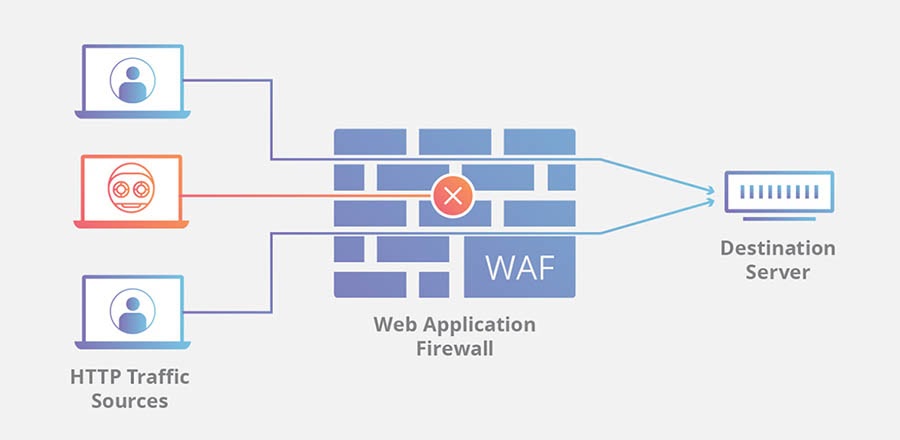
A web application firewall.

Finally, a Web Application Firewall (WAF) like Cloudflare’s can add additional security by monitoring website traffic between applications and the internet.

Next-Generation DNS

DNS security is a growing concern, as DDoS attacks are on the rise. Many businesses use free DNS services for their websites. Not all of these free services have the resources to enhance security. Alternatively, premium services can offer:

  • Better security measures, pointing your domain to more secure nameservers
  • DNS failover, to keep your site accessible in case of a system disruption
  • Better performance due to faster resolution times

The Domain Name System is key to keeping internet traffic safe, secure, and accurate. As hackers and other bad actors continue their assaults against DNS, businesses and individual website owners may consider how they can help ensure security and stability for their sites.

Next-generation domain services play an essential role in developing products and services to ensure DNS security and keep the internet safe and accessible.

Stay in the Know

Join our monthly newsletter for tips and tricks to build your dream website!

Domain Registration, Demystified

DNS propagation ensures up-to-date information throughout the internet so that when someone sits down at a computer and types in your domain name, they’re routed to your website. All of this happens behind the scenes through the Domain Name System’s queries and servers.

You can ensure that your DNS is accurate and up to date by managing your domain names with DreamHost’s domain services. Find your new domain name and get competitive pricing on registrations. Plus, you can stay secure with free Domain Privacy Protection and optional domain locking.

If you registered your domain name somewhere else, we’ve got you covered too. You can transfer your domains to us and manage them all in one place, right from your DreamHost panel!

The post The Website Owner’s Guide to DNS Propagation appeared first on Website Guides, Tips & Knowledge.


source https://www.dreamhost.com/blog/dns-propagation-guide/

Thursday, 4 February 2021

How to Fix the WordPress Not Sending Email Issue

Dealing with email issues can be a frustrating experience. Whether you’re not receiving important WordPress notifications or your contact form seems to be acting up, these problems can disrupt your day-to-day business.

Fortunately, there are multiple troubleshooting methods and tools you can use to fix your email issues. Most aren’t overly complicated, and you’ll still be able to decide what email addresses you’ll use to send and receive messages from WordPress.

In this article, we’ll explain some likely reasons WordPress isn’t sending emails. Then we’ll show you how to fix this issue and configure your contact forms so that they properly deliver emails as well. Let’s go!

Need to Fix WordPress Issues? We've Got You

Avoid troubleshooting when you partner with DreamHost. Our friendly WordPress experts are available 24/7 to help solve website problems — big or small.

Why You’re Not Receiving Emails From WordPress

By default, WordPress uses the PHP mail() function to send emails. Unfortunately, many hosting servers are not configured to use this function, making it impossible to process those emails.

Another reason emails from your site may not get delivered is unintended side effects from efforts to reduce spam. Most email providers attempt to verify that an email is coming from the address it claims.

However, the address used to send email from your website likely uses spoofing. Without spoofing, an email sent from your website might look like “admin@yourserver.yourwebhost.com”. Spoofing enables you to change that address to a more reasonable one, such as ‘“admin@yourwebsite.com”.

Unfortunately, spoofing can also serve nefarious purposes, and email providers can’t tell the difference. Therefore, it can sometimes cause your emails to end up in recipients’ spam folders.

How to Stop Email From Going to Spam

In addition to spoofing, there are a lot of other reasons why emails might go to spam. Some of the most common possibilities are:

  • Your IP address is flagged as having been used for spam
  • You’re using trigger words in your email newsletters
  • You’re employing poor emailing practices

One way to keep your emails out of the spam bin is to use Simple Mail Transfer Protocol (SMTP) rather than PHP mail(). This protocol is the industry standard and uses proper authentication.

Put simply, emails sent via SMTP have a higher chance of being delivered than those sent using other protocols. You can use a few different methods to set up your WordPress site to send emails via SMTP.

How to Set Up WordPress to Send Emails Via SMTP (2 Ways)

Now that we’ve touched on a few reasons WordPress emails aren’t making it to their intended recipients, let’s look at two ways to fix the problem.

1. Send Email Using Your Hosting Account Address

Using your hosting account email is the simplest way to get your WordPress messages moving as expected. We’ll show you how to set this up, using our own DreamHost web hosting as an example.

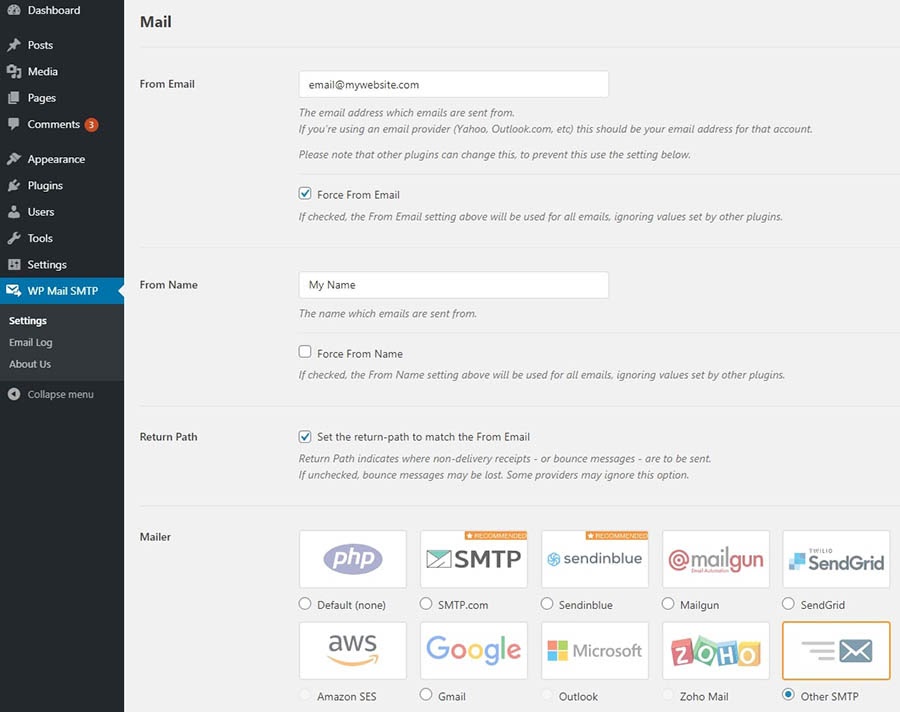
Begin by downloading and installing the WP Mail SMTP plugin. From your WordPress dashboard, navigate to WP Mail SMTP > Settings.

The settings screen of WP Mail SMTP.

There are several fields you’ll need to fill in on this screen. From Email is the address from which you want your emails sent. You’ll also need to check the Force From Email box. The From Name field is the name you’d like the email to come from. You can check the Force From Name box if you’d like.

Finally, select Other SMTP as your mailer. Doing this will cause a Return Path section to appear. Be sure to click on the box in that section as well.

Now you can populate the other SMTP options. We’ll use DreamHost to demonstrate again, but the information should be similar if you use another web host.

WP Mail SMTP settings for other SMTP mailers.

First, make sure to toggle on Authentication. For the SMTP Host, use “smtp.dreamhost.com”. When you select TLS encryption, the plugin should auto-populate the SMTP port as “587”.

Next, you can enter your DreamHost email address and password. Finally, click on the Save Settings button, and you should be ready to go. You can try sending a test email to be sure that everything is working properly.

2. Send Email Using Your Gmail Account

If you prefer, you can use your Gmail address to send mail. Note that while this method also uses the WP Mail SMTP plugin, it’s significantly more complicated. Also, you’ll have to perform these steps again if you ever change your Gmail address.

First, set up a Gmail account to use, if you don’t already have one. Next, download and install the WP Mail SMTP plugin, and navigate to WP Mail SMTP > Settings. You can fill out the fields as described above.

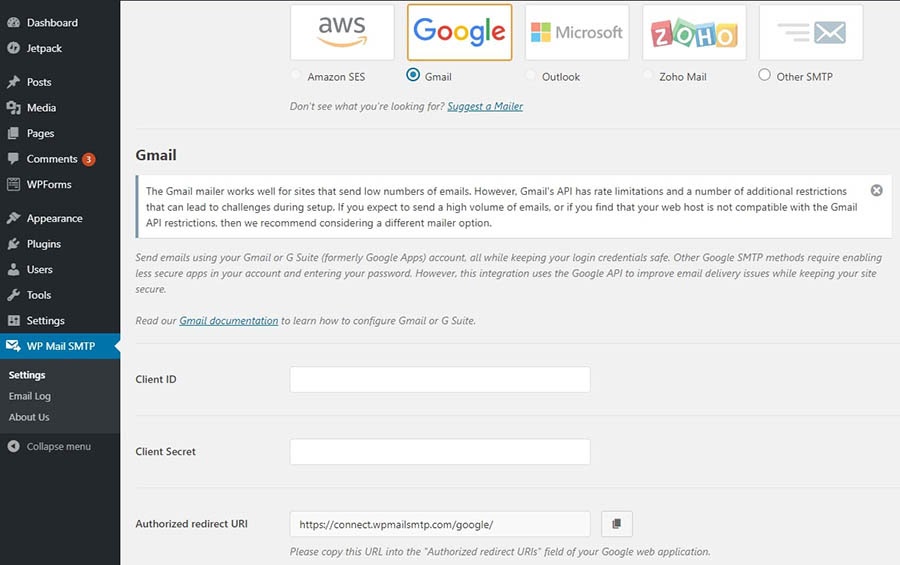
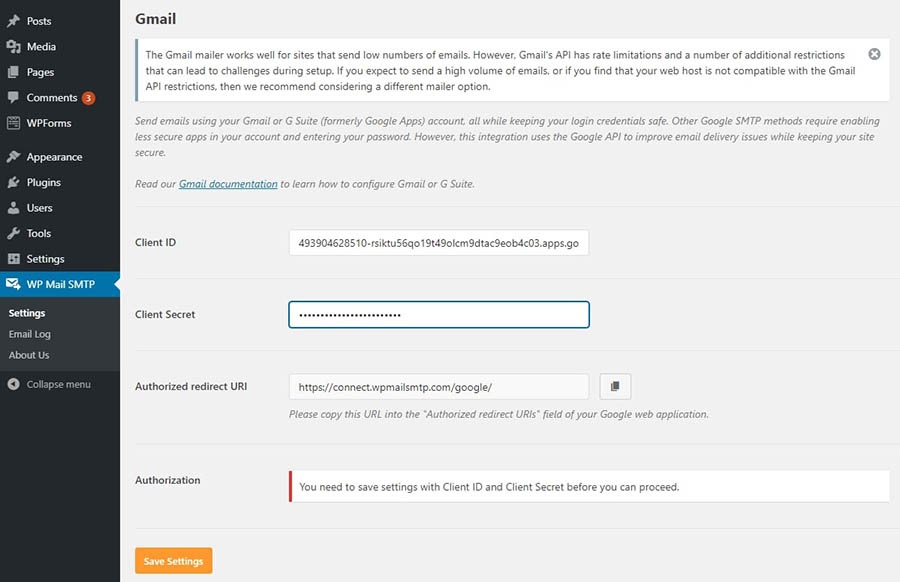
However, when it’s time to select your mailer, choose Gmail.

WP Mail SMTP settings for the Gmail mailer.

Please keep this tab handy, as we’ll need to return to it later. For now, you can create a set of secure credentials that will provide your WordPress installation with the required authorization to use Gmail’s servers.

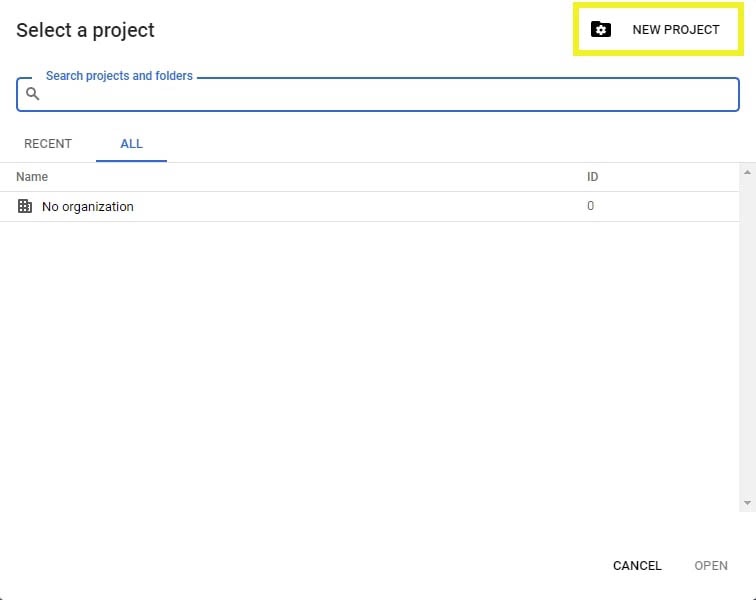
To configure these credentials, head to the Google Developers Console and log in. Create a new project by clicking on Select a project at the top of the screen, followed by New Project in the pop-up that appears.

Creating a new project in Google Developers Console.

Give your project whatever name you’d like, and then click on the Create button. Once you do, you’ll be brought to the API Library. Find and click on the Gmail API in the G Suite section.

Google’s API Library.

Select the Enable button. On the next screen, click on Create credentials to open the credentials wizard.

Opening the Gmail API credentials wizard.

Next, select the Client ID link. You’ll see a pop-up asking you to set up a consent screen. Click on the Set Up Consent Screen button to proceed.

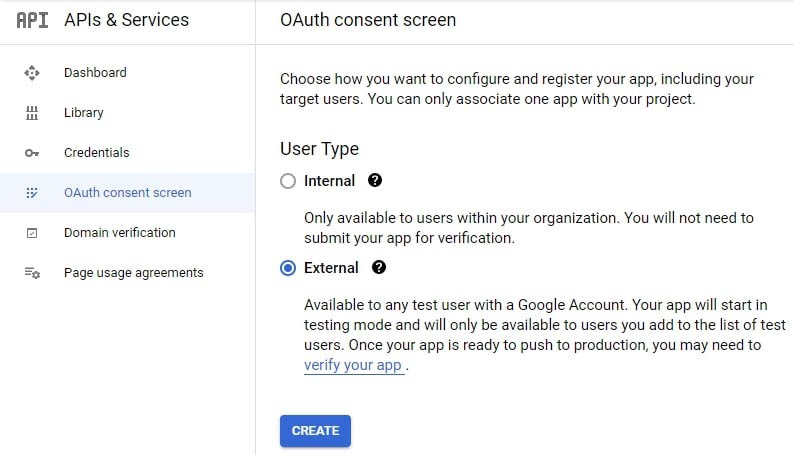
Here, you’ll select whether the application type is internal or external. If you’re not using a G Suite account, you’ll only be able to choose “external.”

Setting up an OAuth consent screen.

You can provide an application name and a contact email address. After you do, scroll down to the Authorized domains section, click on Add domain, and enter your website’s URL.

Adding an authorized domain.

Finally, enter your email address again under Developer contact information. Click on the Save and Continue button. You can also hit Save and Continue to advance through the next two screens. Since you’re the only one who will ever see this page, you don’t need to worry about populating that information.

When you reach the end of this series of prompts, click on the Back to Dashboard button. Select the Credentials tab on the left, followed by Create Credentials > OAuth Client ID from the drop-down menu.

Creating an OAuth client ID.

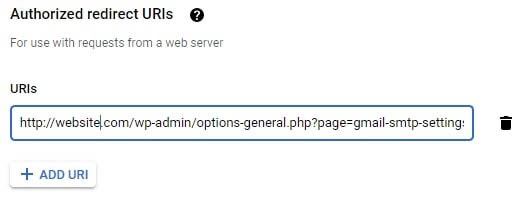
On the next page, select Web Application from the Application type drop-down menu. You’ll need to return to the WP Mail SMTP settings screen. Copy the Authorized Redirect URL, and paste it into the Authorized Redirect URL field on the Client ID for Web Application page.

Adding an authorized redirect URL.

When you’re done, click on the Create button. You’ll see a pop-up containing the Client ID and Client Secret. Paste these OAuth credentials into the appropriate fields in the WP Mail SMTP options.

Adding the client ID and client secret to WP Mail SMTP.

Once you click on the Save Settings button, the page will refresh. Scroll back down to the bottom and click on Allow plugin to send emails using your Gmail account.

The grant permission button.

Enter your Gmail credentials to finalize the connection. Your SMTP status should now be connected, and you can send a test email to make sure everything is working correctly.

How to Configure Your Contact Forms to Send Email Successfully

If your server is now sending emails correctly, but you are still having problems with your contact forms, the issue could be with a setting in the WordPress form plugin you use. Below, we’ll show you how to troubleshoot some of the most popular tools.

Contact Form 7

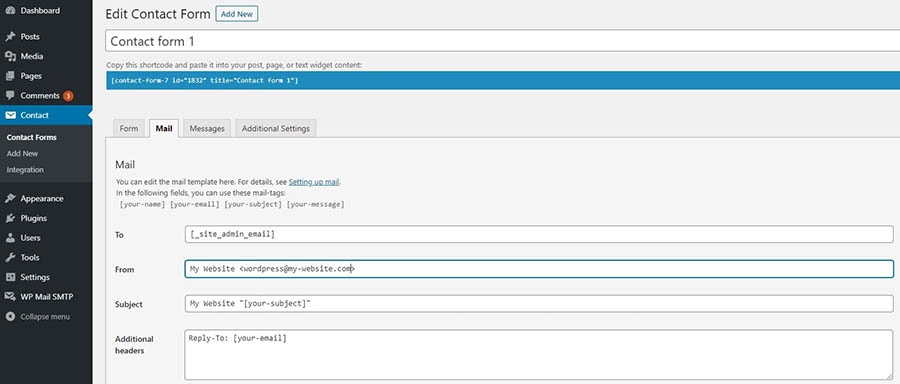
If Contact Form 7 isn’t working for you, you likely need to change the address from which emails are sent. Starting from the admin dashboard, navigate to Contact > Contact Forms. Next, click on the contact form you’d like to edit and select the Mail tab.

The Contact Form 7 settings page.

Ensure that the From field is using your website’s admin email address. Also, verify that the emails in the To and From fields are different. Once you’ve made the necessary changes, click on the Save button.

WPForms Lite

You can change the settings in WPForms Lite by navigating to WP Forms > All Forms. To open the editor, click on Edit under the form you want to change. Next, select Settings in the left-hand menu, followed by Notifications.

The WPForms settings page.

Here, you’ll be able to update the Send To Email Address and From Email fields. Click on the Save button when you’ve made your desired changes.

Jetpack

You’re less likely to run into problems using Jetpack’s contact form, as this plugin doesn’t give you as many configuration options. If there is an issue, it probably stems from having the same email address set as both To and From.

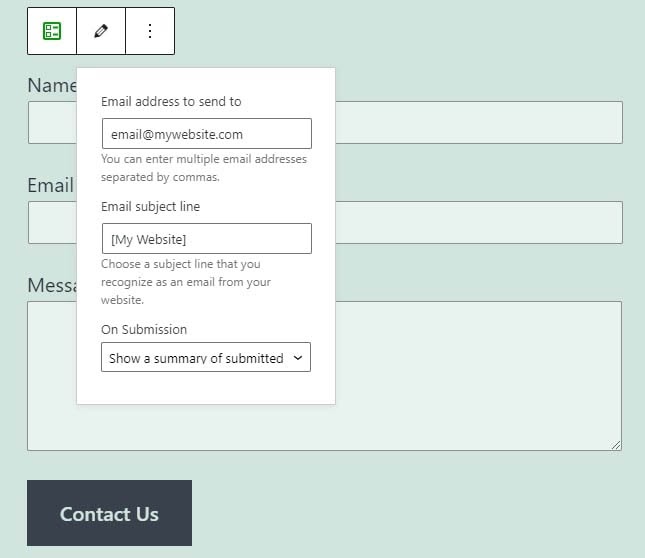
You can correct this by making one simple change. After you’ve added the form using the block, click on the pencil icon to edit the form options.

Settings for the Jetpack Form Block.

You can change the email address your form responses send to on this screen. Note that you won’t be able to change the address that forms are sent from, as Jetpack uses your website’s admin email for this.

Take Your WordPress Site to the Next Level

Whether you need help with plugin settings, transactional emails, or smtp authentication, we can help! Subscribe to our monthly digest so you never miss an article.

Ready to Fix the WordPress Not Sending Email Issue?

There are few things as irritating as having to dig through your spam folder to look for a missing email. However, once you’ve fixed this common WordPress issue, your website’s emails should safely find their way to their intended destinations.

In this piece, we showed you how to leverage the WP Mail SMTP plugin, and use either your hosting or Gmail account to send emails. Once you’ve handled that task, you can move on to configuring the options in your contact form plugin, to ensure that those emails properly send as well.

If you’d like to make your experience with WordPress emails easier, you might want to consider checking out DreamPress, our managed hosting plan. You’ll have access to our premium support 24/7 to help you with any problems you may run into on your site!

The post How to Fix the WordPress Not Sending Email Issue appeared first on Website Guides, Tips & Knowledge.


source https://www.dreamhost.com/blog/how-to-fix-wordpress-not-sending-email/

Tuesday, 2 February 2021

9 Black Innovators Who Made a Huge Impact in Tech

We regularly hear about gender gaps in business and the tech industry, in particular.

And we should.

Although progress has been made, we’ve got a long way to go. According to data from 2017, approximately 24% of technology positions were occupied by women. That equates to the industry being male-dominated at a ratio of 3-to-1.

But something that tends to get less attention is the tech industry’s racial inequality. Many companies claim to be inclusive.

But the numbers often tell a different story.

As reported in The Guardian, in 2017, just 2% of Google’s workforce were African American. In the same year, African Americans made up just 7.4% of what can be described as part of “high-tech employment” across the nation (with much of that employment being confined to Washington DC). This is just half of African Americans’ overall representation in the U.S. workforce, which, in 2017, sat at 14.4%.

Sadly more recent stats signal that little, if any, improvement has been made since.

A 2020 report in Techonomy stated that between 16–19% of computer science degree graduates are Black or Hispanic. Despite this, they make up just 3% of the tech industry.

Many studies have looked into this discrepancy within industries and their biases. The prejudices and barriers are plentiful and certainly something our industries need to work harder to root out.

So to celebrate Black History Month, we’re shining a spotlight on just a few of the incredible Black inventors, Black entrepreneurs, and Black founders who’ve transformed the tech industry.

Alan Emtage

We have a lot to thank Alan Emtage for. His talent and work played a significant role in transforming our everyday lives and, more specifically, how we find and consume information.

That’s because Emtage invented the search engine.

Without him, we may not have had Google or any other programs people use to search the web.

So what’s his story?

As a graduate student and systems administrator at McGill University in Montreal, Canada, Emtage created and implemented the Archie search engine — a program that automated the (previously) time-consuming process of finding specific pieces of software. In other words, the world’s first search engine.

Unfortunately for Emtage, he failed to patent his invention (though how was he to know a system for streamlining locating University software would pave the way for one of the world’s most profitable companies?).

He’s since made many other valuable contributions to the tech industry and today works as the chief technical officer at Mediapolis, an NYC-based tech company.

Image Credit

Kimberly Bryant

Born in Memphis, Tennessee, Kimberly Bryant is an electrical engineer whose early career included work with biotechnology company Genentech, and Pfizer, a company you may not have known about until recently. You likely regularly hear about Pfizer now because it is behind the development of one of the few widely-approved COVID-19 vaccines.

But none of that is what really put Bryant on the map.

What we really should be talking about is this: One summer, Bryant’s daughter (a keen gamer) attended a computing camp. It turned out to be a memorable couple of months — but for all the wrong reasons.

The boys at the camp were given far more attention from counselors than the (minority of) girls.

This, understandably, struck a chord with Bryant. As a result, she founded Black Girls Code, a charity aimed specifically at empowering young girls of color and providing them with the exposure, skills, and confidence to enter historically white, male-dominated STEM fields.

Within just two years, from its conception in 2011 to 2013, the not-for-profit organization had grown to comprise seven institutions in the US, and a further institution in Johannesburg, South Africa. At the time, it had around 2,000 students.

Today, BGC aims “to grow to train 1 million girls by 2050 and become the ‘girl scouts’ of technology.”

Image Credit

Katherine Johnson

As well as her incredible mind, one of the reasons why the late Katherine Johnson (she sadly died in February 2020) was so significant was the time-period in which she made her mark.

In 1962, when women in the workplace were still largely outliers — let alone women of color — Johnson played a pivotal, if not leading, role in the safety of astronaut John Glenn and NASA’s mission to orbit the globe.

In a manner that we assume was a subtle dig at her colleagues — rather than a sexist remark about Johnson — Glenn, distrusting of the systems designed to guide his mission, asked his engineers to “get the girl.” He stated that if she said the equations were good, then “they’re good.”

Of course, they were good, and Glenn safely orbited the earth.

Image Credit

Felecia Hatcher

As a current business and tech influencer, Felicia Hatcher sticks out thanks to her commitment to showing young people that you don’t have to be a straight-A student with a wealthy family to make it big.

You can come from a poor background. You can have been born to parents that didn’t care whether you survived or thrived. And those average or even poor grades? They don’t have to be a barrier to becoming a success later in life.

As well as being an award-winning tech author, speaker, and entrepreneur, Hatcher places extra emphasis on encouraging diversity and inclusivity throughout companies and, by extension, communities.

Image Credit

Clarence Ellis

From humble beginnings, Clarence Ellis’ first introduction to computer technology (as reported, at least) occurred when he took a job as a graveyard shift computer operator at the age of 15. He needed money to help his family, and the only reason he got the job was because he was the sole applicant. He was also banned from touching any of the equipment.

This didn’t stop him from finding a way to capitalize on the role, however.

He used his spare time to repeatedly read the manuals for the computer he was prohibited from touching, and soon after, when an emergency occurred, it was Ellis that came to the rescue.

Needless to say, this kickstarted his career in computing.

In 1969, Clarence Ellis (also known as Clarence “Skip” Ellis) became the first Black male to earn a Ph.D. in computer science.

Other notable moments in his career include his role as director of the Collaboration Technology Research Group and pioneering Operational Transformation, a “set of techniques that enables real-time collaborative editing of documents.” Or in other words, the technology that paved the way for the development of Google Docs (yes, there might be a trend here!).

Image Credit

Marie Van Brittan Brown

Originally a nurse, Brown went on (in collaboration with her husband) to invent another piece of technology many of us deem essential today: the home security system.

As a nurse, Brown worked irregular hours. She was also living in Queens, New York, which at the time (the 1960s) suffered from an incredibly high crime rate. If that wasn’t enough, the NYPD was notoriously slow at responding to reports of crime.

So Brown took matters into her own hands.

The first step to safety was knowing who was on the other side of the door. So she began by creating peepholes — three holes, at three heights, so her children could use them too.

Next, she set up an adjustable camera that could be used to view the other side of the door, through the peepholes. This was hooked up to every television in the home via a radio-controlled wireless system.

Then, she and her husband created a microphone system that would enable them to communicate with whoever was on the other side of the door.

Lastly, knowing the typical delay in the emergency services’ response times, she designed a system that would alert them of an intrusion via the touch of a button.

This incredible innovator, and her other half, are who you have to thank for the home security systems you benefit from today.

Image Credit

DreamHost Takes Inclusivity Seriously

We regularly report on diversity, accessibility, and representation in the tech industry. Subscribe to our monthly newsletter so you never miss an article.

Angela Benton

Angela Benton has had many accolades bestowed on her in recent years, including (but not limited to) Fast Company’s Most Influential Women in Technology and a spot in Business Insiders’ 25 Most Influential African-Americans in Technology.

So how did she become so well-known within the tech world?

Benton has two major accomplishments under her belt that highlight why she’s so well respected for enabling diversity in tech: Black Web 2.0 and NewMe accelerator. But it’s the first for which she gained most of her notoriety.

Black Web 2.0 was a website launched in 2007 that quickly gained popularity within the Black tech community. It served as a place for marginalized Black professionals to gain a voice in the tech sector.

While serving as the site’s editor and main contributor, Benton forged the path to discuss key topics such as the intersection of Technology and Black culture. Arguably it was the first time there had been a platform that discussed these issues so publicly.

Image Credit

Frank Greene

Frank Greene was an American scientist and venture capitalist born in Washington, D.C. in 1938.

Like Benton, Greene was celebrated for boosting the representation of African-Americans within the technology sector.

He was behind two giants of the American technology sector: the Technology Development Corporation (most famous for working on the space shuttle program) and ZeroOne Systems (a supercomputing systems house).

But neither of these are his most noteworthy accomplishments. That designation would go to Greene’s scholarship program.

Launched in honor of his wife, Phyllis, who was a longtime supporter of the National Association for the Advancement of Colored People (NAACP), the Dr. Frank S. Greene Scholars Program helps youth of African ancestry in the San Francisco Bay Area successfully complete higher education in STEM fields and serve as positive role models in their communities.

Frank Greene also was the founder of New Vista Capital, a venture capital firm that aimed to help under-represented groups and communities gather funding for startups and emerging businesses.

His relentless commitment to this cause resulted in his induction into the Silicon Valley Engineering Hall of Fame. Greene’s name is recognized as one of the Most Important African-Americans In Technology by Palo Alto City Hall.

Image Credit

Herman Chinery-Hesse

Herman Kojo Chinery-Hesse was born in Dublin, Ireland, in 1963. Today he is known as the Bill Gates of Africa.

But how did the non-official title come to pass?

In 1991, Chinery-Hesse set up one of the most recognizable leading software houses in Africa, SOFTtribe Ltd. In the years since, they’ve been the brains behind many important products, bringing them directly to the African market.

Some of their groundbreaking products include:

  • Point of sale systems
  • EPS — or electronic payment systems
  • Billing systems
  • Government payroll systems

It’s these technological advancements that resulted in Chinery-Hesse being named one of the 100 most influential Africans of our time, while his work on SOFTtech won him the Ghana Millenium Excellence Award for IT.

These numerous accolades helped him gain the enviable title of Commonwealth Chair for Business and Technology Initiatives for Africa in 2019.

Image Credit

Celebrating Black Innovation

Of course, this is only a small selection of Black innovators who have made a significant contribution to the tech industry.

Not only have these tech superstars changed the way we use technology today, but they’ve helped increase diversity and inclusivity within the tech industry, paving the way for the next generation of Black innovators.

The post 9 Black Innovators Who Made a Huge Impact in Tech appeared first on Website Guides, Tips & Knowledge.


source https://www.dreamhost.com/blog/black-innovators-in-tech/

Creating and Mastering GA4 Explorations

In the switch from Universal Analytics (UA) to Google Analytics 4 (GA4) — which will go fully into effect July 2023 — a lot of things have...