Unless you’re in the information technology field, it’s possible to go your whole life (blissfully) without hearing the words “DNS propagation”.
That is, unless you migrate your website to a new web hosting service. Only then do you learn that the lightning-fast internet you’re accustomed to has this thing called propagation, and it moves like a turtle.
The good news is that it’s really not that slow. DNS propagation isn’t instantaneous, but it has a lot of ground to cover. By understanding what’s involved in DNS and how propagation works, you’ll be able to use this knowledge to better secure your site and offer stronger performance for website visitors.
In this article, we’ll explain what DNS is, how it works, and most importantly, what it means for your website. We’ll also offer some tips to help you ensure DNS security for your site. Let’s get to it!
What Is DNS?
DNS is an acronym for Domain Name System. It’s the directory of every domain name used to access websites across the internet. DreamHost.com, YouTube.com, Wikipedia.org, and your own website’s URL are all stored in the Domain Name System.
It’s called a system because it involves a hierarchy of nameservers that work together. They ensure that when you type “dreamhost.com” in your browser, you’re served the content from our site and not from any other of the millions of websites out there.
When you type a domain name in your browser, DNS gets to work. It facilitates communication between your computer (or another connected device) and the server where the website is hosted. How does this happen? DNS matches domain names with IP addresses. Let’s take a closer look at that process.
Your Great Idea Starts with a Domain Name
Don’t let someone else register your URL. Search DreamHost’s 400+ TLDs to find the perfect fit for your website.

How DNS and IP Addresses Work Together
Each device connected to the internet has a unique Internet Protocol (IP) address, expressed as a numerical value. IP addresses help to route information requests over the internet. Queries (like typing a website’s name into a browser) are returned to the sending IP address – the device you’re using.
IP addresses are assigned by an Internet Service Provider (ISP) for each network device. IP addresses can be updated or changed too, so this makes keeping up with them an ongoing process.
For example, if you use your laptop at home, it’s assigned an IP address by your internet provider. If you take that same laptop to work and join the network there, your laptop will be assigned a different IP address by your employer’s internet provider.
Websites have IP addresses too, since they also are stored on computers connected to the internet. When you type in a domain name, it doesn’t know where the website is located. What you really need is the IP address for the site. Then you can send and receive information.
Rather than having to remember numeric strings (IPs) to designate website addresses (the servers where websites are stored), we use domain names. This makes it much easier to visit the many websites that we frequent. The process is similar to looking up a contact on your phone.
Instead of memorizing all the phone numbers listed in your contacts, you can use a series of lookups. Let’s say you wanted to find Joe’s number. To call him, you might:
- Open your contacts.
- Tap the letter “J” for Joe.
- Scroll through all the “J” contacts until you find Joe.
- Tap Joe’s name to open his contact card.
- Tap the phone icon to call Joe.
DNS progresses through a series of lookups as well, until it finds the one unique number (IP address) for the website you’re looking for. In other words, DNS translates every domain name into its assigned IP address through a series of queries and servers.
Related: A Beginner’s Guide to Domain Name Registration
DNS Lookup in Action
DNS lookup happens behind the scenes when you type a domain name into a web browser. The request is sent through a series of queries and servers. Namely:
- DNS recursor (recursive resolver)
- Root nameservers
- Top-Level Domain (TLD) nameservers
- Authoritative nameservers
The DNS Recursor (recursive resolver) handles the initial DNS query from the web browser. This is similar to tapping your contacts app to start your search for Joe’s phone number. You have a name, but you need a number.
For example, the nameservers for all of the domains managed by DreamHost, including ‘dreamhost.com’, are set up using the following:
- ns1.dreamhost.com 162.159.26.24
- ns2.dreamhost.com 162.159.27.142
- ns3.dreamhost.com 162.159.27.84
Back to our phone example, if Joe’s name is saved in your Favorites, the search is over. You have his number in hand, and you don’t need to look it up in your contacts listing. The DNS resolver acts similarly.
Before your query is sent out to servers across the web, your DNS resolver checks for a “hosts” file on your computer, an index that isn’t often used now. Next, it will search your computer’s DNS cache to see if the IP address is stored in your browser.
When the DNS resolver exhausts its search through your computer, router cache, and internet provider’s nameservers, the query is then sent along to the appropriate root nameserver. There are 13 root zones for the global internet. Each of them has a root DNS server.
These root servers answer queries for the records contained in their zones. The root nameserver looks up the authoritative DNS server that contains the IP address for the domain name being queried. The root server knows where to send the query based on the Top Level Domain (TLD), such as .com, .org, or .net.
Authoritative nameservers index domain names based on TLDs. The root domain (the website name, plus the .com or other TLD extension) is located on the authoritative nameserver. Its corresponding IP address is returned to the sending IP address, your computer. Finally, you have Joe’s number.
Related: Didn’t Buy Your Domain With DreamHost? It’s Easy to Transfer Your Registration
What DNS Propagation Means (And How Long It Really Takes)
DNS propagation refers to the amount of time it takes for a DNS change to update across the internet. For instance, if you move your website to another host, your DNS settings will change because you’ll have a new IP address.
Your website has several different DNS records that might be updated, and you should be aware of these records and what they do:
- A record: lists your website’s IP address
- CNAME records: lists your subdomain or other aliases (can be used to point one domain to another)
- MX records: specifies which mail server will handle your domain’s email
- TXT records: attaches information to your domain, such as verification records
When a DNS change is made, propagation can take up to 72 hours. However, it usually takes less than a few hours. Some obstacles may delay complete propagation. Let’s look at a few of the most common factors involved.
- Internet Service Providers (ISPs). Internet providers keep DNS information cached so they can provide faster page loads for their customers. Sometimes, they may ignore TTL settings and keep DNS information for several days.
- Domain Name Registries. When you update your DNS information, the update is sent to your domain registrar. It then publishes your nameserver records to its root zone. Some domain registrars don’t publish DNS updates immediately.
- Time to Live (TTL) settings. This setting determines how long DNS information is allowed to “live” on a computer or DNS server. A higher TTL saves lookup time by keeping the information cached. This helps deliver faster results to the user. The downside is that a higher TTL setting prevents the DNS resolver from getting the most up-to-date DNS information.
If you update your DNS records, a delay in propagation means that website visitors may be getting outdated information. You can check DNS propagation progress using an online tool, such as Google Admin Toolbox or DNS Checker.
How to Flush Your DNS Cache
Your DNS cache speeds requests by caching information locally, rather than relaying the requests through the DNS every time. When changes are made to a website’s DNS settings, your cache is not immediately updated, so your information may be outdated.
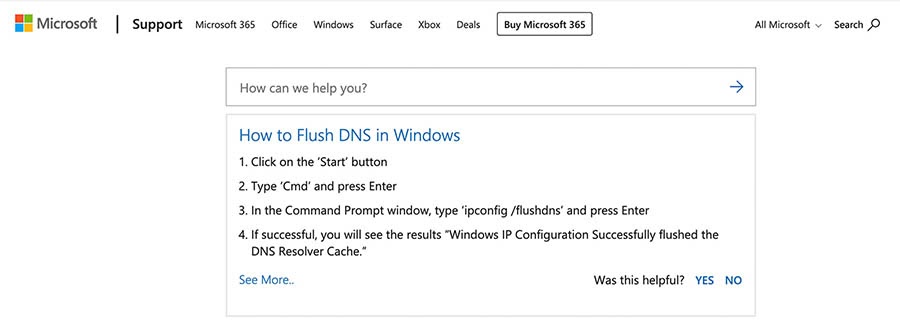
To solve this, you can flush your DNS cache by following the directions for your particular operating system below. If you’re using Chrome for browsing, check out these instructions to clear your cache.
Windows 8 & 10
Click on Start, and when the Run box appears, type in Cmd and hit Enter. At the command prompt, enter ipconfig /flushdns as shown below.

After the command runs and returns the prompt, type Exit and press the Enter key to close the window. Instructions are also available for earlier versions of Windows.
MacOS X 12 (Sierra) and Later
First, navigate to Launchpad > Terminal, then type the following:
sudo killall -HUP mDNSResponder;sudo killall mDNSResponderHelper;sudo dscacheutil -flushcache

That’s all you need to do!
OS X 11 (El Capitan)
You can start by going to Launchpad > Terminal. Then enter:
macbook$ sudo killall -HUP mDNSResponder
Alternately, you can find directions online for older versions of MacOS.
Linux
Linux currently doesn’t cache the same way as Windows and MacOS, so you’ll need to find out how your particular machine should be flushed.
Related: The Complete Guide to New Top-Level Domains (TLDs)
What to Know About DNS Security
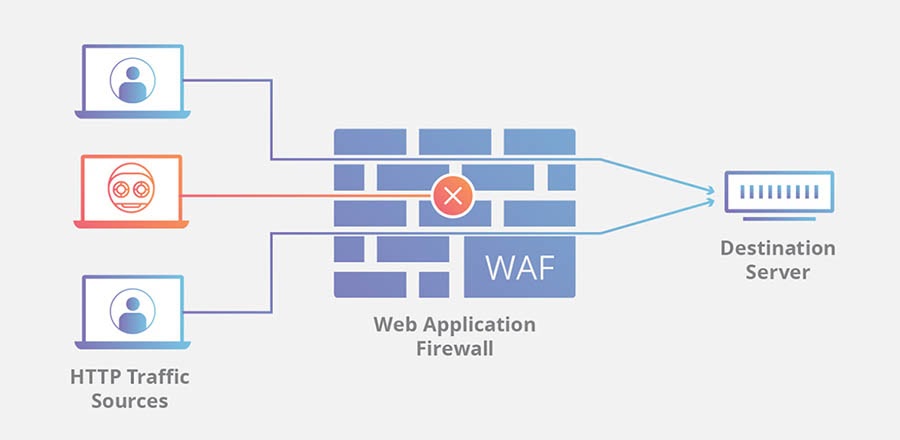
The Domain Name System is constantly assaulted by Distributed Denial of Service (DDoS) attacks. These target DNS servers and try to disrupt the system so that domain requests are denied.
There are several steps you can take to minimize your risk from these DDoS attacks. First, use a secure web host. This is your first line of defense, and your website host should proactively ensure tightened security.
Multi-Factor Authentication (MFA) significantly reduces the risk of unauthorized access to your site’s files by adding an extra layer of security. The first layer is using your secure username and password to log in. The second layer is provided by an authentication application, such as Google Authenticator. Many users also use YubiKey, a hardware authentication device.
You can also use a third-party security service like Cloudflare, a Content Delivery Network (CDN) that helps protect against malicious traffic and attacks. Cloudflare also speeds up your website. You can enable it through your DreamHost panel by going to Manage Domains.

Finally, a Web Application Firewall (WAF) like Cloudflare’s can add additional security by monitoring website traffic between applications and the internet.
Next-Generation DNS
DNS security is a growing concern, as DDoS attacks are on the rise. Many businesses use free DNS services for their websites. Not all of these free services have the resources to enhance security. Alternatively, premium services can offer:
- Better security measures, pointing your domain to more secure nameservers
- DNS failover, to keep your site accessible in case of a system disruption
- Better performance due to faster resolution times
The Domain Name System is key to keeping internet traffic safe, secure, and accurate. As hackers and other bad actors continue their assaults against DNS, businesses and individual website owners may consider how they can help ensure security and stability for their sites.
Next-generation domain services play an essential role in developing products and services to ensure DNS security and keep the internet safe and accessible.
Stay in the Know
Join our monthly newsletter for tips and tricks to build your dream website!

Domain Registration, Demystified
DNS propagation ensures up-to-date information throughout the internet so that when someone sits down at a computer and types in your domain name, they’re routed to your website. All of this happens behind the scenes through the Domain Name System’s queries and servers.
You can ensure that your DNS is accurate and up to date by managing your domain names with DreamHost’s domain services. Find your new domain name and get competitive pricing on registrations. Plus, you can stay secure with free Domain Privacy Protection and optional domain locking.
If you registered your domain name somewhere else, we’ve got you covered too. You can transfer your domains to us and manage them all in one place, right from your DreamHost panel!
The post The Website Owner’s Guide to DNS Propagation appeared first on Website Guides, Tips & Knowledge.
source https://www.dreamhost.com/blog/dns-propagation-guide/

No comments:
Post a Comment