Thursday 22 December 2022

Shared vs VPS Hosting: A Comprehensive Guide

Whether you’re redesigning your site or putting it together for the first time, you’ll want to find the hosting plan with the greatest potential to make your page successful. One of the decisions you’ll have to make is choosing between shared and virtual private server (VPS) hosting.

Neither one is inherently better than the other — it all depends on your website’s unique requirements. You may need super-tight security, lightning-fast speed, a low price point, or scalable resources. By carefully considering the pros and cons of each option, however, you can have your cake and eat it too.

In this post, we’ll explain what VPS and shared hosting are and the main differences between them. Then, we’ll show you how to make the right choice for your website. Let’s get started!

What Is Shared Hosting?

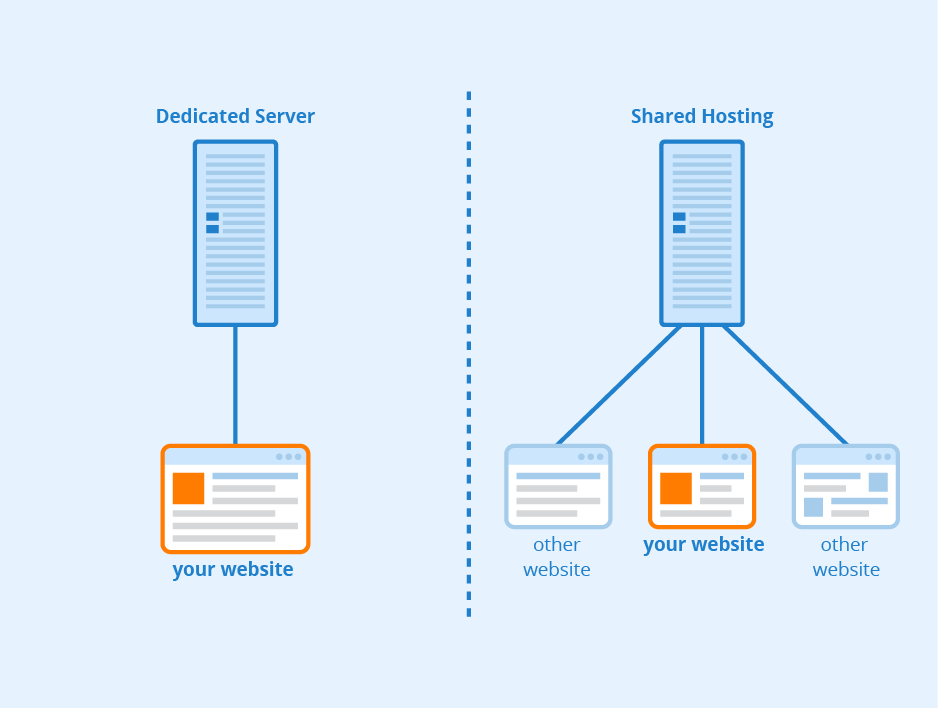
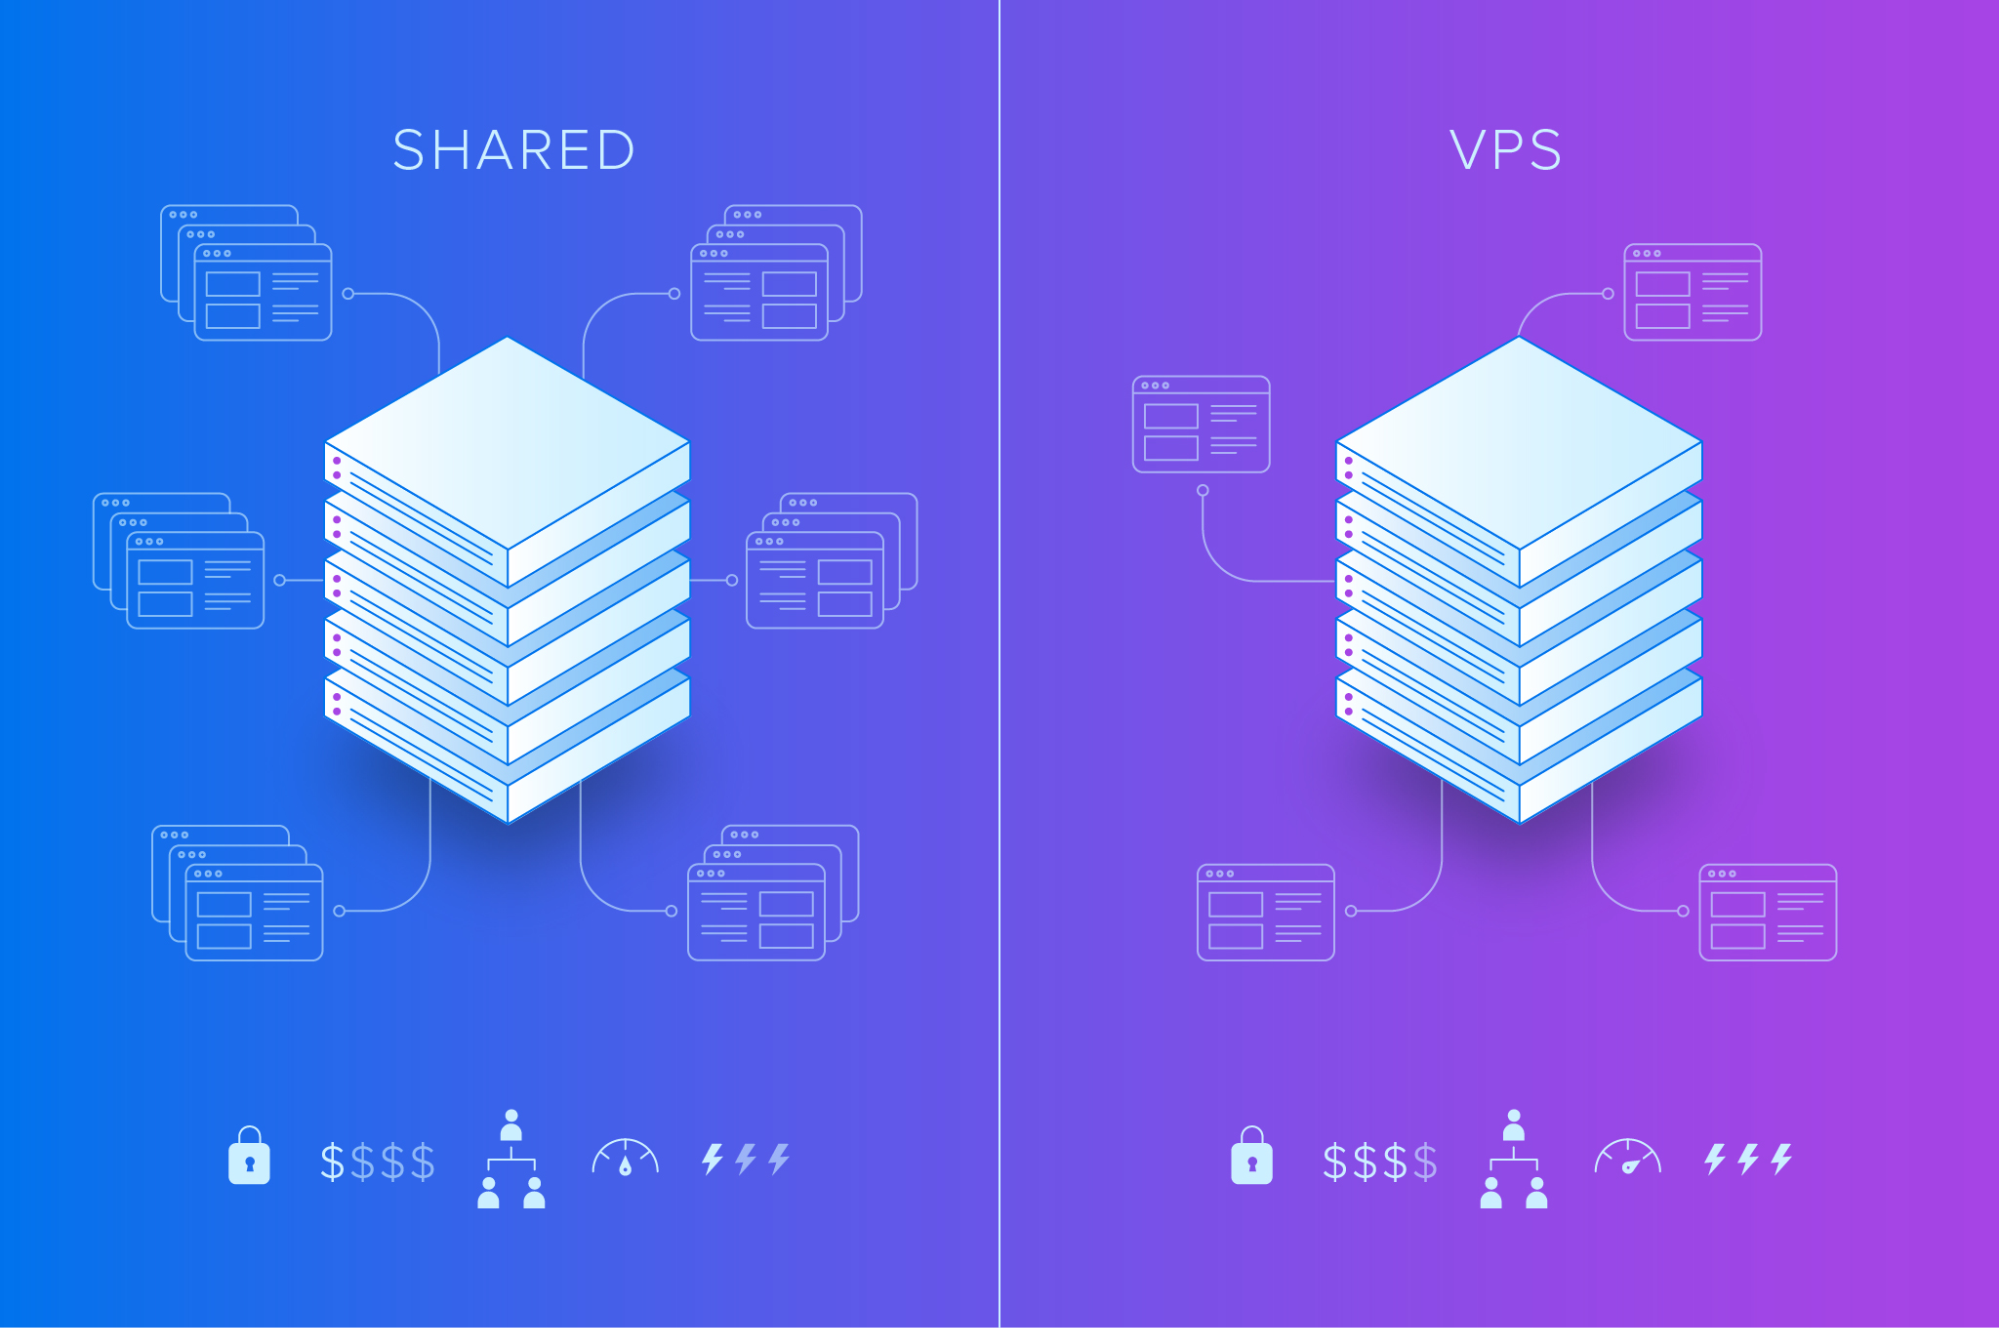
With shared hosting, your site shares the same physical server with many other sites. It’s kind of like an apartment building: you get one unit in a larger structure. While you each have individual living spaces, you may share communal resources like a courtyard, garden, or pool with your neighbors.

There is no reason to be concerned, though. No one using the server can see what others have on it. With a shared hosting plan, you simply share some of the physical resources with other users.

This option tends to be the cheapest because providers can serve many customers from one machine. Shared servers offer customers less bandwidth, management flexibility, and performance, but the hosts take care of all technical configurations, maintenance, and security.

What Is VPS Hosting?

A step up from shared servers is Virtual Private Server (VPS) hosting, which offers more room to grow and fewer restrictions. This version of online real estate is similar to living in a condo. You’ll still share the physical server with a few others, but resources are partitioned off and dedicated to each user.

When you own a condo, you can make changes to your living area such as knocking down a wall. Similarly, virtual private servers allow you to modify the server to your liking. The level of customization lies somewhere between a shared plan and a dedicated server.

As we mentioned earlier, you’ll share server space but have your own resources. Since you don’t have to compete for computing power, there is less worry about other websites using up too much bandwidth or storage and slowing down your site.

If your website deals with secured data or resource-heavy applications, VPS hosting may be the way to go. These plans are typically more costly than shared hosting but still quite reasonable.

7 Key Differences Between VPS and Shared Hosting

Shared vs VPS Hosting

If you’re creating a website for the first time, it can be difficult to choose the right hosting option. To help you decide between VPS and shared hosting, let’s discuss some of the key differences. Both options have their advantages and disadvantages, so let’s take a closer look at exactly what that entails.

1. Performance

As a website owner, it’s important to create a site that is both functional and aesthetically pleasing. However, if your web pages aren’t optimized for fast loading, these factors may not matter.

47% of online visitors expect web pages to load in under two seconds. That means if your website buffers for a longer amount of time, these users will likely be unsatisfied and quickly leave the page.

If you run an e-commerce website, you probably already know how important it is to retain customers. When your visitors experience an unsatisfactory loading performance, 79% of them are unlikely to return to your website.

Ultimately, this is not a lot of time to waste. Choosing the right hosting package is a serious business decision when you consider that mere milliseconds can determine whether people will do business with you.

A VPS hosting plan is almost always going to be faster than a shared hosting plan simply because your users don’t have to queue up with other sites’ visitors to access yours.

To illustrate the difference, imagine a carnival with different food vendors. If everyone had to stand in the same line to get to the vendors, the wait would be longer than if each food stand had its own line.

To put it simply, if your site is relatively small, a shared hosting plan will likely do perfectly fine. However, if your site is larger or is relied on for business and revenue growth, you’ll probably notice the difference.

VPS hosting offers more computing resources and processing power, which can boost the speed of most sites and, thus, increase conversions. Several VPS reviews emphasize performance and reliability when comparing DreamHost with our competitors.

2. Reliability and Stability

When we talk about the availability of a web host, we’re not checking its calendar or relationship status. Rather, we’re examining how often you can expect your website to be working properly. This includes any loading issues because of server or networking problems.

This directly correlates to the uptime of a server, or how often the server is up and running. Uptime is listed as a percentage, and, generally, anything 99.9% and above is considered excellent.

Uptime is important for any website because it determines whether your online presence will be available and open to visitors whenever they appear. This can be especially crucial for professional portfolios, business sites, and e-commerce stores.

Keep in mind that problems can arise with servers in both shared and VPS hosting plans. Much of this depends on the quality of the server hardware and software, as well as the provider’s expertise, support, and management practices.

However, with a VPS hosting plan, fewer customers exist on each server. Each partition can be configured and customized for a particular website or application’s requirements. This extra attention means each VPS is typically more secure and stable.

In a shared hosting environment, there are many websites that could potentially overload the server. A VPS resides in an independent hosting environment and, thus, there is no worry about whether other accounts can affect access to your site.

DreamHost is one of a select few providers that delivers a 100% uptime guarantee, meaning our data centers have a reliable, modern, and redundant infrastructure. In the rare case that your website experiences unexpected downtime, DreamHost will reimburse you the cost of a full day’s worth of hosting expenses.

3. Security

In a shared hosting environment, there is typically more risk for security breaches. Simply because there are more sites on a server, there are more opportunities for attackers to gain entry. Additionally, shared hosting customers are usually the least experienced with web hosting precautions, meaning that server vulnerabilities could be caused by your hosting neighbors.

When one customer sharing the server forgets to update WordPress or has a page that becomes compromised, it can impact other sites on the same machine. Just like performance and reliability, however, the risks can vary wildly depending on how much the hosting company has invested in the security of its servers.

DreamHost, for example, offers Let’s Encrypt SSL/TLS certificates on all domains it hosts. This means that data passed through each site is always safely encrypted.


Websites that deal with a lot of user data or payment information may benefit from choosing VPS hosting. This option offers robust security features that are usually managed by seasoned professionals, so you have less to worry about when it comes to securing sensitive information.

To understand this, consider what it would be like to purchase home security. Basic options come with a few sensors and signs that deter people from breaking in. More sophisticated options, however, include cameras and other monitoring devices that provide additional protection — this is more like a VPS hosting environment.

The world-class security engineering team at DreamHost, lovingly known internally as Nightmare Labs, helps keep websites running smoothly without breaches. By ensuring that your site has the latest patches and security upgrades, you can rest assured that your site is protected.

4. Price

In shared hosting, the cost is split among the many users of the shared server. For this reason, you can generally expect these plans to be more affordable. A VPS plan provides more resources and tends to be more reliable, so it often costs more.

Therefore, from the standpoint of pricing, shared hosting is usually going to be the most economical option overall. At DreamHost, shared hosting plans start at $2.59 per month and increase depending on the features and billing cycle you choose.

VPS hosting plans come with more premium features like increased performance and customizations for online businesses. The VPS hosting plans at DreamHost start at $10 per month, offering a range of varying storage and RAM allocations.

5. Managed Services

Shared vs VPS Hosting

So far, we’ve talked about what constitutes shared servers and virtual private servers, but we’ve yet to talk about who manages them. It’s important to know that most of the time, shared servers are managed, which means that expert employees of the hosting provider will ensure the servers are updated and secured. Shared hosting technicians can also assist with tasks such as migrations, backups, monitoring, updates, and maintenance.

A VPS can be either managed or unmanaged, with the latter referring to a service where the company only assists with problems with its server or network. For example, the customer would be responsible for installing and maintaining software and configurations.

When selecting a VPS host, you can expect more features and support with a managed plan. To decide between a managed and unmanaged VPS, you’ll need to evaluate how much time you want to invest in maintaining the reliability and performance of your site, along with your technical ability to do so.

At DreamHost, we offer managed VPS, so you can be assured that you will get high-quality assistance from the 24/7 technical support team. This can help you easily diagnose and resolve unexpected performance and security issues on your website.

6. Scalability

Scalability is how well your hosting plan will accommodate the growth of your website. This is often the make-or-break feature when deciding between shared or VPS hosting. There are several aspects to scalability, including storage and server capabilities.

A shared hosting plan is well suited for low-to-medium traffic websites, particularly if the visits are spread out over the course of the month. As your site grows, or if its traffic tends to arrive in large bursts, a shared server may not be able to keep up with the increased workload. A VPS hosting plan will provide more guaranteed headroom with resources dedicated to your site, and your site alone.

Resources can often be adjusted to adapt to various traffic trends. For instance, e-commerce stores will likely need more bandwidth to handle the rush of shoppers on Black Friday. Therefore, if you expect to add a lot more content and traffic, a VPS hosting plan is typically a good investment.

Some website owners opt to go with an affordable shared hosting plan initially. This way, they can test an idea and then switch to a VPS plan later. If you anticipate rapid growth, however, you may want to consider starting out with a VPS host right away. When user demand starts to exceed server resources, there is no other option but to upgrade your plan.

7. Customizations

On a shared hosting plan, your server will be pre-configured and optimized for most users. If you’re a beginner, you may not want to modify your server environment at all. In this case, shared hosting may be right for you.

To optimize your website’s performance, you may want to have more control over your installed software. With a virtual private server, you generally have fewer restrictions as far as customizing and installing applications on the server. Unlike shared hosting, you’ll be able to set up new software and customize it to your needs.

Remember, with great power comes great responsibility. With access to the server’s software and settings, you don’t want to inadvertently delete the wrong file or misconfigure a critical component. If you’re new to web development, you may want to start with a shared hosting plan until you learn the ins and outs of these skills.

How to Decide Between VPS and Shared Hosting

With shared hosting, you won’t have to worry about upgrades because most of them are done automatically. Since you won’t need to maintain your own server, no technical expertise is required.

Moreover, shared hosting can be a great choice if you have minimal traffic or are just looking for hosting that’s easy to maintain. This type of plan can be well-suited for:

  • Blogs and personal websites
  • Small to midsize companies
  • E-commerce sites expecting up to 500 visitors per day
  • People who are planning start-ups

Power Your Website with DreamHost

We make sure your website is fast, secure and always up so your visitors trust you.

shared hosting

Like shared hosting, VPS hosting offers a number of its own advantages. Since you’re in full control of your server, you can configure it in any way you please. This can be extremely useful for seasoned WordPress developers.

You’ll also enjoy a tremendous amount of bandwidth and storage that is entirely yours. VPS hosting provides easy backups and scalability, and you can run numerous batch files with your shell access.

Here are some common cases in which a virtual private server is probably appropriate:

  • Businesses that are expanding rapidly beyond shared hosting
  • Companies that expect a substantial increase in traffic in a short few months
  • Businesses that plan to host numerous websites in the near future
  • High-traffic websites in need of extraordinary bandwidth and security

In short, VPS hosting is great when your site is going through rapid growth and expansion as it can keep up with your success. Meanwhile, shared hosting is a terrific entry point into web hosting, allowing you to enjoy affordable hosting as your business develops.

Take Charge with Flexible VPS Hosting

Here’s how DreamHost’s VPS offering stands apart: 24/7 customer support, an intuitive panel, scalable RAM, unlimited bandwidth, unlimited hosting domains, and SSD storage.

VPS hosting provider

When to Upgrade from Shared Hosting to VPS Hosting

If you’re already using a shared hosting plan, you might wonder if it’s time to move on to VPS hosting. Fortunately, there are a few warning signs that can indicate your site is ready for this change.

It’s probably time to get serious about switching when:

  • Your website receives a large number of daily visits
  • You need additional resource allocation like RAM, CPU, disk space, or bandwidth
  • Your website takes longer than 3 seconds to load
  • You receive a lot of unexpected downtime

Whenever you notice any of these factors, it could be time to switch to a VPS. Shared hosting is ideal for smaller websites that need fewer resources, so you should upgrade if your site needs more.

Additionally, you’d be wise to consider scalability. If you plan to host multiple websites for your businesses, you can upgrade to a VPS to accommodate this development. In general, think about what your website currently needs, as well as what it will require for future growth.

Choose the Right Hosting Plan

Ultimately, choosing the wrong type of server can result in a lack of resources. This could be in the form of storage space, scalability, or affordability. However, you can easily avoid this by selecting the best hosting plan for your website.

You’ll want to make sure you evaluate your site’s current needs, as well as your plans for the future. Shared hosting can be a beginner-friendly and cost-effective option for smaller sites. Meanwhile, virtual private servers can provide better security, reliability, and customization options, which is ideal for larger sites with higher traffic.

Want to try VPS or shared hosting? At DreamHost, we offer a variety of both options. That means no matter your budget, required resources, or growth potential, you’ll be able to find a suitable plan for your site!

Get Content Delivered Straight to Your Inbox

Subscribe to our blog and receive great content just like this delivered straight to your inbox.

The post Shared vs VPS Hosting: A Comprehensive Guide appeared first on Website Guides, Tips & Knowledge.


source https://www.dreamhost.com/blog/shared-vs-vps-hosting/

Friday 16 December 2022

Shared Hosting vs. Dedicated Hosting

If you’re dazed and confused about which web hosting service is best for you, you’ve come to the right place! Given the wide range of options, even the tech-savviest clients may need help.

Let’s start with the basics: shared hosting and dedicated hosting. Neither system is going to be right for everyone, so you’ll need to identify your needs and do your homework. Fortunately, we’re here to explore the different options and help you make an informed choice.

In this guide, we’ll go through a full rundown of shared hosting vs. dedicated hosting. Let’s get started!

Shared Web Hosting

With shared web hosting, one physical server is shared by several users who tap into the same resources. Everyone shares the cost of storage, bandwidth, and other features. Web neighbors can’t access other accounts or websites, so the system is safe and secure:

shared vs dedicated hosting

Credit: Seobility – License: CC BY-SA 4.0

Its cost-effectiveness and ease of use make shared web hosting a popular choice. Your web host will set up your server and install the necessary software.

All you have to do is upload your website or application. Using the simple control panel, you can create and manage your database, email account, and other tools for doing business.

Shared hosting may be an ideal solution if:

  • Your business is small to mid-sized.
  • Your traffic is limited to a few hundred monthly visitors.
  • The content on your website is frequently updated.
  • You have no earthly idea how to configure a server, install and upgrade its software or perform technical maintenance.

At DreamHost, we offer affordable shared hosting plans for WordPress sites. Plus, our plans come with a free domain name!

Why Choose Shared Hosting?

If you’re new to web hosting, a shared platform is great for learning the ropes. It’s perfectly adequate for businesses and websites with light to moderate web traffic which don’t require complex customized server configurations.

You could think of it like a large house shared by several roommates. Expenses for things like food, cleaning supplies, and electricity are divided. If the fridge stops working, the kind landlord lives right next door. The arrangement saves everyone money, and things work out nicely, provided no one drinks directly from the milk carton.

Get Content Delivered Straight to Your Inbox

Subscribe to our blog and receive great content just like this delivered straight to your inbox.

Dedicated Web Hosting

With dedicated hosting, you’re the sole user on the server. Its capacity and resources are all yours. This gives you much more control over its configuration and overall operating environment. There’s also a wider variety of services and software to choose from.

Not every business needs all the bells and whistles that dedicated hosting provides. Still, it might make sense under the following circumstances:

  • Your business is continually growing and adding products or services, so you need the control and flexibility to customize the server, choose your software and adapt the system to changing needs.
  • Your website features a significant amount of video streaming and high-resolution photos.
  • You want a unique IP address that you don’t have to share with other websites.
  • Your business handles extremely sensitive transactions, requiring enhanced security features.

If you’re looking for a dedicated server, we offer fully-managed dedicated hosting. You’ll have root access to your server, along with 24/7 monitoring and support to keep things running smoothly.

Why Choose Dedicated Hosting?

Understandably, having a dedicated server all to yourself costs more than shared hosting. After all, there are more features and resources to choose from. Unless you have excellent technical skills or strong tech support in your company, you’ll probably need a package that includes building and maintaining the equipment.

These additional features come at a price, but they’re worth it for clients who need complete control of the operating environment and a little extra security. Furthermore, dedicated hosting can be a better option if you have a high-traffic site that’s continually growing.

Choose the Best Hosting Plan for Your Website

Shared hosting and dedicated hosting come with their own pros and cons. On the one hand, shared hosting is an affordable option that’s perfectly suitable for small to medium businesses. You also won’t need to worry about configuring your server.

By contrast, a dedicated server offers superior performance and gives you complete control over your server’s configuration. It’s an excellent option for larger businesses, high-traffic sites, and tech-savvy users.

At DreamHost, we offer both shared hosting and dedicated hosting plans. Contact us today to find out which service is right for your website!

Get DreamHost’s Most Powerful Hosting

Our dedicated hosting plans are the ideal solution for high-traffic sites that require fast speeds and consistent uptime.

dedicated hosting provider

The post Shared Hosting vs. Dedicated Hosting appeared first on Website Guides, Tips & Knowledge.


source https://www.dreamhost.com/blog/shared-vs-dedicated-hosting/

Thursday 15 December 2022

How to Create the Perfect WordPress Featured Image (Sizing & Design Guide)

To draw new visitors to your site, you may consider publishing blog posts regularly. However, without featured images, your posts likely won’t look inviting enough to earn clicks.

Fortunately, you can easily create well-designed featured images for your articles. Once you know how to find the right photos, size them correctly, and optimize them for search engines, you can instantly revitalize your WordPress posts.

In this post, we’ll explain what a featured image is. Then, we’ll share some tips on how to use them. Let’s get started!

What is a Featured Image?

In WordPress, the featured image is the visual representation of a specific post, page, or custom post type. When someone visits your website, these images will usually appear at the top of posts or in your blog feed:

WordPress featured images

Essentially, the featured image is the default thumbnail of your post. If someone shares the post on social media, this image will appear with the link:

Social media featured image

In WordPress, the featured image settings are determined by your theme. This includes the location and size of your images.

Typically, featured images are displayed in the following places:

  • The top area of posts or pages
  • Pages on your website that link to blog posts, like your WordPress homepage, recommended posts section, or search results
  • Thumbnails for social media links

Sometimes, featured images may be included in image galleries or sliders. You may also see them as background images.

The Advantages of Using Featured Images

If you’re new to WordPress, you might be wondering why you need a featured image for every post on your website. However, these can be the key to making a good first impression with new visitors.

After users click on a link to one of your posts, featured images are often the first thing they’ll see and this can engage them enough to continue reading the article:

Post featured image

You’ll likely have a list of your published posts on your homepage. You can motivate visitors to read your content by including well-designed featured images.

Plus, having a featured image for each post can help you establish visual consistency on your website:

Home page featured images

When you share your posts on social media, featured images can help advertise your content to users browsing their feeds. A well-designed image can increase engagement and generate more clicks to your site.

What is the Ideal WordPress Featured Image Size?

As we mentioned earlier, different WordPress themes can have various sizes for featured images. However, the general size is 1200 x 628 pixels.

Here’s how this would look with the default Twenty Twenty-Two theme:

Featured image size

This size will work effectively with many WordPress themes. However, your featured image sizing may vary based on your personal preference and the layout of your theme.

It’s important to note that WordPress will resize your images to its default settings. Whenever you upload an image, it creates three different versions:

  • Thumbnail: 150 x 150 px
  • Medium: 300 x 300 px
  • Large: 1024 x 1024 px

If you want to keep the original size of the featured image, this will be its ‘Full Size.’ To edit any of these sizing options, you can navigate to Settings > Media:

WordPress media settings

Here, you can update the width and height with new values. Once you save your changes, uploaded images will resize to these dimensions.

You can also add a custom featured image size. Before you do so, it’s a good idea to back up your website. After this step, you can add the following code to your functions.php file:

add_image_size( string $name, int $width, int $height, bool|array $crop = false )

Make sure to update these values with your new featured image sizes. Here’s an example of how this might look:

add_image_size( 'post-thumbnail size', 800, 1500 );

Next, you’ll need to display the new size within your theme. In your theme template file, update the_post_thumbnail() function:

if ( has_post_thumbnail() ) {
the_post_thumbnail( 'your-custom-size' );
}

Once you save the file, you’ll have a new custom-featured image!

Get Content Delivered Straight to Your Inbox

Subscribe to our blog and receive great content just like this delivered straight to your inbox.

How to Set a Featured Image in WordPress

To set a featured image, open your WordPress dashboard and create a new post. Then, in the right-hand sidebar, look for the Featured Image section:

Add WordPress featured image

Here, click on Set Featured Image. This will open a pop-up where you can upload your media file. Alternatively, you can select an image from your Media Library:

Select featured image

If you need to adjust the size, find the Edit Image button. Then, use the various editing options to scale, crop, rotate, or flip the image as needed:

Edit featured image

When you’re done, hit Set featured image. You’ll now see a preview of the image while you create the post:

New WordPress featured image

Before you publish the post, you’ll want to preview it to ensure the featured image is showing. Remember that your theme may require more specific dimensions to work correctly. You can refer to your theme’s documentation if you experience difficulties during this process.

Additionally, you can install a few plugins to make this process easier. For example, Auto Featured Image will automatically use the first photo in your post as the featured image. You can also use Default featured image to select a picture that will be used as a featured image in case you forget to add one to a post.

How to Create the Perfect WordPress Featured Image (6 Tips)

Featured images can turn your website into an engaging, media-rich experience. Let’s discuss some best practices for creating them!

1. Be Relevant and Consistent

When used correctly, featured images can enhance your blog posts and make them more attractive to visitors, but there are a few things you’ll need to keep in mind.

First, you’ll want to avoid using random images. A featured image should serve as an introduction to a post, so it needs to be relevant to the content.

For example, if you run a food blog, you probably publish posts with new recipes. In this case, your featured image can be a photo of the finished meal:

Relevant featured image

It’s also good practice to keep your featured images consistent throughout your entire website. Since these will be displayed on your homepage, archive, and blog, you’ll want photos that align with your web design:

Consistent featured images

To find the right featured image, consider your current WordPress theme and layout. Then, select a high-resolution image that can be easily scaled down. After you finish creating the post, make sure to preview it to evaluate how well the image fits into your website.

2. Avoid Using Copyrighted Images

As you’re browsing images on the Internet, you may stumble across a photo that would look great as a featured image. However, before you upload it to your WordPress site, you’ll need to ensure that it isn’t copyrighted to avoid legal issues.

When sourcing images, you can typically use anything under a Creative Commons license. These will be free to download and use on your website, except if they’re for commercial purposes.

To find Creative Commons images, open Google Images. Then, click on Tools > Usage Rights > Creative Commons licenses. Once you refine your search, you’ll get a wealth of free images to choose from:

Creative commons images

There are also entire websites with these stock images. On a platform like Unsplash, you can download high-resolution photos that are free from copyright claims:

Unsplash website

Another alternative is to make your own featured images. By taking photos yourself or creating graphics in Canva, you can ensure that you avoid any copyright violations. Plus, these will be completely original!

3. Optimize Featured Images to Reduce File Size

If you publish posts on a regular basis, featured images will start taking up a lot of space in your Media Library. If they aren’t optimized properly, these photos could negatively affect your site performance.

Essentially, optimizing your images involves reducing their file sizes. By compressing your featured images, you can minimize your loading time.

If you don’t do this, you could end up with a poor Core Web Vitals score. Images might take too long to render, and you’ll see performance issues in your PageSpeed Insights reports:

Failed Core Web Vitals report


Fortunately, there’s an easy solution for this common image issue. A plugin like TinyPNG can automatically compress images as you upload them:

TinyPNG plugin

Plus, you’ll even be able to compress all images that you’ve already uploaded to your website. TinyPNG lets you bulk optimize any JPEG, PNG, or WebP images in your Media Library.

4. Regenerate Old Thumbnails

When you upload images to WordPress, it will resize them according to the pixel guidelines in your settings. Once you set new default sizes, your previously uploaded images will still have the outdated sizing.

If you want to resize your featured images, you can manually reupload them. However, this will take some time.

To solve this problem, you can install a WordPress plugin like reGenerate Thumbnails Advanced. This tool can regenerate the thumbnails for each of the images in your Media Library:

Regenerate Thumbnails Advanced plugin

After you install and activate the plugin, go to Tools > Regenerate Thumbnails. Under Regenerate Options, select the box next to Regenerate only Featured Images:

Regenerate featured images

Finally, hit Regenerate. This will automatically update all your featured images with the correct sizing.

5. Optimize Images for Search Engines

As a website owner, you probably already know how vitally important Search Engine Optimization (SEO) is. If you want to avoid paying for expensive advertising methods, you’ll want to rise to the top of search results by optimizing your content. This can help you bring in more organic traffic.

Having featured images can help you improve your site’s SEO. By simply tweaking a few elements, you can make your images more appealing to search engines and users.

First, you’ll want to make sure to add alt text. This will describe the featured image to search engines and screen readers. For instance, you could write “Orange and white cat standing in a pumpkin patch”:

Featured image alt text

Remember to include the post’s keyword in the alt text. This way, Google can understand what the post is about and rank it higher for related queries. Similarly, you can include these target keywords in the title, caption, and description for the featured image.

6. Enhance Social Post Thumbnails

Social media can be the perfect platform for promoting your blog posts. Before you encourage social sharing, it’s crucial to optimize your featured images for these platforms.

You can easily customize your social media links using a plugin like Yoast SEO. For example, the premium version enables you to see previews of your Twitter and Facebook thumbnails.

To get started, install and activate Yoast SEO. Next, find Yoast SEO > Social. On this page, fill out the URLs for your various social media pages:

Add social media accounts

Then, open a new post and scroll down to the Yoast SEO settings. In the Social tab, you can click on Select image to upload your featured image.

Featured image for social posts

You can also add a title and description for each social media platform. This will give visitors a taste of your content. Once you publish the post on social media, it will have a featured image and snippet that conveys precisely what the article is about.

Use Featured Images Effectively

Featured images can help make your posts stand out. Whether people are browsing your content on social media or your website, they can look at the featured image to see what the post is about before they start reading it.

To review, here’s how you can create the perfect WordPress featured image:

  1. Be relevant and consistent.
  2. Find copyright-free images on platforms like Unsplash.
  3. Compress featured images with TinyPNG.
  4. Regenerate old thumbnails with reGenerate Thumbnails Advanced.
  5. Optimize images for search engines using keyword-focused alt text.
  6. Enhance social post thumbnails with Yoast SEO’s social settings.

When you create your own featured images, you can build an original website without facing copyright issues. At DreamHost, our custom website design services can help you use the right images on your site.

DreamHost Makes Web Design Easy

Our designers can create a gorgeous website from SCRATCH to perfectly match your brand and vision — all coded with WordPress so you can manage your content going forward.

custom website design

The post How to Create the Perfect WordPress Featured Image (Sizing & Design Guide) appeared first on Website Guides, Tips & Knowledge.


source https://www.dreamhost.com/blog/create-wordpress-featured-image/

Monday 12 December 2022

Why It’s a Good Idea to Change Your WordPress Login URL (& How to Do It)

A strong, unique password can help prevent unauthorized access to your WordPress website. However, attackers have clever ways of getting around this. Therefore, it isn’t always enough to properly protect your site against attacks.

Fortunately, you can reduce the risk of hackers getting into your site by moving your WordPress login page to a new URL. This can put you in a better position to defend against hacks and brute-force attacks.

This article will take a closer look at why you should consider changing your WordPress login URL. Then, we’ll show you how to find your login URL and modify it using two different methods. Let’s get started!

Why It’s a Good Idea to Change Your WordPress Login URL

Since WordPress doesn’t hide your login page, any user can find it as long as they know how WordPress structures its URLs. The default structure for a login page looks something like this:

https://example.com/wp-login.php

This means when a user plugs in your website name into the URL structure above, they should see a page in their browser prompting them to log in to the back end of your website:

WordPress login page

Of course, users will lack the credentials to gain access to your site.

For simplicity’s sake, many people prefer to stick with this default wp-login structure for signing into WordPress. However, by leaving this as it is, you’re actually handing over half of your login credentials to attackers.

This is especially risky if your password is common, weak, and easy to guess. In a nutshell, this is an unnecessary vulnerability that’s easy to resolve.

You can secure your login page more thoroughly by changing your WordPress login URL. As a result, you can prevent unauthorized access to your site and reduce the risk of brute-force attacks.

How to Find Your WordPress Login URL

As we mentioned in the previous section, WordPress uses a standard sign-in link structure that looks something like this:

https://example.com/wp-login.php

So, all you have to do is add the suffix to your domain, and you should land on your login page. You can also find your login page by trying to access your WordPress dashboard while logged out. Simply enter “yourwebsite.com/wp-admin” into the search bar and you’ll land on the same login page.

However, keep in mind that some web hosts change your WordPress login page automatically for security reasons. Therefore, you might already have a custom login URL. We’ll show you how to find this in the next section.

How to Find a Custom WordPress Login URL

If your web host has changed your login URL, you can usually retrieve it from an email or locate it within your control panel. Some hosts even include one-click access links to the WordPress admin dashboard, which can be useful.

However, if you can’t identify your custom login URL using one of those options, you can locate it manually. All you’ll need to do is connect to your site using SFTP.

You can use a client like FileZilla. Keep in mind that you’ll need your FTP credentials, which you can get from your web host. Then, open the root folder that contains the login link. This folder is usually labeled public_html:

Website root folder in File Manager

Find and open the wp-login.php file, keeping an eye out for the string that reads site_url. This will lead to a line of code that specifies your custom login URL.

How to Change Your WordPress Login URL (2 Ways)

Now that you know where to find your WordPress login URL let’s take a look at two easy ways you can change it.

Method 1: Change Your WordPress Login URL with a Plugin

The easiest way to change your WordPress login URL is by using a plugin. Luckily, there are plenty of plugins available that can enable this functionality.

WPS Hide Login is a great option since it’s lightweight. It allows you to safely change your WordPress admin login page to anything you want:

WPS Hide Login plugin

Better yet, WPS Hide Login also prevents all logged-out users access to the wp-admin directory and wp-login.php.

To get started, you’ll need to install and activate the plugin. Then, head to Settings > WPS Hide Login:

Configure the WPS Hide Login plugin on WordPress

Here, you can type in a new login URL and hit Save Changes. It’s as simple as that. The plugin also has a pretty active support forum that you can check out if you need any help.

Bear in mind that once this plugin is active and you make your changes, you won’t have access to your old login screen. Instead, you’ll be directed to the new login you created.

Based on our example above, you would now need to enter “/login” after your domain to access your site. Additionally, keep in mind that your site will revert back to using wp-admin and wp-login.php if you deactivate the plugin.

Get Content Delivered Straight to Your Inbox

Subscribe to our blog and receive great content just like this delivered straight to your inbox.

Method 2: Change Your WordPress Login URL by Editing Your wp-login.php File

This second method is a little trickier and only suitable for experienced users. Therefore, before you get started with the following steps, it’s best to make a fresh backup of your site in case anything goes wrong.

It’s also important to know that your changes may revert to their previous settings when you update your theme. However, you can avoid this issue by using a child theme.

First, you’ll need to access your root folder, which you can do via your File Manager or using FTP. Again, you’re looking for the folder titled public_html:

Root folder of website

Inside the root folder, locate the wp-login.php folder. This is where the code that generates your site’s login page is kept:

The “wp-login.php” file

Once you’ve found the file, you can download a copy of it to your computer. Then, open the folder using a text editor like Sublime or Notepad++.

Ideally, it’s best to use an editor that provides a “search and replace” tool. This way, you can change all the existing WordPress login URL instances much more quickly.

If you have access to it, use the search tool to find every instance of the wp_login_url string:

The “wp-login.php” file

Then, change these strings to the new login URL that you’d like to use. Remember, you can keep it simple and straightforward so long as it’s original (and different from the default). For example, you might prefer something like access.php or wp-new-login. 

Once you’re happy with your changes, save and close the editor. Then, rename the file after the new URL that you chose (such as access.php).

Now, you can upload the new file to your root directory using your FTP client or File Manager. Simply select the modified login file from your computer. Then, register the new login file using the “login_url” filter hook. This enables you to use any page as your sign-in page as long as it contains a login form.

To do this, navigate to wp-content > themes to find your theme functions file. Select your active theme and open the functions.php file:

Finding the theme functions file

Now that you’re here, you can paste the following line of code into the file:

/*
*Change WP Login file URL using “login_url” filter hook
*https://developer.wordpress.org/reference/hooks/login_url/
*/
add_filter( ‘login_url’, ‘custom_login_url’, PHP_INT_MAX );
function custom_login_url( $login_url ) {
$login_url = site_url( ‘wp-your-new-login-file-name.php’, ‘login’ );
return $login_url;
}

Then remember to save your changes.

It’s important to test your new login before deleting the old file. To do this, simply type out your site’s domain with your new login URL added to the end. Then, if you see the WordPress login form, you can delete the original wp-login.php file. 

Other Ways to Secure Your WordPress Login Process

Changing your WordPress login URL is great for tightening up security on your site. However, it’s not all you can do. Here are some other ways to secure your WordPress login process.

1.  Limit Login Attempts

When you limit login attempts, you can stop hackers and bots that attempt to access your site by trying hundreds of usernames and passwords. This is especially important since brute force attacks are the second most common type of online threat.

The easiest way to do this is by using a plugin like Limit Login Attempts Reloaded:

Limit Login Attempts Reloaded plugin

This plugin gets to work as soon as it’s activated on your site. By default, users have four chances to log in before they get locked out of WordPress. However, you can visit the plugin’s settings to modify this:

Configure the Limit Login Attempts Reloaded plugin on WordPress

Here, you can also determine the length of time that users stay locked out. In your dashboard, you’ll see how many brute-force attacks have been blocked by the plugin. Plus, you can switch to the Logs tab to manually blocklist specific IP addresses.

Implement Two-Factor Authentication

Two-factor authentication requires users to submit more than just their standard login credentials. Instead, users are asked to generate a second key in real-time. This is often a code sent via SMS text message, email, or an app:

An example of two-factor authentication

Since bots and hackers are unable to produce the second key, this is a great way to prevent unauthorized access to your site. One of the best ways to add this functionality to your site is by using a plugin like miniOrange:

miniOrange two-factor authentication plugin

Once activated, head to the new miniOrange 2-Factor link in your admin area and find the Account section. To configure the plugin, you’ll have to register for an account. This is completely free and only takes a minute. Then, you’ll receive a code that enables you to verify your email.

At this stage, navigate to Two Factor and use the Setup Two Factor tab. Here, you can choose your preferred method of authentication. For instance, you can use the Google Authenticator app, SMS text messages, QR codes, or security questions:

Enabling two-factor authentication on WordPress using miniOrange

Lastly, if you switch to Settings, you can enable two-factor authentication for all users, specific users, and display your two-factor prompt on your login page.

3. Use CAPTCHA

CAPTCHA or reCAPTCHA provides an extra layer of security for your website. Typically, it’s used to control access to sensitive pages. What’s more, it can deter bots from creating spam or accessing personal information via order forms or login forms on your site.

Again, a plugin is the easiest way to enable CAPTCHA on your site. With reCaptcha, you can add a simple CAPTCHA checkbox to any form you like:

reCaptcha plugin

You’ll need to install and activate the plugin on WordPress. Then, register your site with Google to retrieve your Google API keys. In WordPress, you can head to Google Captcha > Settings to enter your keys and determine which forms should use CAPTCHA.

4. Enforce Strong Passwords

It’s a great idea to change the WordPress login URL, so you’re not using the easily-guessable “admin” suffix. However, your efforts are wasted if you continue using weak or repeated passwords that put your account at a greater risk of attack.

In fact, only 24% of U.S. web users use a different password for each of their online accounts. Meanwhile, just 44% of users use a password manager to generate and store passwords securely.

Going forward, it’s best to opt for lengthy passwords with upper and lower case letters combined with numbers and special characters. We’d also recommend using a password manager like LastPass for extra peace of mind:

LastPass password manager

Plus, it’s important to encourage strong passwords from users with access to your website. You can clarify this in the welcome email users receive upon registering to your site.

Change Your WordPress Login URL to Increase WordPress Security

It can be challenging to ensure foolproof security on your WordPress website. Fortunately, one way you can do this is by changing your WordPress login URL. This way, your login page is almost impossible to find unless you provide users with your new, custom login URL.

Here are two ways to change the WordPress login URL:

  1. Use a plugin like WPS Hide Login.
  2. Edit your wp-login.php file.

Another excellent way to tighten WordPress security is to use a quality web host. At DreamHost, we offer a range of solutions to suit all kinds of users, from managed WordPress hosting to managed VPS hosting. Check out our plans to get started!

Do More with DreamPress

DreamPress Plus and Pro users get access to Jetpack Professional (and 200+ premium themes) at no added cost!

managed WordPress hosting provider

The post Why It’s a Good Idea to Change Your WordPress Login URL (& How to Do It) appeared first on Website Guides, Tips & Knowledge.


source https://www.dreamhost.com/blog/change-wordpress-login-url/

Creating and Mastering GA4 Explorations

In the switch from Universal Analytics (UA) to Google Analytics 4 (GA4) — which will go fully into effect July 2023 — a lot of things have...