If you’re planning on using WordPress to create an online store, you’ll strongly want to consider installing WooCommerce. This plugin has become the de facto e-commerce solution for WordPress sites, thanks to its flexibility and a wide variety of customization options. However, given its wealth of features, it can be daunting to get started.
Fortunately, WooCommerce is very easy to set up. Any e-commerce newbie can download, install, and configure the plugin to create a functional online store in no time. Even smaller tasks, like managing your products and configuring costs, are easy to handle.
Getting Started With WooCommerce

According to BuiltWith, WooCommerce powers 26% of all e-commerce sites. This makes it the most popular e-commerce solution in the world, and it’s not hard to see why. All you need is a WordPress site and the WooCommerce plugin to create a fully-functional, secure, and visually appealing store.
What’s more, WooCommerce offers a lot of customization opportunities and scalability. The basic, free plugin will be enough for most online stores.
WooCommerce also provides plenty of options to grow, scale, and expand your business as it becomes more successful. There are WooCommerce extensions, which add new functionality to your store, as well as dedicated themes like Storefront that help you perfect its appearance.
With all of this in mind, it’s easy to see why you should consider WooCommerce when creating your online store in WordPress. It’s an excellent choice for beginners and experienced professionals alike. Now, let’s take a closer look at how the plugin works in practice.
How to Install and Set Up WooCommerce (In 5 Steps)
Creating and configuring your WooCommerce store is a pretty simple process. However, before you get started, it’s important to take a look at the recommended server requirements for WooCommerce:
- PHP version 7.4 or higher
- MySQL version 5.6 or higher/MariaDB version 10.1 or higher
- A WordPress memory limit of 256 MB or greater
- HTTPS support
If your server does not meet these recommended minimums, your store will struggle, and it might not even work at all. One solution is to take advantage of our WooCommerce hosting plan:

This plan comes with WooCommerce pre-installed, as well as several additional plugins and themes to make your store even better. Plus, essential considerations such as security, performance, and updates will be handled for you.
Once you have your website and hosting plan ready, it’s time to create your WooCommerce store!
Step 1: Install and Activate the WooCommerce Plugin

This first step is the most basic one. Simply install and activate WooCommerce just as you would any other plugin. As soon as you activate it, you will be presented with the WooCommerce setup wizard. This will help you configure your store, and we’ll look more closely at it in a moment.
First, let’s see how activating WooCommerce has affected your site. Once WooCommerce is installed, you’ll find a number of new features, including:
- Two new user roles: Customer and Shop Manager.
- Widgets to help you display products in various ways.
- Custom post types, taxonomies, and menu items.
- Several shortcodes for inserting content into posts and pages.
It’s worth noting that WooCommerce works a little differently on a WordPress Multisite install. Each site will share a database but store information in separate data tables. This setup makes each store its own separate entity. You will not be able to share information between the stores, such as user accounts, products, or checkout information. However, you can share extensions and themes across multiple WooCommerce sites.
If you’re using a single WordPress site, you don’t need to worry about any of that.
Now, it’s time to start configuring your store using the wizard we mentioned earlier.
Get Content Delivered Straight to Your Inbox
Subscribe to our blog and receive great content just like this delivered straight to your inbox.
Step 2: Add Your Store’s Basic Information
The first thing you’ll see after activating the WooCommerce plugin is the setup wizard. This will help you set up your site in a few simple steps. It’s worth noting that any settings you configure here can easily be changed later.
The first page of the wizard contains general information about your store. You’ll be required to enter your store’s location, for instance. If your business does not have a physical location but is entirely based online, you will still need to select your country:
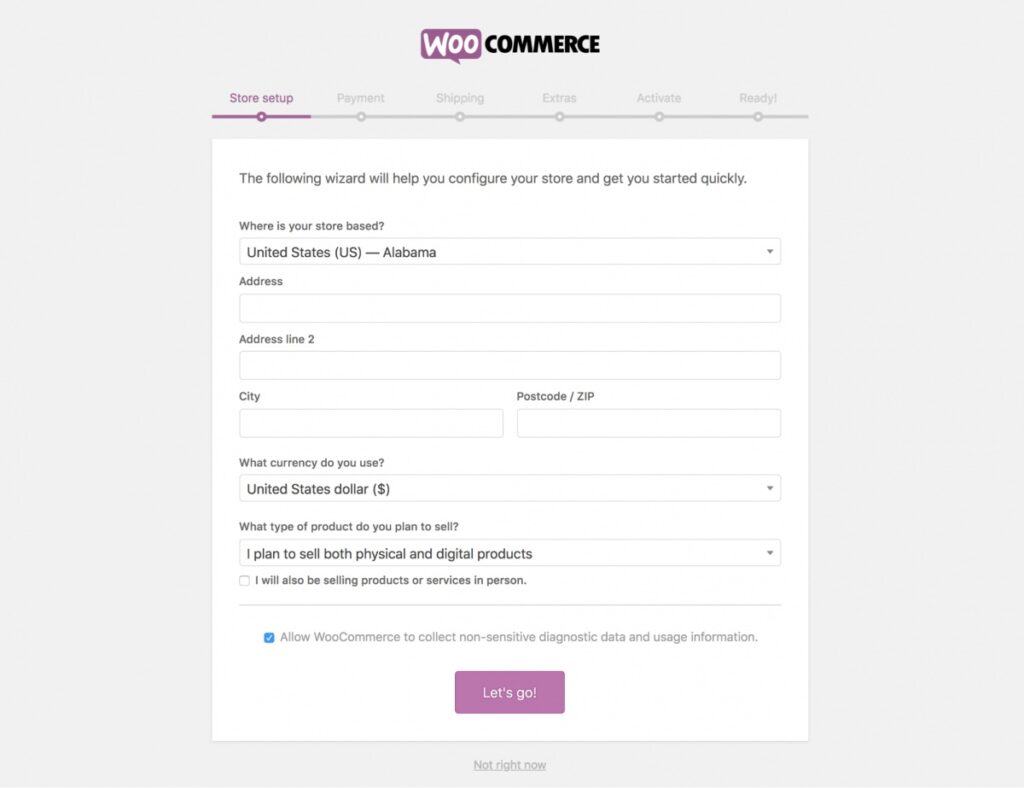
You’ll then need to choose the currency you want to use. Your store can only use one currency at a time, but if you want to display prices in various currencies, you can use a plugin like Currency Converter Widget.
The last option asks what type of products you plan on selling: physical, digital, or both. There are more specific product types (which we’ll look at later), but for now, you can select the option that best suits your needs. The final option is a checkbox that you should only tick if you’re also planning on selling items in person.
When you’ve entered all the required information, click on Let’s go! to proceed to the next step.
Step 3: Set Up Your Payment Options
The next phase of the wizard lets you enter the payment options for your store. Here you can choose which payment methods you want to accept:
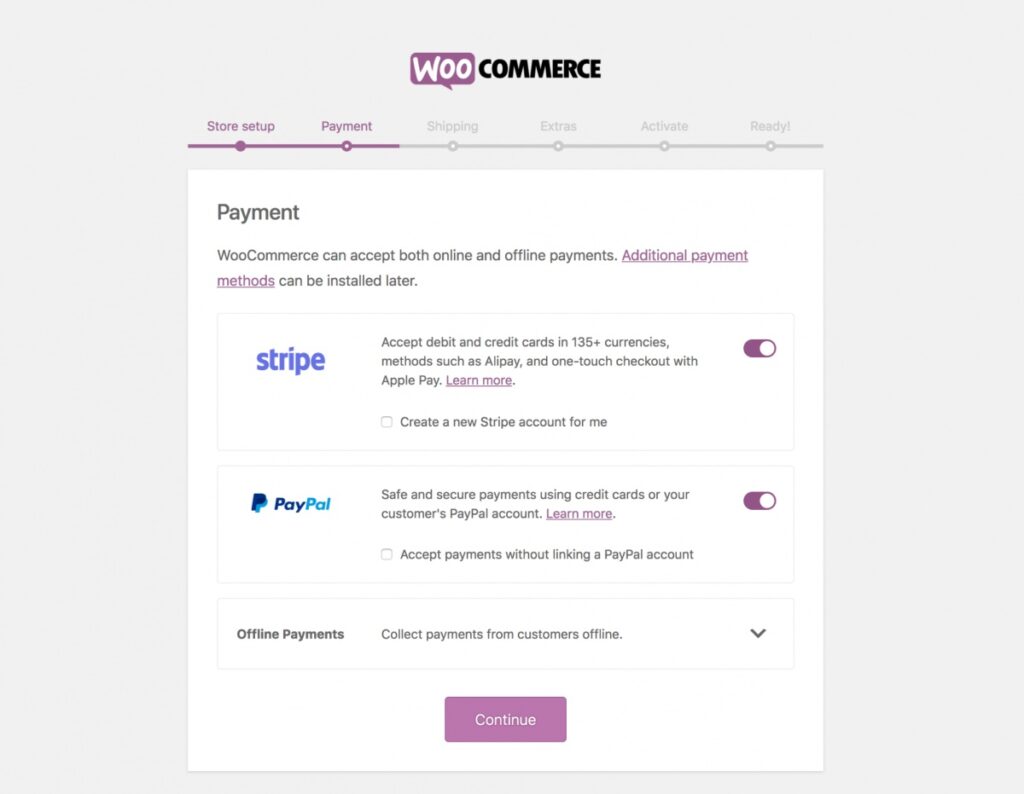
The choices you’ll see will differ slightly depending on your specified location and the options you selected on the previous page:
- PayPal and Stripe are always available.
- Square is available if you selected the option to sell items in person and if your store is located in the U.S., the U.K., Canada, Australia, or Japan.
- Klarna is also available if your store is in the U.K., Norway, Finland, Sweden, Denmark, Austria, Germany, or the Netherlands.
Select the options you want to use, and WooCommerce will install the necessary extensions. You can always remove and add payment methods later.
The final option in this section asks if you want to accept offline payments. If you select this, a panel will appear with more detailed options, letting you choose all payment types you’re willing to use:
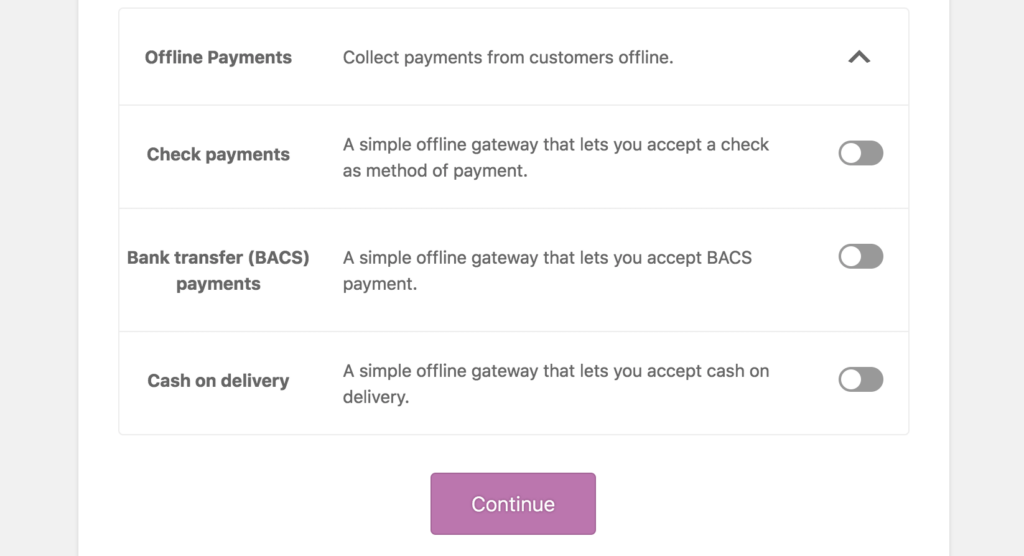
When you have picked all the payment options you’ll need, click on Continue to proceed to the next page of the wizard.
Step 4: Configure Your Shipping Settings
It’s now time to configure your shipping settings. As with the last step, the options here will differ depending on your location. Stores in the U.S. and Canada will see settings relating to USPS and Canada Post, respectively:
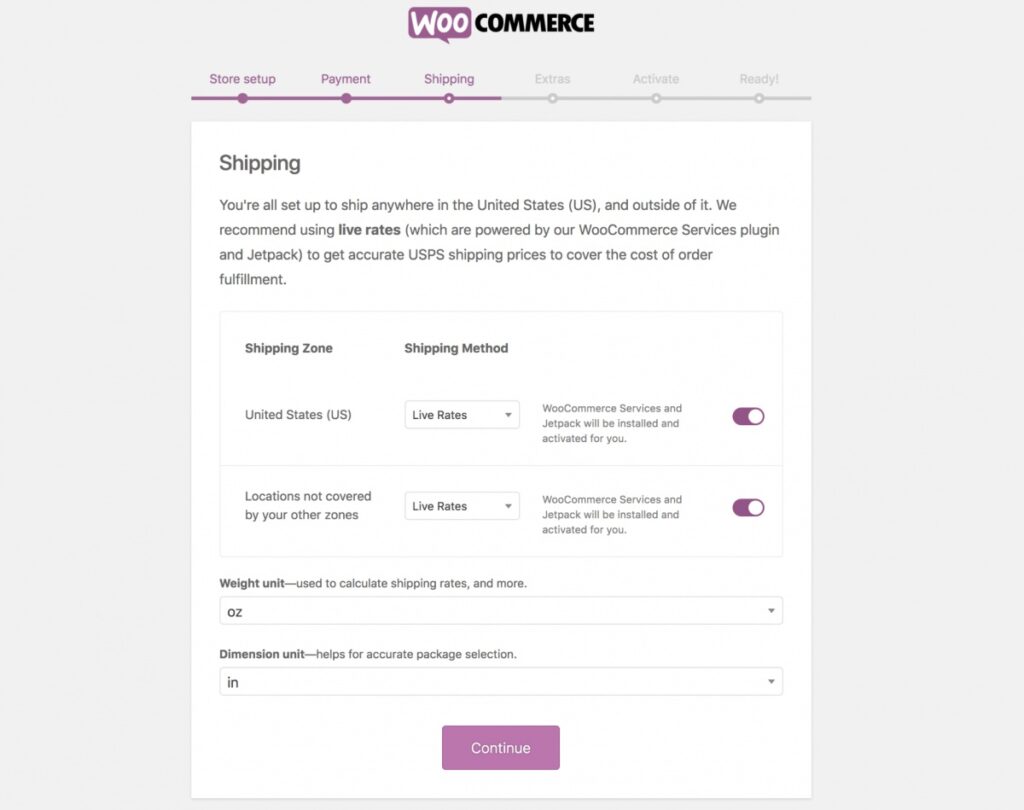
If you want to use these services, we recommend taking a look at their specific settings to help you settle on appropriate rates.
Stores located elsewhere will instead only see the options for specifying the weight and dimension units you want to use in your store. Simply choose the correct units, then select Continue to progress.
Step 5: Complete the Installation Process
The final steps of the wizard offer some additional options to help you get your store off the ground. The Extras section contains two choices:
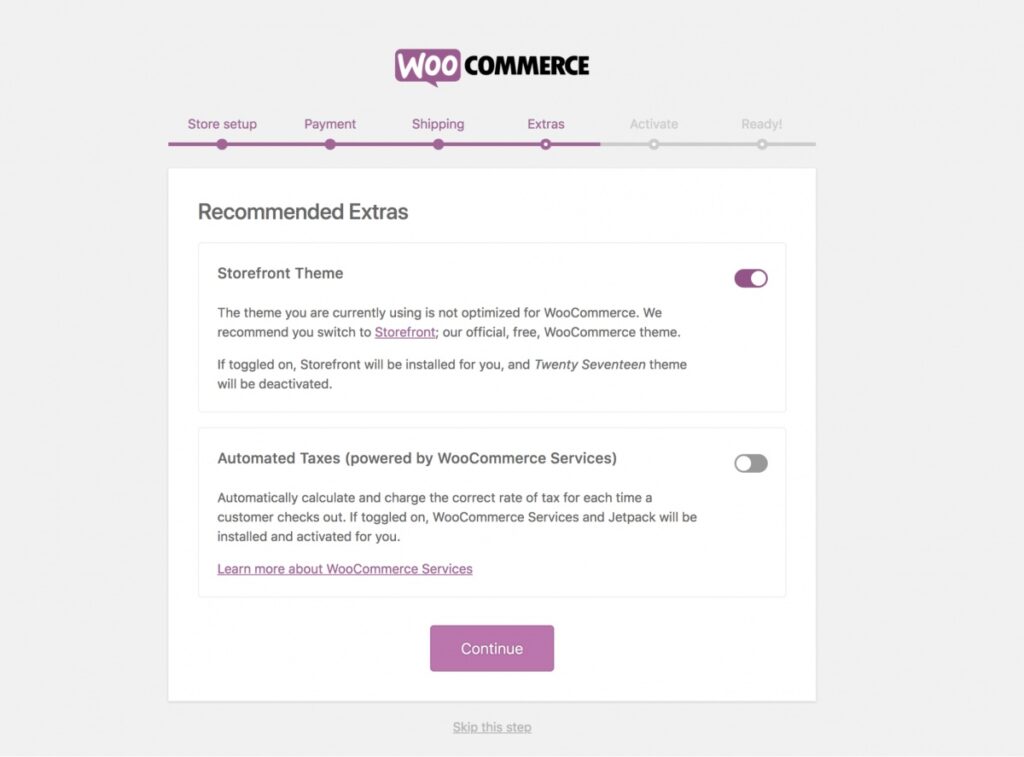
The first one asks if you want to install the Storefront theme. This is the official WooCommerce theme, which is highly recommended, as it’s built specifically to support sites powered by WooCommerce.
You can also choose if you want WooCommerce to calculate tax rates for you automatically. This may be a better option than manually entering tax rates, depending on your location and business. We suggest that you consult with a professional about how your business should handle taxes.
When you select Continue, you’ll come to the final step. Here you can connect your store to Jetpack, a useful plugin that will activate several additional services (such as live rates and automatic taxes):
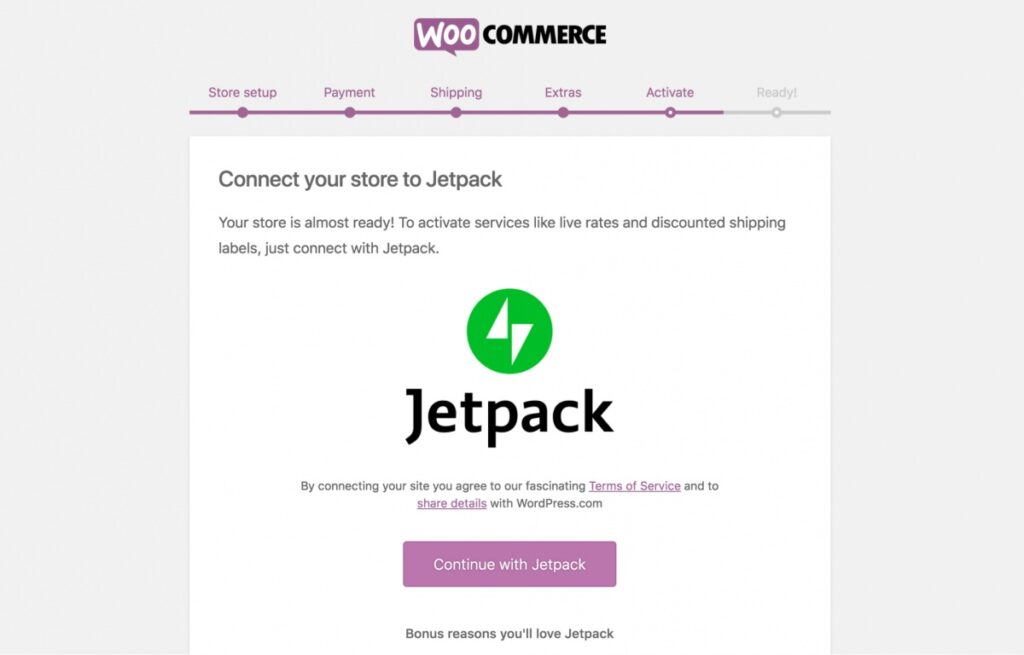
Click on Connect with Jetpack or Skip this step to complete your installation. Your store is now ready to go! If you want to configure it even further, we recommend checking out the official documentation to see all the available options.
Adding Your First Product in WooCommerce
With your store up and running, it’s time to create something to sell. There are plenty of product types you can use, but for this example, we’ll create a “simple” product. This is the most basic and common product type, meant to be used for physical products that will be shipped and require no additional options.
To create a product, go to WooCommerce > Products > Add New. This opens the Add new product interface, which should look familiar if you’re used to creating blog posts in WordPress:
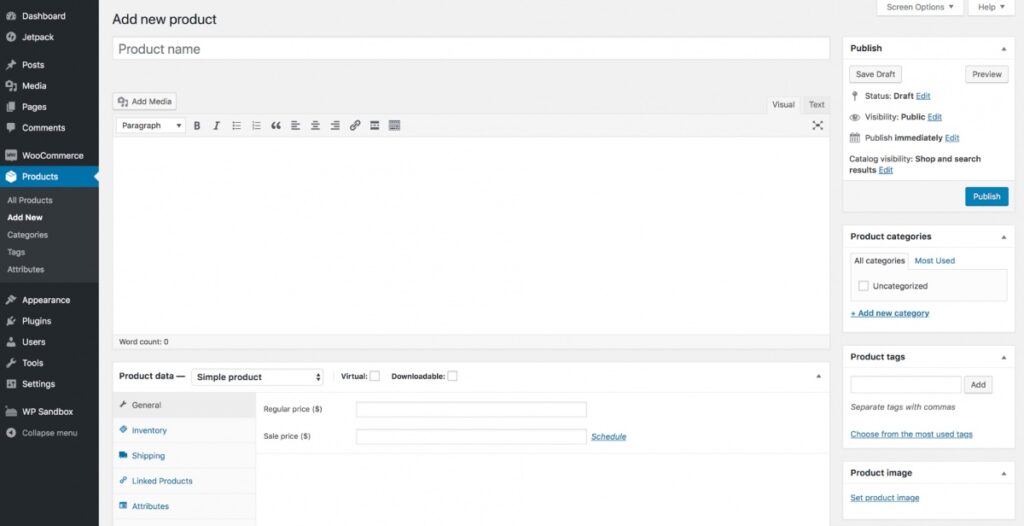
Start by giving your product a title and description. You can also assign it to one or more product categories to keep everything organized.
To configure your product’s settings, you can use the Product Data meta box. You’ll spend most of your time here when managing products, as it covers the most essential information:

The first option is the product type, so leave this as Simple product. Then, state whether the product is Virtual or Downloadable. The rest of this section consists of several panels with additional options:
- General is where you can set the product’s Stock Keep Unit (SKU) and price.
- Inventory can be used to manage the product’s stock levels.
- Shipping lets you specify the product’s weight and dimensions.
- Linked Products can be used to cross-promote similar products or to create product groups.
- Attributes let you assign attributes to the product, which is a way to connect items with similar characteristics.
- Advanced contains advanced options, such as the ability to set up orders for the product and create a purchase note.
These are the basics for creating a product, but there’s plenty more you can do. For instance, you can add product images, create variable products, and learn more about the different product types.
Feel free to experiment with the editor, and refer to the official documentation whenever you need help. It won’t be long until your online store is off the ground and your wallet is feeling the benefits of your hard work!
Uninstalling WooCommerce or Reverting to an Earlier Version
If you want to shut down your store for any reason, you can’t just deactivate and uninstall WooCommerce. This is because the actual store data, such as your settings, orders, customer details, and products, will still be saved in your database.
To delete all WooCommerce data, you will need to make an edit to your site’s wp-config.php file. This is the file that controls your site’s databases. All you need to do is add a single function to it.
Copy and paste the following code into your wp-config.php file:
define( 'WC_REMOVE_ALL_DATA', true);
Make sure to place this snippet on its own line, right above the final comment in the file. This will clear all WooCommerce data from your database.
Finally, you should always use the most up-to-date version of your plugins. However, if you do need to install an earlier version of WooCommerce, perhaps for testing purposes, you can do so from the Advanced options on the plugin’s directory page.
First, you will need to restore a previous backup of your store’s database and uninstall the plugin. You can then use the Previous Versions section on the plugin page to select the one you want:
When you’ve selected the preferred version, click on Download to get a .zip file of the plugin. You can now upload and install the plugin as usual.
Create Your Online Store With WooCommerce
WooCommerce is a terrific option for WordPress users who want to create an online store. Its user-friendly design makes it possible for beginners and experienced users alike to turn their WordPress websites into e-commerce businesses.
To get started, simply install and activate the plugin on your WordPress site and enter some details about your store and products. Then, you can start adding items to your shop.
Are you looking to build a fast and secure WooCommerce store? Our WooCommerce hosting solutions can help you speed up your site and grow your online business!
Your Store Deserves WooCommerce Hosting
Sell anything, anywhere, anytime on the world's biggest eCommerce platform.

The post How to Install WooCommerce on Your WordPress Website appeared first on Website Guides, Tips & Knowledge.
source https://www.dreamhost.com/blog/install-woocommerce-wordpress-website/
No comments:
Post a Comment