Tuesday 27 July 2021

Nameservers vs. DNS: A Complete Guide

If you’re thinking about migrating your site to a new hosting provider, you may be wondering what it will mean for your domain registration. Perhaps you’re worried visitors will be unable to access your content if you switch web hosts.

This is why it’s important to understand what nameservers and the Domain Name System (DNS) are and how they work. This understanding can help you manage your migration more efficiently.

In this post, we’ll take a closer look at nameservers and DNS records. We’ll also show you how you can access these essential components of your site. Let’s get started!

Nameservers vs. DNS Records: What They Are and How They Work

A nameserver connects your domain name with the Internet Protocol (IP) address of the server that hosts your website. Thanks to nameservers, browsers like Google Chrome and Mozilla Firefox can direct users to the right page when they type in a site address.

Typing a site address into Google.

For example, if you type “myblog.com” into Google, the nameserver tells the browser where that domain is located (i.e., the address of your web host). Without this information, the browser wouldn’t be able to display the site.

Nameservers form part of an online database known as the Domain Name System (DNS). This system is part of the  Transmission Control Protocol (TCP) and the Internet Protocol (IP), which defines how computers communicate via the internet and private networks.

DNS plays an important role, as it aids the conversion of simple domain names (e.g., myblog.com) into an IP address (e.g., 12.34.56.78), which computers then use to identify one another on the network. Effectively, DNS functions like a phone directory. It contains records of web devices, such as computers and servers, and their associated IP addresses.

Every domain has its own DNS records, which include the nameserver. These are generated when you register your domain name with a hosting provider or a domain registrar. Therefore, your nameserver points your domain name to the IP address of your host or registrar.

Your Great Idea Starts with a Great Domain

Don’t let someone else register your URL. Search DreamHost’s 400+ TLDs to find the perfect fit for your website.

How the Browser Finds Your Website

Everything that is connected to the internet has an IP address, including websites and servers. There are millions of IPs in use all over the world, and they are all unique. Your site will have its own IP address, which your host provides.

However, your domain name needs to be able to connect with your site’s IP address. For example, when you enter a site’s URL into an address bar, your browser will try to access the corresponding page. To do this, it will go through some steps that the user doesn’t see.

First, the browser connects to the target site’s domain registrar. Then the registrar points the browser to the target site’s hosting provider (e.g., dreamhost.com). Once the browser arrives at the web host, it will look for the correct nameserver (e.g., ns1.dreamhost.com).

The process is practically instantaneous, so as users, we don’t fully appreciate the additional steps. However, should you decide to change your hosting provider, you’ll need to point your domain name to your new host. This is a vital step. Otherwise, users will not be able to find or access your site.

How to Use Nameservers and DNS Records

Knowing how to access your domain’s DNS records, including your nameservers, can help you arrange a smoother transition to your new host. Let’s take a look at the different ways you can locate and manage these important records.

Locating and Managing Your Nameservers

Your domain’s nameservers can be found in your web hosting account. These might also be available on the hosting company’s documentation page.

The nameservers for domains managed by DreamHost are:

  • ns1.dreamhost.com
  • ns2.dreamhost.com
  • ns3.dreamhost.com

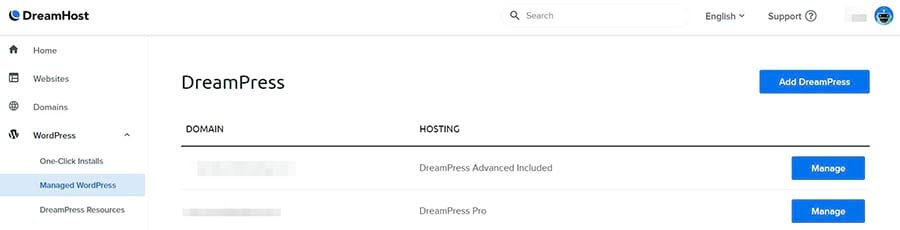
If you’re a DreamHost client, you can also log in to your hosting account to view your nameservers. To start, navigate to Websites > Manage Websites in the side menu.

Managing your websites in DreamHost.

Next, find the domain you wish to edit and click on the DNS tab on the right side of the screen. This will bring up a page with your nameservers.

Locating your nameservers in DreamHost.

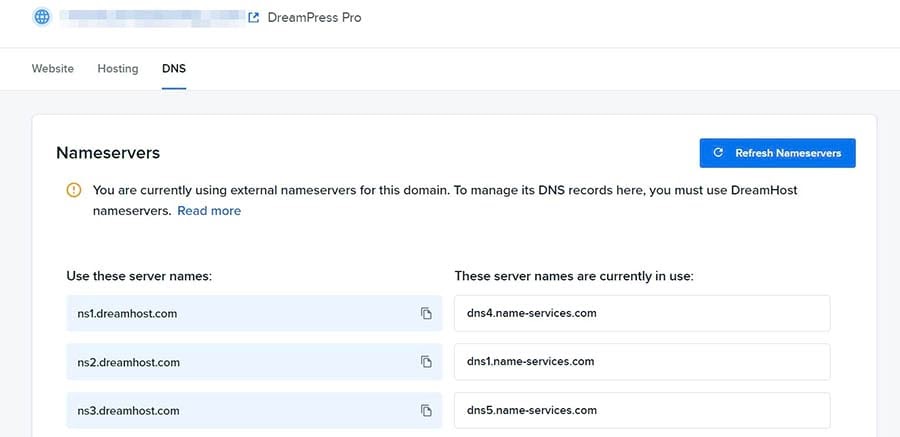
Note that if your domain is registered with a different company, you won’t be able to update your nameservers from your DreamHost account. To manage your nameservers, you’ll need to log in to your account with the company that manages your domain.

If your domain is registered with DreamHost, you’ll be able to edit your nameservers. For instance, if you wish to replace your current nameservers, you can simply erase them from the box and type in your new ones.

You can also manage your domain from the Registrations page in your account. For more information about this, you can read our complete instructions for editing your nameservers on DreamHost.

Alternatively, you can find out what a website’s nameservers are by performing a WHOIS lookup. Nameservers are public records, so it is possible to find this information by using a third-party tool.

Several sites offer this service, including lookup.icann.org.

Running a WHOIS search.

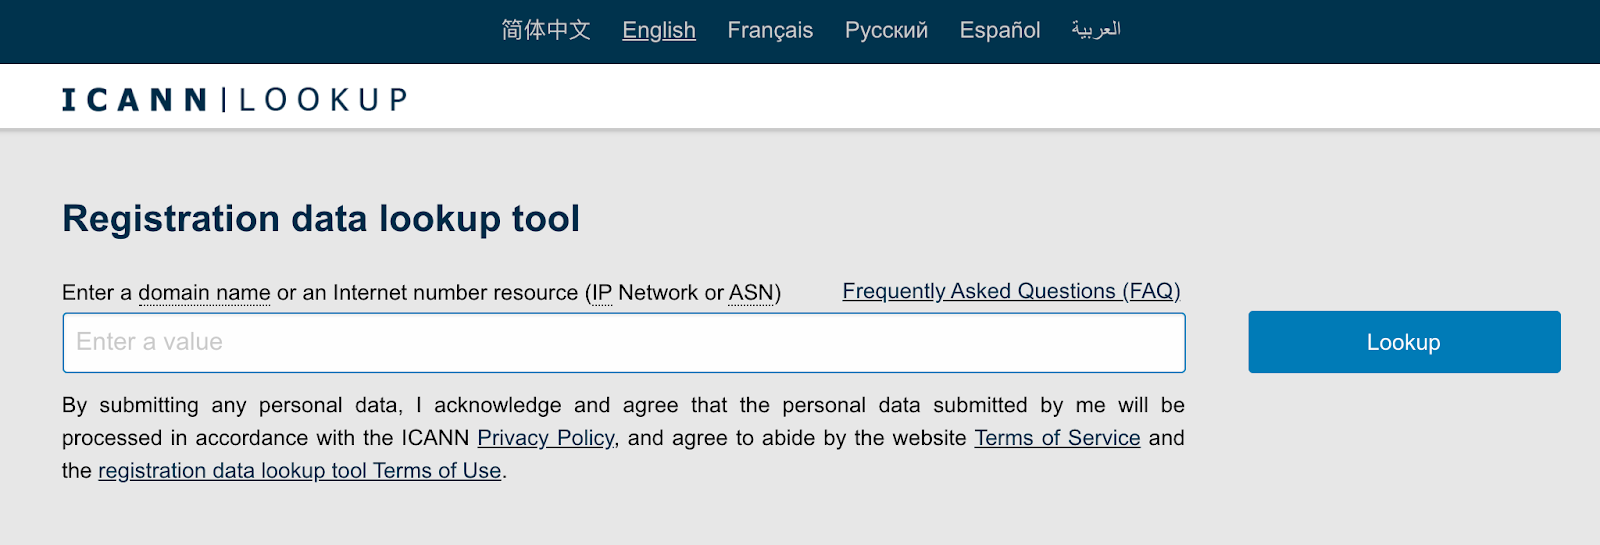
You can type the domain into the search bar, and a list of records will appear. For example, here are the nameservers for google.com:

Viewing nameservers in a WHOIS search.

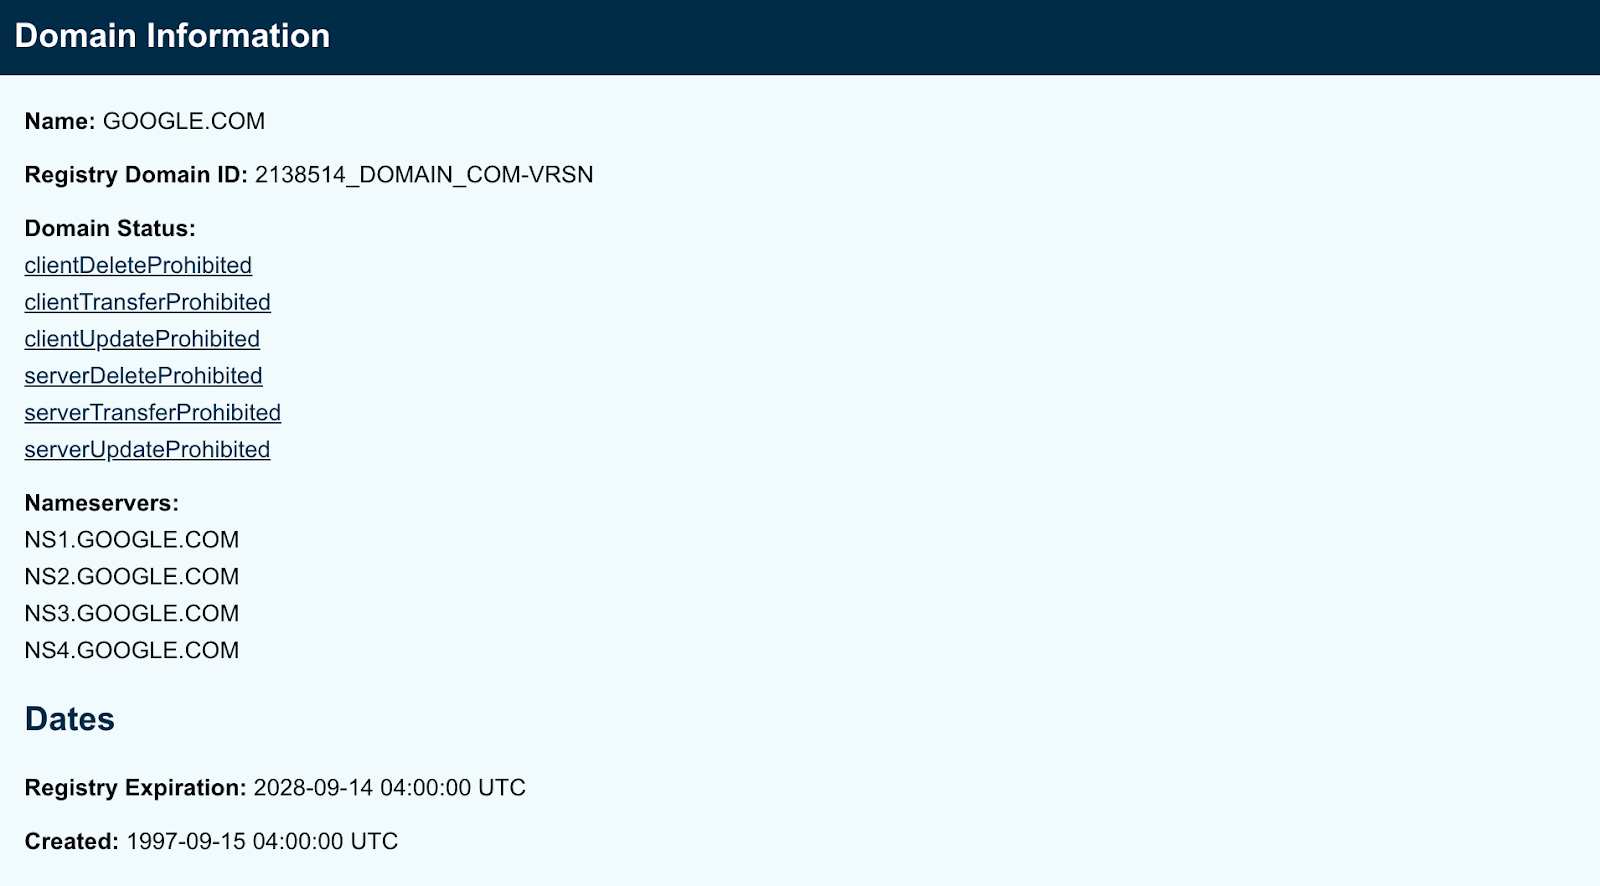
Note that a WHOIS search can also show the personal details of the domain’s owner, including their name and email address. Some hosting providers and domain registrars offer WHOIS privacy, which protects the identity of the user.

Locating and Managing Your DNS Records

Your DNS records are just as easy to locate and manage. You can log in to your hosting account to view your records and make changes to them. If your domain is managed by a third party, such as a domain name registrar, you’ll need to log in to your account with that company.

If you have a DreamHost account, your DNS records can be found on the same page as your nameservers.

Viewing your DNS records in DreamHost.

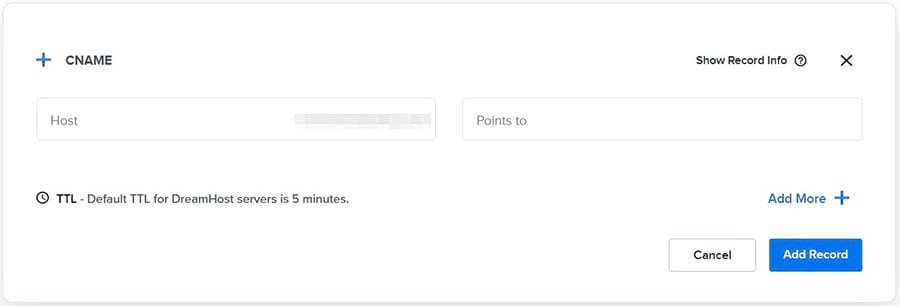
You can add a new DNS record to your domain by clicking on the blue Add Record button. As you may notice, there are different types of records you can create. Let’s take a closer look at the most common ones.

A Record

The address record is the most basic type of DNS record. It is used to point a domain (or subdomain) to an IP address.

CNAME Record

The canonical name record points a domain to another domain, as opposed to an IP address. This is used when a site has subdomains, such as shop.myblog.com or donations.myblog.com.

Adding a CNAME record in DreamHost.

These are subdomains of myblog.com. Let’s say that each of these subdomains has a CNAME record containing the value “myblog.com.” Since the DNS is looking for an IP address, when the CNAME record is accessed, a further lookup is carried out at myblog.com (as this is the value contained in the CNAME file).

It will then return the IP address stored in myblog.com’s “A” record. This means that these subdomains are aliases of the main domain, and the canonical name (or “true name”) of these subdomains is actually “myblog.com.”

MX Record

A mail exchange record is used to direct emails to an address registered on your domain (e.g., hello@myblog.com) per the Simple Mail Transfer Protocol (SMTP), the standard protocol for email.

It is important to ensure that your MX records point to the right mail server. If not, emails won’t be delivered to your account. We also recommend that you back up your emails before switching to a different host.

Adding an MX record in DreamHost.

NS Record

As mentioned previously, this is the nameserver record. You can use this setting to change your nameservers so that they point to your new hosting provider.

TXT (Text) Record

This one allows you to insert text into your DNS records. Originally, the TXT record was designed for human notes, such as site descriptions or development details. However, it is possible to include machine-readable data.

Adding a TXT record in DreamHost.

This record can help you to protect your site against spam. It also enables you to verify your domain, such as by adding a Google Site Verification record. It is very common to have multiple TXT records for a single website.

Monitoring Your DNS Records

When updating your nameservers and other domain records, you’ll need to take DNS propagation into account. This is the time it takes for your DNS records to update across the internet. For example, when you modify your nameserver to point to your new hosting company, this change can take up to 72 hours to come into effect.

At DreamHost, we offer a DNS propagation checker to help you monitor your records. To access this tool, simply click on DNS checker on your Records page.

Accessing the DNS Checker in your DreamHost account.

On the next page, you can check your website’s current IP address and DNS record information. Our interactive maps show you the status of your records across nameservers in different locations.

Using the DNS checker to view the status of your records.

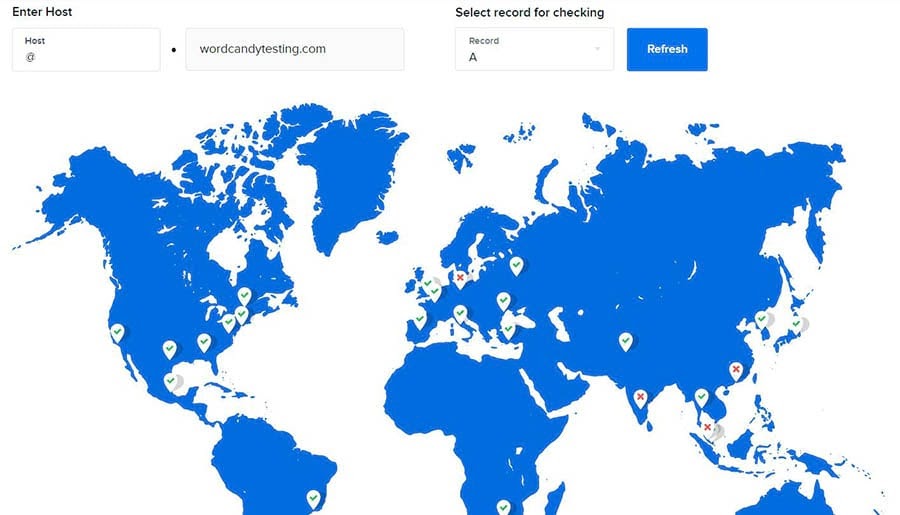
The green checkmarks on the map indicate that your DNS is up-to-date in the specified locations. Meanwhile, a single red cross suggests there might be a problem with the DNS server in that location.

If you see multiple red crosses, it may mean that you haven’t configured your DNS at the company where you registered your domain. However, this could also be a sign that your new DNS settings haven’t yet finished updating.

DNS Management Made Easy

Whether you need help identifying a domain's nameservers, understanding a DNS query, or choosing a web host, we can help! Subscribe to our monthly newsletter so you never miss an article.

Nameservers vs. DNS in a Nutshell

Understanding how nameservers and DNS Records work can ensure a smooth transition when migrating your site to a new host. It is imperative that your domain name points to the correct nameserver. Otherwise, site visitors will be unable to access your pages.

At DreamHost, we make your life easier by managing the entire transition process, including your domain transfers. We also enable you to manage your own domains and DNS from your hosting account, and our service comes with free privacy protection for your domain.

The post Nameservers vs. DNS: A Complete Guide appeared first on Website Guides, Tips & Knowledge.


source https://www.dreamhost.com/blog/nameservers-vs-dns-guide/

Monday 26 July 2021

7 Great Web Accessibility Examples to Inspire You

Here at DreamHost, we believe everyone should be able to use any website on the internet, regardless of any disability they may have. However, while we care about web accessibility, we also understand that designing a website that’s both accessible and visually attractive can be challenging.

The good news is that accessible websites don’t have to be ugly. On the contrary, some stunning websites out there are designed with accessibility in mind — which we could all learn a thing or two from.

In this post, we’ll start by showing you what strong web accessibility looks like. Then we’ll show you seven of the best web accessibility examples on the internet and see what we can learn from them. Let’s get started!

Create a Website for All

We make sure your website is fast and secure so you can focus on the important stuff.

What Great Web Accessibility Looks Like

According to The World Bank, over 15% of the global population has some form of disability. These can include:

  • Visual impairments: Some users have visual impairments that inhibit their ability to see clearly or perceive color contrasts
  • Hearing impairments: This includes deafness and partial hearing loss.
  • Physical disabilities: Some people have mobility impairments that can impact their dexterity and ability to make precise movements, possibly making using a mouse difficult.
  • Cognitive disabilities: Conditions like dyslexia and dementia can affect a person’s cognitive abilities.

It’s important to keep all of these different challenges at the forefront of your mind when creating your website to ensure there are no barriers to disabled users. To help web designers with this, W3C has developed a set of Web Content Accessibility Guidelines (WCAG).

Solid web accessibility means adhering to these guidelines and carefully following the four guiding principles of web content accessibility. These guiding principles state that all websites should be:

  1. Perceivable
  2. Operable
  3. Understandable
  4. Robust

Ensuring that your website is “operable” might mean implementing keyboard-friendly navigation for people who cannot use a mouse. “Perceivable” might mean making sure to use high-contrast colors for people with visual impairments.

We’ve already outlined 10 practical ways to implement the web accessibility guidelines and make your website more accessible (including advice on accessibility testing and UI components). Now we’re going to look at some examples of websites that are already doing it right.

7 Great Web Accessibility Examples to Inspire You

Below, we’ve listed some of our favorite web accessibility examples. These seven websites set the bar when it comes to accessibility.

1. Scope

The Scope home page.

Scope is a disability equality charity based in England and Wales dedicated to creating a fairer, more equal society. As a champion of disability equality, you’d expect that this organization’s website would be as accessible as possible — and it is.

Not only does it fully adhere to WCAG 2.0 and WCAG 2.1 guidelines, but the site is even customizable for individual users. For example, users can change the site’s colors, increase the text size, or even turn on text narration to have the content read aloud.

If you look at the top-left section of the home page, you’ll see an Accessibility tab. Click on this, and the site will bring you to its accessibility page, which includes instructions on how to adapt the experience to your needs, links to assistive technologies, and a list of known accessibility issues that are being worked on.

Scope uses short sentences and large, clean fonts throughout the site for maximum readability. Plus, the site is fully compatible with screen reader software.

Despite already being a fantastic example of website accessibility, the team at Scope continues to make improvements. Every three months, they test the website for accessibility and make updates where necessary.

2. Paralympic.org

The IPC home page.

Paralympic.org is the official website of the International Paralympic Committee (IPC). The IPC is a powerful advocate of social inclusion, and its website is a testament to that.

It features keyboard-friendly tab navigation and an instant “scroll-to-top” button to make it easy to move around the page. Images and videos are large and highly visible, and there’s plenty of white space to make visual elements stand out.

If you go to the home page, you’ll notice a text size adjuster in the top-right corner of the screen. This is easily visible and allows users with visual impairments to quickly customize the size of the text to meet their needs.

3. KidzWish

The KidzWish home page.

KidzWish is an organization that provides therapy, support services, and an annual Christmas party for children who are disadvantaged or have a disability. It caters to many people with different disabilities, so naturally, it needed to build a website that was as accessible as possible.

It definitely achieved that goal. The KidzWish website is wonderfully designed, with a logical structure, keyboard-friendly navigation, high-contrast colors, and large text. Plus, it’s easy to navigate with prominent, clickable elements.

The design is also very child-friendly. It boasts a bright, bold color scheme and tons of fun graphics.

4. SSE Energy

The SSE Energy home page.

SSE Energy is a UK-based energy company. Its website features information about tariffs and bundles and includes a main login portal for its customers to service their accounts.

The company has done a wonderful job of making the site accessible to all by using large readable text and a clear interface. It also incorporates keyboard navigation to make it easy to get around the site.

The designers went above and beyond to ensure that the site is accessible to visually- and hearing-impaired users. There are SignVideo services for British Sign Language users, and the color contrast meets WCAG guidelines.

Customers can also request bills in Braille and larger formats. In addition to all of this, the site is compatible with assistive technology.

5. BBC iPlayer

The BBC iPlayer home page.

BBC iPlayer is the BBC’s online streaming service. Its website is where users go to watch programs online. It’s also another fantastic web accessibility example that we can all learn from.

First, the website is both very easy to navigate and compatible with assistive technology. You can move around the page by clicking on the Tab button. Navigating over the iPlayer logo brings up an option for Accessibility help, which links to a resource page with a lot of useful information for users with disabilities.

The content is logically laid out, and all buttons use a clear visual design with high contrast colors. There are also keyboard and mouse-accessible tooltips that provide extra information for users and descriptive alt text for all images.

The video content is also accessible. All shows on BBC iPlayer feature subtitles. There are also audio-described and signed content categories.

6. NSW Government

The NSW Government home page.

The NSW Government website is the government hub for the New South Wales area of Australia. It’s perfectly designed to make it easy for residents of all backgrounds and abilities to use.

This site features tab navigation, making it simple to navigate pages using a keyboard or screen reader. Thanks to large fonts and contrasting colors, it’s also extremely readable and is compatible with assistive technology.

7. GOV.UK

The GOV.UK home page.

GOV.UK is the central hub for all U.K. government web pages. It can be used to access everything from information about benefits and disability aid to visa and immigration support.

The U.K. Government has done an amazing job of making its site accessible for everyone who needs it. The site features keyboard navigation and ARIA attributes, making it easy to find pages and navigate the site. It also is adapted to support 300% zoom for visually impaired users.

DreamHost Takes Inclusivity Seriously

We regularly report on diversity, accessibility, and representation in the tech industry. Subscribe to our monthly newsletter so you never miss an article.

Make an Accessibility Statement

Making sure your website is as accessible as possible is both a moral and a professional obligation. It might seem like a challenge, but it’s worth it. You can simply follow in the footsteps of the web accessibility examples above to create an inclusive website that all users can enjoy.

Ready to build your accessible website? Let us take care of the technical side for you, so you can devote more of your time and energy to what matters: the design. Sign up for our Shared Unlimited Hosting Plan and get unlimited, secure hosting for all of your websites!

The post 7 Great Web Accessibility Examples to Inspire You appeared first on Website Guides, Tips & Knowledge.


source https://www.dreamhost.com/blog/great-web-accessibility-examples/

Tuesday 20 July 2021

How to Fix the 403 Forbidden Error in WordPress (5 Methods)

Being barred from your own site can be very frustrating, especially when you have no idea what is causing the problem. The 403 Forbidden error typically occurs when you’re trying to log in to WordPress or visit a specific page on your site.

Fortunately, there are a few simple fixes for this common WordPress error. Depending on your hosting plan, you may even be able to resolve the issue with help from your web host.

In this post, we’ll take a closer look at the 403 Forbidden error and its main causes. We’ll then show you five ways to fix it. Let’s get started!

What the 403 Forbidden Error Is (And What Causes It)

The 403 Forbidden error is one of several HTTP status codes used by servers to communicate with your browser. When the 403 status code shows up on your screen, it means that your server thinks you do not have the required permission to access that particular page.

The 403 Forbidden error typically appears when you’re trying to log in to your WordPress admin area or when you visit a specific page on your site. You may also encounter it while installing WordPress.

The error is usually accompanied by one of the following messages (or similar variations):

  • “403 Forbidden – Access to this resource on the server is denied.”
  • “Forbidden – You don’t have permission to access [directory name] on this server.”
  • “You are not authorized to view this page.”
  • “It appears you don’t have permission to access this page.”
  • “403. That’s an error. Your client does not have permission to get URL [address] from this server.”

Instead of the “403 Forbidden” status, you might come across a simple notification that says “Access Denied.” It is also possible that you will get the following message: “Access to [domain name] was denied. You don’t have authorization to view this page.”

There are several possible causes of this 403 Forbidden error. The most likely one is an incorrect file permission on your server. However, this error can also be triggered by a faulty plugin or a corrupt .htaccess file.

In most cases, you should be able to resolve the issue on your own. However, you might also need to get in touch with your hosting provider to access or change some settings on your site.

Skip the Permission Settings Stress

Avoid WordPress troubleshooting when you sign up for DreamPress. Our friendly experts are available 24/7 to help solve website problems — big or small.

How to Fix the 403 Forbidden Error in WordPress (5 Methods)

Now, let’s go through a few ways you can fix the 403 Forbidden error in WordPress. First, we recommend that you make a backup of your site just in case something goes wrong and you need to restore it to an earlier version.

1. Change Your File Permissions

Every WordPress file on your site’s server has its own permissions. These settings control who can access and modify its contents. If these files have incorrect permissions, your server will stop you from accessing them.

If you want to check your file permissions, you can simply contact your hosting provider, and a technical expert should be able to take care of it. You can also do this yourself by connecting to your site with a Secure File Transfer Protocol (SFTP) client such as FileZilla.

Alternatively, you can also access your site through the file manager in your hosting account. If you have a DreamHost account, you can navigate to WordPress > Managed WordPress in the sidebar. Then, find your domain and select Manage.

Accessing your domain in your DreamHost account.

On the next page, click on the Manage Files button in the Details section.

Accessing your file manager via your DreamHost account.

You’re now in the file manager. Next, open the folder labeled with your domain name to access your site’s directory.

Inside your root directory, select the folder that contains all of your WordPress files. If you’re using FileZilla, this is the public_html folder. Then, right-click on it and choose File Attributes.

Changing the file permissions using FileZilla

In the popup window, locate the Numeric field and enter “755” or “750” in the value box. Then select the Recurse into subdirectories and Apply to directories only options, and click on OK.

Changing the file permissions for the directories.

So far, you’ve applied the correct file permissions for your directories. You’ll now do the same thing for your files.

To start, right-click on your public_html folder and select File Attributes. This time, you’ll need to type “644” in the Numeric value field. Then choose Recurse into subdirectories, select Apply to files only, and click on OK.

Changing the file permissions in FileZilla.

Note that your wp-config.php file requires a different numeric value than the ones stated above. This unique value prevents other users on your servers from accessing the file. Therefore, you’ll need to manually change its file permission.

In your root directory, find the wp-config.php file, right-click on it, and select File permissions. Next, set the numeric value to “440”, and click on OK.

Changing the permissions for the wp-config.php file in FileZilla.

Now, every one of your WordPress files and folders should have the correct permissions. Once you’ve completed the above steps, go back to your site and try to reproduce the 403 Forbidden error. If your site is working fine, you don’t need to do anything else.

However, don’t worry if you’re still facing the same problem. There are still a few more fixes to try, and some of them are very simple.

2. Deactivate Your Plugins

As we mentioned earlier, the 403 Forbidden error can also be caused by a faulty plugin. To find out if this is the case, you’ll need to deactivate your plugins and then reactivate them one by one.

To start, connect to your site via FileZilla or the file manager in your hosting account. Then, in your site’s root directory, open the wp-content folder and locate the plugins folder. Then right-click on the plugins folder and select Rename.

How to rename the plugins folder in your site’s root directory.

Next, give the folder a new name, for example, “plugins_test. This will automatically deactivate all of your plugins.

If you can access your site after renaming the folder, then the 403 Forbidden error was caused by a glitchy plugin. Your next step is to find out which one it is.

First, return to your site’s root directory and rename the plugins folder back to “plugins”. Then navigate to the Plugins page in your WordPress dashboard and activate the plugins one at a time. Keep doing this until you are able to reproduce the error. Once you’ve identified the faulty plugin, you can either remove it or contact its developer for support.

3. Delete and Restore the .htaccess File

A corrupt .htaccess file can also trigger the 403 Forbidden error. This file is located in your site’s root directory and enables WordPress to interact with your server.

Inside your site’s root directory, locate the .htaccess file, right-click on it, and choose Delete.

Locating and deleting the .htaccess file in your site’s root directory.

Now, try accessing your site again. If the 403 Forbidden error has disappeared, then your .htaccess file may have been corrupted. This means you’ll need to create a new one.

To do this, navigate to Settings in your WordPress dashboard and select Permalinks. Then click on the Save Changes button at the bottom of the page, and a new .htaccess file will be generated. You can look for the file in your site’s directory to ensure that it has been restored.

4. Deactivate Your CDN

If you’re still getting the 403 Forbidden error after completing the above steps, you may have a problem with your Content Delivery Network (CDN). This is a network of servers located in different parts of the world, with each server hosting a copy of your website. Many hosting plans come with a CDN to help boost your site’s performance.

To see if your CDN is the cause of the error, you’ll need to temporarily disable it. You can do this by logging into your hosting account and locating your CDN settings. If you’re unable to access your CDN, we recommend getting in touch with your hosting provider.

5. Check Your Hotlink Protection

Finally, you might want to check your site’s hotlink protection. Hotlinking is when someone embeds media files on their site by linking them directly from another site. Some individuals may do this to use another site owner’s bandwidth (rather than their own), which is effectively theft.

Some hosts and CDN providers offer hotlink protection. However, if this is not set up properly, it can trigger a 403 Forbidden error on your site. Therefore, you may want to contact your web host about this issue. While you may want to look into this yourself, it’s best to get help from a technical expert to ensure that your hotlink protection is configured correctly.

Additional WordPress Resources

If you’re new to WordPress, you’re bound to run into some technical issues while setting up your site. To help you fix some of the most common WordPress errors, we’ve put together several how-to guides:

Meanwhile, if you’re looking for more WordPress tips and hacks, check out our WordPress Tutorials. This collection of guides will help you set up and design your first WordPress site like a professional.

Take Your WordPress Website to the Next Level

Whether you need help navigating the WordPress dashboard, decoding an error message, or finding the plugins folder, we can help! Subscribe to our monthly digest so you never miss an article.

Bye, WordPress 403 Error

The 403 Forbidden error appears when your server denies you permission to access a page on your site. This is mainly caused by a faulty security plugin, a corrupt .htaccess file, or incorrect file permissions on your server.

In this post, we looked at five main ways you can fix the 403 Forbidden error using an SFTP client like FileZilla or the file manager in your hosting account:

  1. Change your file permissions.
  2. Deactivate your plugins.
  3. Delete and restore the .htaccess file.
  4. Deactivate your CDN.
  5. Check your hotlink protection.

If you want to receive expert help when encountering WordPress errors, you may want to consider a managed WordPress hosting plan. Our DreamPress plans come with 24/7 technical support for WordPress site owners, so you can spend less time troubleshooting and focus your efforts on growing your business.

The post How to Fix the 403 Forbidden Error in WordPress (5 Methods) appeared first on Website Guides, Tips & Knowledge.


source https://www.dreamhost.com/blog/how-to-fix-403-forbidden-error-wordpress/

Monday 19 July 2021

11 Ways Your Online Store Can Compete with Mega-Retailers (And Win)

It’s hard to grasp the sheer scale of mega-retailers such as Amazon. In 2020, Amazon alone took in almost 38% of US online sales (the next closest competitors were Walmart with 5.8% and Ebay with 4.5%). Even more staggering? Amazon’s net sales totaled $96.15 billion in Q3 2020. It’s safe to say that Amazon’s success is unparalleled.

Launching an e-commerce store that can compete with those numbers is, erm, difficult.

Fortunately, your online store doesn’t have to beat the likes of Amazon or eBay to be successful. What it needs to do is find a share of the market for itself and learn how to thrive within that retail niche. That way, you’ll be able to scale your store and increase its earnings organically over time.

In this article, we’re going to talk about 11 strategies you can implement to compete with e-commerce giants such as Amazon. We’re not saying you’ll end up making more money than Jeff Bezos, but every extra dollar helps, so let’s get to it!

1. Focus on Niche Products and Services

Wherever it is that you live, chances are there are a handful of online megastores where you can buy almost anything you want. Those types of stores excel at casting a wide net to catch as many buyers as possible. The problem is that they often can’t compete with specialized sites when it comes to offering more niche items.

For example, while a big box store might have hundreds of generic mugs for sale, you could offer to create custom designs, thereby filling a more specific niche.

Personalization options are a way to differentiate products.  

The main takeaway here is that if you’re starting out, the smart move is not to try and compete at every level. What you need to do is have a specific buyer persona in mind and focus on those buyers, offering the products and services they want. In many cases, filling a particular retail niche may even enable you to command higher prices, so it’s a win-win scenario.

2. Offer Subscription-Based Services

Offering subscriptions is an excellent strategy because it allows you to create consistent, recurring income. Plenty of big-box stores offer subscriptions. Amazon, for example, offers the incredibly popular Prime service.

Amazon Prime is the world’s most famous subscription service.

Even more niche stores, such as Humble Bundle, understand the power of subscriptions. On top of offering cheap video games, this store enables users to pay a set price each month for more stuff.

Humble Bundle offers a set price for access to hundreds of games.

Just because you run an online store doesn’t mean that all your income has to come from product sales. You can also offer subscriptions for monthly freebies, discounts in your store, access to exclusive deals, and more. Keep in mind, though — whatever angle you decide to take with subscriptions, it should synergize with your store’s products.

Competing Online Just Got Easier

Join our monthly newsletter for tips and tricks to build your dream website!

3. Provide Better and/or Cheaper Shipping Options

Competing with massive online stores when it comes to shipping can be difficult. They move such large volumes of products that they can get access to discounts and perks that small online stores can’t hope to match.

What you can do to compete is offer better-quality shipping options for your particular region. In most cases, smaller stores will focus on specific cities or just one country. That means you have the edge over more global stores, since you may be able to offer faster shipping times and a more personalized experience throughout the process.

In some cases, you might even have access to cheap shipping options you haven’t considered. For example, there are a lot of local startups focused around product deliveries. Partnering with them may enable you to offer ultra-fast low-cost shipping, depending on where your customers are located.

4. Excel When It Comes to Customer Service

The level of customer service you offer can make or break your store. People might be willing to take a chance and buy from a retailer they don’t know, but if you treat them poorly, you can be sure they won’t come back.

Some of the most common service-related mistakes small retailers make include:

  • Taking too long to answer customer questions
  • Offering cookie-cutter answers to customers
  • Giving inaccurate shipping estimates or sending packages late

Just to drive home how vital the customer experience is, keep in mind that happy clients are more likely to send new business your way. Likewise, retaining customers is much cheaper than collecting new leads.

In other words, a little more time spent on ensuring better service can pay off for years to come.

5. Optimize Your Online Store in Every Way You Can

The difference between one and three seconds may seem insignificant, but it’s not — particularly if you run an online retail store. Studies show that if your website takes more than a few seconds to load, people start getting impatient. Amazon alone estimates that a one-second delay in its loading times could cost up to $1.6 billion in lost sales over the course of a year.

In other words, your website needs to be fast. There are a lot of factors that can hurt its performance, such as:

  1. Using a hosting plan that doesn’t offer enough resources.
  2. Failing to optimize your images.
  3. Adding too many scripts to your pages.
  4. Not using browser caching.

Reasons two through four fall under the category of poor website optimization.

But it doesn’t matter how much effort you sink into optimization if your web host isn’t up to par. What we recommend is that you measure your site’s loading times, try to optimize them, and consider moving to a new host if you’re still not seeing the results you want.

Shared Hosting That Powers Your Purpose

We'll make sure your website is fast, secure, and always up so you can compete online.

6. Use Social Media to Promote Your Store and Its Products

The largest online retailers can spend millions on advertising each day. At the same time, so many people are familiar with them that word of mouth alone is often enough to get them plenty of sales.

“Mom-and-pop” online stores, on the other hand, need to be much savvier when it comes to marketing. Since you can’t compete in terms of budget, the easiest way to get attention to your store is via social media. This involves:

  1. Being active on several social media platforms.
  2. Knowing how to engage with your audience and reach new users.
  3. Connecting with influencers who can promote your products.
  4. Using non-traditional forms of content, such as infographics, for higher engagement.

The main takeaway is that small businesses need to make more of an effort to get online conversions. However, if you know which platforms to focus on and you have a good grasp of social media, these approaches should yield excellent results. Also, keep in mind that it might be worthwhile to hire a social media professional if you’re not as savvy in this area, as it’s essential to your store’s success.

7. Work on Your Email Marketing Strategy

There’s a reason almost every single website and online store wants your email address. They understand that it’s a powerful tool to drive sales and increase engagement. The average person checks their email 15 times a day, and nearly 60% of users say that the messages they get influence their purchases.

More importantly, email marketing is incredibly scalable, even for a small store. The more addresses you collect, the more sales you can drive via campaigns. What’s more, most email marketing platforms enable you to send an almost unlimited number of messages for a low price.

That’s not to say that you should spam your subscribers, however. In fact, you should only contact them when you have something of value to offer, such as product discounts, important news, and so on.

Amazon sends targeted email deals.

If you’re already using email marketing but you want to get more out of it, then it may be time to review your strategy.

8. Consider Streamlining Your Product Catalog

It stands to reason that the more products you offer, the more sales you’re likely to get. The problem is that managing a huge catalog of items can be much more complicated than you’d imagine. For each product, you have to consider sourcing, storage, shipping costs, marketing materials, and more.

For massive online stores, that isn’t a problem. They’re all about volume, and they can throw all the resources they want at the above tasks. However, the more strapped you are for money and personnel, the more that overextension can hurt you.

Fortunately, it’s entirely possible to run a successful online store that offers a limited catalog of products. SlimFold, for example, built an entire e-commerce experience around a handful of unique wallets.

Alt text: SlimFold has a streamlined product offering.

Offering a limited catalog ties in perfectly with targeting a specific niche of users. As long as you know there’s demand for the products and services you offer, you can limit them to give a feeling of exclusivity and test higher price points.

9. Offer Multiple Payment Options

When it comes to online purchases, most people rely on credit cards. However, there are a lot of payment processors you can use, including PayPal, Stripe, Amazon Pay, and many others.

You’ve probably noticed that a lot of the major online retailers offer several payment options during their checkout processes. This enables the shopper to pick whichever choice they feel most comfortable with, so the store doesn’t lose out on any potential purchases.

Large retailers offer many payment options.

For smaller online stores, dealing with a lot of payment gateways can be a hassle. It means that your earnings will come in via multiple channels, you’ll have to set up accounts for each one, and you’ll need to make sure you’re in compliance with various policies.

However, despite those downsides, offering multiple payment options is still the way to go for most online stores. At the very least, you should enable users to pay via PayPal and the most popular credit cards — just to cover your bases.

10. Study the Competition Within Your Niche

So far, we’ve focused mostly on how to compete with a big box retailer. However, it’s crucial that you don’t lose track of other smaller stores within your niche since they’re also competitors.

Studying your direct competitors so you can provide a better experience than they do is incredibly important. After all, smaller retailers can be much easier to overtake than e-commerce giants. You can compete with these competitors in a number of ways, such as:

These are similar to some of the tactics we’ve discussed so far. Only this time, you’re competing against another David instead of Goliath.

11. Offer Only the Best-Quality Products

Since you can’t generally compete with mega-retailers in terms of inventory, pricing, or shipment, you need to focus on quality. We’ve already talked about providing top-notch customer service, but making sure the products you offer are as good as they seem is also essential.

These days, online megastores such as Amazon are getting overrun with cheap product knockoffs. That’s causing a real headache for the consumer, who doesn’t understand why they’re getting low-quality items from a retailer they know and trust.

This opens up the opportunity for smaller online stores to attract those customers. In many cases, people who want high-quality items will turn to more specialized online stores. If you can guarantee that your products are the real deal, and you offer a solid return policy, this can be one of your best ways to get more sales.

Slay the Retail Giant

When it comes to an e-commerce business, you need to be realistic about your expectations. Competing with mega-retailers when it comes to inventory or pricing is just about impossible. However, there are plenty of small business owners who thrive, despite all the competition they face.

The key is to understand that although you can’t compete in some categories, there are plenty of areas where smaller companies can get a real edge. For example, smaller operations can provide much more personalized customer service or focus on product quality in a way that a big online retailer can’t.

What do you think is the best way for online stores to compete with giants like Amazon or Walmart? Share your thoughts and ideas with us in the DreamHost Facebook Group and let’s discuss!

The post 11 Ways Your Online Store Can Compete with Mega-Retailers (And Win) appeared first on Website Guides, Tips & Knowledge.


source https://www.dreamhost.com/blog/ways-online-store-can-compete-megaretailers/

Wednesday 14 July 2021

11 Secrets to Making a Successful Website

Whether you’re a writer looking to reach a wider audience, a boutique manufacturer needing to boost sales, or you’re someone who just wants to make money online — you’re going to need a website. And not just any website — a great website.

Unfortunately, the World Wide Web has been saturated with sites for some years now.

Standing out. Making your mark. It’s not easy.

But here at DreamHost, we know a fair bit about websites and what makes them work — so here are our 11 secrets to making a successful website.

  1. Defined goals
  2. A good domain name
  3. Quality web hosting
  4. A clear description
  5. A top-notch CMS
  6. A great e-commerce platform
  7. Engaging web design
  8. SEO optimization
  9. High-quality content
  10. Using Google Analytics
  11. A site maintenance plan

1. Define your goals

Before you do anything else, you need to decide what you want to achieve from this website.

  • Is it going to be an e-commerce website that you use to sell products?
  • Are you looking to promote a service?
  • Do you want to make money via affiliate links?
  • Are you simply after a platform to share your thoughts and ideas?

It can be hard to change the direction of an established website. Make sure you know what type of website you want to create and what you need to get out of it.

2. Choose a good domain

Picking a good domain name is easier said than done. It’s also seriously important since it’s tricky to change it once you’ve started establishing your site and brand. (Yes, you can migrate to a new domain, but that comes with all sorts of complications.)

So what is a good domain? What does a good domain look like?

  • It is your brand name or includes your brand name.
  • It’s memorable.
  • It’s easy to spell.
  • It’s short (ideally under 14 characters; but the shorter, the better).
  • It’s free of numbers, hyphens, or other unusual characters.
  • It has a recognized, trustworthy extension (.com is the ideal).

It can also be a good idea to choose an SEO-friendly domain that includes one of your most important keywords.

3. Get secure, quality web hosting with good tech support

It can be tempting to skimp on web hosting and choose the cheapest service you can find. Don’t do this.

A cheap web host can cost you in other ways: excessive downtime, slow site speeds, limited or non-existent support.

It’s not worth it.

If you’re serious about making your website a success, invest in quality web hosting you can rely on. You won’t go wrong with DreamHost web hosting.

4. Include a clear description of your business

This is something a lot of companies get wrong. They know their industry and their business, inside and out. That’s great. But it often means they forget how to describe it to people that don’t.

Ideally, you should be able to sum up what you do in a couple of sentences. This summary should be displayed prominently on your homepage. And anyone should be able to read it and understand it.

If you have any doubts, ask someone who knows nothing about what you do what they think. Better yet, enlist the help of a professional copywriter.

5. Use a top-notch content management system

A content management system (CMS) is where you’ll manage your website’s pages and content. The right one can make this quick, easy, and fun. The wrong one can be the source of endless headaches and can even limit what you’re able to do.

Good content management systems allow you to build pages and posts on a site with no prior knowledge of coding. They cut down the barrier to entry and enable anyone to create their own site.

But how do you know which is the right one for you?

The following questions will help you decide:

  • Do I want a basic website with no frills?
  • Do I want to be able to build the website in the future to have more features?
  • What’s my budget?
  • Will I want to add the ability for a website visitor to buy products in the future?
  • Am I happy to pay ongoing costs, or do I just want to pay a one-off fee?
  • Do I need to integrate with other parts of my business (such as a lead generation tool or a payment platform)?
  • Is it SEO-friendly?
  • Will it scale with my business?
  • Can I use a website builder to make the design process easier?

Depending on what you want to use the CMS for, you may have other questions, but these basic ones should set you off on finding the right content management system for your needs.

6. Choose a great e-commerce platform

If you know that you’ll want to sell products on your site, you need to know what e-commerce platform you need to choose. You can choose from many platforms, but not all of them are built to scale or fit for your purposes. As with most things in life, you get what you pay for.

If you’re running a business website, you need to make sure that the platform you choose is reliable and sturdy. You don’t want to deal with customer complaints because you chose a platform that can’t deliver.

Before selecting a platform, ask yourself the following:

  • Is it SEO-friendly? While there are many cheap and easy-to-set-up e-commerce platforms, not all of them are particularly SEO-friendly.
  • Is it mobile-friendly? We live in a mobile-first world, and if that platform is even a little bit clunky, you’re going to be losing out on revenue.
  • Is it a trusted and secure platform? One of the most important considerations for customers is that their details will be safe when purchasing. Your platform needs to be fully secure, and it needs to communicate that to potential customers.
  • Will it scale? We all have high hopes for our businesses, and while not all succeed, a fair few do. When choosing an e-commerce platform, ensure that it will scale with your online business.
  • How do the systems work? One of the critical areas to investigate is how well the platform deals with product and order management. You need it to be swift so that you aren’t wasting time on the back end, and you can get on with delivering the best service to your customers.

Your Online Store Deserves WooCommerce Hosting

Sell anything, anywhere, anytime on the world's biggest e-commerce platform.

7. Create a beautiful, engaging, accessible website design

When you imagine a design that matches usability, one company usually springs to mind: Apple. They have managed to combine both of these into a wildly successful business.

Users appreciate good design, and when it’s combined with solid usability, you have a winner. A site that people want to revisit. A site that people want to buy from.

Google has always said that you need to create websites with the end-user in mind — and it’s more true today than it’s ever been.

Here are a few tips for creating sites that ooze design quality.

  • Know your target audience and design accordingly — what features would they want, and how design-savvy are they?
  • Don’t skimp on cost. With design, you get what you pay for. Don’t try to cut corners. Use a professional, experienced designer (like team of pros at DreamHost).
  • Look at the competition. Find some sites in your niche that perform well and study them. Google will rank sites based on niches, and design is crucial. If your competitors’ websites are winning with simplistic colors and designs, take notice. Then make yours better.

8. Optimize for search engines

One of the simplest, fastest ways to help make your site successful is to optimize it for search engines. While search engines might be smart — and every day they get better at understanding the meaning and context of web pages, their content, and users’ intent — they still need us to help them along.

In most cases, the first step to optimizing for search engines is keyword research. This will help you identify the sort of keywords you should be targeting through optimization.

Popular keyword research tools include:

If you want to take a more sophisticated approach to keyword research, try Semrush. It’s a great tool for advanced digital marketers, and it’s accessible to people with less experience too. We love it so much, we’ve set up a free 14-day PRO trial for our readers!

SEMrush

Semrush’s keyword research section works similarly to most other keyword research tools; however, in addition to keyword suggestions, search volume, and difficulty scores, you also get global volume data, keyword variations, and questions linked to your starting keyword. You also get insights into the current state of the SERPs.

How to Choose Which Keywords to Target

The right keywords to target can generally be determined by three things:

  1. Search volume
  2. Difficulty/competitiveness
  3. Relevance

Ideally, you want to target keywords that lots of people are searching for (how many searches you can realistically expect this to be will depend on your industry), that have low competition (which increases the odds that you’ll be able to rank), and that, of course, are relevant to your site!

How to Optimize for Target Keywords

The main places for including your target keywords are:

The title tag

This forms part of the snippet of information that appears in the search results. For example, this is the title tag for the DreamHost homepage:

<H> tags

H tags are header tags. You might know them as H1s, H2s, H3s, and so on. They are used to help organize the information on a page, particularly in terms of hierarchy.

While search engines use all the text on a page for ranking, H tags have extra weight behind them — particularly the H1 tag. Include keywords in them where you can (but never, ever be spammy about it!).

On-page content

Search engines use all of a page’s content when determining its subject matter and what it should rank for. It goes without saying that keywords should be included here. Just be tactical about how you do it.

Use words and phrases naturally. Use permutations where possible. Consider entities. And most importantly of all, write for users, not search engines.

If you need more help with optimizing your website, consider adding SEO toolkit to your hosting plan for $4.99/month. It’ll help you improve your search engine rankings and drive more customers to your site with its suite of DIY tools, helpful analytics, and a step-by-step SEO plan.

9. Create high-quality content

It’s hardly a secret that websites with high-quality content have a better chance of performing well than those with poor-quality content.

Great content should be informative, well written, and easy to understand. It should be formatted in a way that guides the user through the copy.

But “create high-quality content” sounds somewhat subjective, doesn’t it?

It’s not quite as subjective as you might think. Here are some ways you can ensure you’re writing high-quality content for your niche.

  • Invest in good writers — as with many points in this guide, cutting corners won’t help your website succeed in the long run. Our SEO marketing service can help.
  • Have experts write your content — Google has been working towards making sure only the best and most accurate content reaches the top of the search results. Middle-of-the-road content isn’t going to cut it for much longer.
  • Conduct deep research — you need to find out what your customers want, not what you think they want. Many websites miss this point entirely. If you don’t satisfy your users’ needs, you can’t really call your content high-quality.

It’s not just about the words — you need to make your content sing. Make sure it appeals to different users. If it’s right for your target audience, then introduce videos, images, infographics, and charts.

10. Track your progress with analytics

It’s tricky, if not impossible, to know whether your site is a success if you’re not tracking your progress. While many tools allow you to track your website and even spy on the status of others, there is arguably no better website tracking tool than Google’s own Analytics.

To get started with Google Analytics, you will need to:

And that’s pretty much it. You can create filtered views of the data to help you hone in on specific data elements, but the above is all you need to do for Google to start gathering extremely detailed data that will enable you to assess the performance of your site and adapt your strategy accordingly.

11. Set up a site maintenance plan

What do you do once your site’s up and running? Should you sit back, relax, and let the visits/leads/money roll in?

No.

Depending on your goals, you may be able to slow down. But you can’t just forget about your website. Things will go wrong.

Instead, implement a maintenance plan, like what we offer as part of our DreamCare service. Your maintenance plan should include a list of periodic must-dos and when you will do them. The most important will likely be:

  • Running security scans
  • Backing up your site’s data
  • Checking Webmaster Tools, primarily for any glaring errors that have gone unnoticed

Another thing we’d advise is to run Hotjar or another tool that monitors user behavior. While you can use its findings to gain a deep understanding of your website’s user experience (UX), you can also use it periodically to pinpoint specific issues or points of contention.

Get Our Best Tips to Boost Website Traffic

Whether you need help optimizing a landing page, crafting the ideal social media strategy, or creating buyer personas, we can help! Subscribe to our monthly digest so you never miss an article.

Your New Website Is Waiting

As you can see, creating a successful website isn’t quick, and it isn’t particularly easy — but knowing the secrets to a successful website will help.

Get started with these key takeaways.

  1. Define your goals. Decide exactly what you want your website to achieve.
  2. Choose a good domain name that’s relevant, memorable, short, and has a trustworthy extension.
  3. Invest in quality web hosting that’s secure, with great tech support.
  4. Describe your business clearly on your homepage, and anywhere else it’s relevant.
  5. Use a quality content management system: one that’s robust and easy to use.
  6. Choose a good e-commerce platform that can grow with your business.
  7. Create a beautiful website design that’s one step above your competitors.
  8. Optimize for search engines. Ensure they understand what your site’s about and the terms it should rank for.
  9. Create high-quality content; substandard content doesn’t rank.
  10.  Track your progress, starting with Google Analytics.
  11.  Create a site maintenance plan, including backing up data and checking Search Console.

Ready to get started with your website? If you’re starting from scratch, we can help with our Pro Services. Our expert team can design, build, manage and market your website — everything you need to launch yourself or your brand online. Learn more about what DreamHost can do for you here.

The post 11 Secrets to Making a Successful Website appeared first on Website Guides, Tips & Knowledge.


source https://www.dreamhost.com/blog/secrets-to-successful-website/

Creating and Mastering GA4 Explorations

In the switch from Universal Analytics (UA) to Google Analytics 4 (GA4) — which will go fully into effect July 2023 — a lot of things have...