It’s like two kids in a trench coat trying to pass off as an adult for a movie ticket. (In case you didn’t know, these kids actually tried it!) If you get a ‘Your connection is not private’ error when trying to access a website, it could mean the connection to the site isn’t encrypted, even if it claims otherwise.
Of course, just like with those kids, the trick never actually works. Only in the case of a website, your browser issues a boring warning message instead of having a good laugh about it like a good-humored box office clerk.
That being said, ignoring such a warning message can be disastrous for both website visitors and backend administrators. After all, an unencrypted connection is an open invitation to cyber criminals to intercept your website activity for their own nefarious deeds!
Worry not! This guide will tell you everything you need to know to successfully troubleshoot an SSL connection error whenever you see it. We’ll go over the error message, the reasons behind its appearance, and potential steps for permanently getting rid of it.
What Does the ‘Your connection is not private’ Error Mean?
Did you notice a ‘Your connection is not private’ error message popup when trying to access a web page? Worry not, you’re still safe, and your security has not been compromised. However, this is still an alert you should take seriously, as proceeding further into the website could make your device vulnerable to cybersecurity attacks.
When you try to access a website, your browser checks the digital certificates installed on the server to ensure that the site is up to privacy standards and safe to proceed. If there’s something wrong with the certificate, a browser like Chrome or Firefox will stop you from accessing the site with the “Your connection is not private” message. Some common variations include:
Google Chrome: “Your connection is not private. Attackers might be trying to steal your information from [website] (for example, passwords, messages, or credit cards).”
Mozilla Firefox: “Your connection is not secure. The owner of [website] has configured their website improperly. To protect your information from being stolen, Firefox has not connected to this website.”
Apple Safari: “Safari can’t verify the identity of the website [website]”
Microsoft Edge: “Your connection isn’t private. Attackers might be trying to steal your information from [website] (for example, passwords, messages, or credit cards).”
Internet Explorer: “There is a problem with this website’s security certificate.”
Digital certificates are like online identity cards, providing proof that a website is who they say they are. They help protect your personal information, passwords, and payment details by encrypting the connection between the client (your device) and the server (of the website you’re trying to access).
So what do you do if an important website you’re trying to visit hits you with this error? Thankfully, there are ways to troubleshoot the error and browse safely. Some are pretty straightforward and can be done by any visitor, whereas others require intervention from the website administrator or even the hosting provider.
HTTP vs HTTPS: Understanding the Difference
HTTP and HTTPS are both protocols used for transferring information between different systems, like your computer and a website. The main difference between them is that HTTPS is more secure than HTTP.
HTTPS is a secure version of HTTP. With HTTPS, data sent between browsers and websites is encrypted with the TLS/SSL protocols. That means data can’t be modified or read during transfer.
HTTP sends information in plain text, which means anyone can intercept and read it. This makes sensitive information, like passwords and credit card numbers, vulnerable to hackers. HTTPS, on the other hand, uses encryption to protect your personal data, making it much harder for hackers to steal your information.
HTTPS uses SSL (Secure Sockets Layer) or TLS (Transport Layer Security) to encrypt and validate your data, ensuring that it remains confidential and secure. Websites with HTTPS have a padlock icon and URL starting with https://, signifying a secure connection.
HTTPS is more secure than HTTP, but can also be slightly slower due to the added computation power required for encryption. However, HTTPS encryption is a must-have for transactions that require entering private information.
Get Content Delivered Straight to Your Inbox
Subscribe to our blog and receive great content just like this delivered straight to your inbox.
SSL Certificates: What Are They Really?
SSL stands for Secure Sockets Layer — a technology that helps keep your internet connection secure and protects any sensitive data you send or receive online.
SSL stands for Secure Sockets Layer. In short, it’s a protocol for maintaining a secure connection and protecting sensitive data. Transport Layer Security (TLS) is the successor to SSL. It is a cryptographic protocol that provides a safe connection over any given computer network.
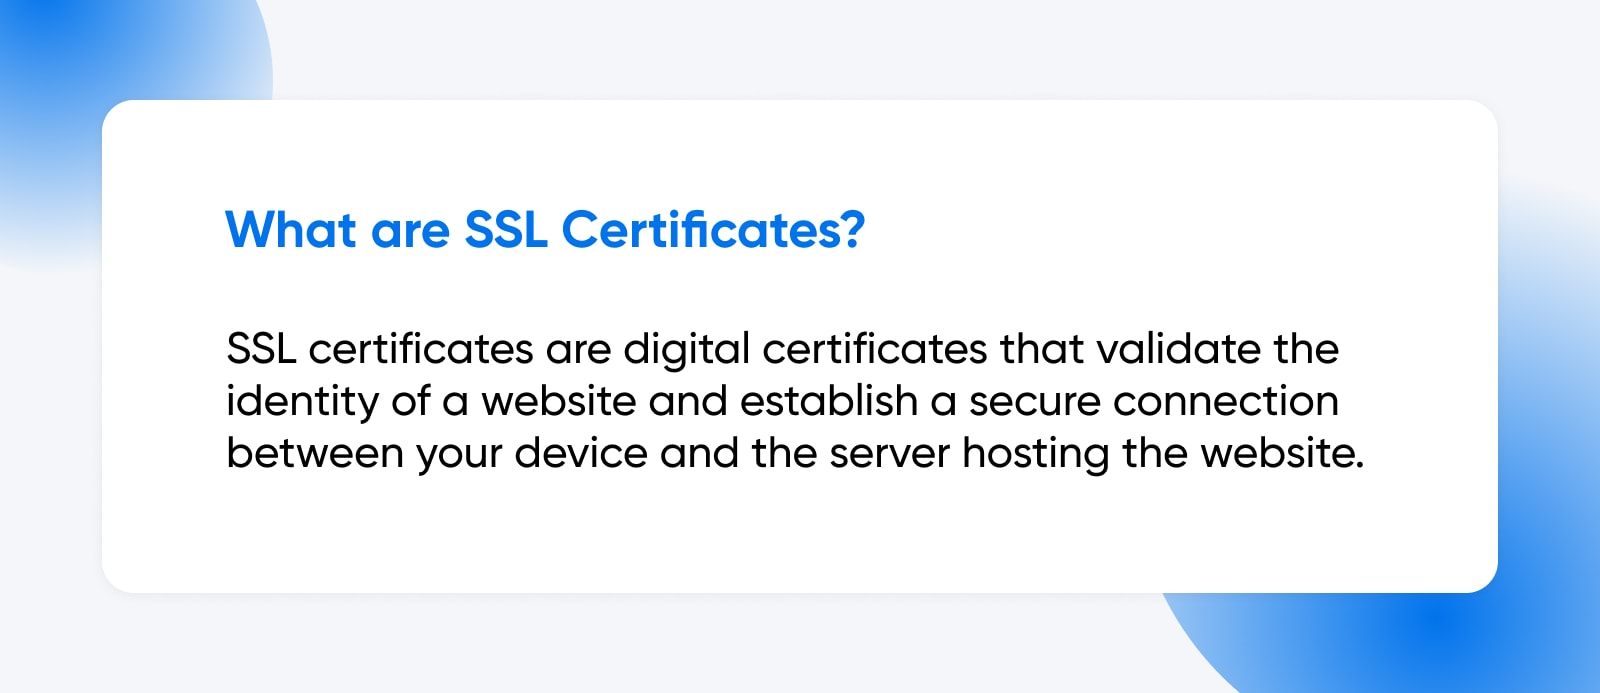
SSL certificates are digital certificates that validate the identity of a website and establish a secure connection between your device and the server hosting the website. This ensures that any information you send or receive over the internet is protected from hackers.
When you visit a website with an SSL certificate, you’ll notice that the URL in your browser begins with “https” instead of “http”. In addition, a padlock icon may be displayed in the address bar next to the URL — This indicates that the website has a valid SSL certificate and that your connection is secure.
SSL certificates use a combination of asymmetric and symmetric encryption technologies to secure your connection. Asymmetric encryption uses a pair of keys, one public and one private, to encrypt and decrypt data. This ensures that only the intended recipient can read the data. Symmetric encryption, on the other hand, uses a single key to encrypt and decrypt data, and this key is shared between the sender and recipient.
Depending on the level of validation and protection required, there are different types of SSL certificates, ranging from basic to highly secure.
9 Potential Causes of an SSL Connection Error
But what really causes an SSL certificate error? SSL errors can be both client-side or server-side, meaning that both your device or the website you’re trying to access could be the culprit. Here’s a list of common causes for the ‘Your connection is not private’ error to help you narrow down your suspect list;
Invalid Certificate: SSL certificates may be invalid when the certificate has been issued to the wrong domain, when the browser sees a self-signed certificate, or when the certificate is otherwise not recognized by the user’s browser, causing the browser to display an error message.
SSL/TLS Protocol: The SSL/TLS protocol is used to establish a secure connection between a web server and a web browser. If there are issues with the protocol, such as outdated or unsupported versions, it can cause an error.
Intermediate Certificates: Intermediate certificates are used to create a chain of trust between the SSL certificate and the root certificate. SSL errors can occur if an intermediate certificate is missing or improperly configured.
Expired SSL: SSL certificates have expiration dates and must be renewed periodically. If an SSL certificate has expired or has been revoked for any reason, it can cause an error in establishing a secure connection.
Antivirus Software: Some browser extensions or antivirus software can interfere with SSL certificate validation, causing the error to occur.
DNS Cache: DNS (Domain Name System) is used to resolve domain names into IP addresses. If there are issues with DNS cache, such as the cache containing outdated or incorrect information, it can cause the error.
Wi-Fi Issues: If there are issues with the user’s Wi-Fi network, such as a weak or intermittent connection, it can sometimes lead to errors in establishing a secure connection between the website and the client. These issues are especially common with public Wi-Fi networks.
Operating System: If the user’s operating system, whether Windows or Mac, is outdated or has corrupted files, it can cause a connection error.’
Client-Side Errors: Client-side SSL errors can occur due to issues with the user’s browser or security settings, such as outdated or unsupported browser versions, or incorrect settings for SSL/TLS.
How to Troubleshoot the ‘Your connection is not private’ Error as a Visitor
It’s always annoying when you’re doing important work (or chasing the latest funny cat video), and a ‘Your connection is not private’ error puts a damper on your plans. However, here are a few quick things you can do as a website visitor to resolve the issue so you can get back to surfing the web to your heart’s content!
Reload the Web Page: Sometimes, an SSL error can occur due to a temporary issue with the website or the user’s internet connection. Reloading the page can sometimes resolve the error. To reload the page, click on the reload button in the browser or press the F5 key.
Check the URL: Make sure that the URL of the website you are trying to access is correct, as a typo in the URL can cause an SSL error. Also, make sure that the URL begins with “https://” instead of “http://” — The “s” in “https” indicates that the website has an SSL certificate installed.
Clear Browser Cache: Clearing the browser cache can sometimes resolve an SSL error. To clear the cache, go to the browser settings and find the option to clear browsing data. Select the option to clear the cache and then try reaccessing the website.
Disable Your Browser Extensions: Some browser extensions can interfere with SSL certificate validation, causing an SSL error. To troubleshoot, try disabling browser extensions one by one and then try accessing the website again.
Disable the Antivirus Software: Antivirus software can also interfere with SSL certificate validation. Try disabling the antivirus software temporarily and then try accessing the website again.
Check Date and Time Settings: SSL certificates have expiration dates and rely on accurate date and time settings to validate correctly. Make sure your computer’s date and time settings are correct based on your time zone, and try accessing the website again.
Try a Different Browser: Sometimes, an SSL error can occur due to issues with the user’s browser. Try accessing the website using a different browser to see if the error persists.
Avoid Incognito Mode: Incognito browsing can sometimes create a breach in the connection between your browser and the website. Try the regular version of your browser, and see if the error persists.
Contact the Website Owner: If none of the above steps resolve the SSL error, it may be an issue with the website’s SSL certificate. Contact the website owner and let them know about the error you are experiencing. They may need to renew or reconfigure their SSL certificate.
How to Troubleshoot the ‘Your connection is not private’ Error as a Site Admin
As a site admin, there’s nothing more frustrating than encountering the “Your connection is not private” error on your website. Not only can it lead to a loss in traffic, but it can also put your website’s and visitors’ security at risk. Luckily, there are several troubleshooting methods that you can use to resolve this error and ensure that your website is secure and reliable.
Check Your SSL Certificate’s Expiration Date: SSL certificates have expiration dates and must be renewed periodically. If your SSL certificate has expired or is about to expire, it can cause an SSL error. To check your SSL certificate’s expiration date, go to the SSL certificate section in your web hosting account or contact your SSL certificate provider.
Confirm That the Certificate was Issued Properly: An SSL error can occur if the SSL certificate was not issued correctly. To troubleshoot this issue, confirm that the SSL certificate was issued to the correct domain name and that the domain name is spelled correctly in the certificate. You can also check the certificate chain to ensure all intermediate certificates have installed correctly.
Run an SSL Server Test for Your Website: An SSL server test can help you identify any issues with your SSL certificate or server configuration that may be causing the SSL error. Several free SSL scan tools are available online, such as SSL Labs or Qualys SSL Server Test. These tools will scan your website’s SSL certificate and server configuration and provide a detailed report of any issues found.
Contact Your Web Hosting Provider for Support: If none of the above steps resolve the SSL error, it may be an issue with your web hosting provider’s server configuration. Contact your web hosting provider’s support team and let them know about the error you are experiencing. They may need to update their server configuration or provide a new SSL certificate to resolve the issue.
Common Error Codes Associated with the ‘Your connection is not private’ Error
SSL errors can occur due to a wide array of factors involving digital certificates, security protocols, cryptographic algorithms, and network connections. However, they also come with an associated error code that can help website visitors and web administrators troubleshoot the issue further. Here’s a list of some of those error codes, along with what they each mean:
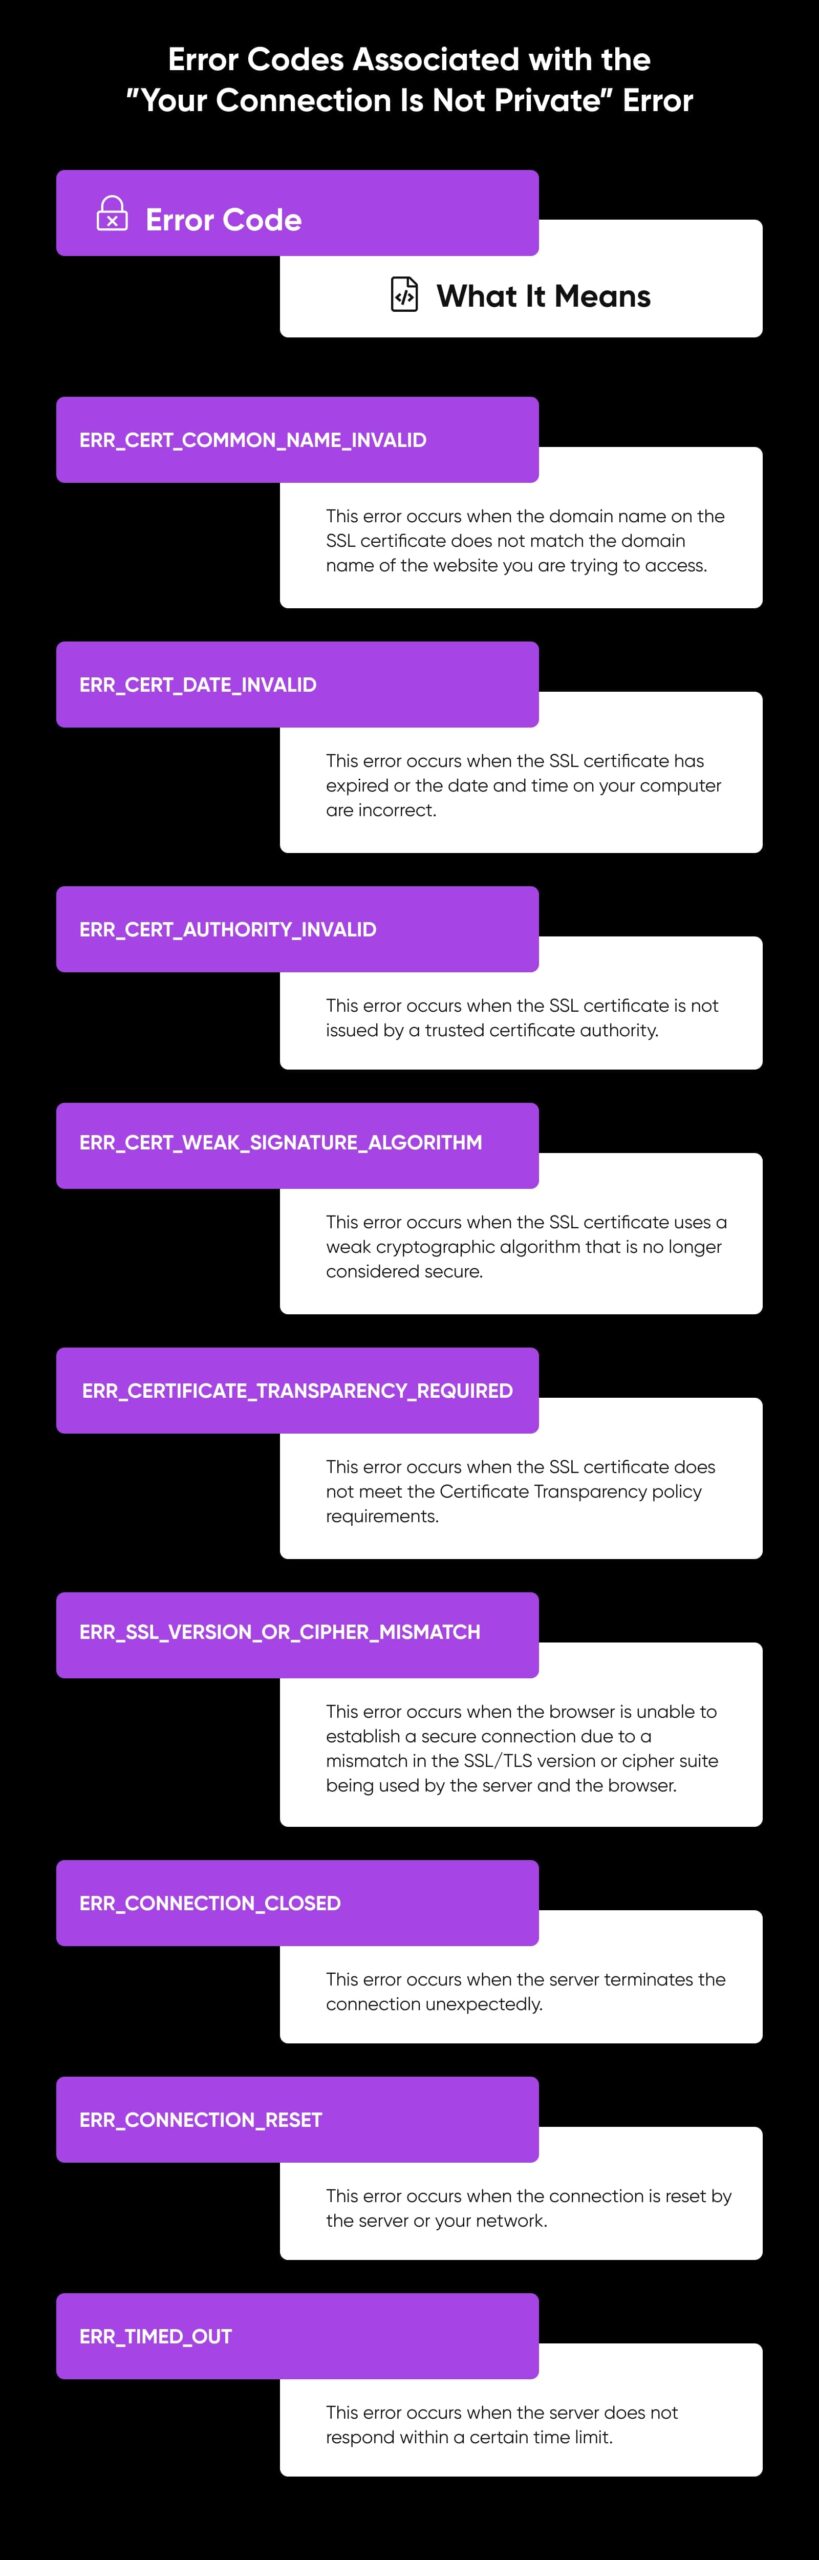
ERR_CERT_COMMON_NAME_INVALID: This error occurs when the domain name on the SSL certificate does not match the domain name of the website you are trying to access.
ERR_CERT_DATE_INVALID: This error occurs when the SSL certificate has expired or the date and time on your computer are incorrect.
ERR_CERT_AUTHORITY_INVALID: This error occurs when the SSL certificate is not issued by a trusted certificate authority.
ERR_CERT_WEAK_SIGNATURE_ALGORITHM: This error occurs when the SSL certificate uses a weak cryptographic algorithm that is no longer considered secure.
ERR_CERTIFICATE_TRANSPARENCY_REQUIRED: This error occurs when the SSL certificate does not meet the Certificate Transparency policy requirements.
ERR_SSL_VERSION_OR_CIPHER_MISMATCH: This error occurs when the browser is unable to establish a secure connection due to a mismatch in the SSL/TLS version or cipher suite being used by the server and the browser.
ERR_CONNECTION_CLOSED: This error occurs when the server terminates the connection unexpectedly.
ERR_CONNECTION_RESET: This error occurs when the connection is reset by the server or your network.
ERR_TIMED_OUT: This error occurs when the server does not respond within a certain time limit.
Know When to Contact Your Hosting Provider About an SSL Connection Error
If your website faces a privacy error, your users’ sensitive information, such as login credentials, credit card numbers, or personal data, may be at risk.
If you encounter an SSL connection error on your website, the first thing you should do is to try to diagnose the issue yourself. You can start by checking the certificate status, verifying that the certificate is up-to-date, and ensuring that the domain name matches the certificate. You can also try clearing your browser data or using a different browser to see if the error persists.
If you are unable to resolve the SSL connection error, it is essential that you contact your web host for assistance. Your web host can help you identify the error’s cause and guide you on how to fix it. They may also be able to provide you with a new SSL certificate or help you configure your server settings to ensure that your website is secure.
When contacting your web host about an SSL connection error, provide as much information as possible, including the error message, the URL of the affected page, and any other relevant details. This will help your hosting provider diagnose and resolve the issue more quickly.
Power Your Website with DreamHost
We make sure your website is fast, secure and always up so your visitors trust you.
Buckle up, WordPress enthusiasts! Following the successful release of WordPress 6.2, the planning proposal for the upcoming WordPress 6.3 release is now live, and the development cycle is set to jump off on April 25, 2023, with a general release date of August 8, 2023. The proposal outlines several key areas of focus, including further full-site editing (FSE) refinements, performance improvements, and accessibility enhancements.
To achieve these goals, the WordPress community is actively seeking volunteers to contribute their skills to various teams. Developers, designers, testers, and content creators are all highly encouraged to participate.
Those interested in contributing to the development of WordPress 6.3 can visit the planning proposal and add a comment to volunteer for a team that aligns with their talents. This collaborative effort is key to making WordPress 6.3 a significant and memorable release.
A Busy Year
With WordPress 6.2 having been released on March 28, 2023, and WordPress 6.3 projected to be released on August 8, 2023, this year has already been shaping up to be a very busy one for the WordPress volunteer developers.
As reported in Make WordPress Core on April 14, 2023, the timeline for WordPress 6.3’s release is taking into account two major flagship WordPress events scheduled to take place this year: WordCamp Europe in early June, and WordCamp US and the Community Summit in late August.
The developer teams hope to avoid having any major milestones like Beta 1 and RC1 conflict with the WordCamp gatherings, so they’ve proposed fitting the release process, from Beta 1 to the final WordPress 6.3 release, in a 10-week window between both WordCamps.
What’s more, regarding the Gutenberg release cadence, WordPress 6.3 is expected to bring over changes in the block editor from the Gutenberg plugin up to version 16.1, for a total of 10 Gutenberg releases since the release of WordPress 6.2.
Teamwork
In the recent announcement at Make WordPress Core, openings were announced for volunteers to lead a number of development teams: Release Coordinator, Core Tech Lead, Editor Tech Lead, Core Triage Lead, Editor Triage Lead, Documentation Lead, Marketing & Communications Lead, Test Lead, Design Lead, and Performance Lead.
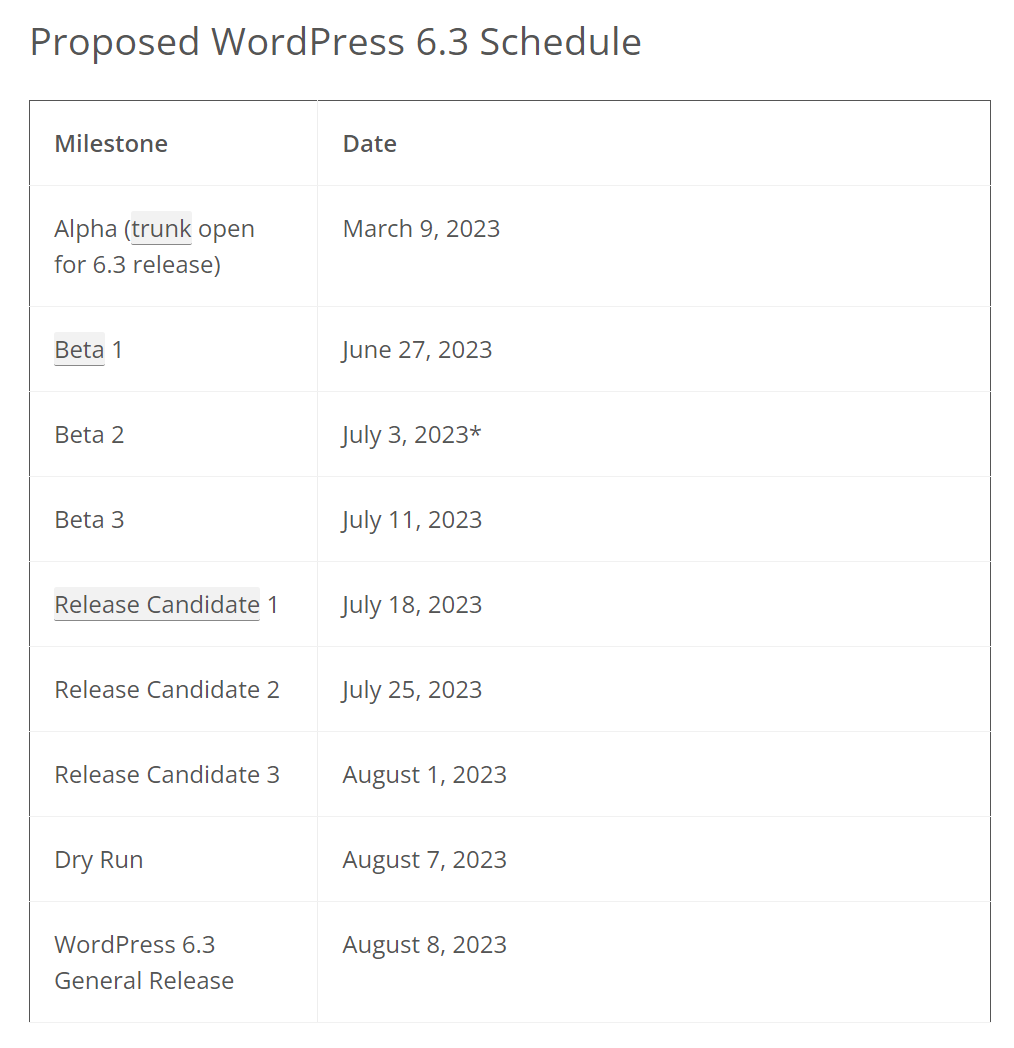
Proposed Schedule
Looking Even Farther Out
Even though WordPress 6.3 is still a budding glimmer in volunteer developers’ eyes at this point, the WordPress community is already thinking ahead to the release of WordPress 6.4 and a return to a historic point in the history of WordPress.
Version 6.4’s development will be led entirely by a team of women and nonbinary creators, which harkens back to the WordPress 5.6 release, “Simone.” The release squad will be open to anyone who identifies as a woman, nonbinary, or gender-expansive, but, of course, in keeping with the WordPress collaborative spirit, all contributions from anyone, regardless of how they identify themselves, will be welcomed.
Stay Tuned for More
The planning proposal for WordPress 6.3 sets the stage for an exciting development cycle, with key focus areas such as full-site editing, performance improvements, and accessibility enhancements. As the WordPress community calls for volunteers to contribute to this highly anticipated release, stay tuned for further updates and news on the platform’s ongoing development.
After making the leap from Universal Analytics to GA4, you’ll likely spend some time learning your way around. You might need help finding insights you used to reference on the regular. In fact, you might not know where to find anything.
Luckily, there’s a powerful tool that can help: Google Analytics Intelligence, an AI tool that can help even total beginners answer questions and find metrics in Google Analytics 4.
To get the most out of Analytics Intelligence, you’ll need to know a few basic tips and tricks — Read on to learn what Analytics Intelligence is, how it works, and the steps you can take to unlock its power and get the most out of GA4.
What is Analytics Intelligence?
Google Analytics Intelligence is a set of artificial intelligence (AI) features that uses machine learning algorithms to analyze data and provide automated insights about website traffic and user behavior. It’s designed to make it easy for anyone — even total beginners — to discover important website insights and stats very quickly, without having to spend time manually digging through their data.
Analytics is the field of data interpretation, typically used to help guide strategy. When applied to SEO, this can include keyword research as well as website traffic and competitor analysis. The goal of SEO analytics is to improve a website’s ranking in results pages, and ultimately drive more traffic.
If you’ve spent any time experimenting with popular tools like ChatGPT, you know just how powerful consumer AI is becoming. Analytics Intelligence is how Google harnesses some of that vast power to make GA4 easier for all users. With a combination of statistical analysis, machine learning, and natural language processing, it does a lot of the dirty work of analytics so you can get right to the parts that matter to you: the insights and next steps.
How Does Analytics Intelligence Work?
There are two main ways that Analytics Intelligence provides its users with data.
1. Ask Questions
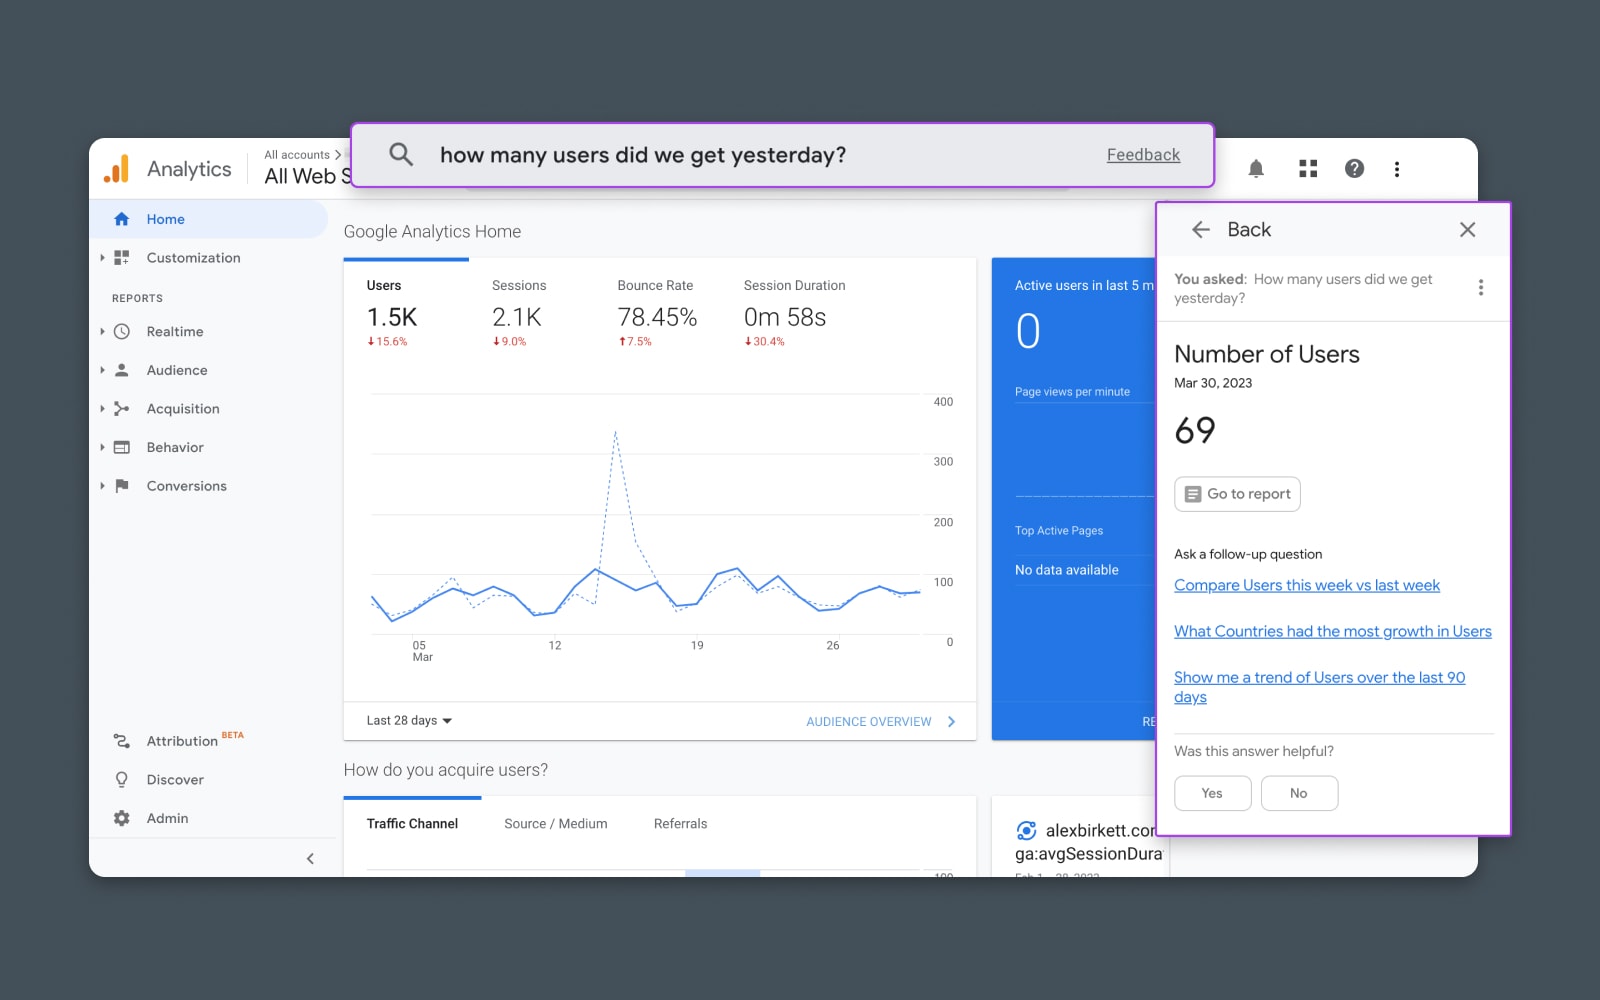
One of the most powerful use cases for Analytics Intelligence is that you can ask it questions in plain English to get fast answers about your site.
The answers it provides are simple, easy to understand, and use everyday language. They typically give you a quick overview, with links to other solutions and more detailed reports when relevant.
For example, if you ask Analytics Intelligence a basic question about your analytics like, “How many users did we get yesterday,” its response will be:
The number of users.
A graph or visualization showing the day’s users.
A “Go to report” button linked to a more detailed report for further insight into the day’s users, trends over time, and other useful stats.
2. Insights
The other main feature of Analytics Intelligence is auto-generated insights, usually highlighting significant changes or opportunities the AI sees in your analytics that could impact your business. These are offered without you having to ask any questions.
Automatic insights can act as an alert system for any major changes or anomalies that could indicate a problem or opportunity you should address quickly. Some examples are sudden increases or decreases in traffic, rapid spikes in conversions, sudden drops in revenue, and other unexpected changes.
3. Other Features
Aside from questions and insights, Analytics Intelligence offers features like Smart Goals, Smart lists, and modeling features like session quality and conversion probability.
Before You Use Google Analytics Intelligence
To use Analytics Intelligence, you’ll need a GA4 account for a website property that has historical data – ideally three or more months, so the data and insights you see will be statistically significant.
If you try to use Analytics Intelligence for a brand new reporting view without any historical data, the AI may not be able to answer your questions. For example, this is probably what’s happening if you ask a question and get this answer: “We understood your question, but there is no data for your profile in this time range.”
Get Content Delivered Straight to Your Inbox
Subscribe to our blog and receive great content just like this delivered straight to your inbox.
How to Use Google Analytics Intelligence
The whole point of Analytics Intelligence is to make GA4 more straightforward and user friendly by putting data analysis capabilities in the hands of people who are not data scientists. As such, it should come as no surprise that Analytics Intelligence is pretty easy to use and navigate. Here’s a step-by-step guide to getting started:
Step 1: Sign In
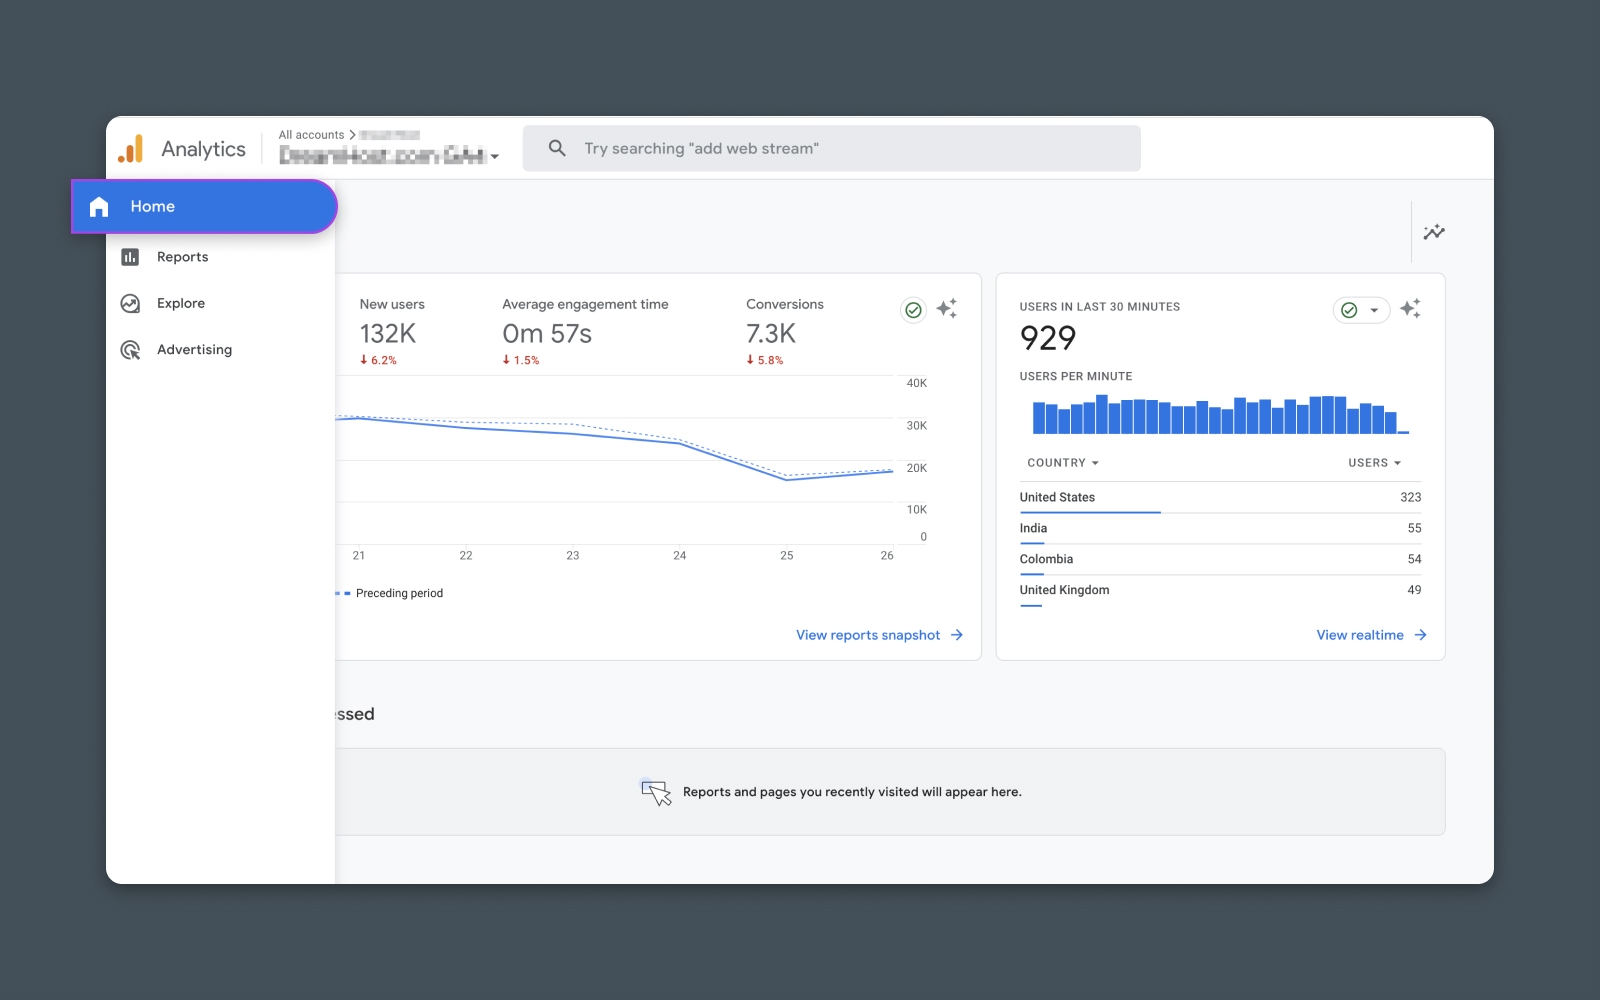
First, sign into Google Analytics and choose the website property you want to explore. Navigate to the Home page using the left sidebar.
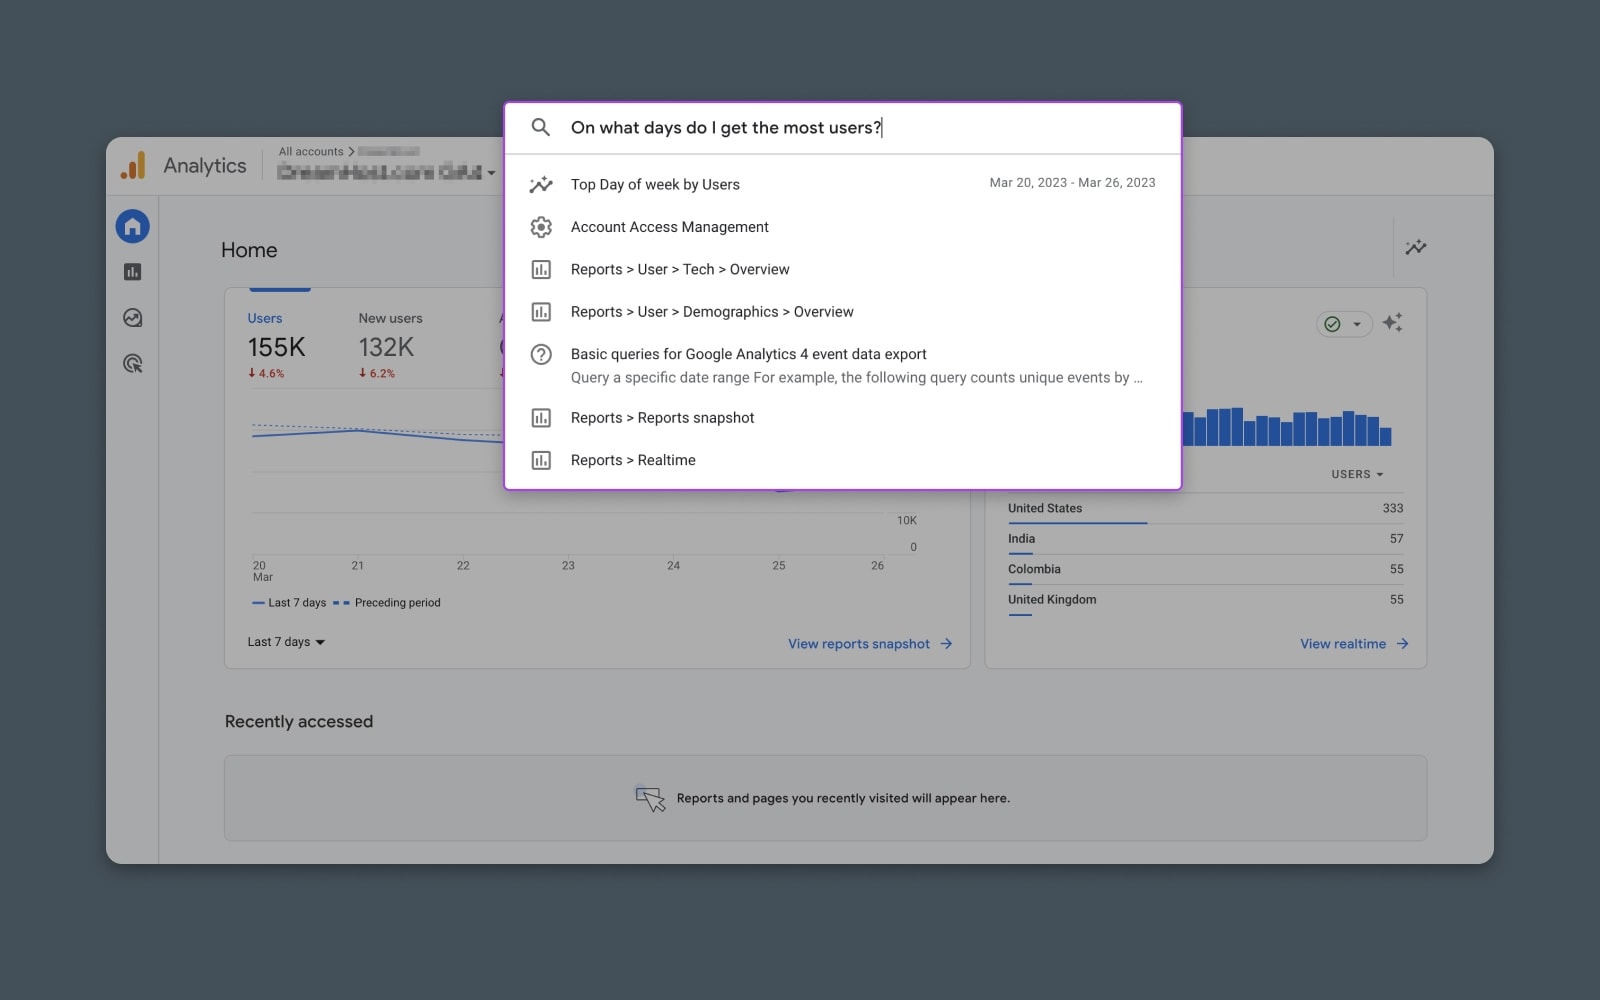
Step 2: Navigate to the Search Bar and Ask a Question
At the top of the home page, you’ll see a search bar that says, “Try searching…” This is where you can ask Analytics Intelligence a question.
Click on the search field and type your question, and you’ll see a drop-down menu with possible answers. Anything with the Analytics Intelligence icon is powered by AI, and you can click these options to get more information.
For this example, we’ve asked, “On what days do I get the most users?” Analytics Intelligence is suggesting an AI report for “Top Day of week by Users.”
Step 3: Explore the Insights Panel
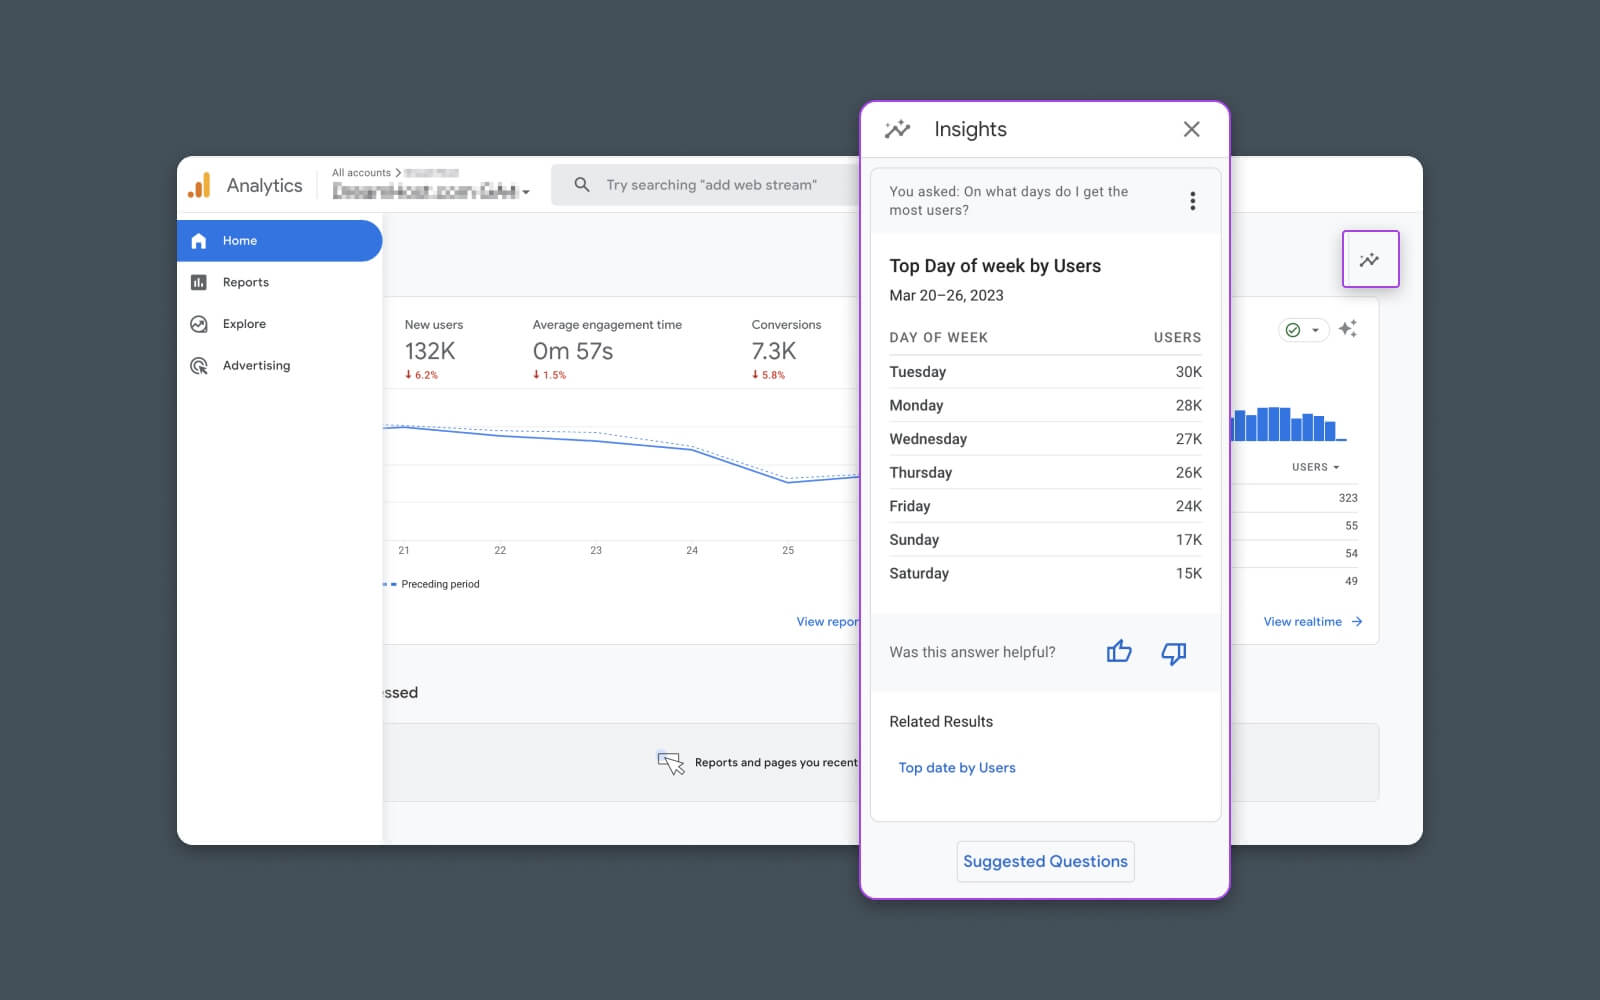
After you click an Analytics Intelligence answer, it will pop up in a sidebar on the right side of your screen. There, you can see the answer, any related queries, and, if available, a link to a more detailed report about your question.
Navigating Analytics Intelligence
Google Analytics Intelligence offers more than questions in the search bar. Here’s how to navigate its features to take full advantage of AI analytics:
Insights Panel
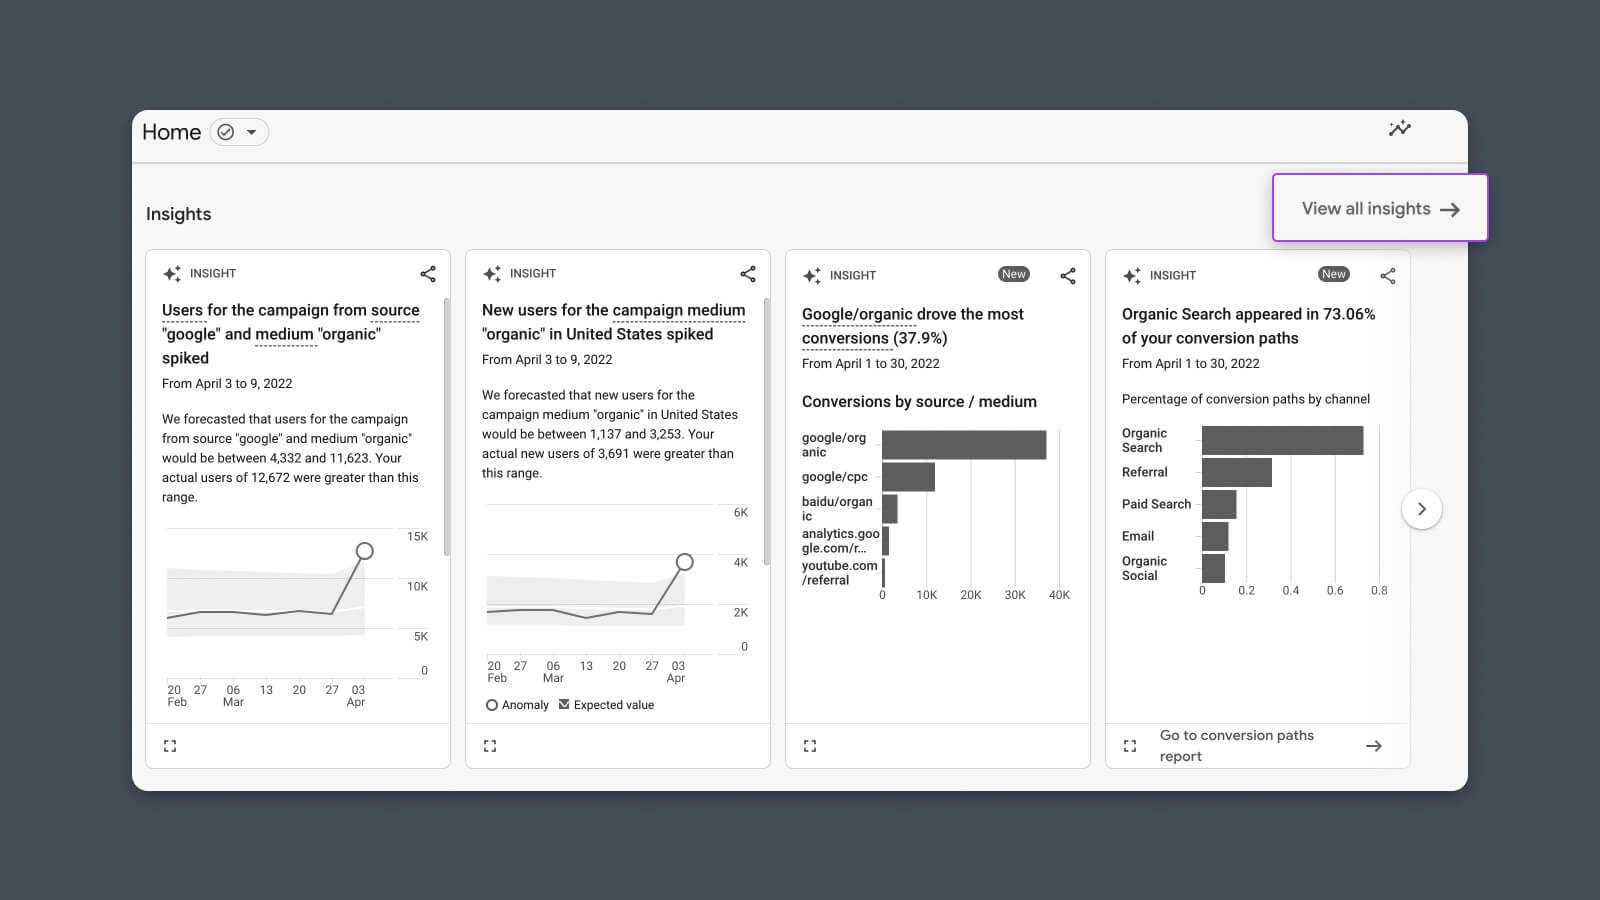
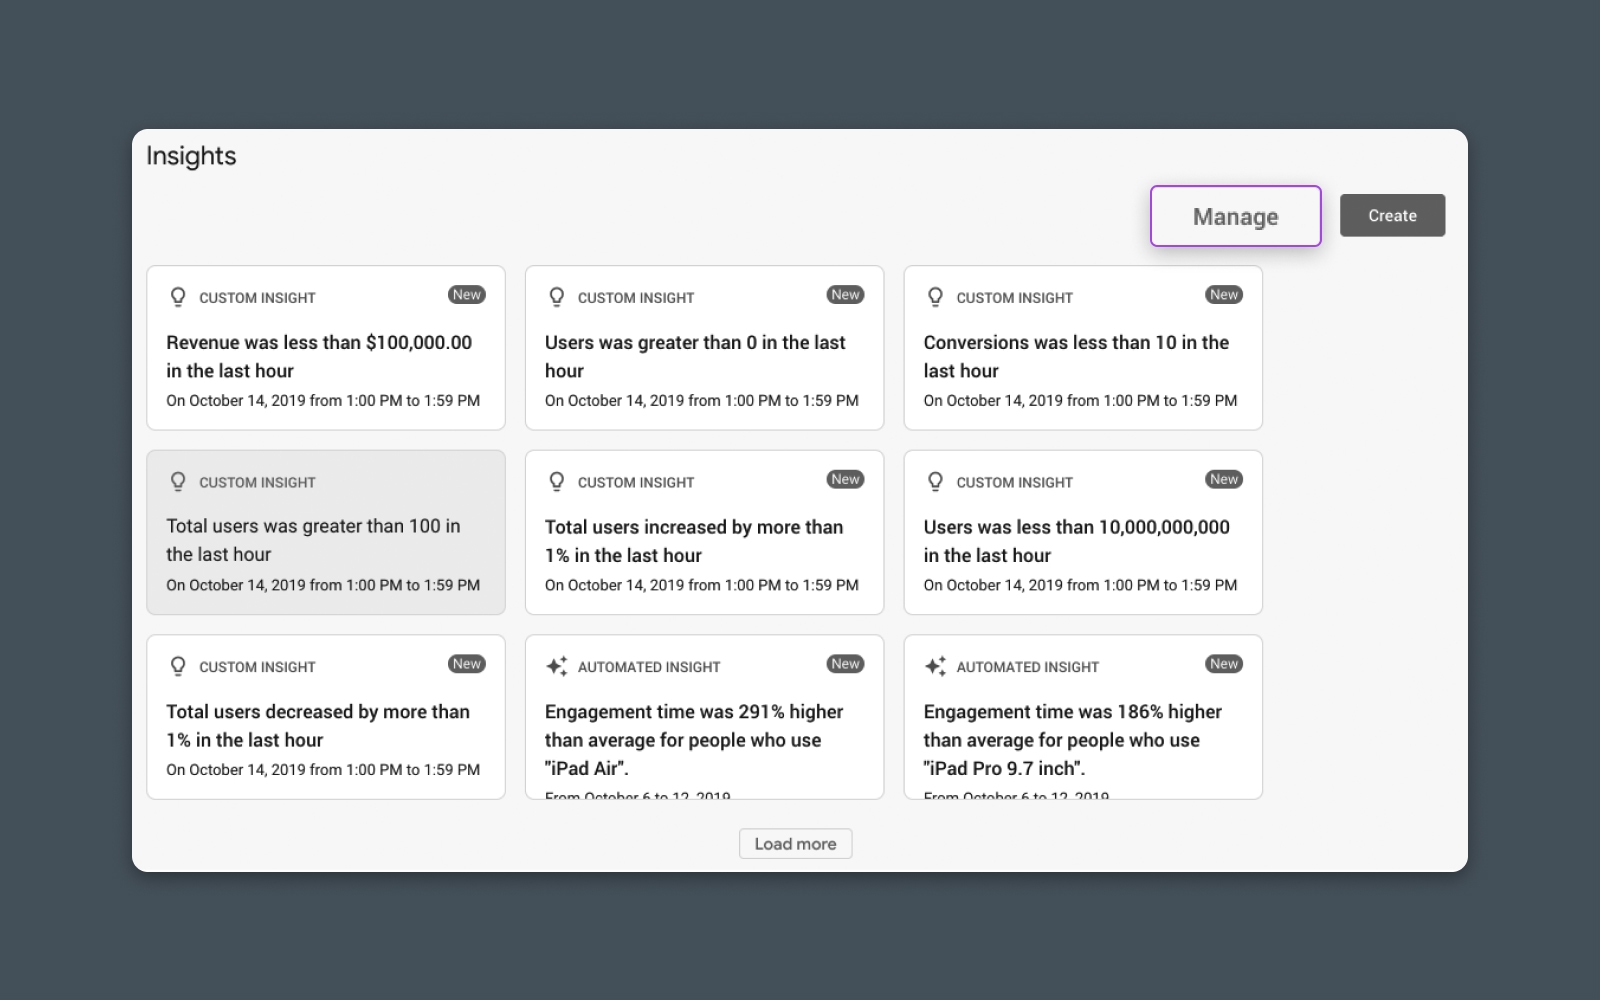
If you scroll down on your Google Analytics home page, you’ll see the Insights panel, powered by AI and offering a series of snapshots (both real-time and historical) to get a quick overview of some important stats about your site.
When you first start using Analytics Intelligence, this panel will be filled with auto insights generated by Google based on your Google Analytics usage history. Auto insights are updated regularly as Google learns more about how you use GA4 and Analytics Intelligence and seeks to provide you with the most relevant and useful information.
You should see a link at the top right of the Insights panel that says, “View all insights.” Clicking this will take you to a more detailed view where you can see more insights and customize what you see.
Each card in the “View all insights” view is clickable — clicking an insight will show you the full details. Click “Load more” to see older insights, but keep in mind, insights are stored for one year after they’re created.
Creating Custom Insights
From the “View all insights” view, you can create your own rules to generate insights you want to keep track of.
First, click “Create.” Then, click the checkboxes for any suggested insights you want to create or click “Create new” under “Start from scratch.” From there, enter a name for the insight, fill in the required information for evaluation frequency, metric, and segment, and click “Create” on the upper right side of the screen.
Managing Custom Insights
Once you’ve created custom insights, you can manage their notifications or remove any insights you no longer want to track.
From the “View all insights” view, click “Manage” to open a list of all the custom insights you have set up.
From there, you can adjust email notifications, or click the three dots next to an insight and select “Delete” to remove it.
Note that you’ll need the Analyst or Editor role (and all associated permissions) to create, edit, or share insights for a property.
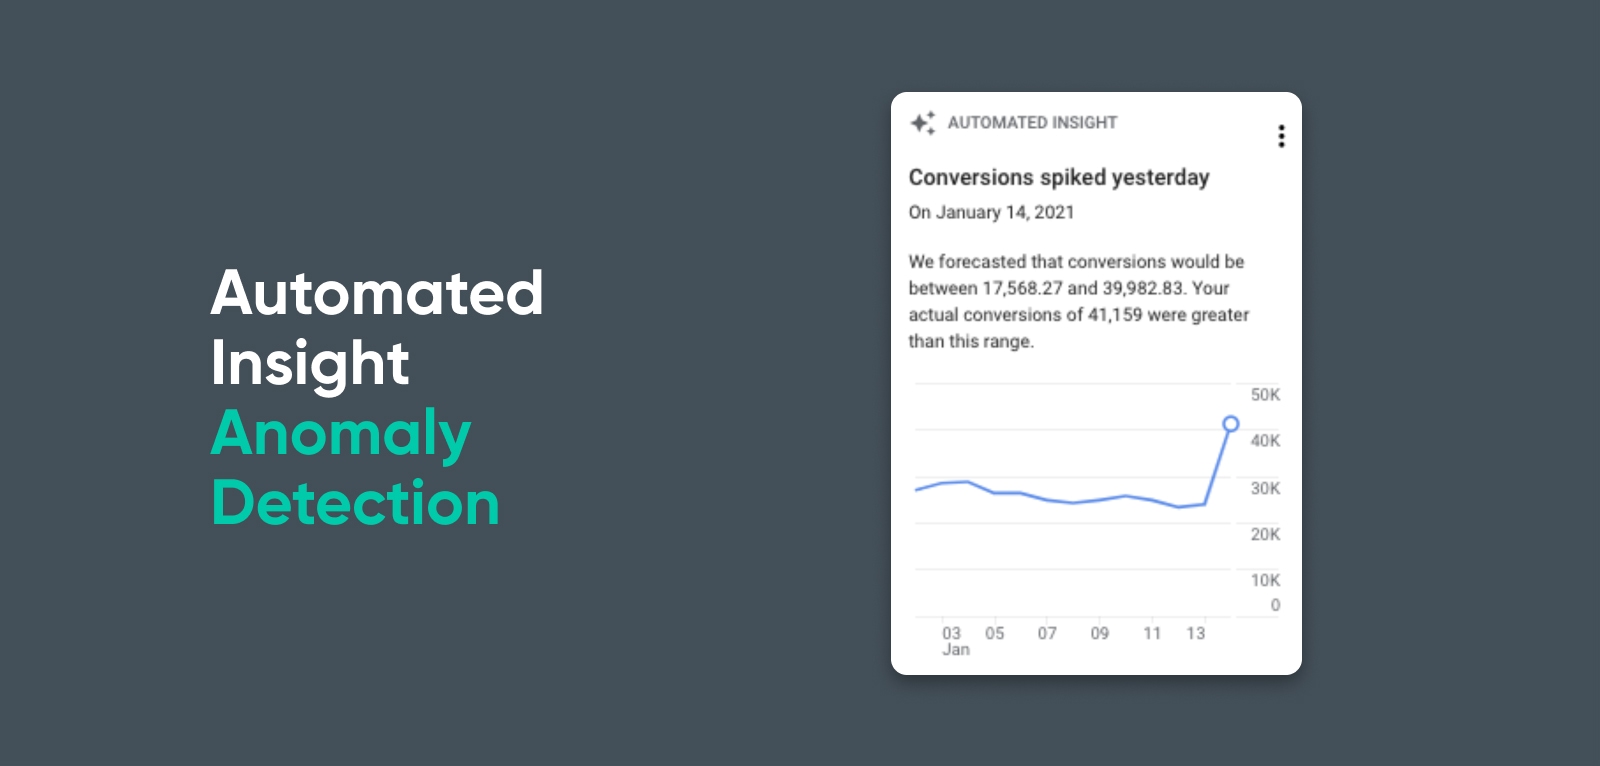
Anomaly Detection
One of the most useful features of Analytics Intelligence is its ability to use statistical analysis to detect (and warn you about) anomalies in your site data.
For example, let’s say your website has a day with much higher conversions than usual. Analytics Intelligence will automatically generate an insight to let you know this happened.
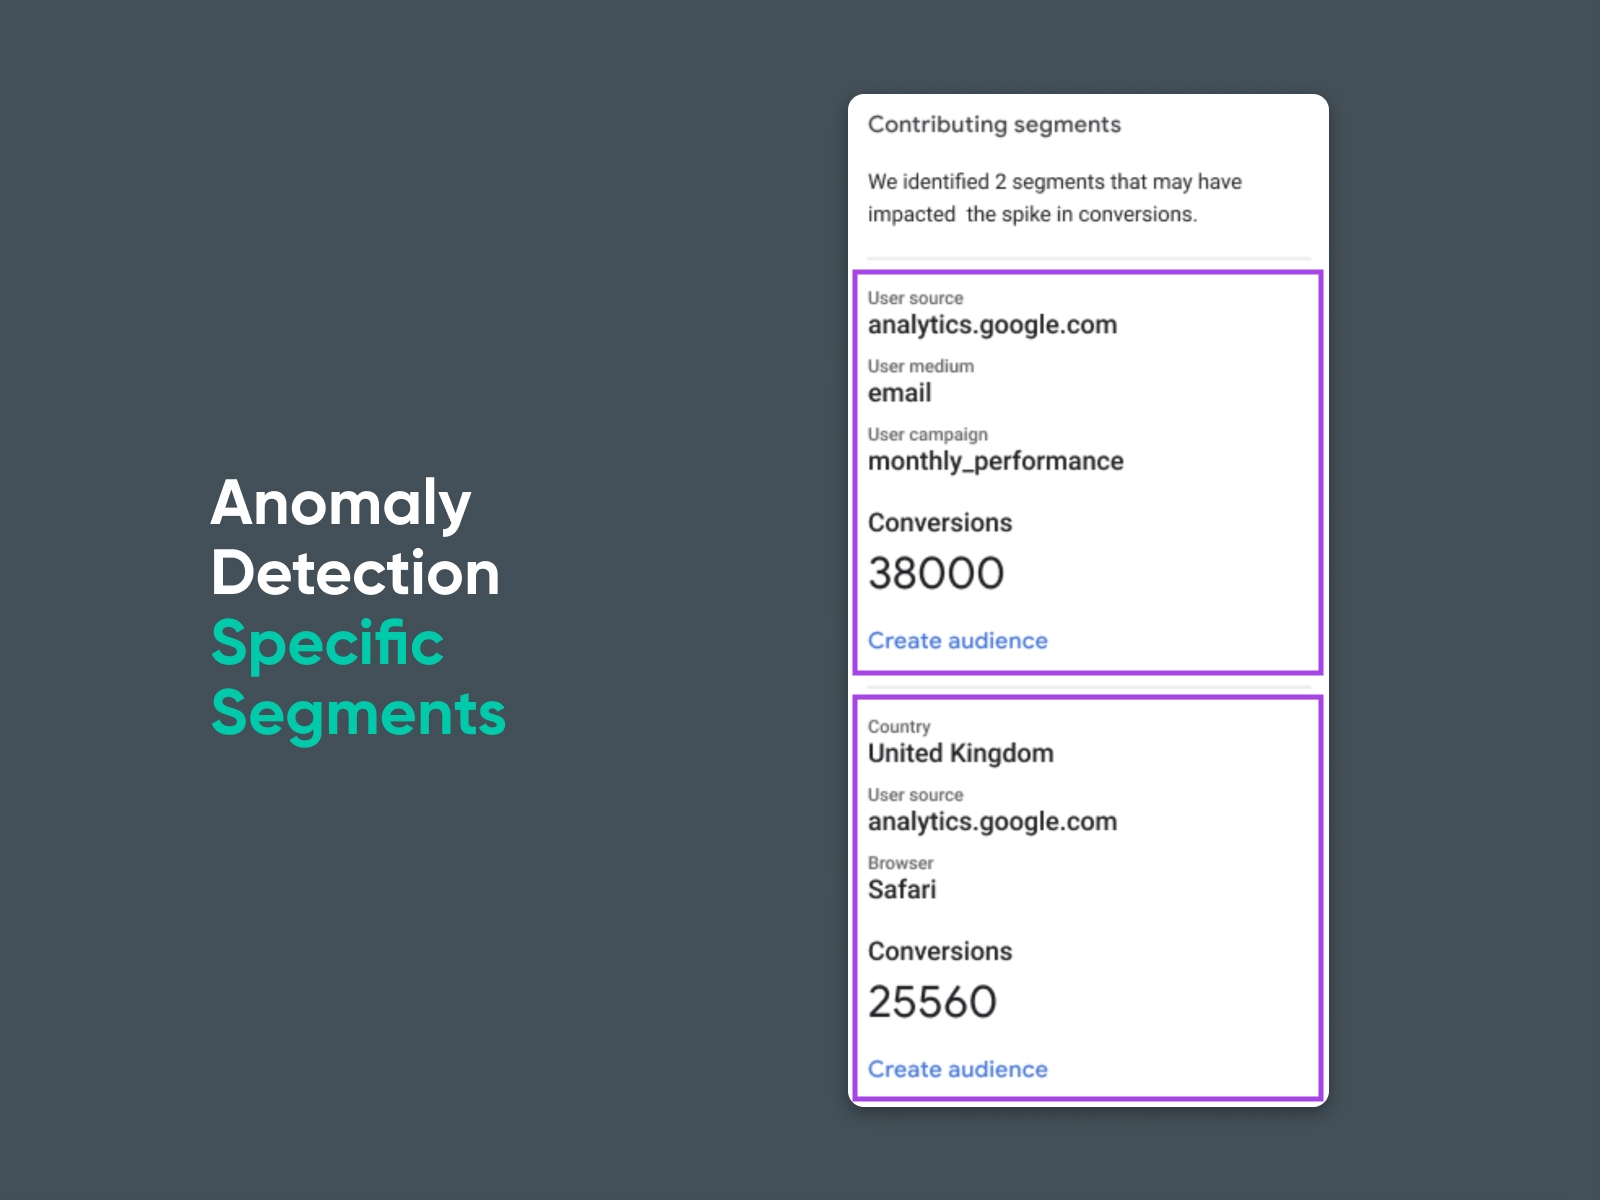
But even more than that, Analytics Intelligence can investigate the anomaly to identify specific segments that contribute to it, which can help you get to the bottom of unexpected changes more quickly.
Recommendations
The last area of Analytics Intelligence that you need to know about is Recommendations. These can be found on the Home page in the “Recommendations” section, as well as throughout Google Analytics — they’ll appear in the upper right of your screen if Google has a relevant recommendation to show you.
Google uses your property’s history, settings, and trends from across GA4 to create customized recommendations. These often use business intelligence and automation features to help you get the most out of your analytics. They also highlight new features that you may want to take advantage of.
How to Format Analytics Intelligence Questions
One of the nice things about Analytics Intelligence’s ability to understand plain English is you don’t necessarily need to format your questions as questions — that is, they don’t need to start with “what,” “when,” “where,” or “how” and end with a question mark. They also don’t need to be perfectly grammatically correct for Google to understand what you’re looking for.
Type queries like “trend of new users this week” or “sales today,” and Analytics Intelligence will still be able to return the insights you’re looking for.
Of course, it’s always best to be as specific as possible with your queries. This will help Google understand what data you want and return the most relevant results.
Limitations of Analytics Intelligence Questions
While Analytics Intelligence is pretty good at figuring out what you mean in most cases, it does have some key limitations. These are some of the types of questions it may struggle to answer:
AI isn’t great at answering the “why.” If you ask a question like “Why are my pageviews declining,” Analytics Intelligence probably won’t be able to give you a good or conclusive answer.
AI doesn’t give advice. If you ask a question like “What kind of marketing campaign should I use,” Analytics Intelligence likely won’t be able to answer — it can provide the data, but the decision-making is still up to you.
AI isn’t great at forecasting (yet). AI tools are getting better and better at predictive technology, but this is still a limitation for Analytics Intelligence. If you ask a question like “What will my sales look like in 6 months,” it may or may not give you an answer, but it may not be accurate if it does.
AI can’t answer generic questions. Analytics Intelligence isn’t an all-purpose chatbot. If you ask it something like “How’s the weather today,” it won’t be able to answer.
20 Sample Questions to Try
Experiment with Analytics Intelligence (and explore your site’s stats) by asking some of the questions below:
What landing pages on my website are currently experiencing the most traffic?
What is the overall bounce rate for my website?
What is the conversion rate for my most popular product?
What are the top traffic sources to my website?
What is the average session duration for my website?
What is the click-through rate for my latest email campaign?
How many users are currently on my website?
What is the most popular page on my website?
What is the conversion rate for visitors coming from social media?
Over the last year, have pageviews for my website trended up or down?
How many sessions have resulted in a transaction in the last week?
What is the geographical location of my website visitors?
What is the behavior flow for visitors on my website?
What is the revenue generated from my website in the last month?
How many visitors have returned to my website within the last 30 days?
What is the percentage of visitors using mobile devices to access my website?
What is the average order value for transactions on my website?
What is the exit rate for my shopping cart page?
What is the engagement rate for visitors on my blog?
What is the overall performance of my website in comparison to the previous month?
Pros and Cons of Using Analytics Intelligence
Now that you know how to navigate and use Analytics Intelligence, let’s talk about what makes it such a useful, powerful tool — and what limitations it has.
Analytics Intelligence Pros
Analytics Intelligence Cons
Intuitive and easy to use, even for beginners with no data analytics or data science experience.
Auto-generates insights to scan for anomalies, significant changes, etc., and shows them all in one place.
Sometimes doesn’t understand questions in plain English.
Can’t provide answers to questions seeking strategic advice.
Can’t answer general support-related questions.
How to Get the Most Out of Analytics Intelligence
By now, you’ve probably gathered that Analytics Intelligence is a powerful tool that deserves a spot in your daily rotation.
One of the key ways to get the most out of Analytics Intelligence is to keep using it — and providing it with feedback — over time.
Each time you ask Analytics Intelligence a question, it will ask you if the answer it provided was helpful. Click the thumbs-up or down icon, then explain why the answer was helpful (or not). This information helps Analytics Intelligence improve over time — user feedback helps inform new features and optimizations that Google rolls out over time.
The other way to keep improving your Analytics Intelligence experience is to keep experimenting. Over time, Google will learn more about you — and how you use analytics — and provide more tailored recommendations and auto-insights.
You’re now armed with the knowledge to take your GA4 insights to the next level. It’s time to master your site’s analytics with AI — and it all starts with asking your first question.
Get More Visitors, Grow Your Business
Our marketing experts will help you earn more traffic and convert more website visitors so you can focus on running your business.
Captivating animations that hold your gaze while a webpage loads.
Seamless transitions guiding you effortlessly through a website’s content.
Unexpected bursts of color and motion as you interact with buttons on an app.
Though subtle, these elements greatly influence your perception of a brand and your overall digital experience.
What brings these engaging details to life?
Often, with the help of CSS animations.
Want to create similarly unique and captivating user experiences on your digital properties?
In this guide, we’ll help you get there with:
A primer on CSS and CSS animation
Key reasons why you should try CSS animations
The few roadblocks to adopting CSS animations (with solutions)
17 exemplary CSS animations to use on your app or website
How to get started with adding CSS to your website
Meet CSS
CSS is short for Cascading Style Sheets.
CSS is a code language that dictates how graphic and content elements on a website or application look and act. CSS is useful for customizing colors and fonts, positioning and spacing elements on a page, and of course, creating animations. There are “pure” CSS animations built just from HTML (Hypertext Markup Language) and CSS code, and there are CSS animations that incorporate other types of code (like JavaScript) or existing media (like GIFs).
Cascading Style Sheets (CSS) is an essential coding language used for styling webpages. CSS helps you create beautiful pages by modifying the appearance of various elements, including font style, color, layout, and more.
CSS hit the scene in the early 1990s, and has since evolved from CSS1 to CSS2 to CSS3 — the current and widely-used version. In this article, we’ll follow the common practice of using the term “CSS” when referring to this latest version.
HTML is like the foundation and framing of a home, without which the home can’t exist. But CSS transforms that home with paint, finishings, and decor that impart unique styling and functionality.
CSS Animation Building Blocks
CSS animations use CSS code to string together various properties and values that make on-screen elements “move.”
CSS properties are the pieces of the animations, such as background, border radius, font, margin, type of movement (like spin or fade), etc. Values fill in the details around these animation properties by defining color, alignment, size, length of time, direction, speed, etc.
Let’s look at the elements of the popular @keyframes rule, which defines CSS transitions throughout an animation sequence, for an example of how properties and values work together:
The animation-name property gives the name of the animation.
The animation-duration property outlines the length of an animation. Values are typically displayed in seconds (0s, 4s, etc.).
The animation-delay property specifies a delayed animation start. Its value is also given in seconds (-2s, 5s, etc.).
The animation-iteration-count property states the number of times an animation should run. The value represents how many times you wish the animation to repeat; for example, infinite-alternate will make it go on forever.
The animation-direction property tells how an animation should play. Values include normal (forward), reverse, alternate, etc.
The animation-timing-function property outlines the speed curve. Values include ease-in-out for a gentle start and end, cubic-bezier to create a complex-looking curve, etc.
The animation-fill-mode property defines how an element looks when the animation is not playing. Values include forwards to retain the values set by the last keyframe, etc.
Now to bring it all together! In this example from W3Schools, which attaches an animation (named “example”) to the <div> element, you can see that the element is 100px square and has a red background. When the animation begins, it will continue for 4 seconds while the background transitions from red to yellow:
/* The animation code */

@keyframes example {

from {background-color: red;}

to {background-color: yellow;}

}
/* The element to apply the animation to */

div {

width: 100px;

height: 100px;

background-color: red;

animation-name: example;

animation-duration: 4s;

}
(Note: This is just one example. Keyframe animations aren’t the only way to create CSS animations, and they aren’t compatible with every browser version — keep reading for more insight and tips on compatibility.)
3 Awesome Reasons to Implement CSS Animations
From powering unforgettable interactions to ensuring that they’re happening at the speed of modern expectations, CSS animations have a lot to add to the digital experience — both for you and your amazing customers or visitors.
Create a Unique Story and Experience
The days of websites functioning as digital billboards are in the rearview mirror.
In the global economy, websites and apps are your best opportunity to tell your brand story.
Why focus on your story? Because a great story sets your brand apart, captures the attention of your ideal audience, creates lasting connections, and — perhaps most importantly — inspires action.
And your story is, in part, built on the interactive elements you include within your user experience.
CSS animations are all about creating unique experiences that react to and move with the user, building rapport and engagement with your brand story.
Revamp and Maintain With Fewer Keystrokes
CSS is an organized and somewhat brief coding language. In the web development world, it’s what’s known as “clean.” Style sheets can typically be kept to a minimum for straightforward app and website projects.
That means when it’s time to update your project, do routine maintenance, or just refresh your look and experience — it should be pretty quick to track down where to make the change, create your update, and apply it across your entire interface. No need to re-code and deploy lots and lots of individual HTML files.
Optimize Your Speed
CSS is considered “lightweight” when compared to JavaScript and other coding languages, making it a great tool for adding lively, engaging content and experiences to your product — without also adding weight that slows down loading.
In addition, it also tends to be aggressively cached. Together, these factors mean animations built using CSS should be quick to show up after that first click, as well as on subsequent loads of your website or app.
As an important ranking factor when it comes to Google search results, speed is something all businesses with an online presence should be thinking about.
Considerations Before Diving Into CSS Animations
Now entering the slow-down zone. Before you go running headlong into CSS animations, there are a few slight hangups we want to make sure you’re aware of and prepared to handle.
Compatibility Concerns
Ever notice how some features seem to disappear or get in the way when you’re interacting with a website on the phone — or slow your computer way down?
Different devices (mobile phones, smartwatches, tablets, computers, etc.) and browsers (Chrome, Safari, Firefox, etc.) are all built using different technologies. Those technologies mean how they interact with code languages can vary — and it’s no different in the case of CSS animations.
If you don’t make custom adjustments, an animation effect that looks amazingly cool on Firefox with your laptop may look or act odd for someone viewing it using Safari on their phone.
Quality assurance (QA) testing is critical to ensure your CSS animations are compatible across all the places where users interact with your digital presence.
Solution: Use a CSS validator and browser developer tools to help identify compatibility issues and errors when creating CSS. Those who are especially code-savvy can install a Sass mixin library such as Bourbon to keep browser prefixes (webkit for Chrome and Safari, moz for Firefox, etc.) up to date and compatible.
Get Content Delivered Straight to Your Inbox
Subscribe to our blog and receive great content just like this delivered straight to your inbox.
17 Dynamic CSS Animations to Try Today
Ready to use CSS animations to build amazing digital experiences that attract and retain users? Ready to increase all-important site speed, and cut down on maintenance and re-design time?
Then you’ve come to the right place! We’ve compiled some awesome CSS animations for your viewing pleasure. Click any option that strikes your fancy to acquire the code you need, and then you can add it to your website style sheet. (FYI, public Pens on CodePen are free to use by anyone for any purpose per their licensing details.)
Loading Animations
Loading animations might not be the most exciting class of CSS animation, but they’re critical to the user experience. App and website visitors are more likely to be patient with a bit of load time when you’ve provided an indicator that something great is coming shortly.
By now, a pulsing line of dots is universal for “Just a sec!” Just like the code, this option is clear and concise, making it a good fit for an online presence with a serious tone or minimal style.
Another classic loading symbol — the spinner. This animation comes with an option to integrate an SVG, which stands for Scalable Vector Graphic, which can be scaled without quality loss.
This spinning set of teardrop-like shapes offers a beautifully simple animation to get lost in, making a little extra load time feel a lot less annoying. What more could you ask for?
An impressive, pure CSS animation that reminds us of entering the website for an upscale restaurant or hotel. Change the color and name to match your own brand.
The most creative loading screen we’ve seen, this animation gives the viewer a lot to look at while waiting for the rest of your digital elements to come to life.
The “revealing” effect with this animation offers yet another interesting way to draw the eye to important content elements that you want to make sure visitors don’t miss.
With lots of interesting fonts, animated buttons, and a flip feature that uncovers more information — this seems like a great option to introduce users to longer sections of can’t-miss content like FAQs, features, etc.
From the same creator of the previous CSS animation, this option presents another bold and creative way to guide users through elements of your brand story.
Buttons are often the gateway to getting users to take action or dive deeper into your content. Inspire interaction by adding CSS animations to important buttons.
You want the backgrounds of certain elements of your website or app to be just interesting enough to catch the eye — without overshadowing what it is you want users to read and do.
A parallax scroll animation enables both the foreground and background to move, but at different speeds to create the illusion of depth. As you can see from the example, the parallax effect can be overwhelming when not applied with restraint.
A gentle floating effect like this is another surprising and fun touch that lets viewers know you care about your digital properties as well as their experience.
Each of the above CSS animations is accompanied by HTML, CSS, and sometimes other code you can paste directly into your website style sheet and edit as needed to make it your own.
If you have a custom-built website where you manage the code and you aren’t familiar with CSS just yet, we think it would be helpful for you to get to know the language before trying to implement the above animations. Learn the basics of creating a line of code then dive into the best tutorials for developing your CSS skills with DreamHost’s guide to learning CSS.
You’ll notice from the above examples that it can take quite a lot of code to create an animation. If you’re feeling comfortable with CSS and are ready to optimize for space and time, consider tapping into a CSS animation library. Each library will have instructions on how to add it to your website, usually involving adding a source file or CDN to your markup. Once installed, you can use the library’s specific animation shorthand to add your animations.
CDN is an abbreviation for “Content Delivery Network”. It refers to a geographically-distributed network of web servers (and their data centers). The entities that make up a CDN collaborate to ensure speedy content delivery via the internet.
If you’re rockin’ with a WordPress site, the platform itself offers a handy guide to editing CSS using either the Site Editor (a beta feature available on some themes) or the Customizer (available on most classic and some third-party themes). Inside these editing screens is where you’ll paste the code from our CSS animation examples above.
But what if a website that enables you to tell your brand story is still just a dream? Then we have good news, because at DreamHost we specialize in making website dreams come true. With custom web design, an easy-to-use WordPress website builder, pro services from our in-house experts, and of course robust hosting options — DreamHost will help you get your dream online.
Get More Visitors, Grow Your Business
Our marketing experts will help you earn more traffic and convert more website visitors so you can focus on running your business.
On the Internet, there is no speed limit – but thankfully, there is a speedometer.
Your website’s speed and performance has a major impact on business. It can improve your search rankings and SEO, increase website engagement, and drive more conversions – and revenue.
But before you can optimize your website’s speed, you need to know how it performs.
This free tool from Google helps you understand your website’s performance, but it can be complicated to jump into.
After all, what do all of these different terms and scores mean? How are you supposed to know what to do or where to start?
This guide is focused on what to do with the results of your PageSpeed Insights report and how to strategically work through specific solutions to improve each of your scores, no matter what issues need to be addressed!
Today, we’ll walk through each of the key factors and show strategies for improving your performance with each one.
What is Google PageSpeed Insights?
PageSpeed Insights is a tool that tests, measures, and reports on your website’s performance. It captures vital data about how users experience and engage with your site by analyzing things like site speed, load time, and user experience.
In addition to scoring your website on a stable of key performance metrics, PageSpeed Insights runs a range of diagnostics and also recommends specific action items to help you improve your website’s performance.
What makes PageSpeed Insights particularly important for webmasters and marketers is that site performance is intricately linked to user experience (UX), SEO, traffic, conversions, and all of the other KPIs that matter most to the business.
A website’s performance refers to the speed and uptime of the site. A better-performing site will have faster load times, run more smoothly, and have little to no downtime.
Getting 100% on PageSpeed Insights is sort of like acing your SAT.
It doesn’t necessarily mean you’ll do great in college, but it definitely gives you a leg up.
Page Speed and SEO
Let’s answer the main question first.
Yes, your website’s speed and performance can impact search engine optimization (SEO).
In particular, poor performance can hurt your SEO. It’s helpful to think of your PageSpeed Insights as a “governor” for your website. If your scores are low, it means the website is slow – which also slows down your growth in the SERPs (Search Engine Results Page)!
There are three central factors included in the search algorithm that Google refers to as Core Web Vitals:
Loading – Largest Contentful Paint (LCP)
Interactivity – First Input Delay (FID)
Visual Stability – Cumulative Layout Shift (CLS)
All of these factors measure how quickly your website loads and the speed and quality of the user experience, which can also impact accessibility.
These three factors are part of the six total metrics measured by PageSpeed Insights.
How PageSpeed Insights Works
Now that we understand the who, what, where, and why….all that’s left is the how.
How does PageSpeedInsights work, and how do you use the information it provides?
First, a bit about how the tool functions behind the scenes, from Google directly:
“PageSpeed Insights provides both lab and field data about a page. Lab data is useful for debugging issues, as it is collected in a controlled environment. However, it may not capture real-world bottlenecks. Field data is useful for capturing true, real-world user experience – but has a more limited set of metrics.”
In other words, PageSpeed Insights is looking at two things.
First, Google’s computers load your website to see how it performs.
Second, since Google’s computers aren’t the same as a laptop you might use at home or work, they look at a log of historical data from real-world users who have visited your site in the last 28 days. (This data comes from the Chrome User Experience Report, often called “CrUX,” and it’s collected from users who use the Chrome browser.)
Then PageSpeed Insights combines these two tests and scores your website based on how real users might experience it.
The PageSpeed Insights Score is a collection of metrics about your site’s performance that breaks down which areas are good and which may need work.
There are 6 scores to know:
First Contentful Paint (FCP)
First Input Delay (FID)
Largest Contentful Paint (LCP)
Cumulative Layout Shift (CLS)
Interaction to Next Paint (INP)
Time to First Byte (TTFB)
Each of these metrics is measured and then scored according to the level of performance.
When you run a PageSpeed Insights report on your site, you’ll receive a score and a “grade” for each of these, which will fall into one of three buckets:
Good
Needs Improvement
Poor
These grades are determined by predefined ranges that Google sets:
Good
Needs Improvement
Poor
FCP
[0, 1800ms]
(1800ms, 3000ms]
over 3000ms
FID
[0, 100ms]
(100ms, 300ms]
over 300ms
LCP
[0, 2500ms]
(2500ms, 4000ms]
over 4000ms
CLS
[0, 0.1]
(0.1, 0.25]
over 0.25
INP (experimental)
[0, 200ms]
(200ms, 500ms]
over 500ms
TTFB (experimental)
[0, 800ms]
(800ms, 1800ms]
over 1800ms
How to Use This Guide to Improve Your PageSpeed Insights Score
Understanding PageSpeed Insights is the first part of the battle.
Next, we have to figure out how to translate all the scores, numbers, and suggestions into an actionable plan for improvement.
Look for failed CWV tests or metrics in the “Poor” end of the scale.
Find the section below that relates to those specific metrics.
Work the steps (presented in order from highest to lowest impact).
Re-run the PageSpeed Insights report.
If necessary, repeat the process for any metrics still marked “Poor.”
Move to the metrics marked as “Needs Improvement.”
Repeat from the beginning.
Get Content Delivered Straight to Your Inbox
Subscribe to our blog and receive great content just like this delivered straight to your inbox.
#1 – First Contentful Paint (FCP)
Let’s dive into the first metric on Google’s list.
It’s the First Contentful Paint, or FCP, and it measures how quickly the user can see your website as it’s loading.
What is First Contentful Paint?
First Contentful Paint (FCP) is the time it takes for the first object to load in a user’s browser. This is different from the page load speed or load time because it’s not the time for the entire page to render — It’s just the first piece of the page to appear on the screen.
This is important from a user’s perspective because they can see progress as the page begins to appear.
It also means the strategies for speeding up FCP are unique from just making the whole page load faster.
FCP is measured in seconds.
Good: < 1.8 seconds
Needs improvement: 1.8 – 3 seconds
Poor: > 3 seconds
Techniques to Improve FCP
Let’s say you scored 2.2s on your FCP score. You’re hoping to knock it down to 1.8s.
What tools are at your disposal?
Minimizing Render-Blocking Resources
Remember, First Contentful Paint isn’t just about how long the whole page takes to load. It’s about getting the first pixels to appear on the screen as quickly as possible.
One key strategy is simply changing the order of content on your page.
Let the browser render the most important text, images, and styles before it starts loading heavy scripts, fancy animations, and content that’s “below the fold.”
The first thing you should do: Delete any unused styles or scripts from your page.
If you’re loading JavaScript or CSS onto the page (usually in the Head section of the website), this will slow down the FCP. If you’re not using them, then it’s just slowing you down for nothing.
JavaScript is a programming language that enables you to create things within a web page or on a web server. When you view a web page, the JavaScript code will execute automatically.
In WordPress, you can usually accomplish this by disabling unused plugins, which may load code onto the page even if the plugin isn’t being used or displayed.
If you look at the findings in your PageSpeed Insights report, it will flag code that’s loaded into the page but not being used:
This should tell you which code or plugins you might safely remove.
(Note: Just because code isn’t used on one page doesn’t mean it’s not on other pages of your website! Be careful before you start hacking and slashing things from your pages.)
Next: Defer or load scripts asynchronously.
If you need scripts or styling on your page, but they aren’t immediately vital to the first content the user sees, then you can do what’s called defer or load them asynchronously. This tells the browser to wait to load them rather than loading them in the order they appear on the page.
This is pretty simple — You can add a bit of extra code to your website that will instruct the browser to either defer or load async (or both):
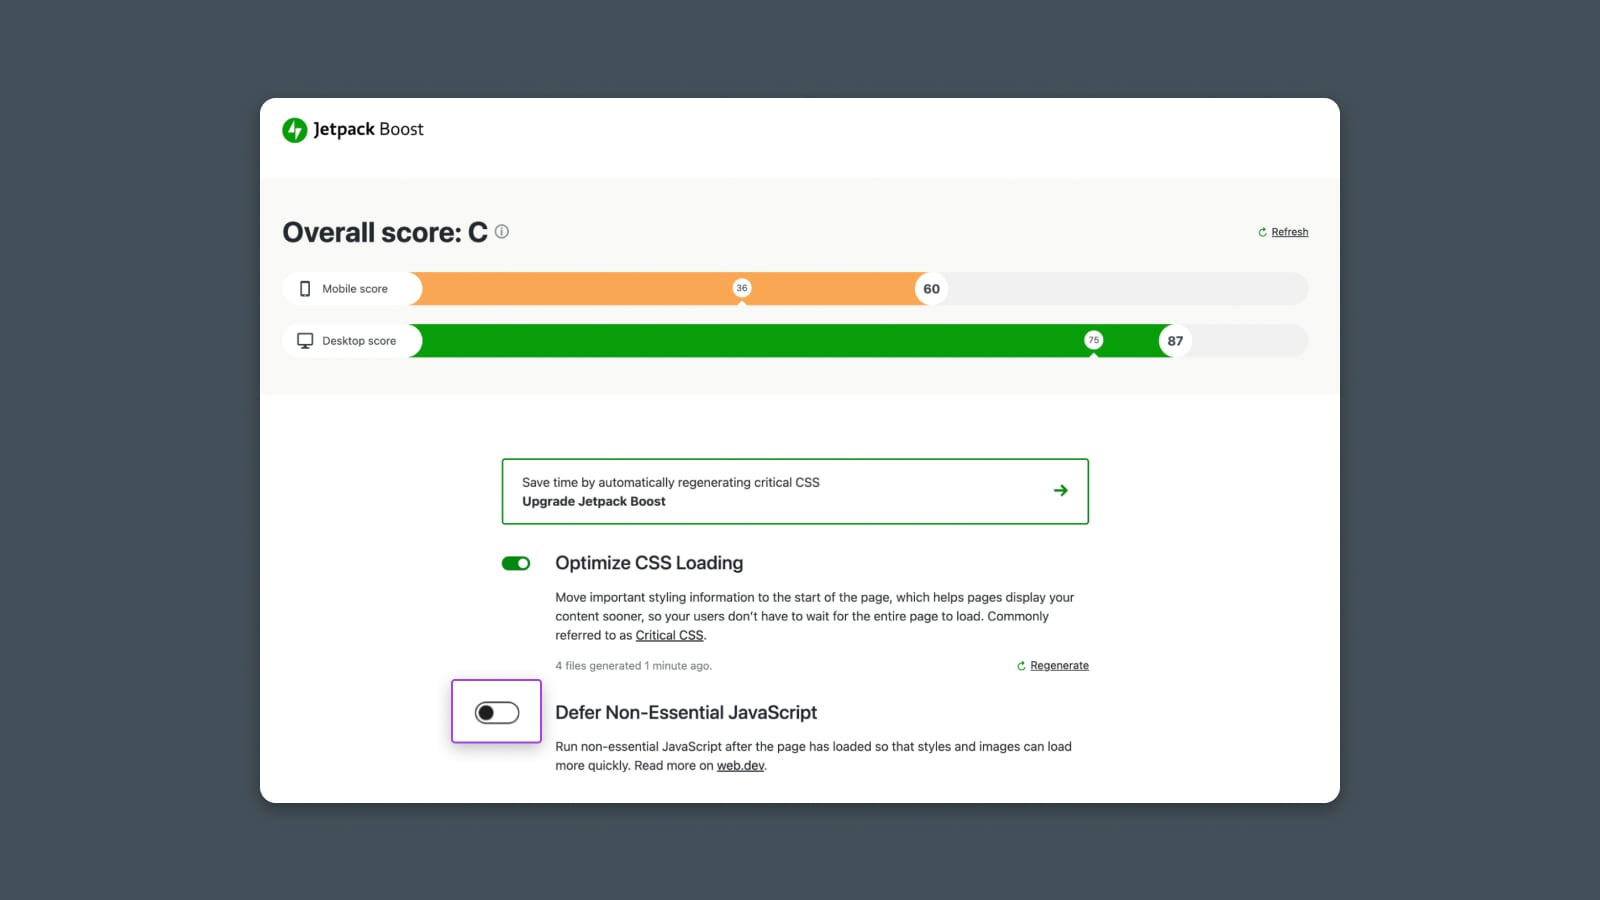
JetPack is a free plugin suite that gives you all kinds of tools to optimize the speed and performance of your website. Notably, you can choose to defer loading non-essential JavaScript with a simple click.
From inside WordPress, go to Plugins > Add New.
Then, search for Boost. Click “Install” and “Activate”.
You should see a new menu in your left-hand navigation called “JetPack”.
Go to JetPack > Boost.
The plugin will render your site in the background and show your score, plus options for improvement. To defer non-essential JS, simply click the toggle to enable it.
Finally: Restructure CSS (styling).
If you’re familiar with CSS, you’ll know that it’s common to throw all your styles into one big blob of code and load it all in a standard file like style.css.
It’s not wrong. It’s just not very performant.
To improve FCP, you can optimize your CSS structure:
Remove all of the styles that apply to content that’s part of the FCP (anything “above the fold.”)
Add these styles as an inline style block in the header of your website.
Load the remaining styles asynchronously with a “preload” function (shown below.)
Since FCP is mostly about optimizing for the first few hundred pixels at the top of the page, we won’t go into too much detail on optimization for images and videos here.
But if your header has a lot of images or you have a video at the top of the page, then it may be worth investigating how to optimize these assets to improve initial load speed. See below for more details on how to approach optimizing.
Using a Content Delivery Network (CDN)
Same as above. CDNs can help load your whole page faster, which gives a small boost to FCP. See below for more details on using a CDN.
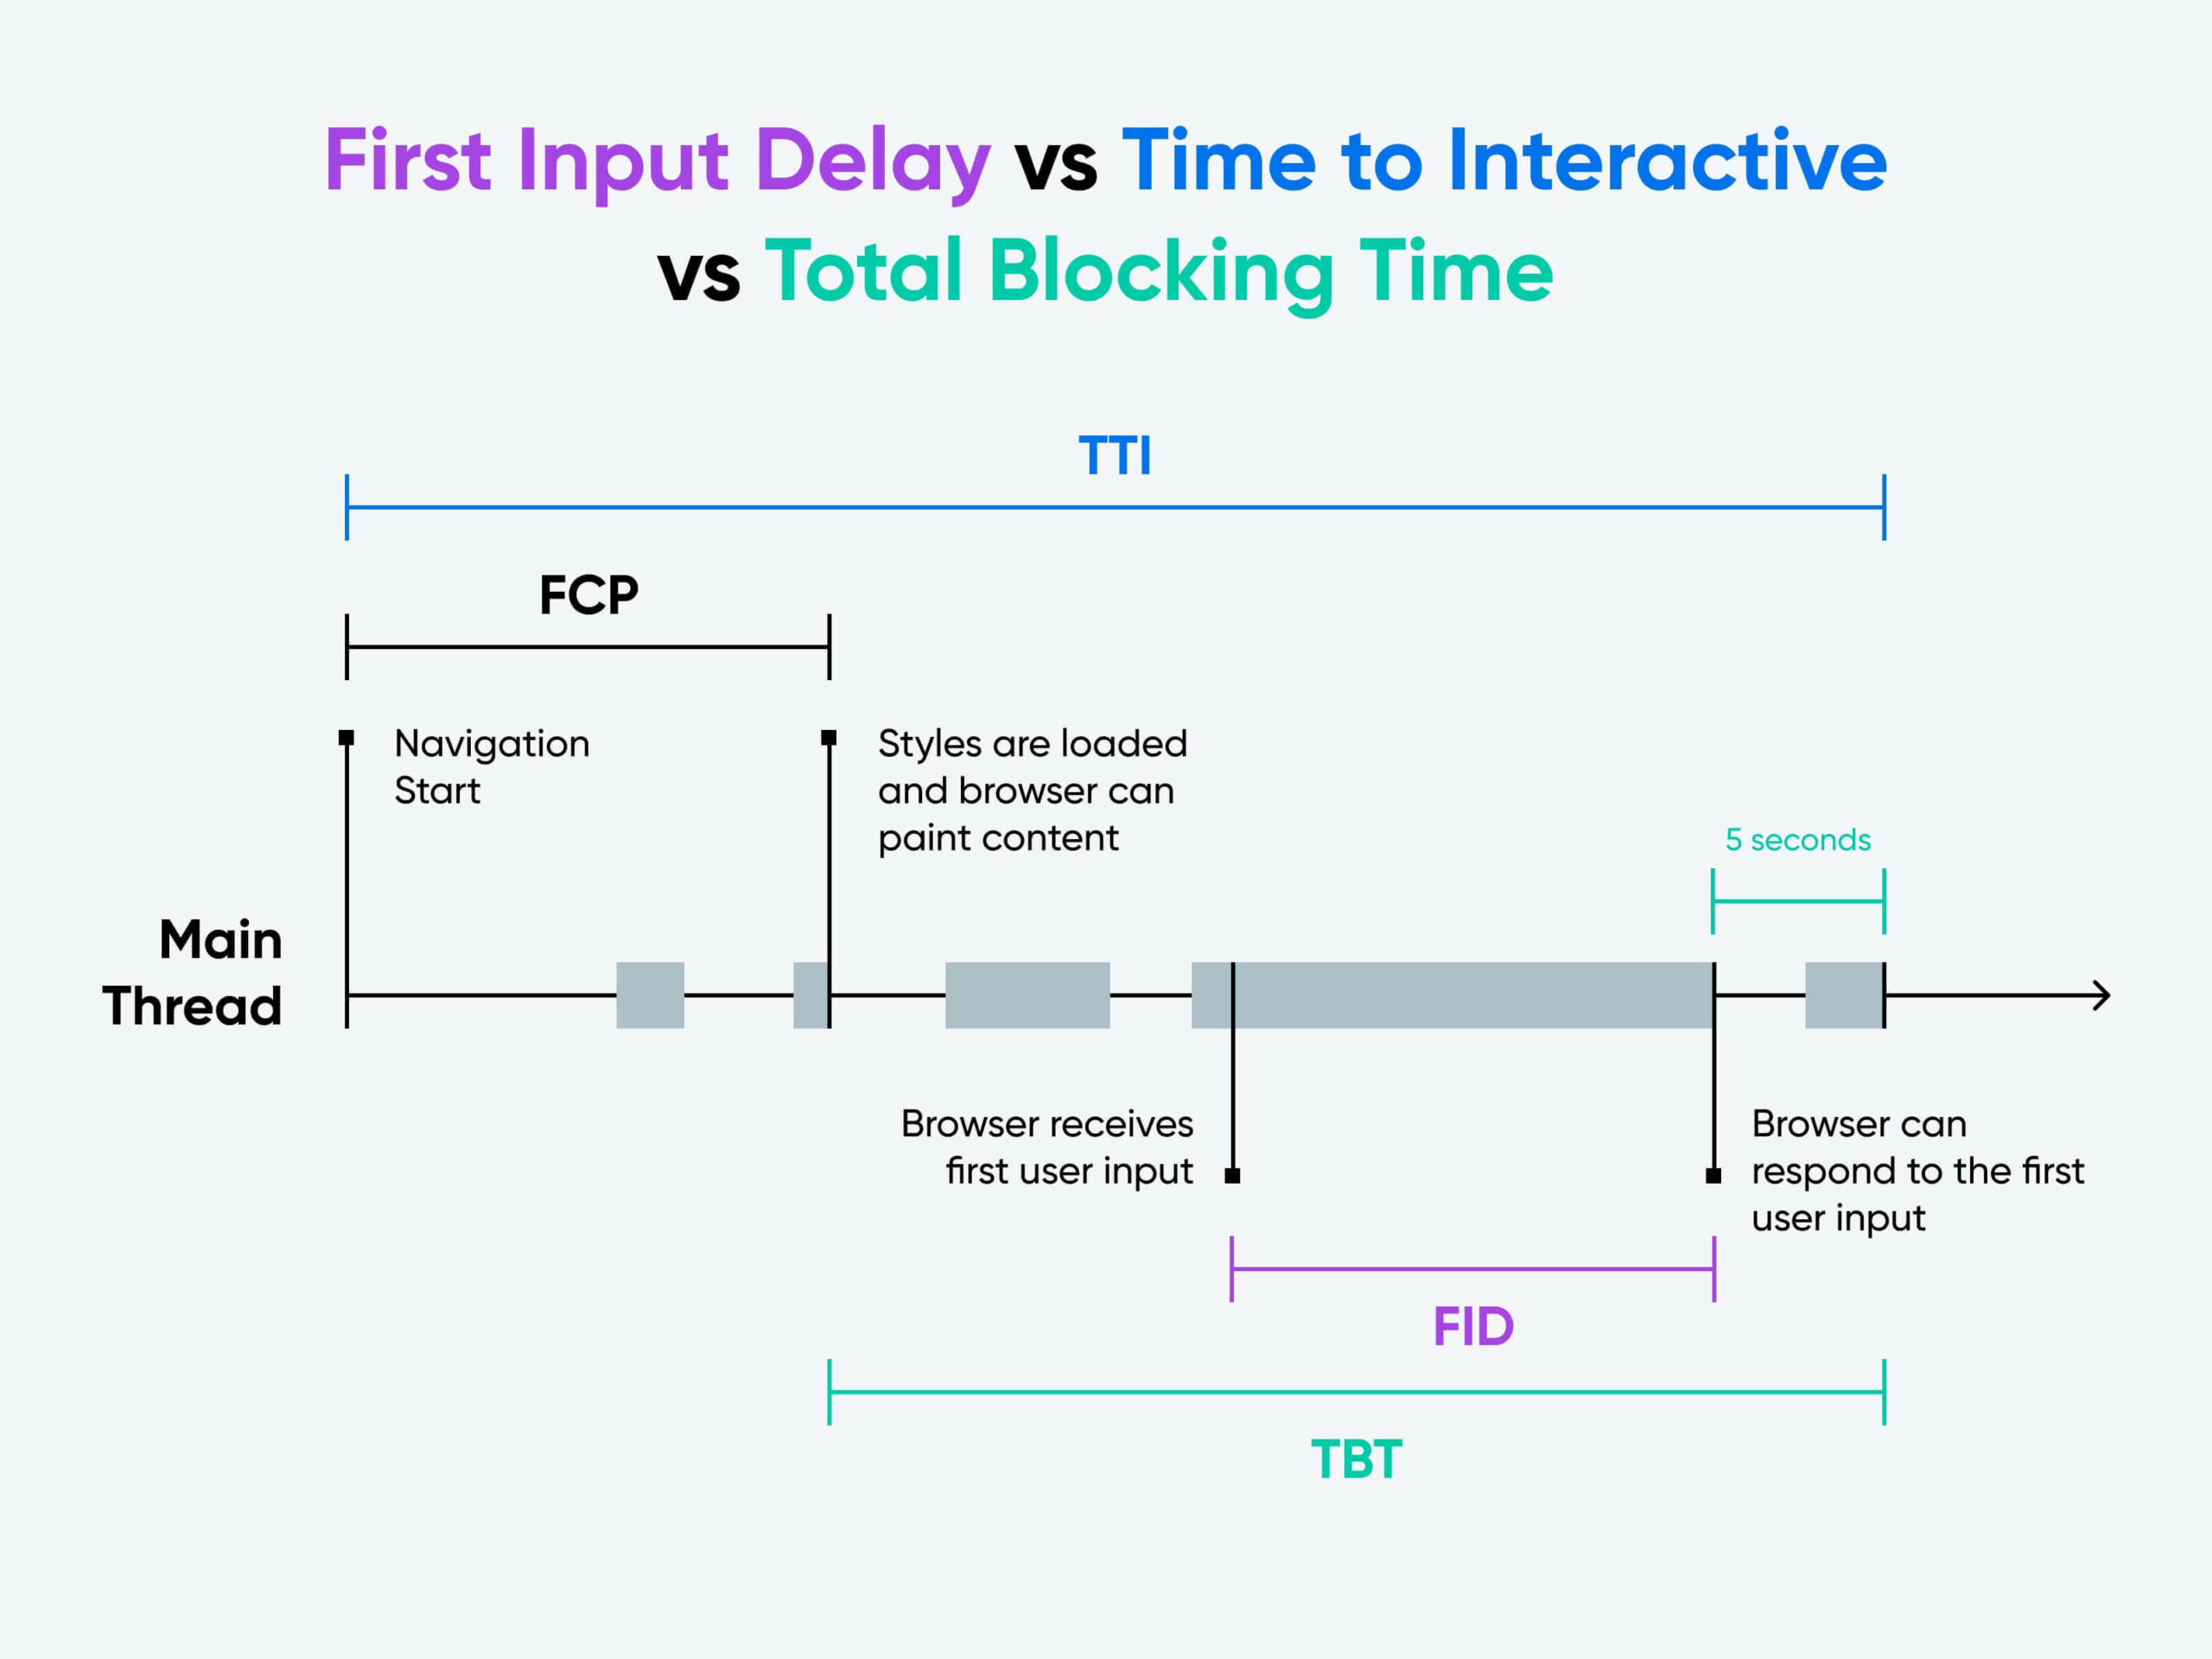
#2 – First Input Delay (FID), Total Blocking Time (TBT), and Time to Interactive (TTI)
Now let’s talk about tradeoffs.
If you only paid attention to First Contentful Paint, you may think that all you need to do to crush your PageSpeed Insights score is defer and load all of your resources later to make that top portion of your website load quickly.
But if the website appears to load quickly, yet I can’t actually interact with it, then that’s also a poor user experience.
Enter: First Input Delay.
First Input Delay is also related to Total Blocking Time (TBT) and Time to Interactive (TTI) metrics.
Let’s unpack each of these and how they’re related but different.
What is First Input Delay?
First Input Delay (FID) is the time it takes for the browser to respond to a user’s first input or interaction (e.g., clicking a link or button). Your website’s performance impacts the delay because most interactions can’t be processed while the browser is loading or rendering code.
In other words, if your code takes a long time to finish loading, it will prevent the user from interacting with the website, and there will be a delay or lag time between when they click to when the action takes place.
This metric is measured in milliseconds, and based on real-world user data.
Good: < 100ms
Need Improvement: 100 – 300ms
Poor: > 300ms
What is Time to Interactive (TTI)?
Time to Interactive is the time it takes for the page to become “reliably interactive.”
Google defines “reliably interactive” as when the browser’s main thread is free for at least 5 seconds, making the page fully interactive to the user.
This is a metric measured by Google’s Lighthouse, so it’s not based on actual user data. Instead, it’s measured under specific, controlled criteria.
What is Total Blocking Time (TBT)?
Total Blocking Time measures the full period of time between FCP and TTI.
In other words, the clock doesn’t start running until the top of the page is rendered, and then it stops after the page is considered “reliably interactive” or 5 seconds after the main thread is free.
First Input Delay vs Time to Interactive vs Total Blocking Time
These three metrics are related but not identical.
First Input Delay is based on real-world user data and Core Web Vitals. TTI and TBT are measured by the performance report in PageSpeed Insights, powered by Google’s Lighthouse.
In terms of improving the performance of these three metrics, the solutions are also similar but not identical. Most notably, solutions for improving FID that involve deferring JavaScript rendering won’t improve TTI or TBT because JavaScript still needs to be loaded.
But solutions like removing, minifying, and caching should help improve all three metrics.
Techniques to Improve FID, TTI, and TBT
By far, the most significant impact on FID is the JavaScript loaded on your page.
You can think of JavaScript like a separate train track for the browser. While it’s rendering or executing JavaScript code, it can’t complete other tasks or respond to inputs like a user clicking a link (the “main thread” needs to be free for the browser to respond).
So the longer it spends reading and executing the JavaScript when the page first loads, the longer the delay will be if the user begins interacting with the page.
Reduce the Impact of Third-Party Code
One usual suspect for slow input response is that the website is still loading in all kinds of third-party tools, widgets, and apps to your website.
Every time you add things like Facebook, Drift, Intercom, HotJar, or other third-party tools and services to your website, it adds a bit of code that will need to be loaded and rendered on the page.
If you have a lot of these services, it can take a long time to load them all.
Worse yet, you don’t have any control over how quickly these resources are loaded on your site. So if the browser is trying to fetch some JavaScript from a third-party website on a slow server, it could cause significant delays.
Let’s fix it.
Option #1: Delete all unused third-party tools.
Chances are that you’ve installed all kinds of services, plugins, and tools on your website over the years. And you probably only use a few of them.
Now’s the time to delete or uninstall the ones you aren’t actively using.
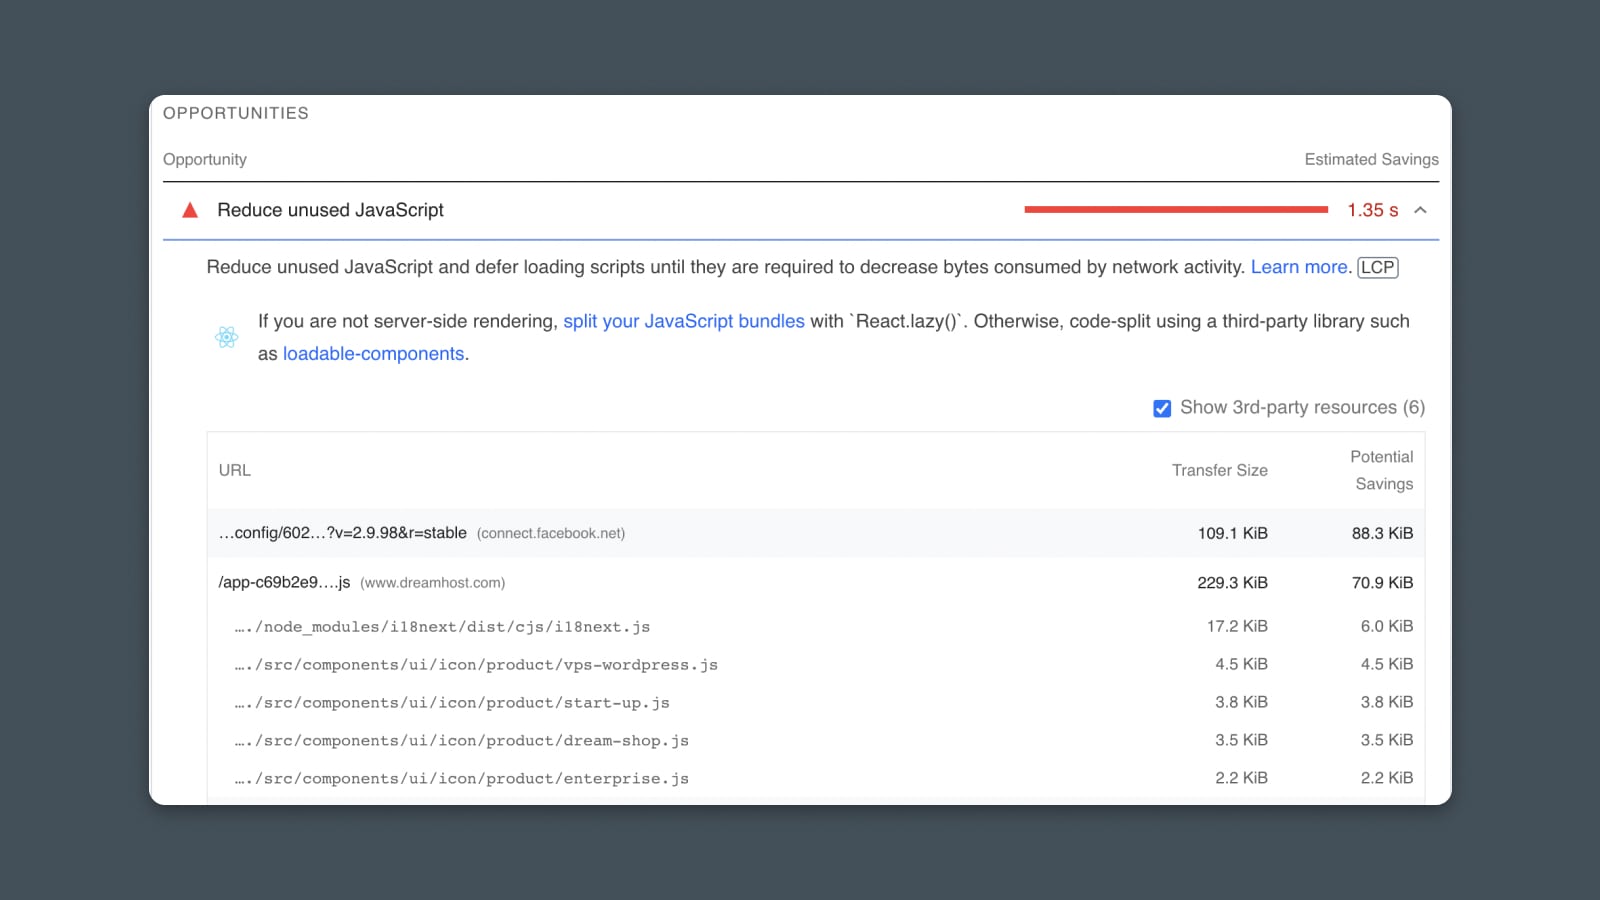
To get a full list of the third-party JavaScript loading on your page, refer to your PageSpeed Insights report or run a separate Lighthouse report.
You should see a list of all of the scripts being loaded and how long they take:
Now, using this information, you can decide which of these are critical and which can safely be removed.
Depending on which services you want to delete, you may need to manually remove the code from your website, uninstall a WordPress plugin, or remove code that’s added via Google Tag Manager to improve page performance.
Option #2: Load JavaScript async.
Unless it’s vital to rendering the FCP, it’s almost always advisable to render third–party scripts asynchronously. If you have vital JavaScript that’s slowing down FID but you can’t remove it, then try having it load async instead.
Minimizing JavaScript Execution Time
Third-party code can be a scoundrel, but what about our very own code that we’ve put on our website?
Chances are it’s not innocent in the slow load time.
If you have non-essential JavaScript that you’ve added to your own website, you may want to remove it.
Looking at the PageSpeed Insights report, you should see a section that references unused JavaScript:
If the JavaScript is 100% unused, consider deleting it
If the JavaScript is used on other pages, consider only delivering it selectively on the pages where it’s necessary (also known as “code splitting”)
You can also explore options for improving the JavaScript’s load time.
The most common way to speed up load time is to reduce file size. And with JavaScript, there are two main strategies:
Minification – Removing all of the spaces, line breaks, etc. in the code
Compression – “Zipping” the file to make it smaller
If you’re primarily concerned about improving FID, then you may want to focus on deferring JavaScript and other page elements to only focus on content within the first contentful paint.
After all, users cannot interact with elements that haven’t been rendered.
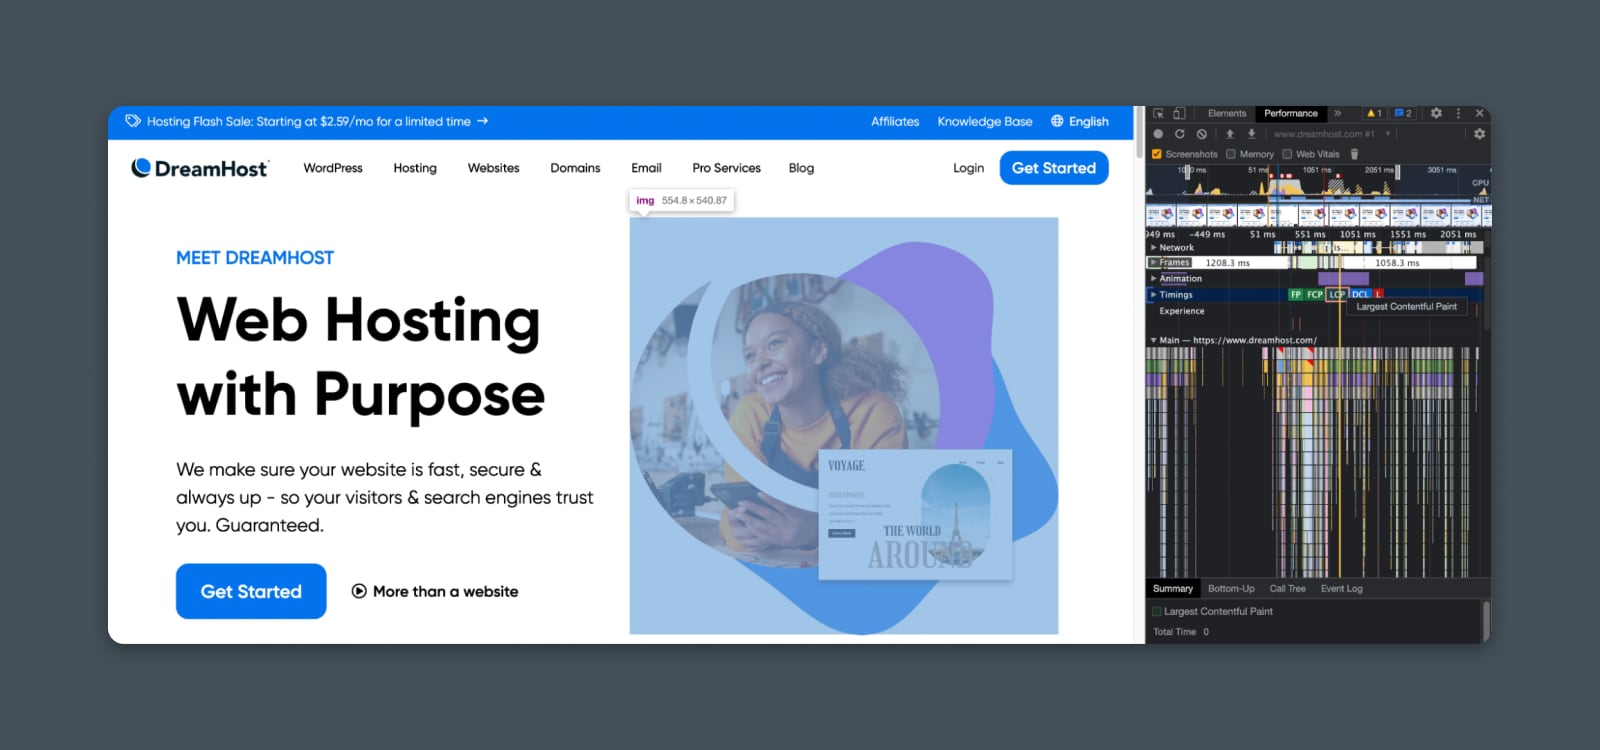
#3 – Largest Contentful Paint (LCP)
If FCP is your car’s 0 to 60 time, then LCP is its quarter-mile.
Okay, for the non-gearheads, what I mean is that LCP measures how quickly the user can see the “main” content on your web page.
What is Largest Contentful Paint?
Largest Contentful Paint (LCP) is a metric that measures how long it takes for the largest block of content on a page to be visible to the user. Unlike FCP, it looks at the load time for the largest block of image or text on the page regardless of its position or order.
It measures the largest block of content based on its dimensions within the user’s viewport. In other words, if there is a single <div> with lots of text or a single image that takes up a large portion of the screen, that may be considered the largest block of content and used to calculate LCP.
It’s measured in seconds and based on real-world user data (or “in the field”):
Good: < 2.5s
Needs Improvement: 2.5 – 4s
Poor: > 4s
Techniques to Improve LCP
Before you begin working to optimize your LCP, you may want to determine which part of your page is considered the largest block of content.
This may help you target your efforts to improve performance on a specific page or template.
In the above sections, we’ve discussed options such as using async or deferral strategies to accelerate rendering key parts of the page.
You may want to consider those here as a first-line option.
Removing or deferring render-blocking resources can help the main content load more quickly. But keep in mind that if these resources significantly change the layout or structure of the page, it could actually change which block is considered the largest and slow down LCP rather than improve it!
You can take this strategy one step further. Especially if the largest block of content is an image.
You can apply what is known as a PRPL (Preload, Render, Precache, Lazy load) framework to target specific resources on your page and to load first in the queue. If that image is the largest content block, then it will dramatically improve your LCP score.
Lazy loading is a design pattern used in software development to improve performance and reduce resource consumption. It involves postponing the initialization or loading of an object until it is needed.
In addition to async rendering options, this framework provides other strategies for optimizing the rendering path.
One of the simplest is preloading critical assets.
You can do this by simply adding a small snippet to your website’s header that tells the browser to prioritize critical images, fonts, styles, or scripts, which may be critical to your largest content section.
For instance, if you have a hero image that is the largest block on the page, then you might want to pre-load that image on each page using a snippet like this:
<link rel="preload" as="image" href="image1.png">
This tells the browser to start loading this resource right away, before it’s discovered on the page.
Optimize File (Resource) Size
Now let’s talk about file size.
Bigger files take longer to load. This applies to images, scripts, videos, fonts, and anything else on your page that may be loaded as part of the largest content block.
One way to speed up your LCP score is file size optimization.
Strategies for optimizing file size will depend on the format of the file.
Optimizing Images
Commonly, you’ll find big gains by compressing and optimizing your images.
Start by evaluating these areas for improvement:
Format: Different image formats offer varying levels of compression and quality. For most web use cases, JPEG, PNG, and WebP are the most common formats.
JPEG is usually best for photos.
PNG is usually best for designed images with text or sharp edges.
WebP is a more efficient format that provides better compression without sacrificing quality, but it may not be supported by all browsers.
Compression: In many cases, you can compress an image’s file size without losing much or any visual quality.
Image size: If you’re uploading raw images or photos to your website and then adding them to your page, chances are they’re way bigger than they need to be, slowing down the load time.
Re-size your images and upload only the size you need.
Use the “srcset” and “sizes” attributes in the “img” tag to specify multiple image sources and sizes. The browser automatically chooses the most appropriate image based on the user’s screen size and resolution.
Optimizing Scripts and Styles
Any resources necessary to render the largest content block will need to be fully loaded before LCP is calculated.
This includes scripts and styles that impact your largest content block.
Using some of the techniques we’ve discussed before, you can improve LCP by optimizing the file size and render path for JavaScript, CSS, etc.:
Minify the files.
Code splitting to reduce file size.
Add styles and scripts in-line.
Pre-load or cache.
Optimizing Videos
If your LCP resource might be a video, then you should consider ways to optimize videos.
Host the video on YouTube or another service with a fast CDN rather than uploading directly.
Compress the video file size.
Optimizing Fonts
If the LCP resource in question is text and that text uses an imported font (e.g., from Google Fonts), then you can optimize by improving the load speed of the font file.
CDN is an abbreviation for “Content Delivery Network”. It refers to a geographically-distributed network of web servers (and their data centers). The entities that make up a CDN collaborate to ensure speedy content delivery via the internet.
The main thing to know is this: Implementing a CDN can dramatically improve website performance across the board. And, especially when it comes to LCP, it can help render images, scripts, and other assets faster than your web host’s normal server.
Set up an account and configure the CDN: Once you have selected a CDN provider, sign up for an account and configure the CDN settings. This typically involves creating a CDN zone, configuring caching rules, and setting up SSL/TLS encryption.
Integrate the CDN with your website: To integrate the CDN with your website, you will need to update the URLs of the content you want to serve through the CDN. This involves changing the nameservers to point to the CDN instead of your normal server.
Test the CDN: After integrating the CDN with your website, run tests to ensure that the content is being served through the CDN and that the LCP performance has improved.
Last, but certainly not least, your web host’s server performance also plays a key role in LCP.
We’ll cover this fully when we dive into TTFB; suffice it to say that the browser can only download resources as quickly as the server allows. If it takes a long time for the server to respond, it will take a long time for the resource to load.
#4 – Cumulative Layout Shift (CLS)
Did you know websites can dance?
Well, sort of. And not very well.
More accurately, they can shift. The elements on the page move around while different images, scripts, styles, and text get rendered until the page is fully loaded.
What is Cumulative Layout Shift?
Cumulative layout shift measures how far the images, text, buttons, and other elements on your page move on the screen while the user is waiting for the page to load. Lower CLS is considered better for the user experience.
That’s not really surprising if you consider your own browsing habits.
If you feel like you’re playing whack-a-mole while trying to click a link that keeps moving further down the page, you’ll probably get frustrated and leave the site altogether. (Hello, bounce rate!)
This experience can be especially infuriating while browsing on a mobile device.
CLS is field data from real users, and it’s measured as a score that combines the “impact fraction” (what percentage of elements in the viewport shifted) and “distance fraction” (how far did they move relative to the total size of the screen).
There is also a special designation for “expected shifts” (e.g., clicking a button that opens up a new section on the page) and “unexpected shifts,” which aren’t prompted by user input.
CLS is measured by multiplying the impact fraction and distance fraction:
Good: < 0.1
Needs Improvement: 0.1 – 0.25
Poor: > 0.25
Techniques to Improve CLS
Chances are that if you’re not intentionally trying to trick your users by moving things around on your page, your CLS is pretty low by default, but there are a few innocent mistakes that you can make and are worth fixing.
Define the Sizes of all Images and Videos
One small thing with a big impact. If you don’t explicitly define the size of the images and videos on your page, it can lead to a shift in the layout because the browser isn’t sure how much space to reserve for that resource.
This is as simple as adding the attribute for any image or video on the page:
You’ve got to pay the bills somehow, but avoid using pop-ins or pop-ups that shift the page layout. If nothing else, use a CSS aspect ratio box to “reserve” space for ads or other messages loading into the page as the user interacts.
Choose Animations Wisely
With modern CSS and JavaScript, we can implement all kinds of cool and fancy animations on the page.
But, from a user’s perspective, function always trumps form.
Remove any animations that trigger layout changes, since each change of state can contribute to the overall layout shift and ding your CLS score.
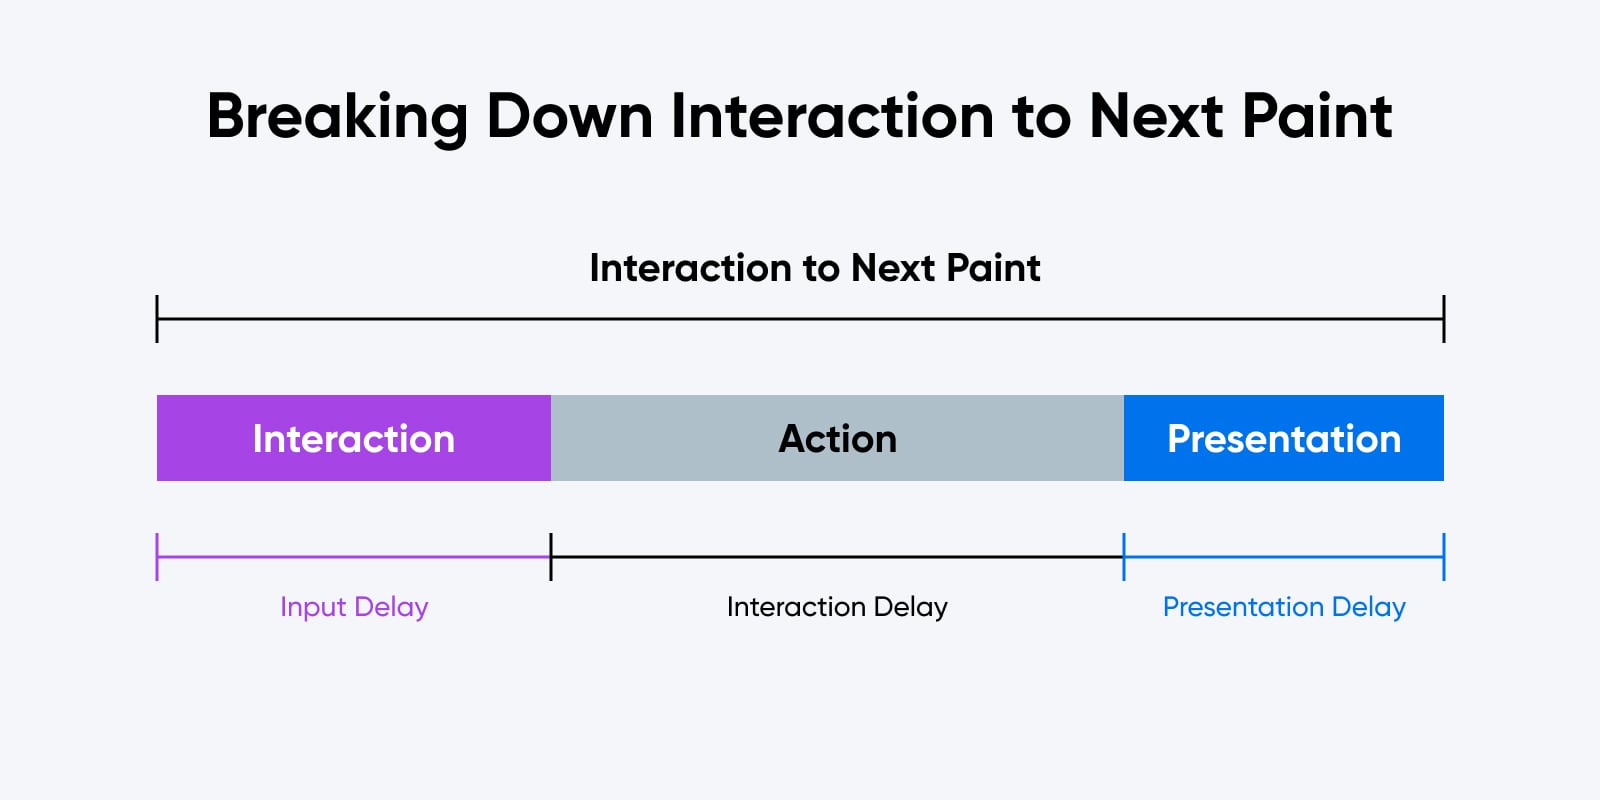
#5 – Interaction to Next Paint (INP)
As Jay-Z once said, “I’ve got no patience. And I hate waiting.”
Don’t we all?
While we’ve already covered the input delay on the first interaction with your website (FID), INP is a broader metric that assesses your website’s overall responsiveness.
What is Interaction to Next Paint?
Interaction to Next Paint measures how long it takes for the next “paint” or updated frame on your website to appear after the user interacts with a button or page element. It measures overall website responsiveness and how fluid the interactions feel.
This is especially important for web apps that require significant user interaction and can feel sluggish and confusing if there’s too long of an input lag or delay between the action and the outcome.
INP is measured in milliseconds:
Good: < 200ms
Needs Improvement: 200 – 500ms
Poor: > 500ms
Techniques to Improve INP
If you’re having INP problems, I feel bad for you, son. (Sorry, that’s another Jay-Z lyric.)
Luckily, you can break down most issues into three main problems:
Here you can zoom in on an individual interaction and see where the longest delay occurs.
From there, we can look for some solutions to each one.
Fixing Input Delay
Input delay is caused when the main thread is busy at the time of the interaction. This means something else is happening when the click or keypress takes place.
To fix it, you’ll want to dig into which processes are running as part of the main thread:
Remove or optimize third-party JavaScript.
Use web workers to run JavaScript outside of the main thread.
Use listeners like isInputPending() to yield the main thread (this is the most advanced option.)
Fixing Interaction Delay
If the interaction itself is the culprit – meaning it takes a long time for the interaction to actually execute – then you’ll need to refactor the code for this input.
The main recommendation here is to defer non-essential computations.
In other words, execute the part of the interaction that the user immediately sees and expects. Then, after updating the frame, perform any other calculations or interactions behind the scenes.
Say, for instance, that the user clicks a button that opens a window and also logs an event showing that they clicked the button. You would want your code to open the window first, “completing” the interaction from the perspective of the user.
Then, once the interaction is completed, log the event that the user won’t see or experience directly.
Fixing Presentation Delay
It’s possible that the input and the interaction are both happening pretty quickly, but it’s taking a long time for the browser to update the presentation with the new frame.
Unfortunately, there isn’t a lot of refactoring that will help with this.
But a few things could cause a longer-than-normal delay:
Overuse of requestAnimationFrame(). Each time this function is called, it creates a tiny delay. So look for cases where it may be used too frequently or unnecessarily.
“Async” attributes run awry. Depending on the context, some resources you’ve marked for async rendering might ignore the directive or load unexpectedly. If that happens, it will delay other render path items and the next frame.
#6 – Time to First Byte (TTFB)
Now, we find ourselves thinking about that very first instant when a webpage loads.
Before the page can even start to render, the user’s browser needs to make contact with the web server, figure out who it’s connecting to, and get marching orders about what to start loading in what order.
That initial handshake contains the first byte of information. How quickly that byte arrives is like the pistol shot at the start of a horse race.
What is Time to First Byte?
Time to First Byte is the time it takes your browser to go through processes like DNS lookup, TCP and SSL handshakes, and connection setup in order to request – and receive – the first bytes of information from a web server. The speed of establishing connection with the web server is almost entirely dependent on the server itself and how the website is hosted.
It’s measured in milliseconds:
Good: < 800ms
Needs Improvement: 800 – 1800ms
Poor: > 1800ms
Techniques to Improve TTFB
You can think of TTFB as the time you spend at the starting line before the pistol is fired. Anything that delays the initial greenlight will add time to TTFB and the overall page load time.
So what are your options for improvement?
Eliminate Redirects
First and foremost, eliminate page redirects whenever possible. If you’re redirecting users from one page to another, the time it takes to execute falls within the TTFB window, which means you’ll add a significant amount of time to your score.
This includes 301 redirects from old URLs to a new one, as well as temporary redirects and other implementations.
Upgrade Your Web-Hosting
Hosting plays a huge role in your website’s overall speed and performance score, especially when it comes to TTFB.
A hosting provider is a business that charges a fee in exchange for “renting” server space and resources. You can choose any hosting provider that you want to launch a new website.
You’ll want to look at the specifics of your web hosting provider, paying close attention to things like:
Shared vs dedicated hosting: Is your website hosted on its own instance or is it sharing resources with other users and their websites? Dedicated hosting usually costs more but provides more consistent performance.
Memory (RAM): The memory your site can access on the server plays a major role in its overall performance. If the memory is maxed out, then the server won’t be able to process and respond to new requests.
CPU / Processor: The speed of the server’s processor also plays a role in its response speed and processing time.
Infrastructure updates: Is the software running on the server kept up to date and free of errors or conflicts? Update the latest versions of PHP, MySQL, and other essential applications to maximize performance.
Implement Caching
On so-called “dynamic websites,” like sites running on WordPress, caching your pages can make huge improvements to page load times and TTFB.
Caching essentially means that rather than fetching information from your site’s database each time a page is loaded, the site will store a copy of the page and serve that up to the user. It’s much faster than looking up information each time.
We didn’t include a separate section focused on the Speed Index metric in this guide because that’s essentially measuring the overall load time of the page.
This means that addressing Speed Index issues is usually a matter of tackling the other related metrics we’ve already covered:
First Contentful Paint
Largest Contentful Paint
Interaction to Next Paint
Time to First Byte
Each will play a small role in the cumulative page speed and addressing them directly should improve your overall Speed Index score.
Final Thoughts on PageSpeed Insights
In this guide, we’ve covered just about everything there is to know about the PageSpeed Insights report and how you can strategically address each potential problem.
Altogether, I expect that page performance, accessibility, and technical best practices will continue to grow in importance. We’re building the web together – one website at a time – and that relies on us all investing in keeping the web open, accessible, and beautiful.
Take Charge with Flexible VPS Hosting
Here’s how DreamHost’s VPS offering stands apart: 24/7 customer support, an intuitive panel, scalable RAM, unlimited bandwidth, unlimited hosting domains, and SSD storage.