Picture this: You’re in a Zoom meeting, and your coworker joins — but he’s accidentally added a filter that makes him look like an adorable puppy and he doesn’t know how to remove it. It’s a viral video in the making, but no one is recording the call. You have to at least take a screenshot to share in the Watercooler Slack channel so everyone at the company can get a kick out of this, but there’s just one problem: You don’t know how to take a screenshot on a Mac.
Taking a screen grab on a Mac computer is essential for more than just capturing hilarious Zoom faux pas. You can take screenshots to share information with colleagues, show examples of bugs — you can even mark up your screenshots to make visual instructions. And MacOS makes screenshots easy with keyboard shortcuts you can learn in minutes.
A mockup is a static design used to showcase how a website or an application might look. People use mockups to help evaluate potential designs without coding the actual application or site.
So here’s your chance to never miss another hilarious moment without documenting it — read on to learn how to take a screenshot on a Mac (plus some other time-saving shortcuts all Mac users should know.
4 Ways to Take a Screenshot on a Mac
There are actually many different ways to take screenshots on a Mac, depending on the type of screenshot you need. All of these use Apple’s built-in screenshot tool, so there’s no need for third-party apps or tools.
For each type of screenshot, you’ll press command. Then, while still holding it down, press shift and a number.
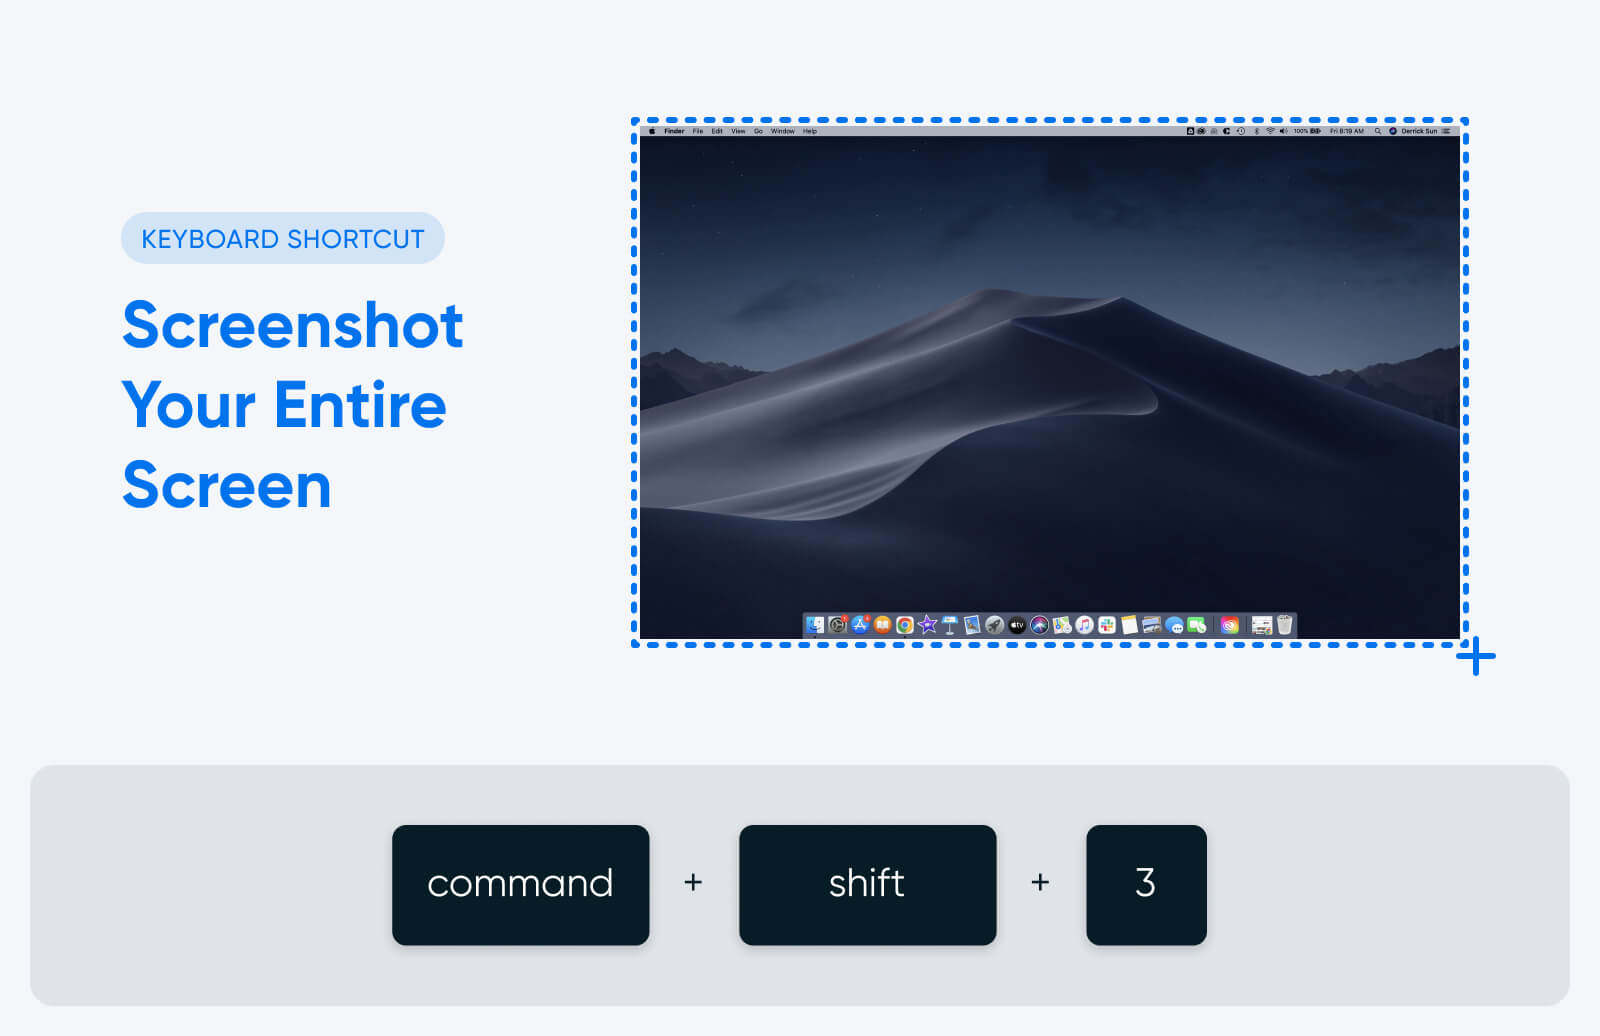
Command + Shift + 3
Screenshot your entire screen
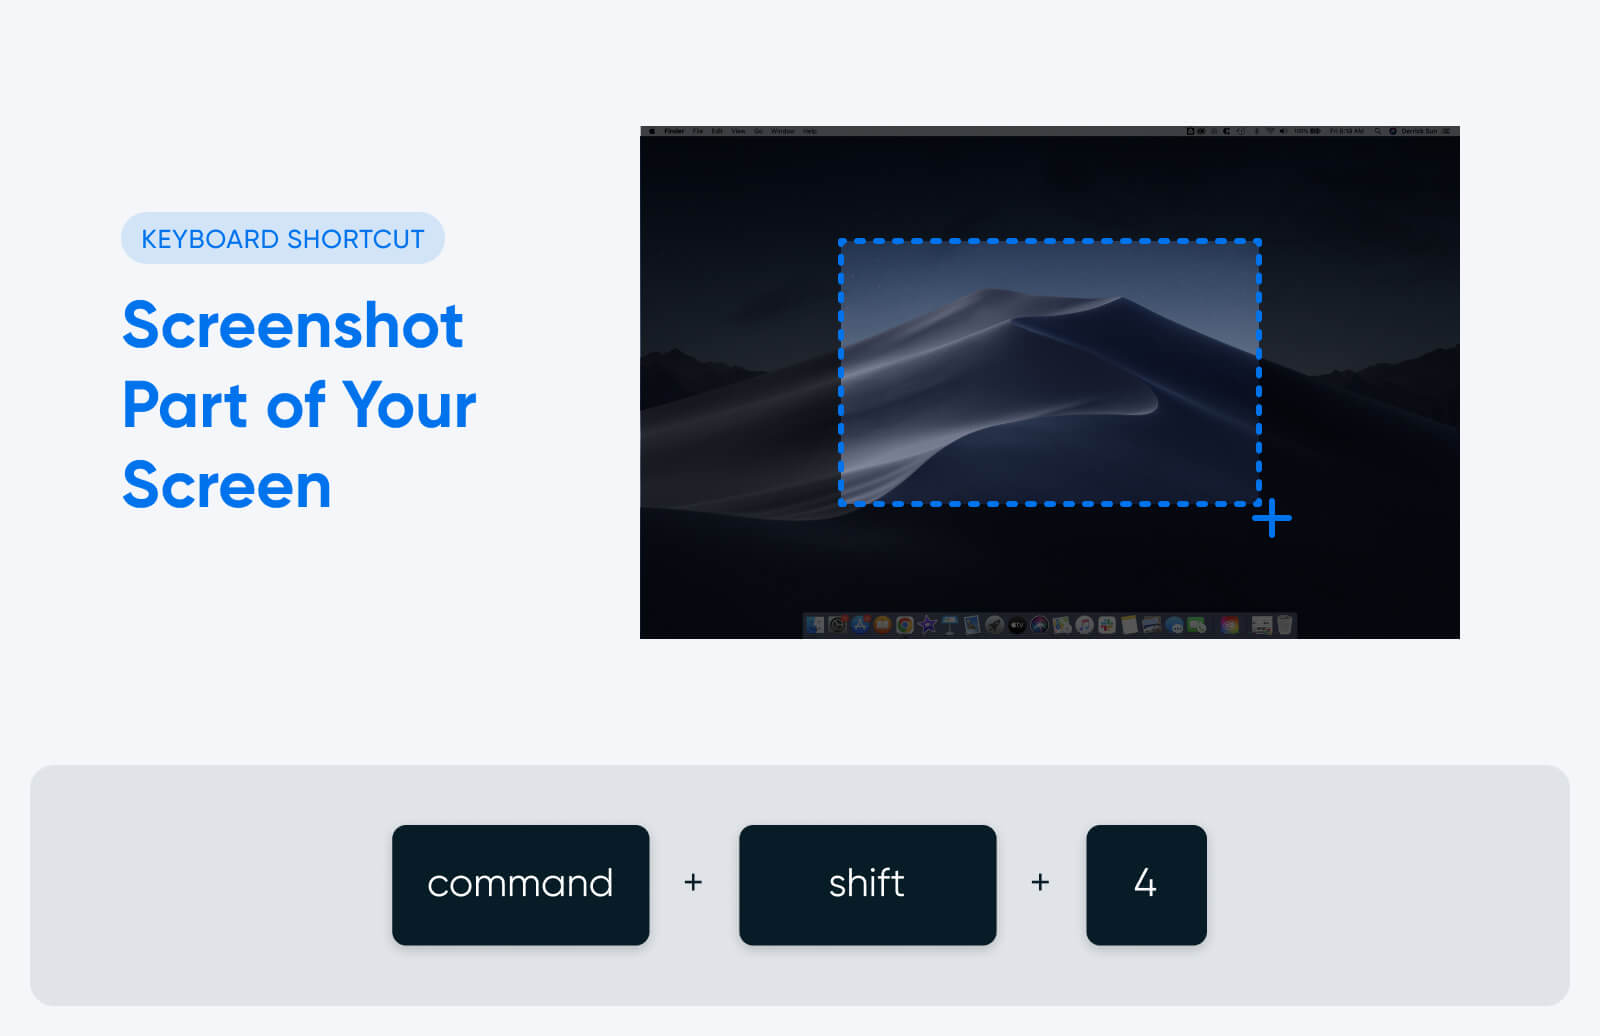
Command + Shift + 4
Screenshot a selected portion of the screen
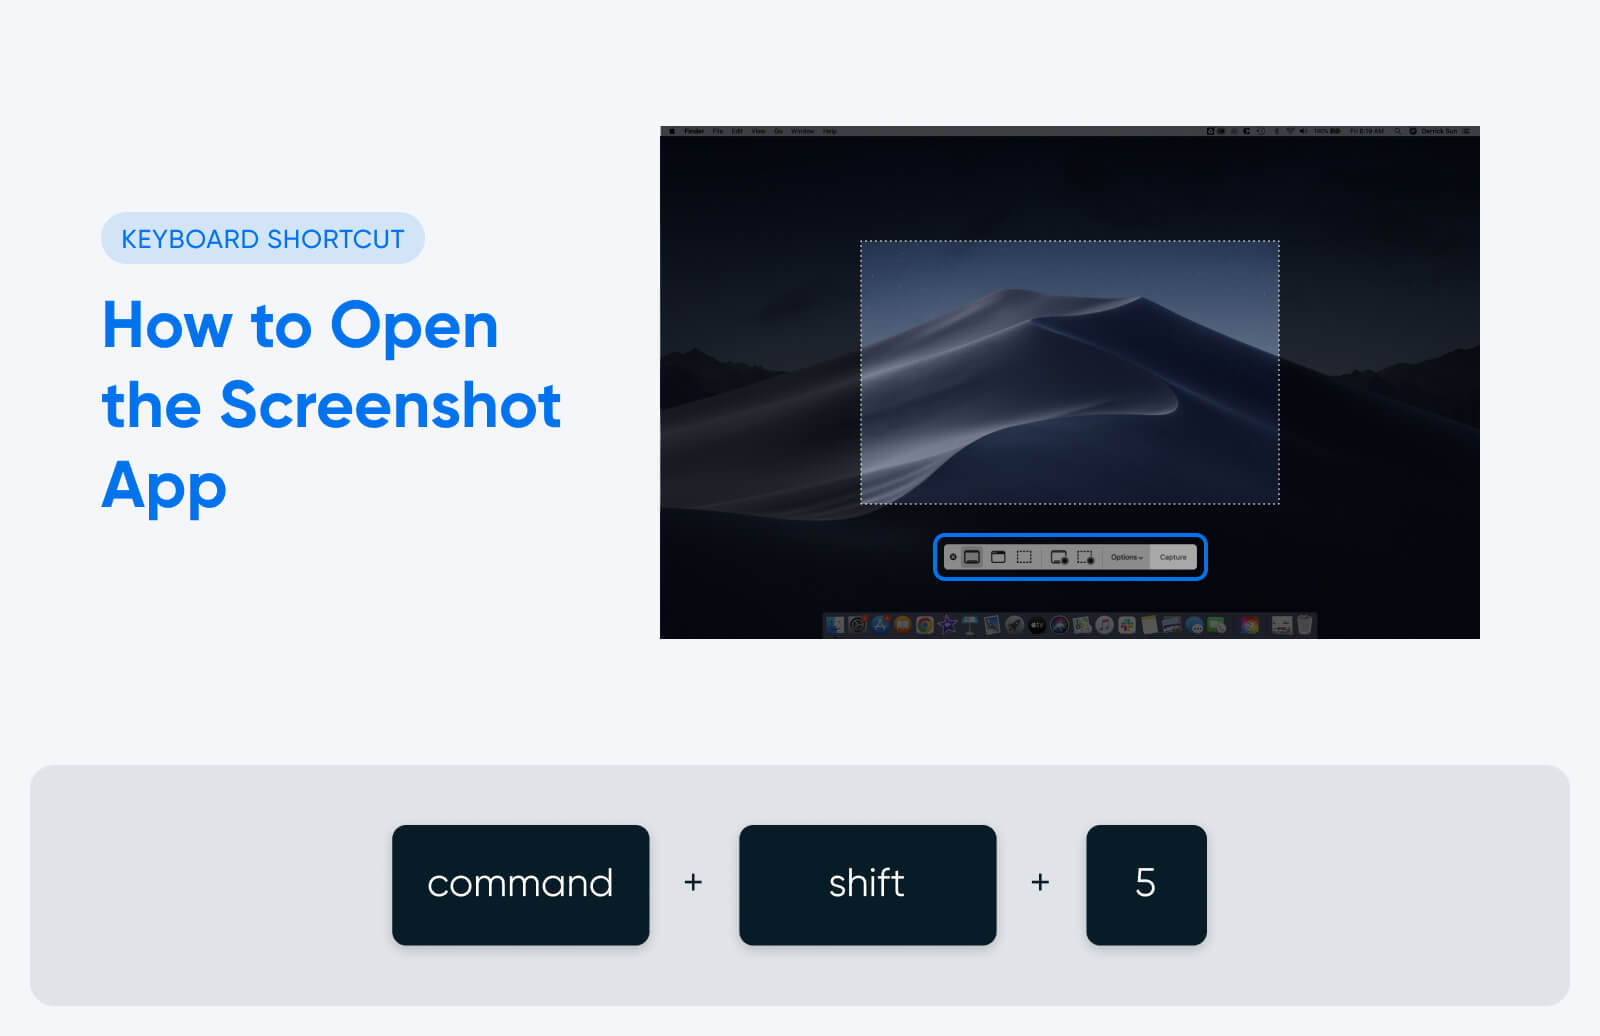
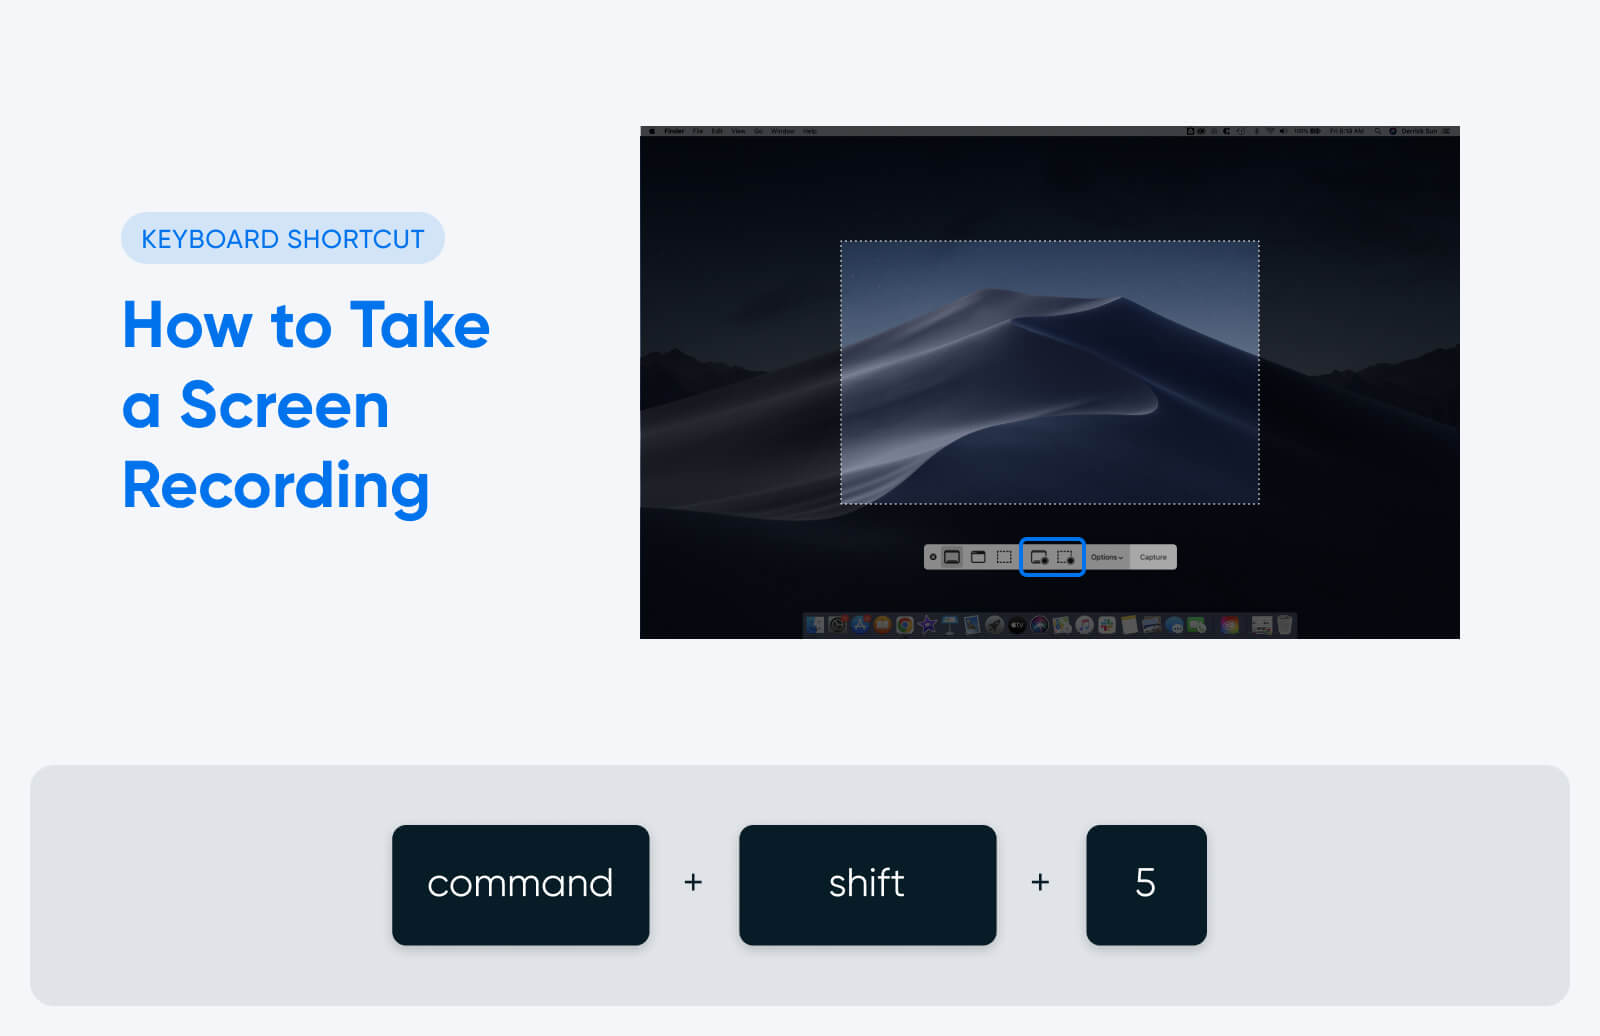
Command + Shift + 5
Open the screenshot menu
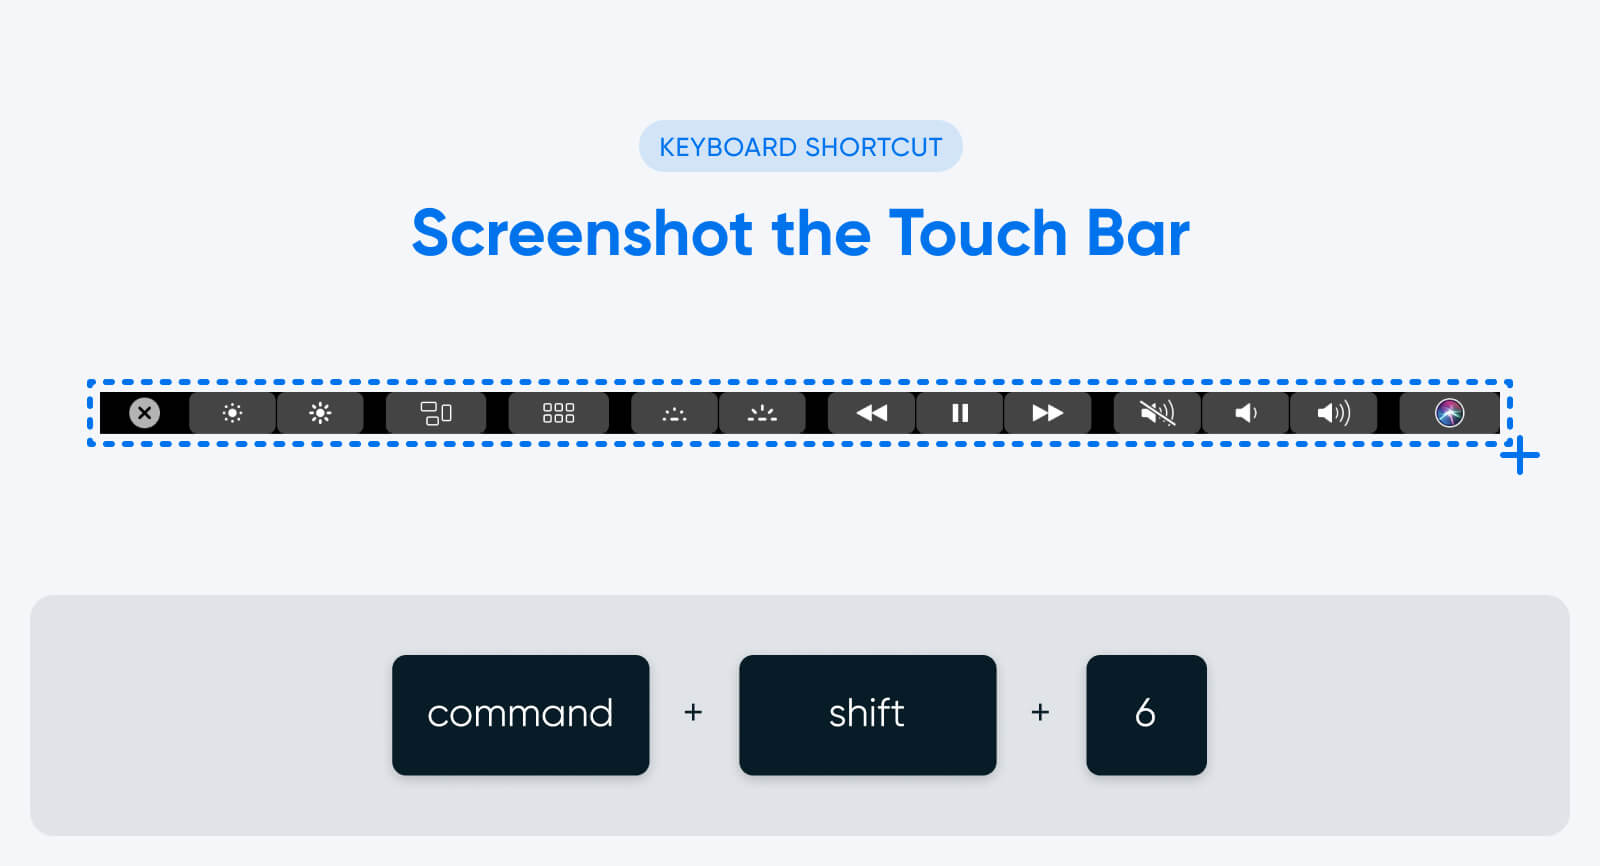
Command + Shift + 6
Screenshot the Touch Bar, if your Mac has one
Check out the different types of screenshots below for the keyboard shortcuts and some more information about each.
How to Screenshot Your Entire Screen
If you need a screenshot of your whole screen, use this shortcut:
Command + shift + 3
This shortcut will work whether you’re in full-screen mode or have multiple windows visible on your screen. Note that if you’re using multiple monitors, this shortcut will take and save a screenshot of each one simultaneously.
How to Screenshot Part of Your Screen
If you don’t need a screenshot of the entire screen, but rather a selected area or part of the screen, use this shortcut:
Command + shift + 4
Once you use the shortcut, your cursor will turn into a crosshair. Use your mouse button or trackpad to click and drag the crosshair to select the part of the screen you want to capture. Let go when you have the total area you want inside the screenshot box, or press the Esc key to cancel the screenshot.
There are a few more ways you can use this shortcut:
Press Command + shift + 4 and then hit the spacebar. This will turn your mouse pointer into a camera icon, and instead of clicking and dragging to select an area for your screenshot, you can click on a specific window to capture it.
After clicking and dragging to create your screenshot area, press and hold the spacebar. This will lock the size and shape of the box. You can then drag it anywhere on the screen, and release the spacebar to take your screenshot.
After clicking and dragging to create your screenshot area, press and hold the Shift key to adjust the height and width of the selected area. Press Shift to toggle between height and width. Let go of the mouse button or trackpad to take the screenshot.
How to Screenshot the Touch Bar
Not every Mac computer has a Touch Bar, but some models of the Macbook Pro come with this backlit toolbar built into the keyboard. It replaces the function keys and serves as a menu bar for volume, brightness, video playback controls, and more.
On a Mac that has a Touch Bar, you can screenshot it by using this shortcut:
Command + shift + 6
This will capture everything showing in the Touch Bar at the time you took the screenshot.
How to Open the Screenshot App
Certain Mac operating systems (including MacOS Mojave, Catalina, Big Sur, Monterey, and Ventura) have a built-in screenshot app that offers even more screen capture features and options.
To open the screenshot app, use this shortcut:
Command + shift + 5
The icons on the left side of the menu allow you to take a screenshot. From left to right, clicking the icons will allow you to:
Screenshot your entire screen
Screenshot a selected window
Screenshot a selected portion of your screen
Once you’ve chosen the option you want, click the “Capture” button on the far right of the menu to take and automatically save the screenshot.
The screenshot app also has an “Options” menu that allows you to customize how your Mac takes and saves screenshots. For example, if you click “Options,” then “Show Floating Thumbnail,” you can customize whether a thumbnail preview of your screenshot appears in the corner of your screen right after taking it. You can also customize how and where your screenshots are saved (but more on that in a minute).
How to Take a Screen Recording on a Mac
Screenshots are static images of a single moment in time on your screen. Screen recordings are videos that show everything happening on your screen over several seconds or minutes — great for giving someone visual instructions on how to do something cool on their Mac, for example.
To take a screen recording without a third-party tool, you’ll need a Mac with an operating system installed that supports the built-in screenshot app. Open it with this shortcut:
Command + shift + 5
Then, use one of the two buttons immediately to the left of the options menu. The left button will record your entire screen, while the right button will record just a portion of the screen you select.
After you select the type of screen recording you want to take, click on the screen to begin recording. A black circle icon with a white square in the center will appear in the menu bar at the top, right side of your screen. Click this icon when you want to stop recording, and your video will automatically save to your desktop (or wherever you’ve chosen, if you’ve customized your screenshot saving options).
How to Screenshot on an iPhone
To take a screenshot on an older iPhone, press the Home button and the Power button (on the right side of the iPhone) simultaneously.
If you have an iPhone X or newer (without a Home button), press the Side and Volume Up buttons instead.
You’ll see a flash on the screen and hear the sound of the camera shutter if your phone is not on silent. The screenshot will be saved in your Photos app under the “Screenshots” album.
If you take a screenshot on an iPhone and need to share it with a Mac, you can do so wirelessly using Airdrop. Here’s how:
Open the screenshot in your Photos app.
Tap the “Share” button (the square with an upward arrow).
Scroll down and tap on “AirDrop.”
Make sure your Mac is nearby and has AirDrop enabled.
Your Mac should appear as an icon in the AirDrop section. Tap on it to send the screenshot.
On your Mac, a window will appear asking you to accept the AirDrop transfer. Click “Accept” to save the screenshot on your Mac.
Where to Find Your Mac Screenshots After You Take Them
Right after you take a screenshot, it will appear as a preview in the bottom right corner of your screen. You can click the preview to open the screenshot, change the size or crop, add annotation, or make other edits.
By default, screenshots save to your desktop. You can also find them by going to the “Desktop” tab in Finder.
In the screenshot app, you can find an options menu that allows you to change and customize how your screenshots are saved. For example, if you want them to save to a specific screenshots folder you create (instead of your desktop), you can set that up in the options menu. Older Macs that still need to upgrade their operating systems to include the screenshot app will not have this option.
20 Other Mac Shortcuts You Should Know
You can use keyboard shortcuts on your Mac to do much more than just capture screenshots.
Developer Bruno Michels documented an experiment where he found that he could save up to five seconds every single time he did a basic action (like copying and pasting some text) with a keyboard shortcut instead of with his mouse.
After experimenting and measuring, Michels developed a formula to determine how much time he could save over the course of an entire year by utilizing keyboard shortcuts. According to his math, the average person wastes 134 hours per year using their mouse instead of their keyboard to perform most basic computer tasks. That’s a total of 17 work days — almost a full month of work.
With that in mind, these are the time-saving Mac shortcuts that everyone should know:
Shortcut
Function
Command + c
Copy highlighted text or images
Command + v
Paste
Command + shift + v
Paste without formatting
Command + a
Select all
Command + z
Undo
Command + x
Cut
Command + w
Close the window you are active in
Command + option + w
Close all open app windows
Command + , (comma)
Open Preferences for the app you are active in
Command + m
Minimize the front app window to the dock
Command + option + m
Minimize all open windows to the dock
Command + tab
Tab through all open apps
Command + `
Tab through all windows in the app you are active in
Command + space
Open Spotlight to search your Mac
Command + L
Navigate to the URL bar in an active web browser
Command + option + d
Show or hide the dock
Command + control + q
Instantly lock your Mac
Option + shift + volume
Adjust your Mac’s volume in small increments
Control + command + space
Open the Character Viewer to insert emojis 👍
Option + command + esc
Force quit an app that’s stopped responding
Bonus: How to Customize Your Mac Shortcuts
One of the best things about Apple products is that they’re designed to be intuitive, user-friendly, and customizable. That goes for your keyboard shortcuts, too.
If you don’t love Apple’s pre-set keyboard shortcuts, did you know you can create your own?
Just open up System Preferences, then click “Keyboard,” then “Shortcuts.” From there, you can view all your Mac’s built-in shortcuts — and customize them if you want to.
Now, not only do you know how to take a screenshot on a Mac, but you’re also armed with all the knowledge you need to become an Apple power user. Good luck shortcutting, and enjoy all the time you’ll save using your Mac.
Get Content Delivered Straight to Your Inbox
Subscribe to our blog and receive great content just like this delivered straight to your inbox.
401 – Unauthorized is the internet equivalent of a “Restricted Entry” sign at a posh nightclub. Sure, it may help you keep away some unsavory visitors. But it can also turn away legitimate customers while making you look like a snob.
Worse still, 401 errors are often caused by reasons that have nothing to do with the visitor, making them extra frustrating to encounter. But not to worry! Here are a few simple steps you can take as a website owner to troubleshoot the 401 error before it starts impacting your website’s trust.
What is the 401 Unauthorized Error?
The 401 Unauthorized error is an HTTP status code indicating that the client is not authorized access to the requested resource.
What that actually means: 401 – Unauthorized is an authentication error, which means that the web page you are trying to visit is password-protected, and you don’t have the correct permissions to access it. This can happen when the user enters a wrong password or when there’s a restriction on accessing the web page from the user’s geographic location.
Of course, 401 errors can also be false positives, meaning that the error can occur even when the visitor has the right credentials to log into a website. It may even occur when the web page isn’t supposed to be password-protected at all. For example, it can be caused by a jittery firewall, a troublesome plugin, or an uncooperative extension added to your website.
You may notice the 401 error as one of these messages popping up in your browser window:
401 Authorization Required
401 Unauthorized
HTTP 401 Error – Unauthorized
Access Denied
HTTP Error 401
401 Unauthorized: Potential Causes of the HTTP Error Code
401 errors occur when a web browser has trouble authenticating the visitor’s login credentials with the website’s server. Here are a few common causes why that might happen:
Error or typo in the website’s URL.
Outdated cookies or browser cache.
IP address restrictions on-site access.
Errors in server configuration.
Incompatible plugin or website theme.
Incorrect login attempts by the user.
401 errors are normally client-side errors, meaning they can often be fixed by clearing your browser’s cookies or inputting the correct password. However, server-side issues like plugins and firewalls can also cause these errors, making it very important for site admins to be aware of potential conflicts.
But these are all surface-level explanations. If you want to know what causes a 401 error, you must understand how authentication works in web development.
When a client (i.e., a web browser) requests access to a protected resource on a website, the website will need the client to provide some form of valid authentication. These credentials could be in the form of API keys, a username and password, digital certificates, or something else — depending on the authentication scheme used by the site.
The website then processes the authentication credentials to verify their validity. This could involve checking the credentials against a stored database of users and passwords, contacting an external authentication provider, or performing some other form of validation.
If the authentication is successful, it returns a 200 status code, and the website will generate a session token for the client. This identifies the authenticated client and tracks the client’s interactions within the website. The session token is often stored in a cookie in the client’s browser or as a header in any subsequent requests.
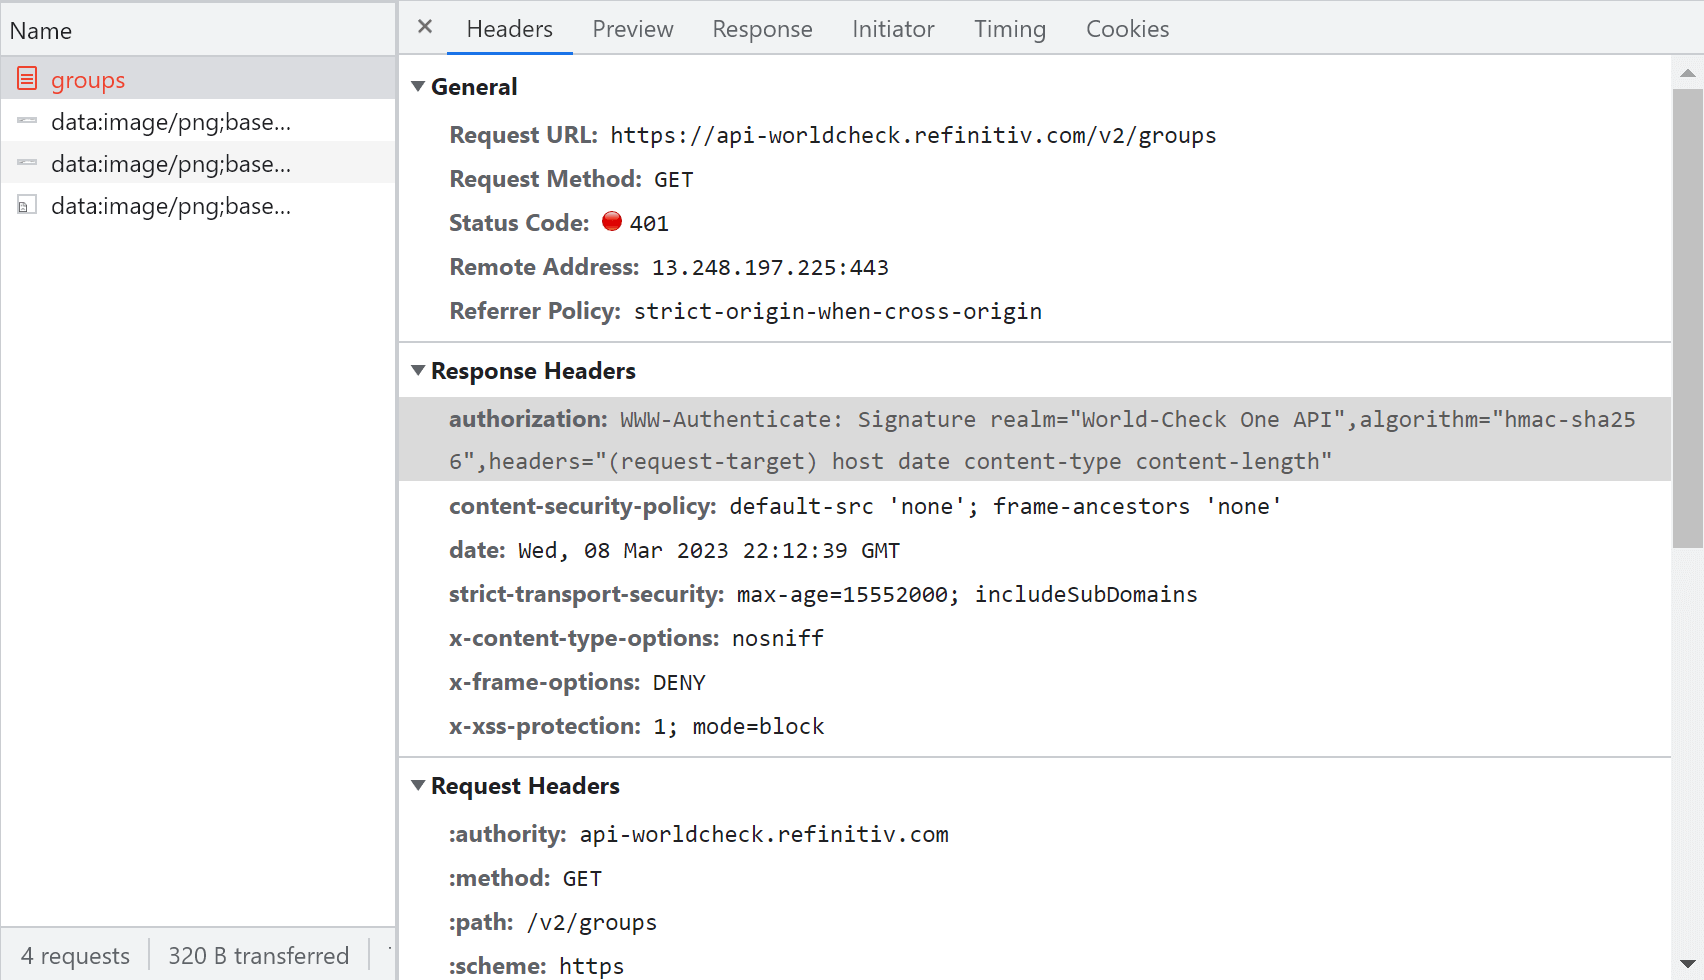
However, if the authentication is unsuccessful, the website will return an HTTP error message, such as the 401 error code. The 401 error message typically includes a WWW-Authenticate header, which explains how to authenticate with the server in the user’s browser. This header can include more context about the 401 error, such as the type of authentication required (e.g. Basic, Digest, or OAuth).
How to Diagnose the 401 Error as a User or Administrator
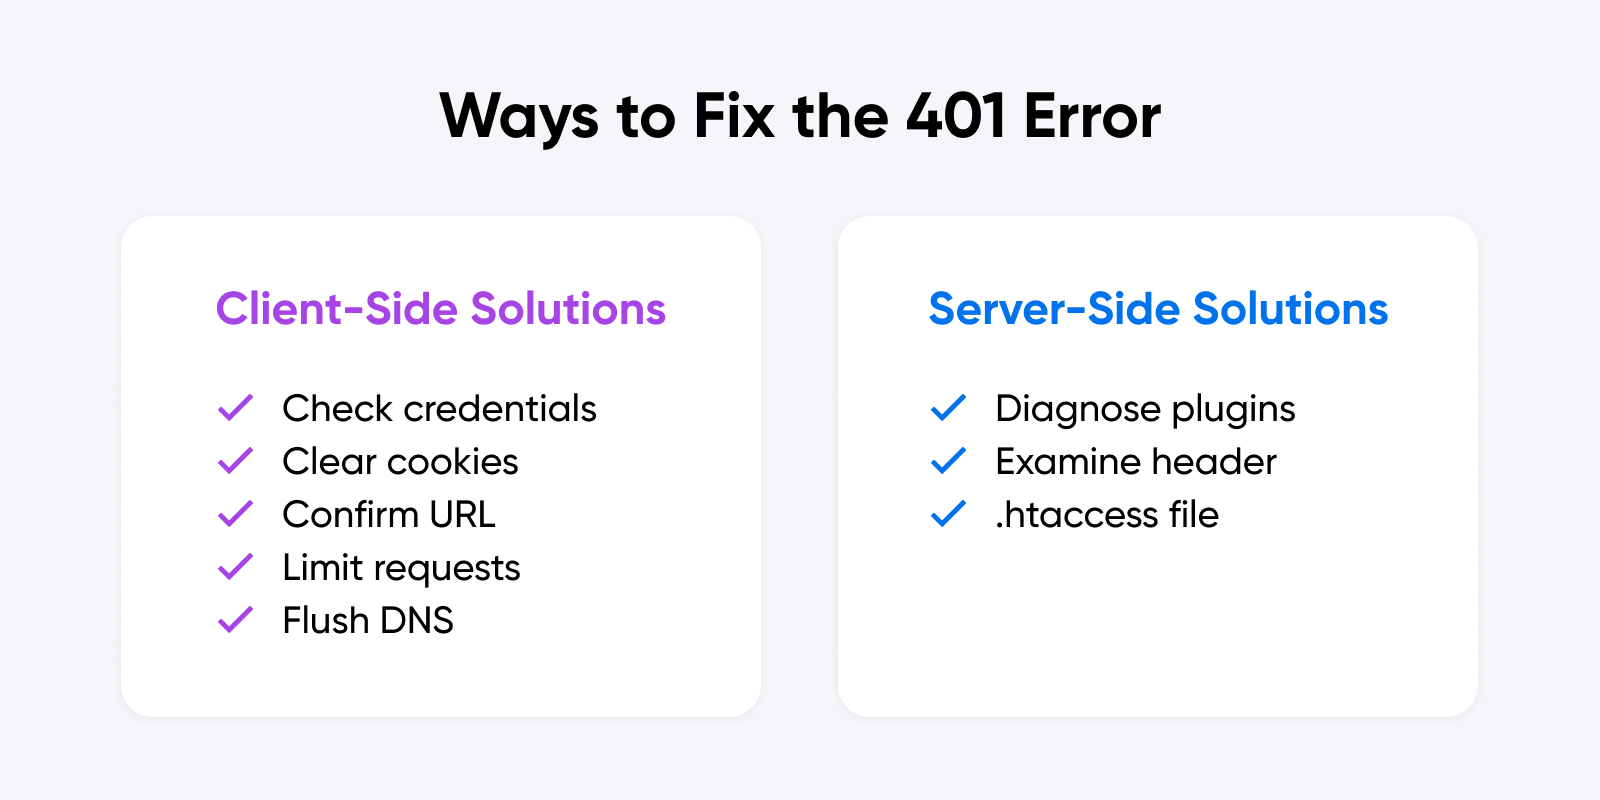
401 access control errors are pretty common when logging into a membership site or accessing a protected web page. Luckily, they are also very easy to fix most of the time. Here are a few things you can do to address this error, both as a website visitor and a web administrator:
Client-Side Solutions
401 error pages are sometimes caused by client-side issues like login credentials or even the web browser used to access your website’s password protection system. These can be fixed with a few simple steps from the visitor’s end:
Check User Credentials: Make sure you entered the correct username and password combination. Double-check your authentication credentials for the slightest typo. Remember, usernames and passwords are case-sensitive.
Clear Browser Cookies: If the website uses cookies for authentication, the error may be because of invalid or expired cookies. Normally, cookies have an expiration date or just expire when the browser is closed. If you’re having trouble accessing a website, clear browsing data by following the instructions for your specific web browser to help solve the issue.
Cookies are pieces of data sent to a user’s computer or mobile device by a web server. They are then stored on the user’s device. Cookies can be used for authentication, identification of a user session, personalization of web content, or collecting information about the use of a website.
Verify URL: Make sure the URL you’re trying to access is correct and up-to-date. Otherwise, the DNS server may not be able to find the website and instead return the 401 error. If you’re following a link from another website, it’s quite possible that the link is using the wrong URL.
Rate Limiting: If the website server is rate limiting requests from the same IP address, this can lead to a 401 Unauthorized Error. Make sure that you don’t exceed the number of login requests allowed by the server. The limit is often indicated in the login form.
The Domain Name System (DNS) protocol keeps records of which domain names correspond to specific IP addresses. This system enables you to browse the web by typing in regular URLs instead of IP addresses.
DNS Caches help improve loading speed and website performance when browsing the internet, but they can sometimes become corrupted and result in an authorization error when accessing specific web pages. Fixing this is as easy as flushing (clearing) your DNS server, which can be done a few different ways:
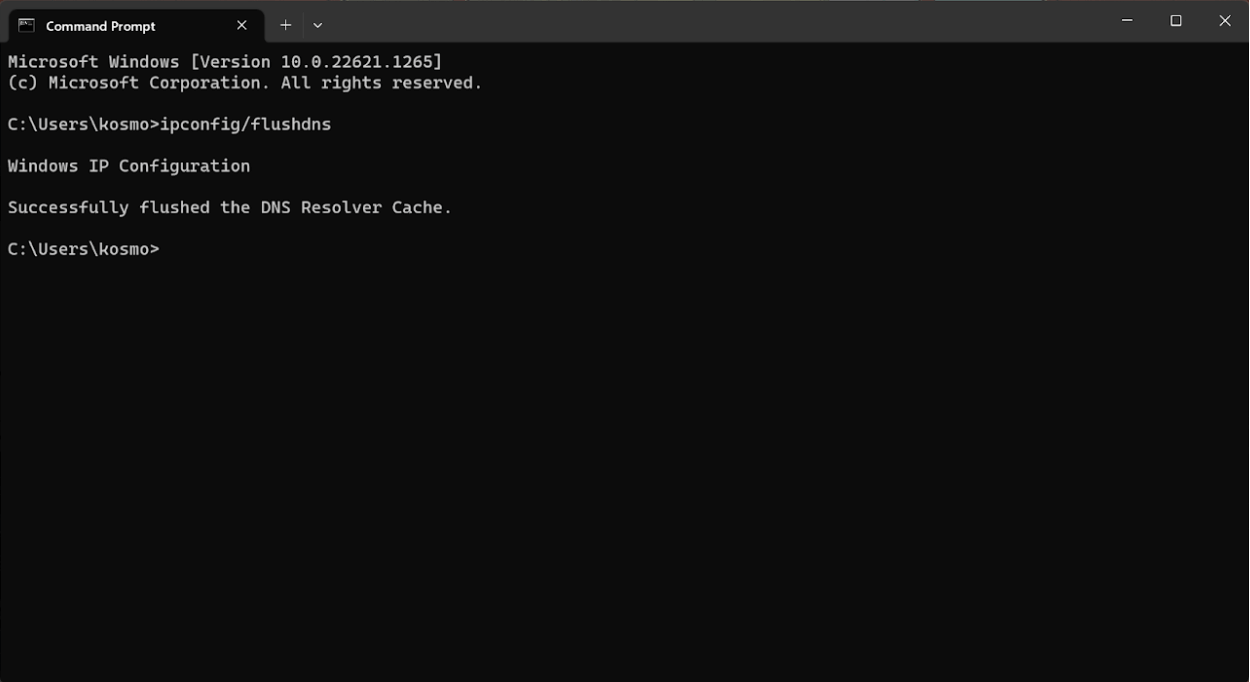
Windows: To flush your DNS on Windows 10/11, follow these steps:
Open the Command Prompt by pressing Windows+R and typing “̌cmd” (without quotes) into the Run dialog box.
Now type in the command “ipconfig/flushdns” inside Command Prompt.
If you are a Windows PowerShell user, you can do this by opening PowerShell and typing in “Clear-DnsClientCache” (without quotes).
This will flush the DNS and clear all the records from the local DNS cache.
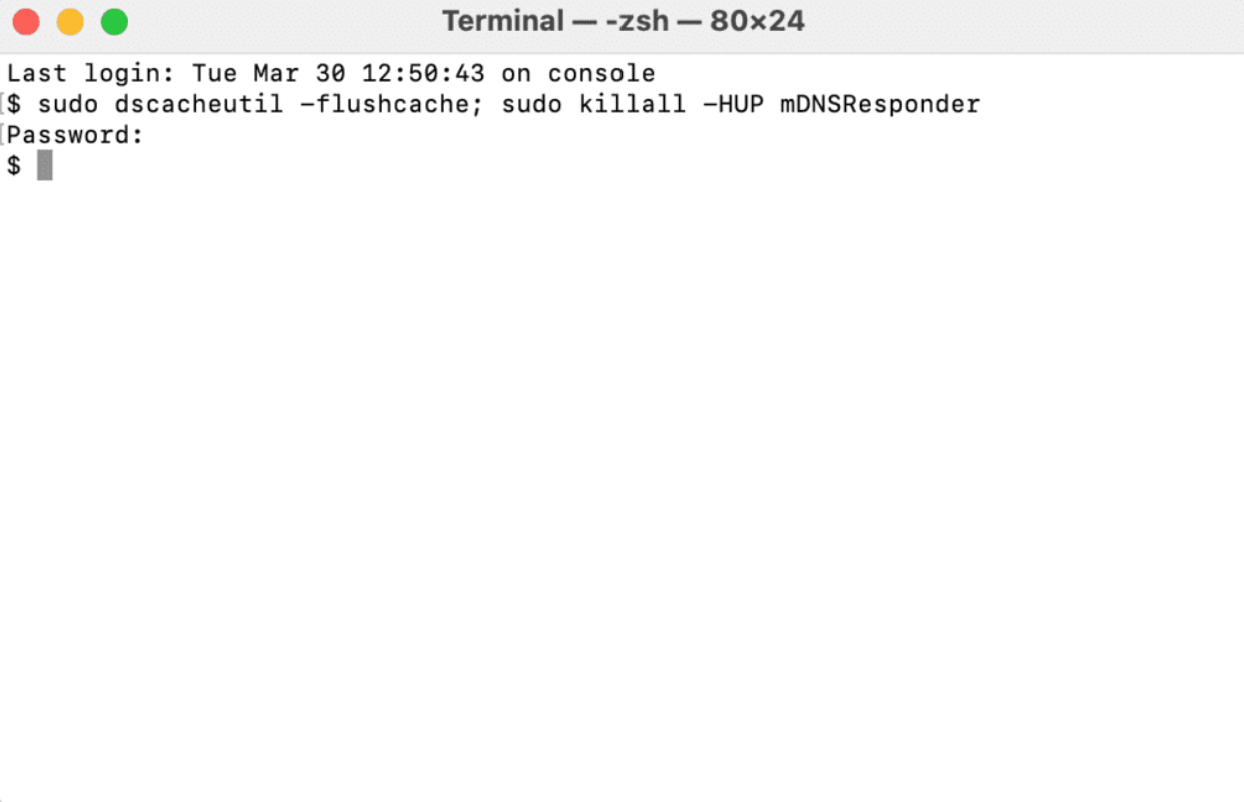
MacOS: If you’re using a Macbook or iMac, you can flush your DNS cache using Terminal.
Open Terminal on your Mac by using Spotlight Search or pressing Command+Space and typing Terminal into the search box.
Inside Terminal, type in “sudo dscacheutil -flushcache;sudo killall -HUP mDNSResponder” (without quotes).
Your DNS cache has now been flushed on your Apple computer.
Google Chrome: If you’re using Google Chrome, the browser has its own DNS cache that’s independent of the Operating System (Windows or Mac). To clear Chrome’s DNS cache:
Type “chrome://net-internals/#dns” into the address bar.
Now, click on the “Clear host cache” button to clear your DNS records.
WordPress Plugins
Plugins are a staple for WordPress websites, but they can sometimes also cause errors if configured improperly. This can happen when the plugin contains code that creates a website security issue or conflicts with the platform’s core functionality.
So, what can a site admin do to fix this issue? Well, the first step is to identify which plugin or plugins are causing the issue. Usually, this can be done by disabling each plugin one-by-one and checking if the error still appears. Once the plugin causing the issue is identified, you can either update, reconfigure, or permanently remove it. Common culprits may include:
CDN services like Cloudflare and KeyCDN.
Web firewalls like Sucuri and Wordfence.
Poorly built WordPress themes.
Follow these simple steps to enable or disable plugins on your WordPress site:
First, log in to your WordPress dashboard.
Click on the “Plugins” option in the left-hand menu.
Find the plugin you want to enable or disable and click on the “Activate” or “Deactivate” button below the plugin name.
If you want to disable multiple plugins at once, check the box next to each plugin and select “Deactivate” from the “Bulk Actions” drop-down menu.
If you want to enable multiple plugins at once, check the box next to each plugin and select “Activate” from the “Bulk Actions” drop-down menu.
In some cases, it is also possible to fix the issue by disabling or reconfiguring specific settings within a plugin. For example, if your website uses a caching plugin, it’s worth trying to clear the cache and check if the error still appears.
WWW-Authenticate Header
In a few rare cases, 401 errors can result from a server error. You can find out more about this by looking at your WWW-Authenticate Header.
The WWW-Authenticate Header is a response header sent by the server that contains information on the authentication methods supported by the site. This header helps the user’s browser decide which authentication protocol to use when requesting data from the server.
The header is also used to send additional information about the authentication process. This may include the domain being protected by the authentication scheme, or the algorithm used by the server.
To check the WWW-Authenticate Header, open Chrome, navigate to the URL causing the 401 error, and right-click anywhere on the page. From the drop-down menu, select ‘Inspect’. This will bring up the Developer Tools window.
Select the Network tab once inside the Developer Tools window. Here, you’ll see all the requests the browser sends when loading the page. If the response from the server contains a WWW-Authenticate header, it will be visible in this tab.
By inspecting the WWW-Authenticate header, you can get a better understanding of the authentication process used by the server. Next, check that the response was sent and identify what authentication scheme was used to send it. That’ll help you narrow down the problem before looking for a specific solution. Here are a few authentication schemes found in the WWW-Authenticate Header, along with descriptions of how they work, for reference:
Basic: This scheme uses a base64-encoded username and password separated by a colon. This is considered the least secure authentication method and should only be used over HTTPS.
Digest: This scheme uses a challenge-response protocol to authenticate clients. The server sends a nonce value to the client, which the client uses to create a response based on the username, password, and request information.
Bearer: This scheme is used for OAuth 2.0 authentication. The client receives a token from the server, which it uses to authenticate subsequent requests.
Negotiate: This scheme is used for Kerberos authentication.
AWS4-HMAC-SHA256: This authentication scheme is used to authenticate requests to Amazon Web Services (AWS) using an AWS access key and a secret access key.
Token: This scheme is used to authenticate with a token-based system.
.htaccess File
If you’re experiencing a 401 error on your website, one possible cause could be an issue with your .htaccess file. The .htaccess file is a configuration file used by Apache web servers to control access to your website’s directories and files. Here’s how to check your .htaccess file for causes of a 401 error:
Connect to your website’s server using an FTP client or file manager.
Navigate to the directory where your .htaccess file is located. This is usually the root directory of your website.
Download a copy of your .htaccess file to your computer.
Open the .htaccess file in a text editor (like Notepad++) and look for any lines that specify access controls or authentication requirements. Specifically, you’ll want to look for the following parameters: AuthUserFile, AuthName, AuthType, and Require.
Check that the access controls or authentication requirements specified in the .htaccess file match the settings you intend to use for your website. For example, if you have recently updated your website’s authentication mechanism (AuthType), you may need to update the corresponding settings in your .htaccess file as well.
Save the changes to your .htaccess file and upload it back to your website’s server.
Test your website to see if the 401 error has been resolved.
If You’re Still Having Trouble, It’s Time to Contact an Expert
HTTP response codes offer little context on their own, which makes them troublesome to navigate without the proper technical assistance. It’s part of the reason why DreamHost offers 24/7 support to help you troubleshoot downtime on your website and domain.
If you’re having trouble diagnosing or fixing a 401 error on your website, you can try contacting your hosting provider for support. It’s also possible to contract a technical expert, such as a web developer, for help with the issue.
401 errors can be jarring for the end user, but they are often an easy fix. If you’re contacted by someone unable to access your website due to this error, walk them through the common client-side solutions before looking into any potential server issues, such as WordPress plugins or the WWW-Authenticate header. If you’re still having trouble, you can always bring in some technical help to diagnose the issue.
Get Content Delivered Straight to Your Inbox
Subscribe to our blog and receive great content just like this delivered straight to your inbox.
As a marketing person or website owner, you knew the day would come when you really needed to understand GA4.
And today is that day.
Luckily, your search for knowledge has led you here. So rather than wading through complex tutorials written by analytics nerds, you can wade through this simple tutorial written by analytics nerds! 🤓
If you’re trying to figure out how to set up events or track conversions, stay with us for the next few minutes, and we’ll make it as clear as day.
How Does GA4 Track User Behavior?
As you probably know, GA4 is the latest edition of Google Analytics. It was initially launched in the latter half of 2020 and has now replaced UA (Universal Analytics) as the primary version of the suite.
GA4 represents a significant change in the way we track user behavior. Instead of recording each request to your website server individually, Google now tracks every user interaction across your website or app, along with the context around it.
Every interaction is categorized as an “event”. This means instead of pageviews being their own measurement, they’re just one event of many that you may want to track.
This “event-based model” allows us to build a picture of the entire user journey, from that first click-through to making a purchase.
What Is an Event in GA4?
In Google Analytics 4, an event allows you to track a specific user interaction or occurrence on your website or app.
Examples would include:
Visiting a specific page
Clicking a button
Completing a purchase
Sharing specific content
Submitting a form
Your app crashing
You can analyze each event individually, and multiple events can be bundled into event categories for a higher-level overview.
For anyone familiar with Universal Analytics, events essentially replace pageviews. The main difference is that every user interaction is treated the same way — No predetermined Category, Action, or Label is associated with any event.
What Type of Event Does GA4 Track?
Once you have installed the code snippet, Google Analytics can track an impressive variety of events right out of the box:
Pageviews – Including navigation around your site or app.
Scroll – Vertical and horizontal, and the percentage of the page.
Click – Links, buttons, videos, or any specific position on the screen.
Session start – Including returning to a session after inactivity.
User engagement – Such as submitting a form or completing an interactive quiz.
Video engagement – Play, pause, and completion.
In addition to these metrics, you can build your own custom events for more detailed data collection. You can add up to 500 events to each account.
How to Create Events in Google Analytics 4
Okay, that’s enough for theory — It’s time to make some Google Analytics events for your site.
There are several ways to add events within GA4. Let’s go through each of them in order from the easiest to the most challenging:
Automatic Events
When you first set up a property in Google Analytics, the platform automatically creates some basic events.
Many of these relate to Google products in some way, such as clicks on Google Ads, views of embedded YouTube videos, and app purchases made through Google Play.
However, there are some very beneficial events here:
first_visit – This triggers when someone visits your site or launches an instant app on Android for the first time.
session_start – Records when a user first engages with your website or app.
user_engagement – This event fires whenever a specific page or app is in the foreground for one or more seconds.
first_open – Records when someone opens your app for the first time.
app_remove – If you’re tracking an Android app, this event records when people delete it from their device.
You don’t need to do anything to start collecting information here; it’s completely hands-free. Any data that is collected will appear in your event reports automatically.
Default Parameters
Along with the specific data collection mentioned above, GA4 sets several additional parameters for every event:
language – The preferred language of the user.
page_location – The URL of the page.
page_referrer – Where the user came from.
page_title – The HTML title of the page.
screen_resolution – The display resolution of the device being used.
These parameters are designed to provide extra contact for each event, allowing you to better understand how various users interact with your website or app.
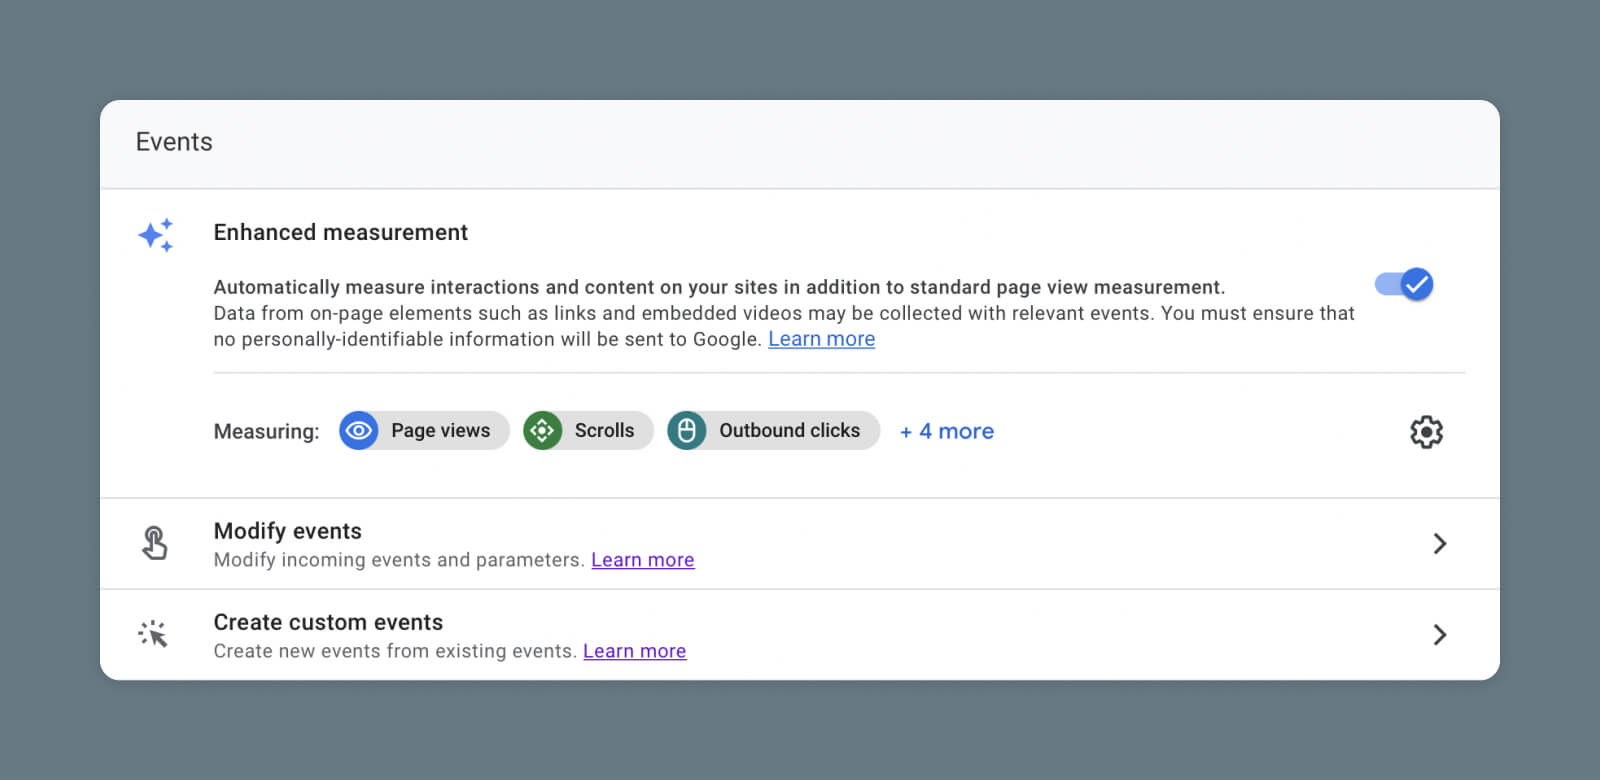
Enhanced Measurement Events
Want to dive deeper? You can enable Enhanced Measurement.
This feature introduces a wider selection of events that record common user interactions. In some cases, they extend the tracking of automatic events.
Here’s a quick look at all the events covered by Enhanced Measurement:
page_view – Records when a page is loaded, or an active site changes browser history.
scroll – Records when a user scrolls down to the bottom of a page.
click – This records all outbound click events (i.e., towards another domain).
view_search_results – This event will track it whenever someone uses your site search.
video_start – Google creates an event that tracks when users start any video.
video_progress – This measures how far a user has watched a video.
video_complete – Triggered when a user watches a video to the end.
file_download – Records when someone grabs any file from your website or app.
form_start – If someone starts interacting with a form on your site, this event will record it.
form_submit – Triggers when someone completes and sends a form.
As with automatic events, you don’t have to manually set up Enhanced Measurement events. Instead, you only need to add a data stream within GA4 and enable Enhanced Measurement under Admin > Data Streams > [Your Data Stream].
If you want to edit any of these events or switch them off individually, click the cog icon on the right of the Enhanced Measurement section.
Use Cases for Enhanced Measurement
You may have thought about how you could use the various events mentioned above to gain insights about your website or app.
If you’re still looking for inspiration, here are a few examples of how you can utilize automatic events and Enhanced Measurement in the real world:
Use click events to understand how users exit your site or app and where those outbound links take them.
Compare form_start with form_submit to see how many people abandon your forms halfway through.
Check out scroll to monitor how many people read to the bottom of your blog posts.
Use video_progress to see how long visitors are staying engaged with your videos.
Create New Events in GA4
Once you have set up automatically collected events and Enhanced Measurement, you’ll be rolling in data!
But if you’re greedy for more, GA4 can help you scrutinize your website or app in greater detail. Of course, to make this happen, you will need to create some new events.
Creating an Event
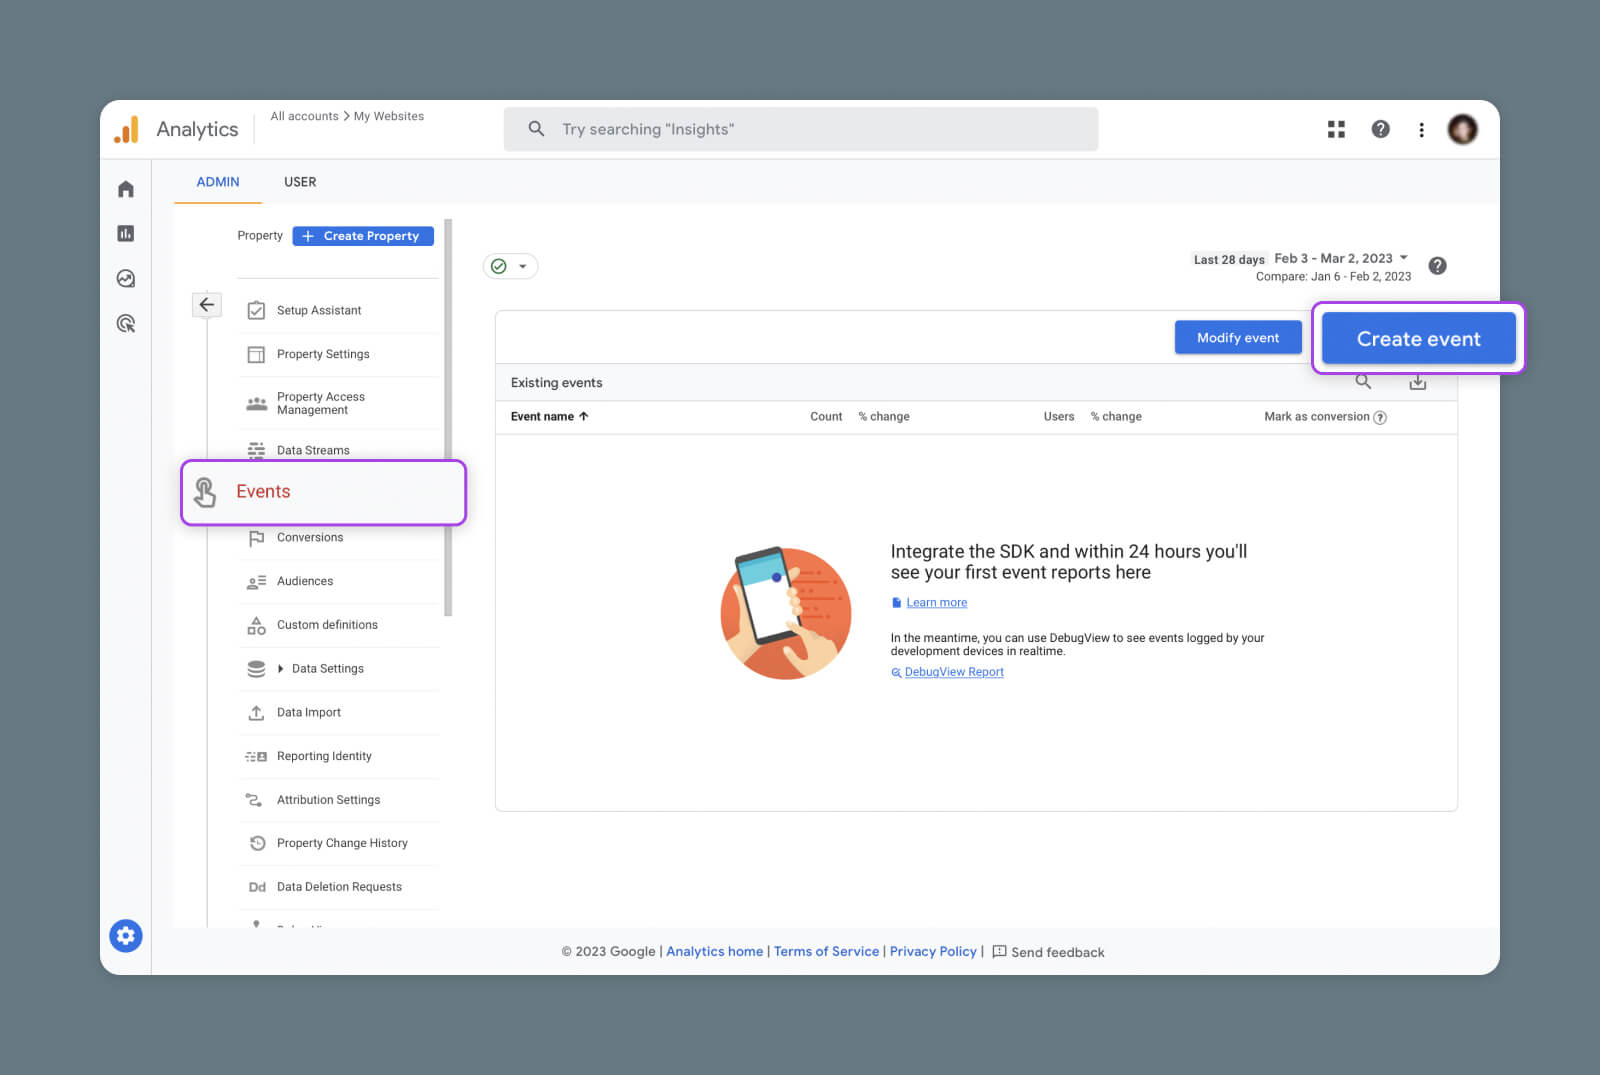
Visit the Admin section of Google Analytics, and select Events under the property you’re working on.
Next, tap the big blue Create Event button in the top right corner, followed by Create in the pop-out menu.
Name Your Custom Event
You should now have the GA4 event creation form in front of you.
There are several fields to fill out here, but we can start with an easy one — your event name.
You can call your event pretty much anything (as long as the event label is unique), but there are a few principles to bear in mind:
Be descriptive – Choose a name that clearly identifies what the event is tracking, and the original event that you’re tweaking.
But don’t be too wordy – Long names mean more reading.
Create your own naming conventions – This will make it easier to organize your data.
Replace spaces with underscores – Google Analytics only supports letters, numbers, and underscores in event names.
Consider using a hierarchy – For more complex projects, it’s worth building a hierarchy of events that mirrors the structure of your site or app.
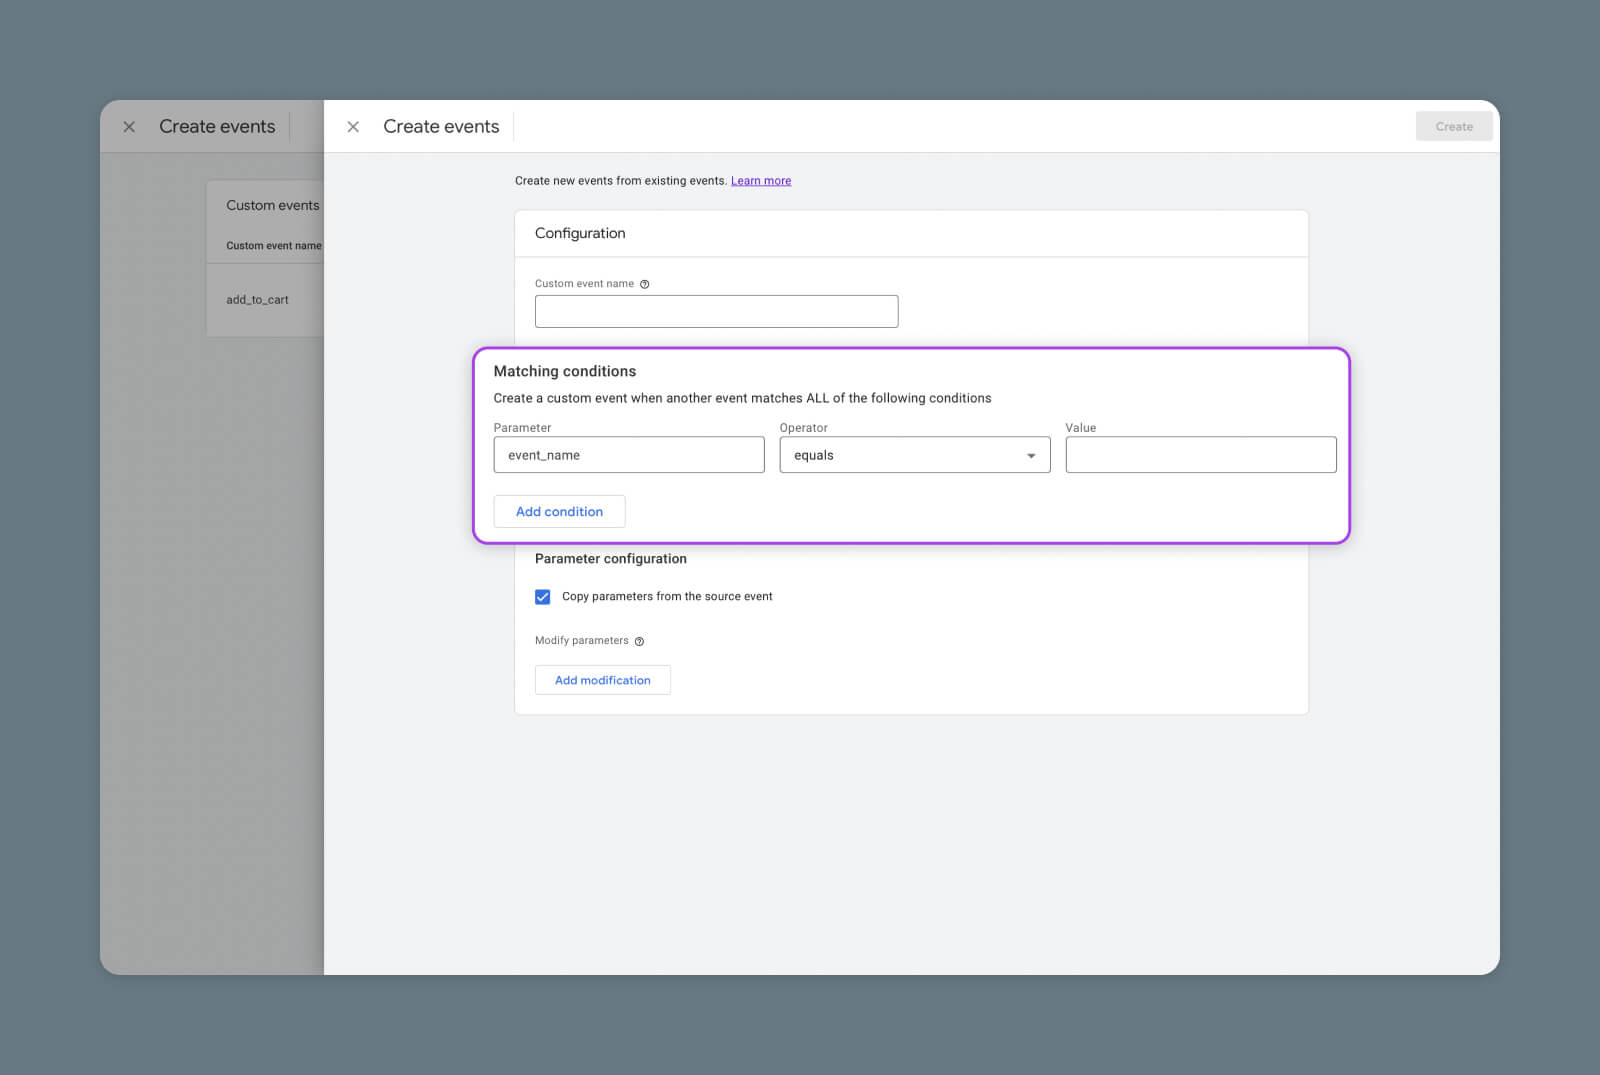
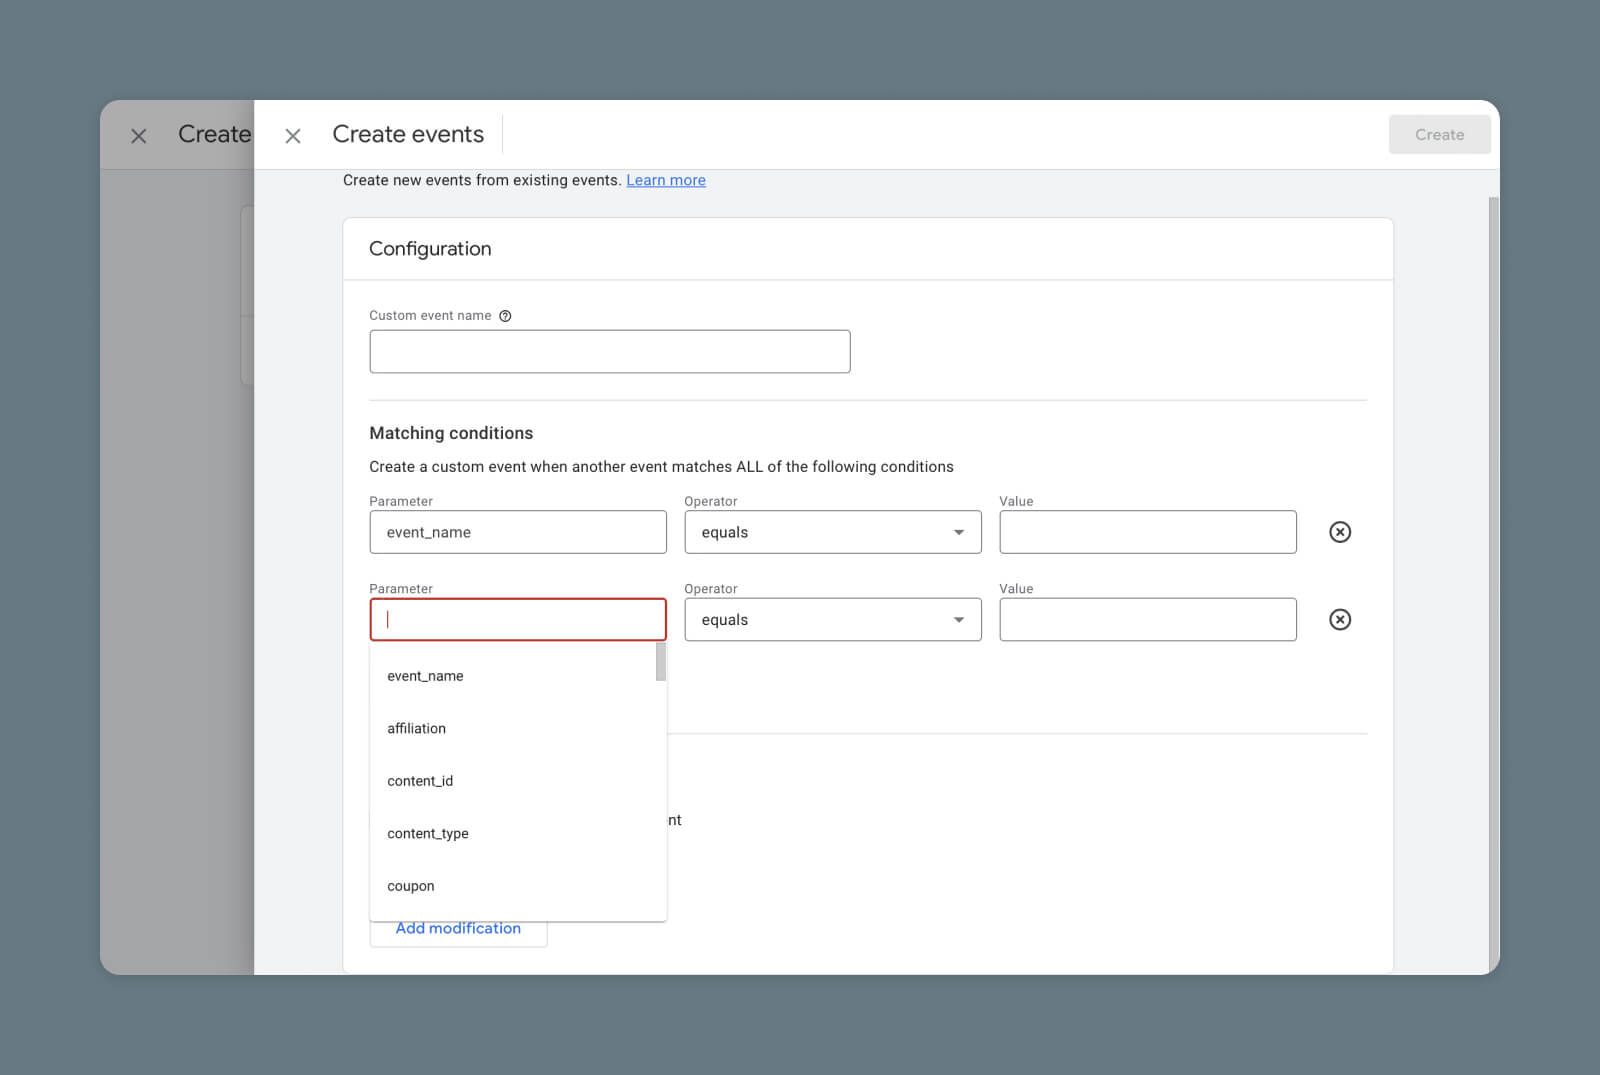
Set Your Matching Conditions
Here’s where things get interesting.
When you create a new event within GA4, the platform makes a copy of an existing event. You can then add your own conditional logic to the original event to target specific data.
For instance, you could copy the page_view event and create a new event focusing on a particular URL.
These rules are called Matching Conditions.
When you set up your new event, GA4 will first ask you to choose the existing event you want to copy. You can make this selection in the first Matching Conditions field.
Then, you can choose your new rules for data sorting. Google Analytics provides a generous selection of parameters and operators, and you can input anything in the “Value” field on the right.
In most cases, you won’t need to add many parameters. Just make sure to select the checkbox at the bottom of the form, marked Copy parameters from the source event.
Get Content Delivered Straight to Your Inbox
Subscribe to our blog and receive great content just like this delivered straight to your inbox.
Real-World Example of Matching Conditions
To understand how Matching Conditions work in practice, let’s look at a simple example.
Say you operate an e-commerce store, and want to see when someone registers for an account.
To detect when users sign up, you could create a new event with the following Matching Conditions:
Parameter: page_location
Operator: equals
Value: [URL of confirmation page]
This combination will record every time someone views the confirmation page for your signup form.
Test Your New Event
After you choose your Matching Conditions and hit Submit, your new event should appear in the events list for your chosen property.
Job done? Not quite. As Dr. Frankenstein discovered the hard way, it’s a good idea to test your creations before letting them loose.
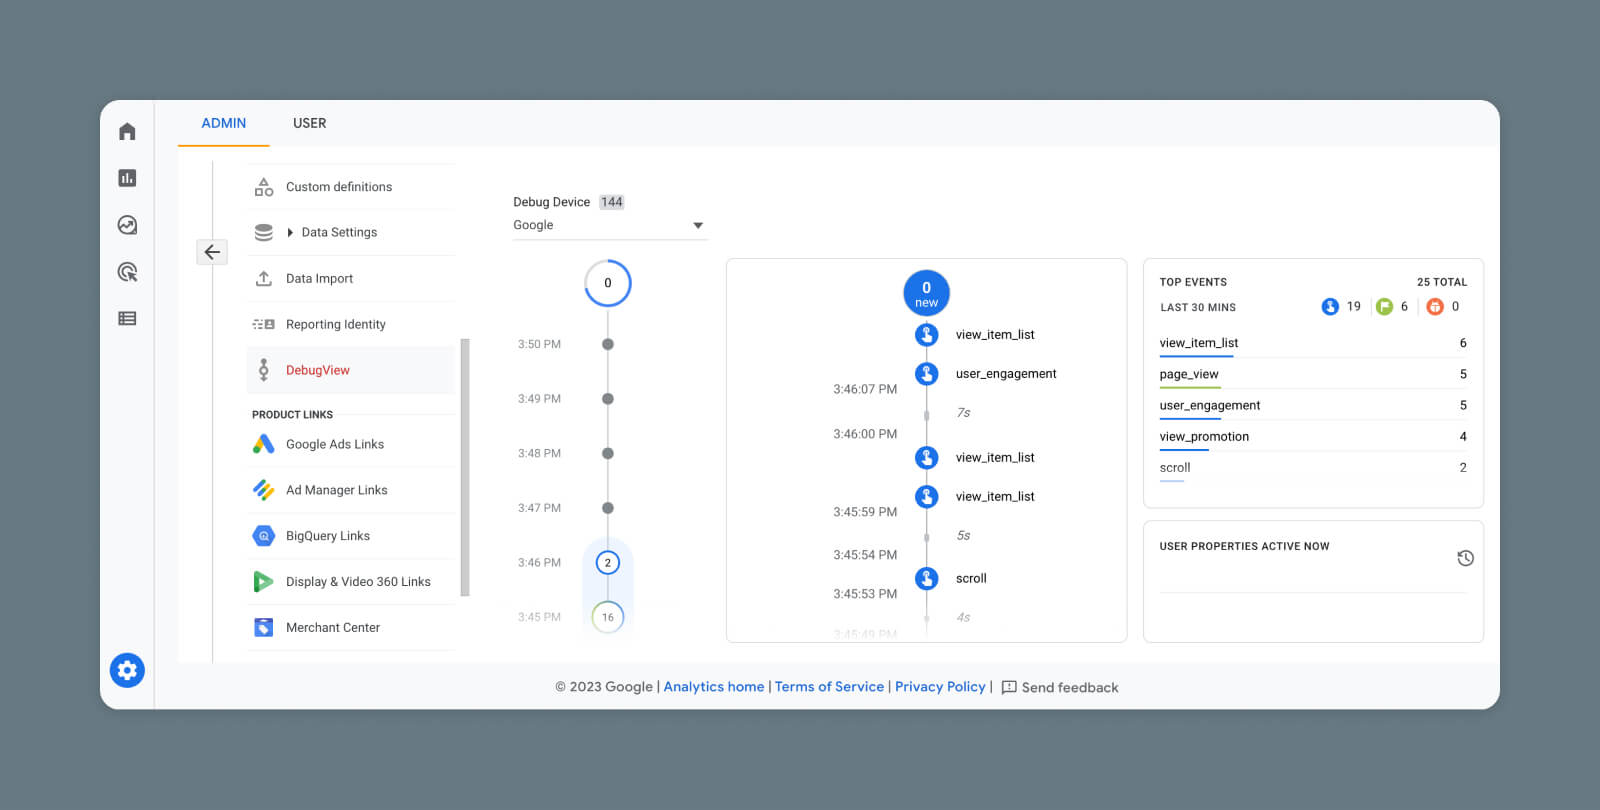
The simplest way to test new events is by opening up your real-time report and testing the interaction yourself. You can access this option at Reports > Realtime.
Alternatively, if the event action isn’t easy to test, you can head to Admin >DebugView for a more in-depth view of live interactions.
Adding Recommended Events With Google Tag Manager
If you’re not a technical type, it’s perfectly fine to use the methods above for setting up events in Google Analytics.
However, it’s possible to fill up Google Analytics with more specific data if you’re willing to take a detour via Google Tags Manager (GTM).
Here, you can point Google towards particular elements of your website or app, and track them individually.
Recommended Events
To make this process faster, Google provides a long list of Recommended Events. These are designed to track the interactive elements you can find in most websites or apps.
We won’t list them all here, but some examples include:
add_to_cart
login
share
unlock_achievement
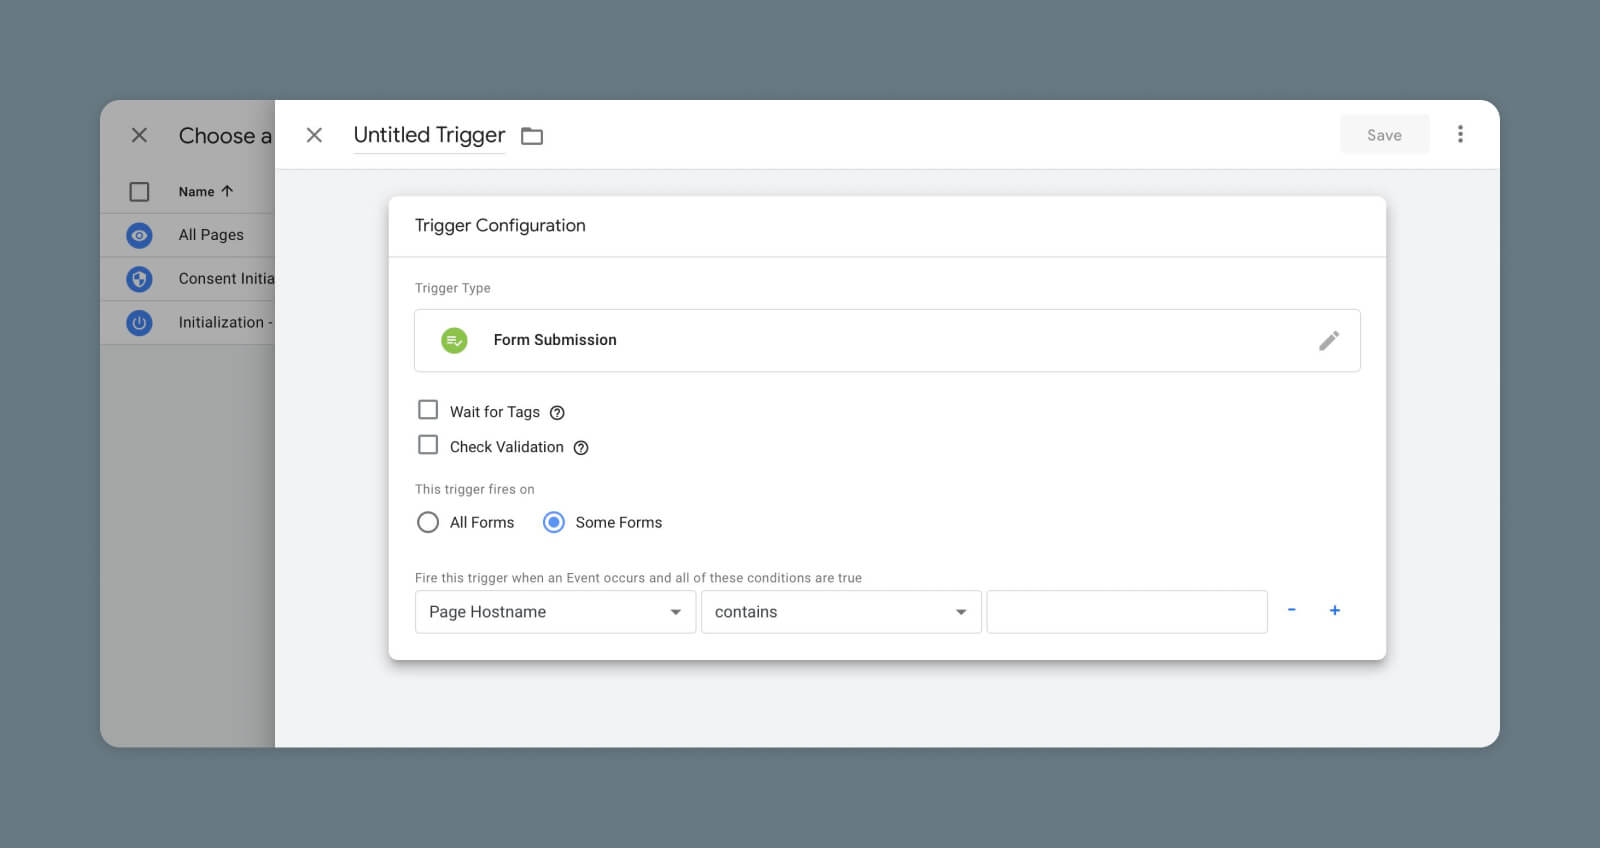
To add recommended events to your GA4 property, create a tag and trigger for your new event in GTM.
Before you begin, make sure you have set up a data stream and created a Configuration Tag.
Then, to create a new event tag:
Select Tags > New
Click in the Tag Configuration box, and select Google Analytics: GA4 Event
Choose your Configuration Tag
In the Event Name field, enter one of Google’s Recommended Events
By default, your new tag will track multiple elements on your site. If you want to be more specific, open Event Parameters (scroll down to the “Custom Dimensions” section in this guide to learn how).
Check the Recommended Events list, and input one of the parameters that work with the type of event you want to create. Make sure it matches the parameter name exactly.
As the event value, choose a unique identifier for the element you want to track, such as an HTML class or id.
We also need to tell Google which trigger it should be tracking. To do this:
Click the Triggering box on the new event screen
Tap the + in the top-right
Click the Trigger Configuration box
Choose an appropriate trigger type from the menu
Add a Trigger Name that matches your event
To be specific with triggers, tap Some <trigger type> and use the built-in parameters to identify the exact interaction you want to track.
It’s also possible to add completely custom events via Google Tag (gtag.js) or Google Tag Manager. But as this requires developer-level expertise, we will leave that to another post!
Custom Dimensions
An easier way to spice up your analytics is by creating new ways to categorize incoming data.
To make this happen, you will need to set up some custom dimensions in Google Tag Manager.
A dimension is essentially an attribute of an event or user. GA4 captures five default dimensions as soon as you set up tracking (see “Default Parameters” earlier in this guide).
However, you can also create your own custom dimensions to track more specific details about events and user properties. Let’s work through an example.
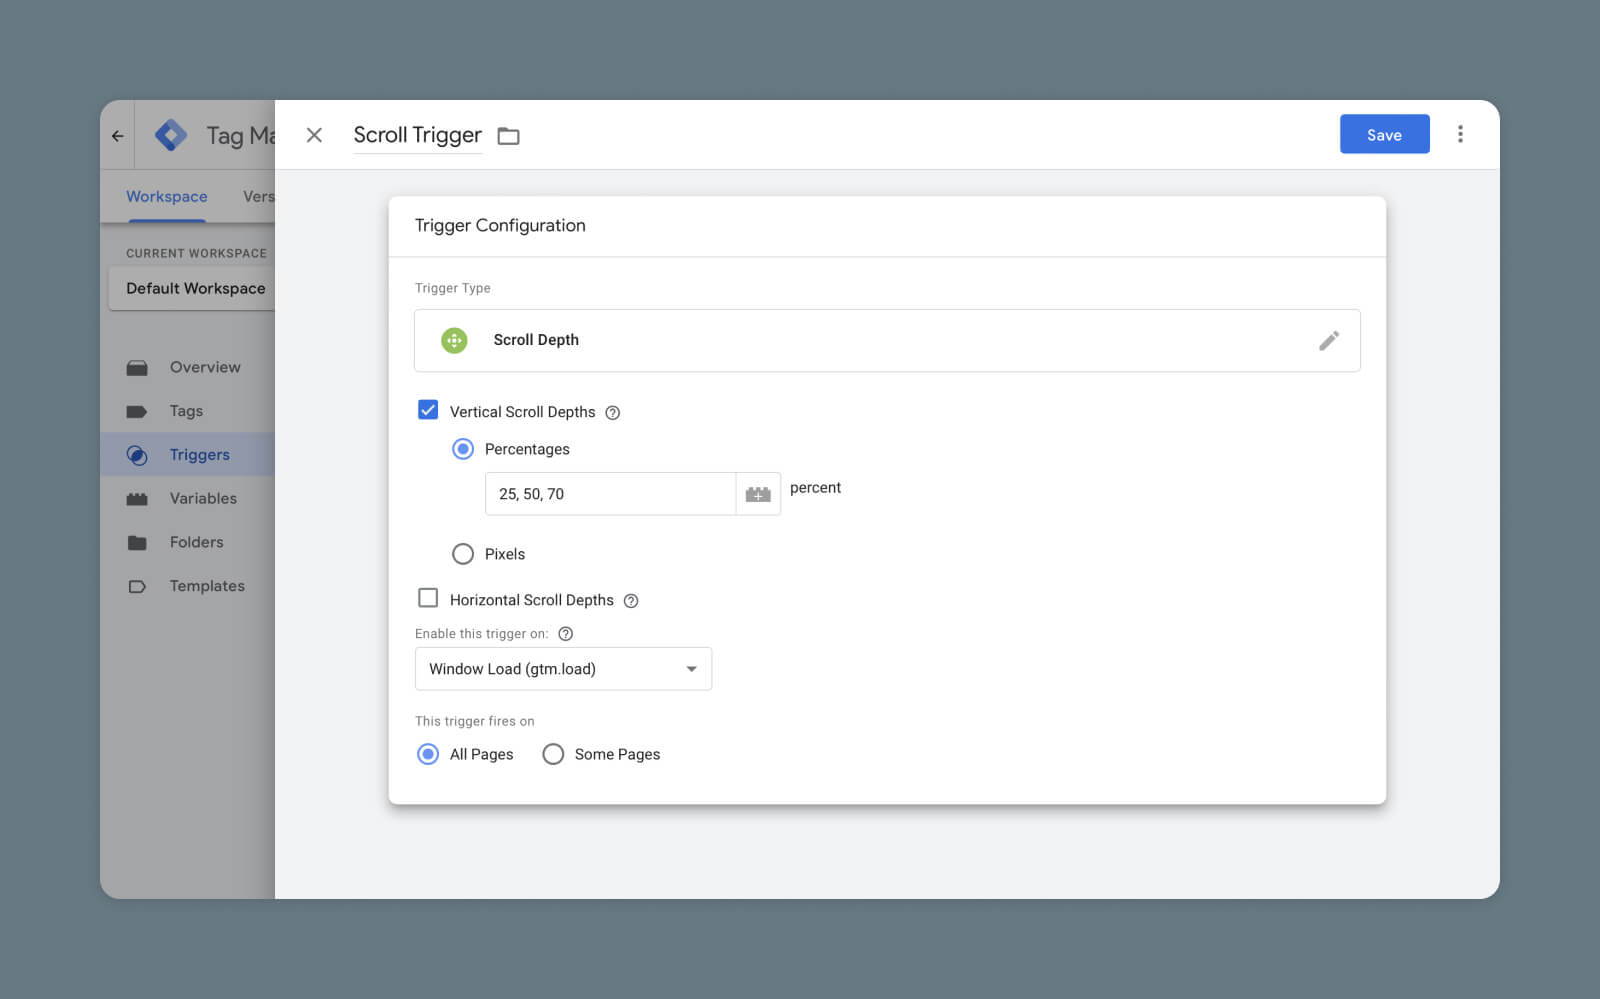
Say you want to measure when a user scrolls 25%, 50%, or 75% down any given page. You’re going to need a new event with custom dimensions.
First, you need to build the trigger. In GTM, select Triggers in the left-hand menu and then hit the New button.
Give the new trigger a name, then tap the Trigger Configuration box. Google lets you choose from a generous array of options here. In this example, you would need to select Scroll Depth.
Next, create a new GA4 event tag by following the process we went through earlier, but this time open the Event parameters section and hit Add row.
Under Parameter name, add the name you want to give to your new dimension. In the Value box, you need to choose a suitable variable for measurement. In this case, you need .
(Can’t see the variable you need? Navigate to Variables > Configure and make sure all the boxes are checked.)
Finally, click the Triggering box and choose the trigger you made earlier. You can now save your new event tag. It’s a good idea to test it, as well.
Your new event should show up in GA4 under the Events section within about 48 hours, and you can click on the name to see all the data collected within the past half an hour.
To see further into the past, you’ll need to register the new event parameter as a custom dimension in GA4.
On the Admin screen, head to Custom definitions under your chosen property and tap the blue Create custom dimensions on the right-hand side.
Fill in the following fields:
Dimension name – This is how your dimension will appear in reports.
Scope – Does this dimension relate to an event or a user?
Description – A place for comments or extra info.
Event parameter/User Property – Input the exact name of the parameter you just created in your new event.
In a standard account, you can add up to 50 custom event dimensions and 25 user dimensions.
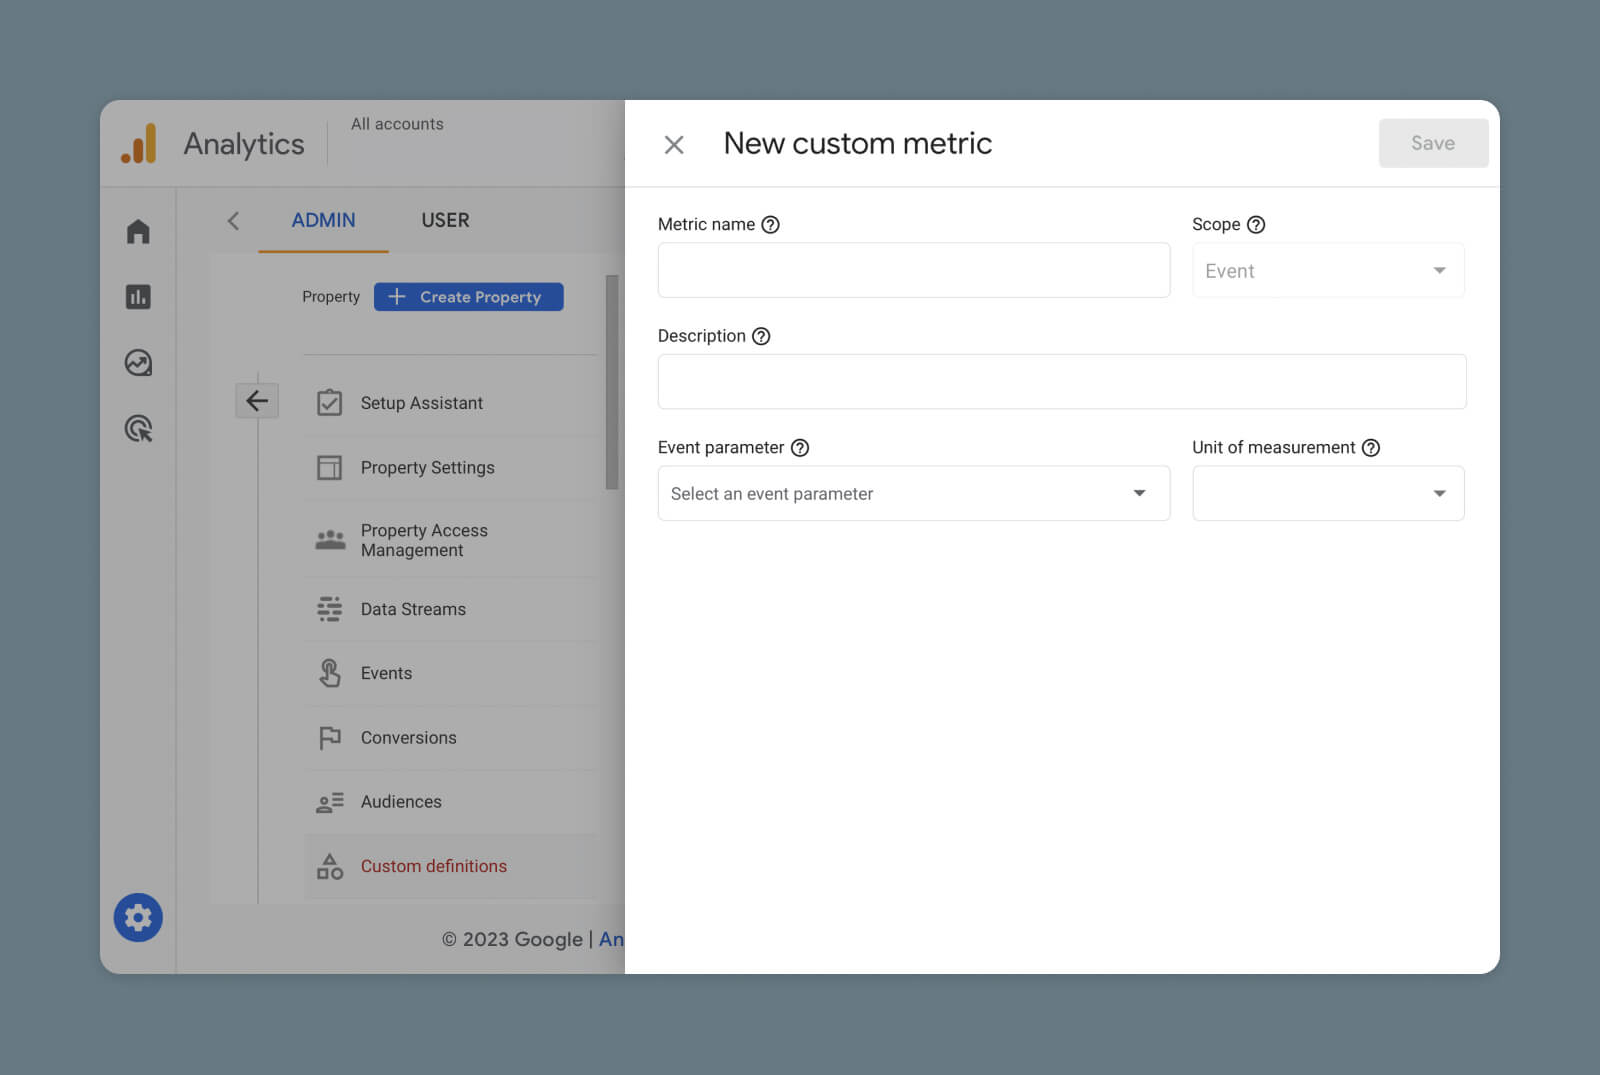
Custom Metrics
Of course, raw data is only useful to a certain extent. To understand exactly how your website or app is performing, it’s a good idea to create some custom metrics that track your custom dimensions.
Don’t worry; this part is a lot easier!
In your Google Analytics Admin area, choose your property and visit Custom Definitions. Next, tap the menu tab labeled Custom Metrics and then tap the blue Create custom metrics button on the right.
Then, fill out these fields:
Event name – How your metric will be listed.
Scope – Event or user.
Description – Add a comment.
Event parameter – The parameter/dimensions this metric is tracking.
Unit of measurement – Choose how you want the incoming data to be measured (integer, time, distance).
Make sure to select the Active checkbox, then hit Save. Within 48 hours, your custom metric should start populating in GA4.
How to Measure Conversions in GA4
While measuring clicks and scroll events can be useful, there is only one thing that ultimately matters to your business or brand: conversions.
A website conversion is any action a user takes on a site that moves them further into the sales funnel. Examples include filling out a web form, clicking a call to action, or purchasing a product.
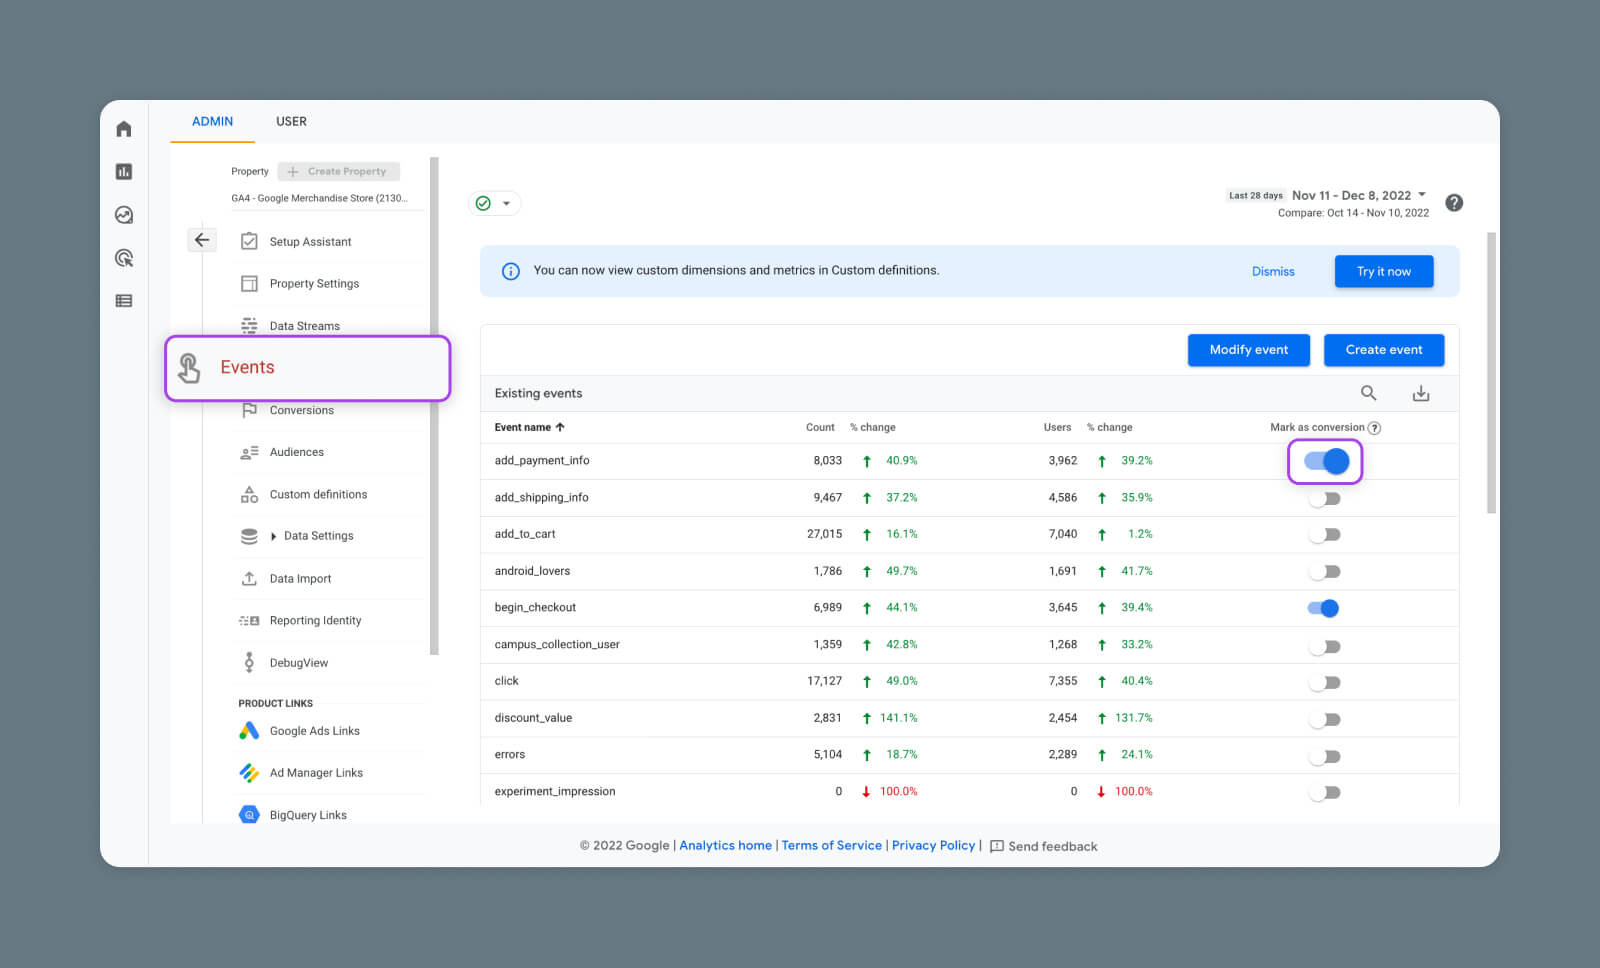
In Google Analytics 4, tracking conversions is pretty straightforward. All you need to do is identify which existing events count as some form of conversion.
If a particular event has been triggered at least once, you will see the option to Mark as conversion on the right-hand side of the main Events list.
Remember that only events that track pageviews for a specific URL will work properly here. If you don’t already have an event for your confirmation page, be sure to make one using the steps mentioned above.
There is another way to set up conversion tracking for events that have not yet been triggered or haven’t appeared in your events list.
Under the property menu, head to Conversions > New conversion event. Give your new Conversion exactly the same name as the event you want to link. Once your new event goes live, Google Analytics will recognize it as a conversion event.
Testing New Conversion Events
As with any new event, it’s a good idea to verify your conversion events before relying on them.
Simply visit the URL that is your designated confirmation page, and then open up the Realtime view in Google Analytics. If your conversion event shows up, you’re good to go.
Be aware that it might take a while after configuring your event before Google Analytics starts tracking it. Be patient.
Conversion Reports
Whenever you want to check on how many conversions you’re making, just visit the Conversions page in GA4.
Here, you can see which conversions are happening most often, how many users converted through each event, and how much money you’ve made.
You can view a full breakdown of these stats for any conversion in the list by clicking on the name of the event you want to study.
This detailed view also reveals the number of times the event has been triggered in total, and how many times it’s been triggered in the past 30 minutes.
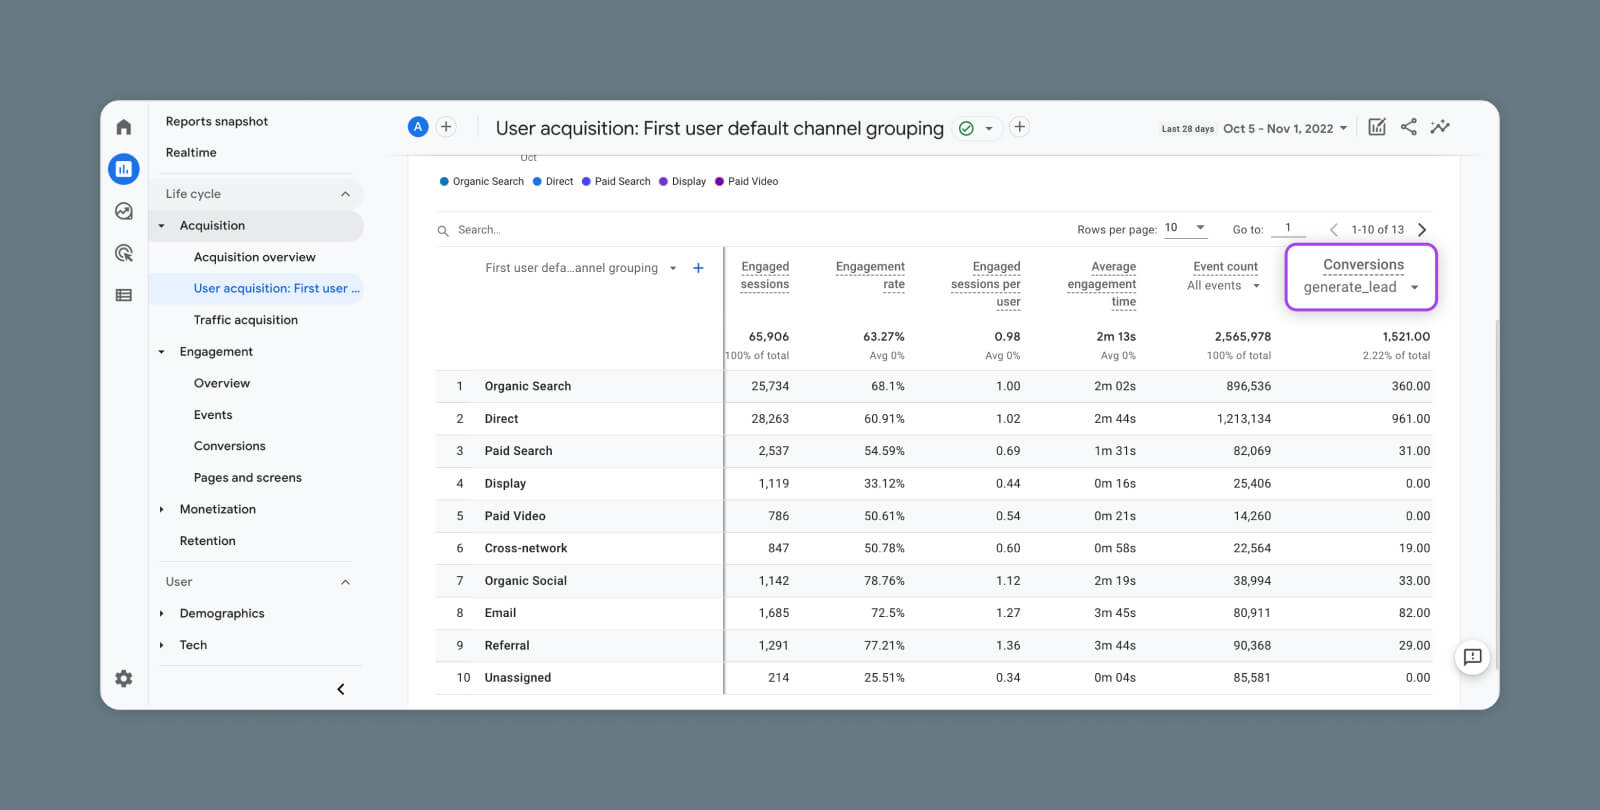
If you want to understand how users make their way to your conversion page, head over to User acquisition and select any conversion event. Google Analytics will then show you which channels are delivering users to your site, and then to that specific conversion.
To trace the exact steps your users are taking, visit Advertising > Conversion paths.
The reporting dashboard here shows you which channels are popular with users at different touchpoints, on their way toward a specific conversion.
Why You Should Set Up GA4 Events
As we have discovered, GA4 makes it possible to track user interactions across every detail of your website or app.
Obviously, setting up all the various events and conversions requires some effort. The bigger your site, the longer the task will take.
But if you want to build an audience or make more e-commerce sales, configuring GA4 event tracking is time well spent. The more you understand your users, the better you can optimize your content.
Get More Visitors, Grow Your Business
Our marketing experts will help you earn more traffic and convert more website visitors so you can focus on running your business.
Wouldn’t earning a little extra money from your website be fantastic? You put all this work into a website, and you deserve to have it work for you! Monetizing your website can give you a form of passive income, allowing you to make money with little time and effort – But it’s important to know the ins and outs of monetization to help you achieve your goals.
Fortunately, there are plenty of ways you can monetize your website. Whether you’re just starting out or you’re a seasoned pro, you’re sure to find an option that suits you. For example, you could turn your site into a membership platform, sell digital products, or become an affiliate marketer.
In this post, we’ll take a look at why you should consider monetizing your site. Then, we’ll discuss 21 exciting monetization ideas to choose from. Let’s get started!
Why Monetize Your Website?
You might already know that monetizing your site enables you to unlock revenue from your content. Still, you also probably know that this tends to generate irregular earnings.
The good news is that with the right methods, you can actually turn your website into a consistent passive income stream. Plus, you can mix and match different methods to further stabilize your earnings.
One of the best parts about passive income is that once it’s set up, it requires very little time and effort to maintain. Therefore, it’s an excellent route if you’re looking to achieve a better work-life balance.
On top of that, the money that you make from your website can easily cover the costs associated with running your site. So, rather than cutting into a portion of your salary, you’ll be able to pay for web hosting, premium plugins, and more, with the money you make.
In fact, you might currently be managing your website on a strict budget, forced to use poor-quality hosting and sub par themes. But, once you get started with monetization, you can finally upgrade your existing plans, setting you on the right track to grow your website.
It’s also good to keep in mind that not all of the advantages are money-oriented. For instance, monetization can organically create opportunities to diversify the way visitors engage with your content. For instance, you can offer more value and more ways to get involved with your site via memberships, consultations, or webinars.
Get Content Delivered Straight to Your Inbox
Subscribe to our blog and receive great content just like this delivered straight to your inbox.
When to Consider Monetizing Your Website
Lots of small online businesses begin as a side hustle: a way to make some money while exploring your passion. But, eventually, if you find an audience and your idea gains traction, you might seriously consider turning your hobby into a profitable business.
However, timing is key. You may not see the best results if you start too early. With that in mind, here are some clear signs that you’re ready to monetize your website:
Niche. Having a clear, focused niche for your content is crucial if you want to successfully monetize it. If readers can’t find the same information elsewhere, your material will likely become popular.
Traffic. The success of certain monetization strategies relies on high-traffic numbers. So, if your website is too new, you might want to wait till you’re more established and are gaining more visitors.
Engagement. Some techniques are better suited to a loyal audience rather than a large one. Do you receive regular comments? Shares? Likes? This shows that readers care about your website and take it seriously.
Schedule. If you’ve adopted a structured approach to your website or blog (rather than posting when you feel like it), you might be ready for monetization. For example, you might schedule posts at the same day and time every week. This is critical since your audience will come to trust you when you share content consistently.
If you’re not hitting the mark with any of these factors, then it might be best to keep publishing content and work on growing your audience before turning towards monetization.
The Hustler’s Guide to Monetizing Your Website (21 Ideas)
Now that you know whether monetization is a viable option for your site, let’s take a look at twenty-one ideas to inspire your efforts!
1. Become an Affiliate Marketer
Affiliate marketing involves a mutually beneficial relationship between your website and different companies. In exchange for a commission, you promote their products or services.
Rather than relying on traditional ads, companies distribute affiliate links for you to include in your content. You get your own unique link (as does every affiliate working with the brand) and generally, the link leads to a particular product that you’ve been asked to promote.
This method is a great option for blogs since it can be easy to implement your affiliate links naturally within posts and comments. However, it can also be a good option if you have a YouTube channel since you can utilize the description box:
Details vary depending on the program you join, but you’ll get an attractive deal with the DreamHost affiliate program. It takes just two minutes to sign up and you can earn up to $200 for every referral you make:
You’ll have the most success with affiliate marketing if your website has a large amount of traffic. However, you can also use tools like ThirstyAffiliates to help you manage your programs, easily add links, and view analytics to improve your efforts.
2. Use Google AdSense
Google AdSense is an ad network that provides a quick way to monetize your site. While it involves displaying ads on your pages, it’s much more user-friendly than selling ads yourself.
Thanks to Google’s advanced algorithm, this tool allows you to present tailored ads to your visitors. Since these are more relevant to your users, they tend to be less frustrating:
The network matches advertisers that want to promote their business with publishers that have ad space to sell. Typically, you’ll be matched with brands that share a similar niche or audience to your website.
Then, every time a reader clicks on one of your ads, you’ll make a cut of whatever the advertiser pays Google. It’s important to note that you might not make as much money as you would by doing this yourself, but it requires much less effort. Plus, Google’s ads are less disruptive to your User Experience (UX).
To get started, you’ll need to create a Google account. You might already have one if you use tools like Drive, Docs, or Gmail. Then, you’ll fill in a quick form about your website.
Additionally, if you’re not sure about the best placements for your ads, you can always opt for auto ads. This way, Google chooses the best locations for your ads automatically.
3. Sell Ads on Your Site
Selling ads on your website requires a lot more time and effort than using an ad network. However, it also means you can reap bigger rewards since there’s no middleman taking a cut of the profits.
Instead, you’ll go directly to the advertiser, giving you more control over the brands you work with and the ads you run. Plus, it enables you to set your own price and determine how long the ads will appear:
However, with this method, you’ll need to be comfortable handling the negotiations yourself. What’s more, it requires you to catch the eye of advertisers. Factors that can make you seem more appealing include high traffic numbers, competitive pricing, and a sought-after niche.
To get started, you’ll need to find advertisers that you want to work with. Then, you’ll need to give them a reason to work with you. Once your site grows and you have a larger sphere of influence, this strategy becomes easier. In fact, quite often, brands can end up reaching out to you.
4. Publish Sponsored Posts
Sponsored posts offer another monetization method that’s based around partnerships. However, it’s much less aggressive than presenting ads on your site.
You’ll still need to join forces with other blogs or companies. But, rather than promoting these brands directly, you’ll publish content on your blog that features their products or services. This tends to feel more natural for some publishers, rather than taking a hard-sell approach.
There are also different ways that you can execute this strategy. For instance, the brand can create the content and hand it to you for publication. Or, you can create the content yourself. In which case, you can charge a lot more.
The sorts of posts you can create include roundups, product reviews, tutorials, etc:
However, there are some key factors to consider before getting started with this method. For starters, you’ll need to make sure you adhere to the Federal Trade Commission’s rules regarding disclosure. As such, it’s important to be transparent about any posts that are sponsored.
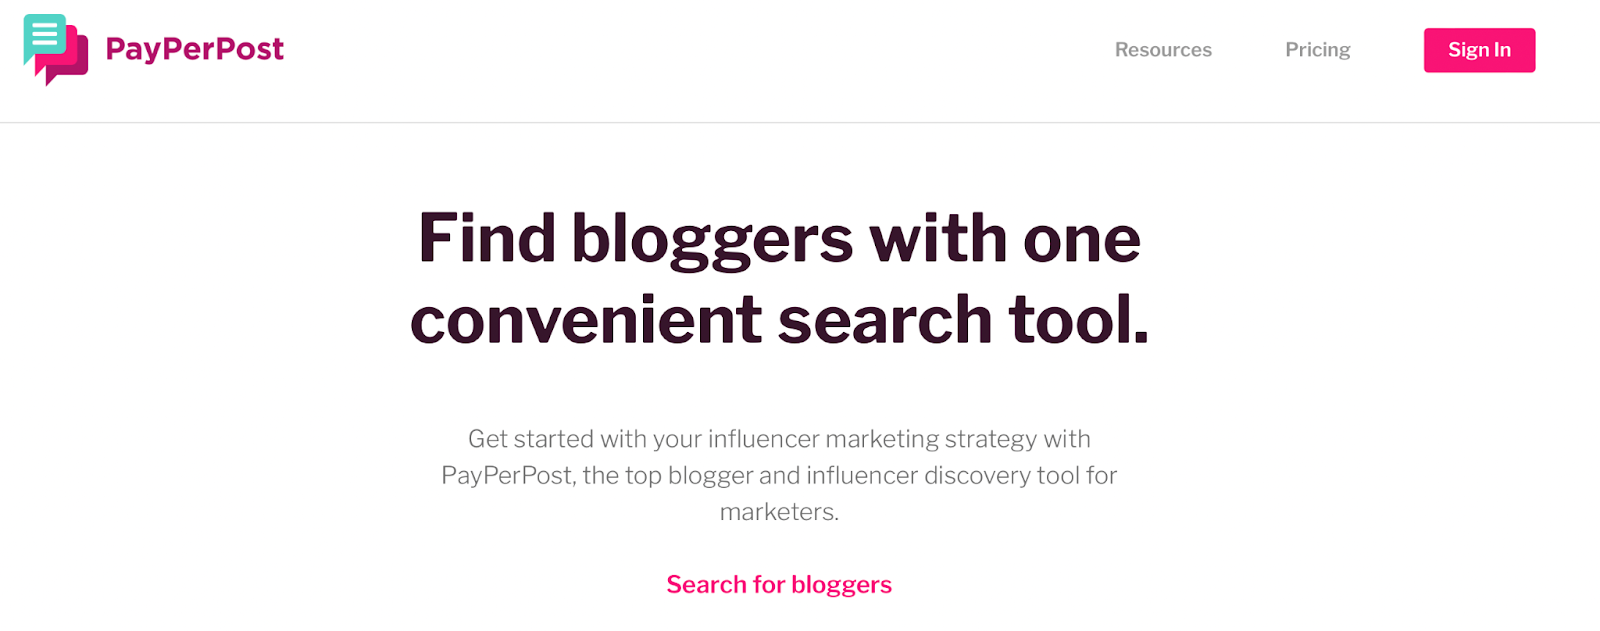
You can reach out directly to companies or blogs that you want to work with. Or, you can register with a site like PayPerPost:
PayPerPost is a directory that enables sponsors and bloggers to connect with one another. All you need to do is fill out a quick form to get listed in the directory.
5. Become an Influencer
If you already have a strong social media presence, one of the easiest ways to monetize your website is to become an influencer. However, strong doesn’t necessarily mean big. In fact, micro-influencers have as little as 1000 followers.
Micro-influencers are an attractive option for brands since they are a lot cheaper than partnering with more established creators. Plus, quite often, micro-influencers occupy a more specific niche which can be appealing to sponsors.
For instance, Gvantsa Ivanishvili is a fashion influencer with just 14.9k followers. But, thanks to her minimalistic style and clean content, she’s acquired a loyal and engaged audience:
If your following is small, it will generally be up to you to strike up negotiations with brands. However, as your influence extends, companies can end up flocking to you.
Influencing works a bit like affiliate marketing, but it’s largely based on social sites like Instagram and TikTok. Similar to affiliate marketing, you’ll recommend products and services in exchange for a fee. But, pricing tends to be more flexible, working on a case-by-case basis.
Typically, you’ll be paid a commission as you would with affiliate links or ads. Eventually though, you could be given a contract for your efforts. This can bolster a long-term partnership, enabling you to generate a more stable income:
To get started, you can reach out to companies or apply to a site like Famecast. You’ll also need to work on building your network and engaging with your audience to build loyalty.
6. Sell Physical Products
If you make physical products yourself, or you have the potential to start doing so, you can monetize your website by selling your work. Think about the types of custom gifts you find on marketplaces like Etsy. Thanks to the level of personalization, these tend to be a big hit:
However, with these types of marketplaces, you can end up paying hefty commission prices. Instead, you can get started with WordPress and then install WooCommerce to transform your website into an online store. Then, you can accept payments by integrating your store with a payment gateway like PayPal.
You can sell anything from hand-made goods like ceramic mugs or leather accessories to personalized greeting cards. Or, if you don’t have the creative skills to get going yourself, you can always resell products you’ve purchased from a supplier.
7. Sell Digital Products
Digital products are easy to sell since they don’t require inventory space or shipping costs. This makes it less expensive for you to get started with this monetization method. Better yet, digital products are usually downloaded by users, so they are instantly accessible.
When it comes to digital products, there are plenty of options for you to choose from, depending on your area of expertise. For example, you might be a personal trainer. In which case, you could sell workout guides. For creative professions, you can sell photographs, sheet music, or illustrations:
If this is an option for you, the best news is that it’s super simple to get started. Once you’ve set up your website with WordPress, you can add a plugin like Easy Digital Downloads to store and sell your digital files.
8. Create Licenses for Your Digital Products
In addition to selling digital products, you can also sell the license agreement for each of your products. The license determines what the customer can and can’t do with the product since the item contains your intellectual property.
You can use different licenses for different products, or match licenses to specific pricing levels. For instance, you might offer a lower price for a license that’s only valid for non-commercial usage. However, it’s generally best to consult a legal professional when deciding on licensing.
9. Offer a Coaching or Consultation Service
If you have expertise in a specific area, you can offer a coaching or consultation service to monetize your website. For instance, you might be a thought leader, industry expert, or influencer.
This is an excellent venture if you enjoy engaging with people one-on-one. Your coaching or consultation service can be done in-person. But, you can also leverage virtual sessions to reach more people, regardless of their location:
It’s important to be aware that this method requires more ongoing time and effort than other options such as passive income streams. Therefore, it’s a good fit if you want to ease into starting your own business, with the goal of eventually making it your full-time job.
What’s more, you’ll need to be able to promote your services effectively. That’s why it can be useful to set up landing pages for each of your services while utilizing social media to market your offerings. Additionally, you can add a scheduling plugin to your website like Booking Calendar to enable visitors to schedule appointments easily.
10. Create an Online Course
Another effective way to monetize your website is to create an online course. Since COVID-19, distance learning and online education has become increasingly popular.
Offering online courses is a great idea if you possess a particular expertise that you want to share. For example, you might be a successful expat, thriving far from home. In which case, you could create a course teaching others how to achieve the same success:
Alternatively, you might be an entrepreneur with the knowledge to help others achieve six figures with a startup. However, you can also create short fun courses. For instance, you might help people learn a language or teach people a craft like knitting or sculpting.
What’s great about creating an online course is that you can also combine this method with other ideas in this guide. For example, you can add your affiliate links within your course materials and include ads within your content.
To get started, you can add a Learning Management System (LMS) plugin like MemberPress Courses to WordPress. This tool enables you to set up your courses, integrate a payment gateway, and protect your content with unique membership access controls.
11. Launch a Webinar
If you’d prefer to connect with your audience on a more personal level, then you can create a webinar to monetize your website. This way, you can organize and host virtual summits that can be delivered as recorded or live webinars.
This is a great option if you enjoy having lots of control over your schedule, since you’re able to leverage specific times of the year when you need an income boost. Plus, it’s a very flexible option.
For instance, your online event can be anything from a mini conference to a workshop:
You can either charge visitors to join your webinar, or if you run a membership site, you might offer it to your members for free.
To get started, you’ll need to embed a list of upcoming events on your pages. Then, you can add a registration form where users can sign up with their names and email addresses. It’s super easy to coordinate your website with your webinar using a tool like WP GoToWebinar.
12. Start a Podcast
Starting a podcast is an exciting way to monetize your website. Podcasts have recently become very popular, and they’re even expected to gain further traction. Here are some statistics to motivate your future venture:
82 million people listened to podcasts in 2021, with an estimated projection of 100 million listeners by 2024
Only 22% of people were aware of podcasting in 2006 but this figure rose to 79% in 2022
A podcast is also a great add-on to other platforms like blogs since you can repurpose your written material as podcast episodes. Plus, podcasts lend themselves well to video content that you might publish on YouTube or TikTok.
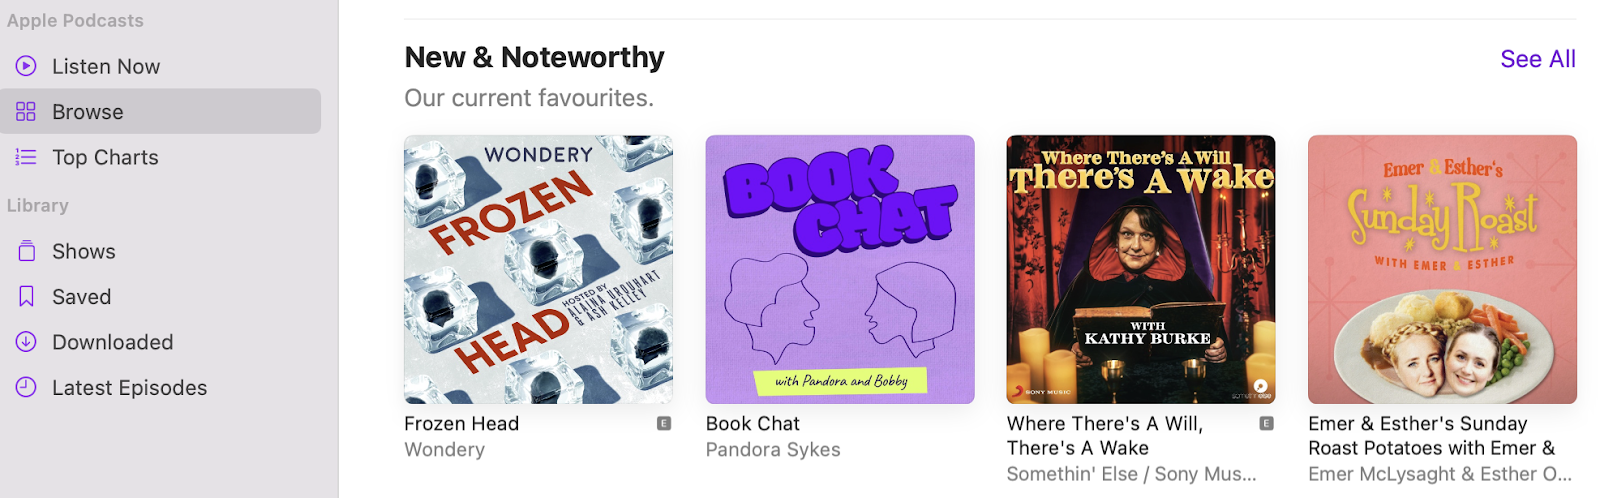
To get started, you can join a podcast network or list your podcast in directories like Spotify and Apple:
Alternatively, you’re able to create your own podcast website with a tool like Podcastpage to gain complete creative control over your content.
Then, once you’ve established your podcast and are attracting sufficient listeners, you can utilize other monetization methods in this guide. For example, you can create a podcast membership site, include ads within your episodes, and publish sponsored content.
13. Create a YouTube Channel
Since YouTube has been around for a fairly long time, you might not think this is a viable method to monetize your website. However, the number of YouTube users has been continually increasing and is estimated to reach a new peak of 1.1 billion users in 2028.
Creating a YouTube channel is a great choice if you enjoy connecting with your audience and producing video content over text-based material. Plus, there are multiple ways to earn money through YouTube such as subscriptions, advertising revenue, and affiliate marketing:
The YouTube Partner Program is a great place to start with your research. If you can’t apply for the program, you can still use YouTube to direct visitors between your channel and your website.
Additionally, you don’t need to spring for expensive equipment. In fact, it can be best to get started shooting videos with your phone before deciding whether this is an avenue you’d like to explore further.
14. Accept Donations
One of the simplest ways to monetize your site is to ask readers for donations. It’s not necessarily the best way to earn lots of money, but you might make enough to cover ongoing costs like web hosting, premium themes, and plugins.
This strategy works best for high traffic sites because even if people don’t donate a lot, it can add up to a sizable amount. If you feel uncomfortable asking visitors to donate to your site, it can help to share information about what the money will go towards.
For instance, an artist might collect donations to put towards an exhibition. Or, a musician may collect payments to subsidize touring costs.
Better yet, there are plenty of ways to get started. You can either start a crowdfunding campaign and promote it on social media. Or, you can install a donations plugin like GiveWP.
Lastly, you might prefer the more manual route, implementing donation buttons on your site using a plugin like Buy Now Plus. Then, you can integrate your site with a payment gateway such as PayPal.
15. Create a Membership Website
A membership website is an excellent option if you want to unlock revenue from your site without using ads or partnering with companies. Plus, it’s a very flexible solution.
For instance, you might choose to paywall all of your content, making it exclusively available to users with a membership. Or, you can make your website accessible to everyone and then ‘gate keep’ your best content like blog posts, courses, or recipes:
Typically, it can be useful to offer at least some content to non-paying visitors. This way, users can get a preview of the value that your membership plans offer.
Then, you can provide various membership options to suit different budgets. For example, you can offer a basic option with access to a handful of resources. Meanwhile, your premium plan can provide additional perks for a higher price.
To get started, you can use a plugin like MemberPress to add to your WordPress website. This is an effective way to protect your content with membership rules so that only logged-in users or users with a specific membership can access your content.
16. Set Up a Swag Shop
Setting up a swag shop is a fun, creative way to monetize your site. It involves selling physical products (usually) that feature your brand name and/or logo. As such, it works best for individuals or brands with a loyal fanbase.
When choosing products to sell, it’s helpful to consider your niche and audience. For instance, a serious profession like a law firm might opt for coffee mugs or stationary. Meanwhile, individuals in the creative sector might prefer to sell clothing items or phone cases:
This enables you to create a swag shop, choosing from an inventory of over 220 items. Better yet, some of these items can be customized by your followers. Plus, Printful will even ship items to your customers and help you set your prices.
17. Create a Dropshipping Store
Dropshipping is a relatively new but highly popular way to make money through your website. It’s a great way to test out ideas without having to invest in actual products yourself. This makes it a low-risk business venture.
So, what do we mean by that? Dropshipping enables you to sell products without actually having them in stock. Instead, you’ll purchase the items from a third-party site like Amazon. Then, the third-party site delivers the items to your customer. Essentially, you’re the middleman that facilitates the sale while making a profit.
You can use a tool like Oberlo to find the right products to sell. However, it’s best to go into dropshipping with an open-mind and a flexible approach. For instance, you might find that your preferred niche is too competitive. Or, perhaps your products aren’t in demand. In this instance, you can move onto another niche or product that sells better.
18. Deliver Premium Content to Your Email List
So far, we’ve looked at website-based monetization strategies. But, there are plenty of channels you can make use of. For instance, you can build your own mailing list and deliver premium content to your subscribers:
Like a membership website, this method works best with a loyal audience since members need to be willing to pay to access your content. Once your mailing list is set up, you can connect with readers in all sorts of ways. You might send newsletters, articles, or discounts for your products (or for your affiliate partners).
But, for those who have a membership to your site, you can also send premium content straight to their inboxes. Typically, you’ll need to include a signup form on your pages using a plugin like WPForms. Then, you can integrate your form with an email marketing provider like MailChimp.
19. Monetize Your Media Gallery
If you have a website with lots of original images, you can monetize your Media Gallery to generate an income. For instance, you might run a photography portfolio site or perhaps you design your own illustrations.
This way, you can sell your images straight from your Media Gallery in WordPress. All you need is the NextGEN Pro’s eCommerce System:
Once it’s installed, users will see a shopping cart appear beside each of your images. Then, when a visitor clicks on one of your images, they’re able to view your pricing information. What’s more, with NextGen Gallery, you can create an unlimited number of price lists, customize your gallery, and adjust the way your images display.
20. Flip Your Website
This method is slightly different from other options on this list. Rather than monetizing your existing website, you can sell your website in exchange for a price.
It works in the same way that you’d flip a house. You create and do up the site to make it more valuable. Then, you sell it to the highest bidder.
However, in order to attract bidders, you’ll need to design an impressive website with quality content. Therefore, this strategy works best if you possess some technical skills since you’re able to do development and design work fairly quickly, without outsourcing the job.
Empire Flippers is a marketplace for businesses, so it’s a great place to find opportunities. It’s also important to note that while you can flip your website, you’re also able to sell business names and domain names separately which can result in higher earnings.
21. Set Up a Directory
Throughout this post, we’ve mentioned directories quite a bit. There are podcast directories, advertising directories, business directories, and more. Typically, they’re used by individuals and companies to connect with others to form mutually beneficial relationships:
Since one (or both) of these parties pays to access the directory (or pay a commission), this can be another great way to monetize your website. You can charge a monthly or annual listing fee. But, you can also make money in other ways.
For instance, you can give businesses the option to pay more for premium listings. Plus, you can leverage your advertising space, and charge extra for users to make bookings and reservations.
It’s best to stick to a clear, focused niche in order to make your directory stand out. You might choose to create a podcast directory or a job directory. Then, you can determine your price based on your website’s traffic level.
Turn Your Website Into Cash Flow Today
Quitting your day job might seem like a pipe dream. However, there are ways to monetize your website so that it can become a reality. Or, at the very least, generate a significant bonus income.
For example, when you already run a high-traffic site, you can get started with affiliate marketing. Or, if your website has a loyal following, you might create a membership site or set up a swag shop. Plus, you can find even simpler methods such as monetizing your Media Gallery, selling digital products, or accepting donations.
If affiliate marketing sounds appealing, check out our DreamHost affiliate program. This is one of the quickest ways to start making money from your site. With DreamHost, you can earn up to $200 per referral!
Become a DreamHost Affiliate
Join the DreamHost Affiliate Program to get cash quickly. Earn up to $200 per referral!