Wednesday 25 May 2022

Private Domain Registration FAQs

If you aren’t familiar with registering domain names, the process can be confusing. There are many registrars to choose from, there are seemingly infinite domain extension options, and prices can vary wildly. However, one of the more common causes of concern is that you may be publishing your personal information on the web without even realizing it.

The good news is that private domain registration replaces your personal information with generic placeholders through a web host or registrar. You can usually opt for private registration when purchasing a domain, though privacy can also be added to your existing domains.

This article should help you answer 13 frequently asked questions about private domain registration. Let’s dig in!

What Personal Information Is Required When Registering a Domain?

When registering a domain, you’ll need to provide your name, physical address, phone number, and email address. This contact information is used to track ownership of the domain. It is made publicly available online via the WHOIS directory.

domain WHOIS check

Other data is also made available, such as the year and date the domain was registered, when it was last updated, and when it will expire. Technical information like the domain status and server name can also be found.

Why Do I Need to Provide Personal Information to Register a Domain?

There are countless domains on the web which are being bought, sold, and created every day. Keeping track of them is no simple task, and a method to track them is essential. While some may not like it, the current approach is to post domain registration information publicly online for all to see.

This information is used to prove ownership of the domain. This type of record is essential in the event of a dispute.

In addition, registering a domain is necessary for regulating online activity. For instance, if an online business is involved in illegal transactions, the authorities may need to contact the website owner to resolve the issue.

What Is WHOIS?

WHOIS is a public database of all website domains. It includes personal information about every website owner. This directory is intended to track ownership of domains, though spammers and scammers are increasingly abusing it.

The WHOIS directory is maintained by the Internet Corporation for Assigned Names and Numbers (ICANN). Their duty is to manage and maintain domain ownership records for technical and legal purposes.

ICANN domain registration data lookup

The problem is that this system was implemented a long time ago, and its outdated procedures are vulnerable to modern cybercriminals. Therefore, a replacement for WHOIS, the Registration Data Access Protocol (RDAP), was created to be more secure and to comply with more stringent internet privacy laws such as the GDPR.

While this is a much-needed update, RDAP has yet to be fully implemented and still provides much of the same information as WHOIS. The data used for domain registrations can currently be accessed by anyone. This means that the name, phone number, mailing, and email address of site owners can be exposed.

Get Content Delivered Straight to Your Inbox

Subscribe to our blog and receive great content just like this delivered straight to your inbox.

What Is Private Domain Registration?

Private domain registration allows you to purchase and register a domain without posting your personal information to the public directory. Many web hosts and registrars offer this service.

When you opt for private domain registration, your information is replaced with substitute data from the host or registrar providing the service. If anyone looks up the details in WHOIS for that domain, they are directed to the company providing the privacy service instead of the actual website owner.

domain WHOIS lookup

WHOIS requires a name, phone number, email, and mailing address when buying a domain. This information is made public for business and legal reasons, though many people do not wish for their personal information to be publicly available online.

Why Should You Keep Domain Registration Private?

Domain registration requires personal information that should often be kept private. If you wouldn’t post your name, address, and phone number on a billboard, you probably don’t want it available to everyone on the internet.

One of the most common reasons for private domain registration is to avoid spam, identity theft, and harassment. Unfortunately, these days, having your contact details publicly available online puts you at risk of unwanted communication.

While the personal information provided isn’t incredibly sensitive, it could still be used nefariously. For example, with your name, email address, and website information, someone could easily send emails from a fake account similar to yours and pretend to be you. They could use this to phish for account information of your users and compromise your site’s security.

Can I Add Privacy to an Existing Domain?

If you have already registered your domain with your personal information, don’t fret! Usually, you can still apply privacy settings to hide that data.

To do this, check your host dashboard or contact your registrar to request this service. In most cases, your data can be kept private and replaced with a generic placeholder for a nominal fee.

ICANN domain registration data lookup

In short, if you wish you had registered privately in the first place, you can still add that privacy now. There is little reason not to, as it could save you from some major headaches in the future.

What Is Domain Privacy Protection?

Domain privacy protection is a service offered by web hosts and domain registrars to keep your personal information hidden from public view. Normally, a domain owner’s contact information is made available in the WHOIS directory for anyone to look up.

However, domain privacy protection acts as a proxy, substituting your information for a generic user number or the name of the service provider. This way, anyone interested can still verify ownership of the domain by contacting your host company or registrar, and you can keep your information off WHOIS.

Unless you have a business phone number, protected email address, and company mailing address, domain privacy protection is likely a worthwhile investment. It can help you avoid spam and ensure your cyber safety. Keep in mind, that even if you have the above business contact information to shield your personal details, you still don’t have to attach it to your domain publicly.

How Do You Keep Domain Registration Private?

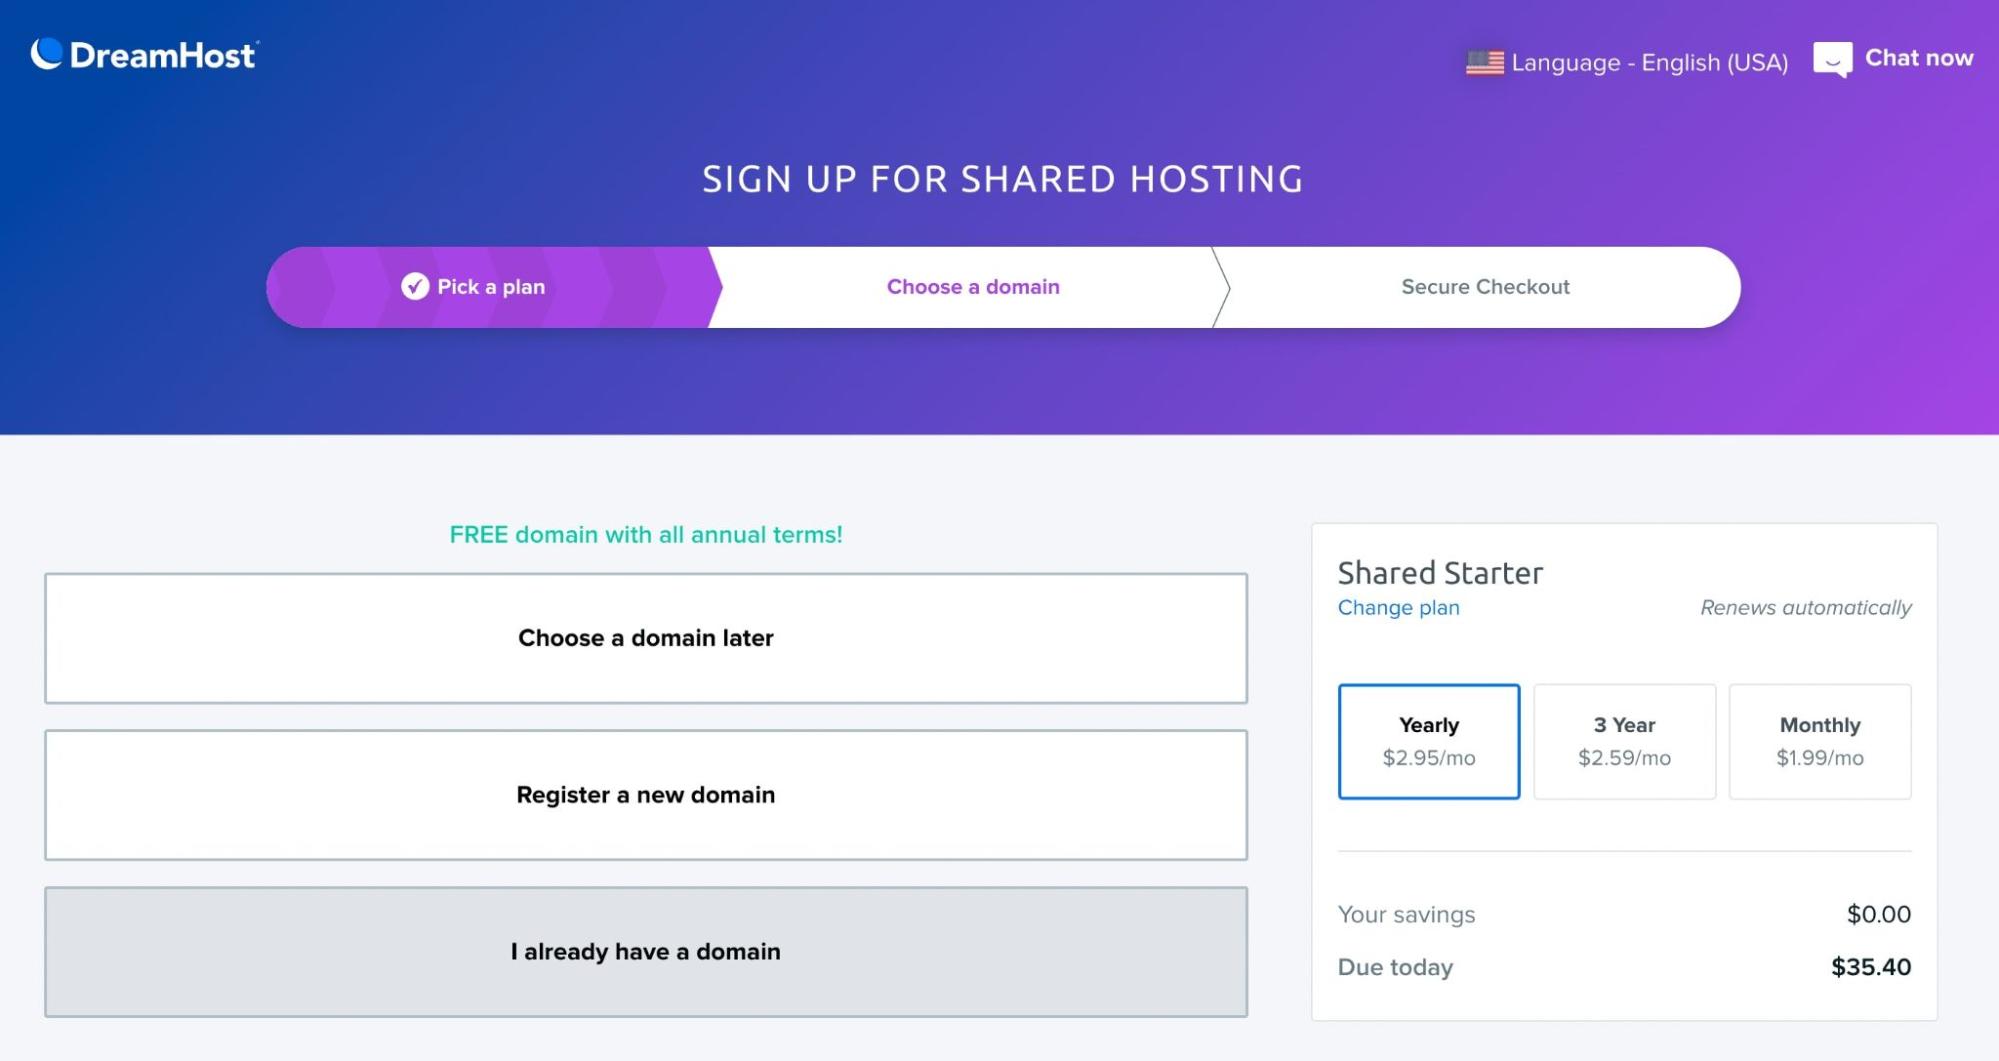
To register a domain without sharing your personal information publicly, you’ll need to use a registrar that offers private domain registration. You’ll sometimes pay a small additional fee to get this service, but some hosts include it in their plans.

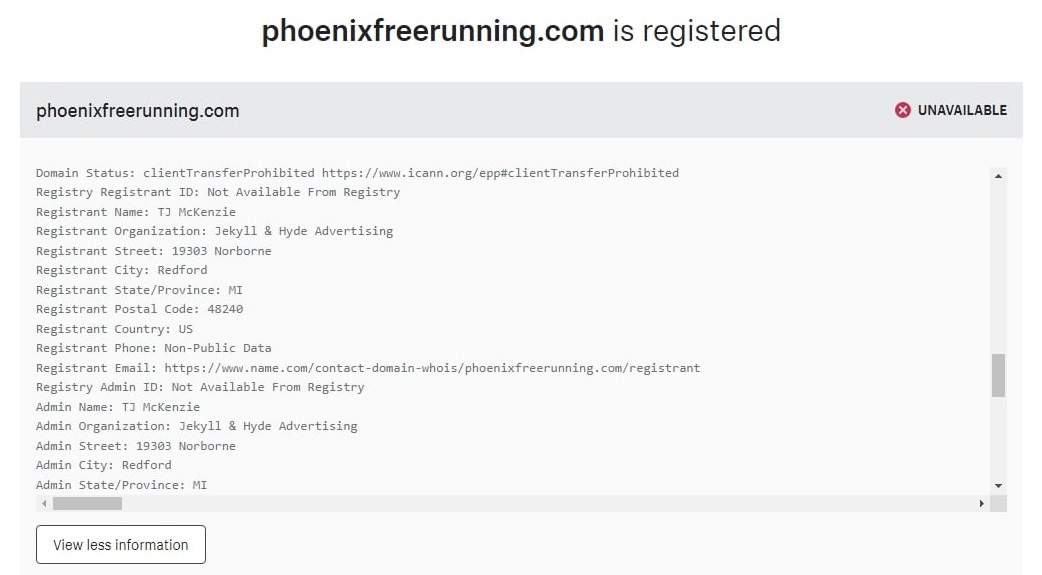
For instance, you can opt for free private registration when purchasing a domain with DreamHost. That way, your personal information is replaced with a generic placeholder in the public registry:

DreamHost domain privacy protection

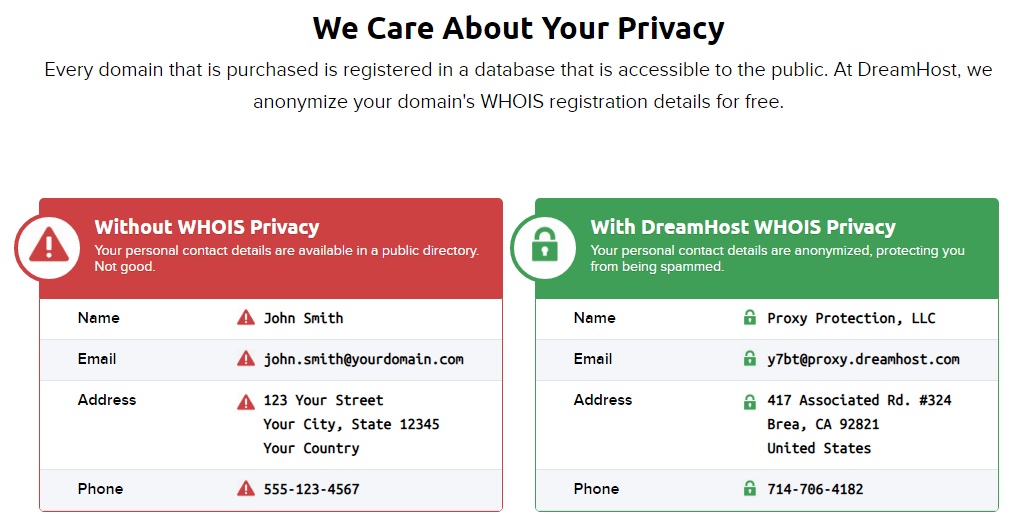
You can also add privacy to existing domains on DreamHost at no additional cost.

Other registrars and hosting providers may have different methods and pricing for registering privately, but it should be as simple as selecting the option during the purchase process. If you registered without selecting the private registration option, you can usually go back and add it. Better late than never, but keep in mind that some spam bots may have already scraped your email address from WHOIS.

How Much Does Private Domain Registration Cost?

There is no set fee for private domain registration. This service is provided by a number of hosts and registrars that each determine their own price, usually in addition to the base price of the domain.

For example, we offer free private domain registration included in our service at DreamHost. Other companies commonly treat private registration as an add-on and charge $10 to $30 or a recurring monthly fee of around $1 to $2.

In most cases, private domain registration is affordable enough to be worth the peace of mind. You should come across this option when registering your domain with the most popular registrars and web hosts.

Which Domain Extensions Are Eligible for Private Registration?

The majority of common URL suffixes are eligible for private registration. The following popular extensions can be registered privately:

  • .com
  • .org
  • .net

In fact, plenty more extensions can be privately registered. The majority of extensions that cannot be privately registered are geography-specific suffixes (countries, states, etc.) such as:

  • .us
  • .eu
  • .ca

These are not exhaustive lists, and it should be noted that eligibility can change. That’s because Top Level Domains (TLDs) are periodically expanded, and the privacy status of current extensions can be updated. The options available to you can also differ depending on your host and registrar, so be sure to check for privacy compatibility before registering.

How Do I Enable Domain Name Privacy for My Website?

Enabling domain name privacy is usually not something done on your website, per se. Your domain registration information is made available in the WHOIS directory, which is run by ICANN and tracks domain ownership across the web.

To enable domain name privacy, you will need to go through your hosting service or registrar. This option is usually presented during the purchase of the domain, but it can often be added after the fact.

manage registered domains in DreamHost Panel

The process will differ depending on the company you use, but it is usually as simple as checking a box or paying for the private registration add-on.

If you are having difficulty finding this option from your hosting dashboard or registrar’s website, you can always contact them to see if they offer this service. If they do not, you may be able to use another company’s privacy service, though this could require transferring your domain to that company.

How Can I Protect Myself from Digital Stalking?

One of the most important things you can do to protect yourself from cyberstalking is to remain anonymous. When possible, avoid using personal information like your real name online. In situations when you must use your real name, avoid pairing it with your contact information.

You may not think anyone will abuse something as simple as your email address, but stalkers can be relentless. For example, you could block an email address that is harassing you, only for that person to start sending emails from a different address.

The bottom line? Keeping personal information private is the best way to avoid digital stalking. However, if it has already begun, it’s a smart idea to seek further help.

Protect Your Online Privacy When You Register a Domain

Now that you have a better understanding of private domain registration, you can protect the personal information attached to your websites. Adding this layer of privacy can help prevent identity theft, hacking attempts, and spam.

To add privacy to your domain, you can either:

  • Choose private domain registration when purchasing your domain
  • Add domain privacy protection using your host dashboard or by contacting your registrar

DreamHost is one of the most popular hosting and domain services on the web. All of our plans include free private domain registration. Plus, you can easily add it to existing domains too!

Private Domain Registration For All

Don’t let someone else register your domain first. Search DreamHost’s 400+ TLDs to find the perfect fit for your website.

buy a domain name

The post Private Domain Registration FAQs appeared first on Website Guides, Tips & Knowledge.


source https://www.dreamhost.com/blog/private-domain-registration-faqs/

Friday 20 May 2022

The Rise of Mobile Shopping: A Beginner’s Guide to M-Commerce

Online shopping is hardly a new concept. However, mobile shopping or “m-commerce” has grown drastically during the past few years. By 2025, mobile commerce is projected to account for 44.2% of all online retail operations, reaching a projected $728 billion in sales.

Moreover, mobile shopping just keeps expanding year after year. That means if you’re a business owner with an online store, improving the experience for mobile consumers is essential. When you provide a positive mobile User Experience (UX), you’ll be able to tap into a massive and continuously growing market.

In this article, we’re going to take a look at the different types of m-commerce and how they’ve grown in recent years. Then, we’ll show you four ways you can use m-commerce to expand your reach. Let’s get to it!

What Are the Different Types of M-Commerce?

When we talk about mobile commerce, it’s important to understand that we’re not just referring to e-commerce or online retail. Instead, M-commerce is a broad term that encompasses multiple types of industries and operations.

Any type of operation that involves transacting money over a mobile device (smartphones, tablets, etc.) falls under the umbrella of m-commerce. Now, let’s talk about the most common types of mobile commerce.

Mobile Banking

Usually, banks enable you to operate through mobile devices using standalone apps on top of their existing websites or online banking platforms. Mobile banking is the primary way they conduct transactions for a large segment of users in the US.

95% of Gen Z and 91% of millennials use mobile banking due to how convenient it is.

mobile banking

Some banks and standalone service providers also enable you to invest using mobile applications. That means users can manage both their standard accounts as well as their portfolios through mobile devices – at any time. Arguably, mobile investing applications can account for the growing share of Gen Z and Millennial customers joining the investment markets.

Mobile Payments

There is a lot of overlap between mobile payments and mobile e-commerce apps. When we talk about mobile payments, we’re referring to platforms and services that enable you to send and receive money and process sales transactions.

One great example of a mobile payment service is Venmo. Since 2017, Venmo’s annual revenue has grown from $160 to $850 million, and its user base has skyrocketed to over 80 million users.

venmo accept payment

With Venmo, users can send payments to each other using a simple mobile app. Other similar mobile payment apps enable customers to store money, request loans, and keep comprehensive transaction logs.

Get Content Delivered Straight to Your Inbox

Subscribe to our blog and receive great content just like this delivered straight to your inbox.

Mobile E-Commerce

Most users interact with the web mainly through mobile devices. We know this because 54.4% of all web traffic in quarter four of 2021 came from mobile devices. With that number in mind, it’s only logical that many consumers also make online purchases through mobile phones.

From 2016 to 2021, the share of mobile e-commerce operations grew from 52.4% to 72.9%. In case you were wondering, these mobile operations include:

  • Online purchases through online stores and social media (‘social commerce’)
  • Subscriptions through services such as Google and Apple Pay
  • Microtransactions

The rise of mobile shopping is a boon for online stores that offer a great mobile experience. But, on the other hand, if your online store is a pain to use on smartphones and other mobile devices, you’re likely to lose tons of potential sales.

How to Boost Your Online Business with M-Commerce (4 Ways)

Adapting to new markets is always a challenge. That’s why many online stores are stuck in the past, not interested in offering a better experience for their mobile users. However, adapting your online store to m-commerce trends can greatly expand your audience.

Here are four ways to leverage mobile commerce to boost your online business.

1. Prioritize the Mobile Shopping Experience

An online store should offer an amazing user experience on mobile and desktop devices. One mistake that many stores make is that they design pages with large screens in mind. In today’s world, you need to adopt a mobile-first design approach to maximize your potential audience.

Statistically speaking, most of your users will come from mobile devices. If you use WordPress, one great way to adapt to that reality is to utilize the Block Editor’s Preview functionality to see how your pages will look on smaller screens:

Alt text: Previewing a page in WordPress using the Mobile setting.

Ideally, you’ll test how every page looks on mobile before publishing it. That means testing your shop, product, and checkout pages on your own devices. During those tests, you want to keep an eye out for:

  • How the design looks on mobile
  • Whether pages are easy to navigate and interact with
  • If you can see images and read the text without zooming in
  • How the checkout process works on mobile

Ideally, you’ll let other people test your shop as well to avoid any bias. Third-party users are much more likely to spot problems with your store’s UX as they’re not familiar with how it works. To make your life easier, you might want to work with a mobile-responsive WordPress theme.

2. Integrate Your Online Store With Mobile Payment Options

One of the best parts of shopping online using a mobile device is that making payments tends to be a lot easier. Take Google Pay or Apple Pay, for example. If you shop at a store that supports either payment gateway, you can simply select what card to charge, confirm the transaction, and that’s it.

saved credit cards on device

When you’re shopping online with your smartphone, you can usually get away without entering payment details. That’s because most gateways integrate with multiple payment methods and apps.

Plus, if you have the corresponding mobile payment app on your phone, the store will simply redirect you to it. This ease of use may make customers spend more freely, as they have fewer opportunities to change their minds about a purchase.

Therefore, if you’re an e-commerce website owner, we recommend including payment methods that offer a streamlined mobile experience. Google Pay and Apple Pay are the two most popular options.

However, other major payment gateways include:

  1. PayPal
  2. Stripe
  3. Braintree
  4. WePay
  5. PaySafe

Furthermore, if you use WooCommerce, the plugin offers built-in integrations with PayPal and Stripe. You can also find extensions for most payment gateways, including all of the options listed above. With every payment gateway you offer your customers, you widen your audience, so we’d recommend including as many as possible.

However, when running an online store, there are few things more important than your customers’ safety and security. With that in mind, it’s a smart idea to only work with trusted payment gateways and make sure you are taking the proper cybersecurity measures to protect your customers’ data.

3. Launch a Mobile E-Commerce App

A significant percentage of online retail sales happen through mobile apps. Instead of visiting your website through a browser, the entire customer journey occurs within an application.

Creating a mobile application for your store offers a broad range of benefits. For starters, once customers install your store’s app, you get to send them e-commerce marketing notifications, which have an astounding open rate.

Moreover, having an app on customers’ phones means they’re more likely to return to you for further purchases. The app serves as a constant reminder of your store’s existence, which is invaluable in terms of marketing and branding.

To be fair, developing an e-commerce app is no small feat. On average, if done from scratch, it can cost anywhere between $30,000 and $170,000. That is, at least if you hire an experienced team of developers.

Developing a mobile app from zero may require a considerable investment that a modest online store can’t afford. However, there are plenty of services that enable you to create e-commerce apps using pre-built systems, such as AppyPie:

create an ecommerce app

A custom e-commerce app will almost always be a superior option. However, launching an app on a budget can benefit almost any online store. Even if it’s not completely custom, it will still likely help you win new customers.

4. Break Into Social Commerce

Social commerce is perhaps the most significant m-commerce trend of the moment. For the first time, consumers can purchase a large portion of what they see in their social feeds.

social selling m-commerce instagram

For instance, on Instagram, mobile users can go to a post and simply click on View Shop to  browse a store:

mobile e-commerce website

Whether you’re offering luxury sunglasses or piano lessons, it’s relatively simple to get started with social commerce.

For Instagram, you just need a creator or business account. Then you can set up your shop. Depending on your target audience, you may also want to have complementary social shops on TikTok and Facebook Marketplace.

However, we’d recommend choosing just one or two social channels to focus on. It’s best not to spread yourself too thin, especially since your target demographic probably doesn’t use every social platform.

Once you’ve established any social stores, you can further boost your sales by collaborating with influencers or hosting live shopping events. On the whole, breaking into the social commerce market may be a good idea if you want to reach more mobile customers but don’t have the means to create your own app.

Use M-Commerce to Grow Your Online Shop

If you have an online shop, but you’re not working on optimizing the customer journey for mobile users, you’re likely missing out on massive growth opportunities. The vast majority of e-commerce retail sales take place on mobile devices. So, if customers don’t enjoy the mobile experience your shop offers, they might look for alternatives.

Every field of m-commerce has expanded dramatically over the past few years. However, none of them come close to matching the growth of mobile shopping. If you’re not sure how to optimize your store’s mobile shopping experience, here are four ways to do it:

  1. Prioritize the mobile shopping experience.
  2. Integrate your store with mobile payment options.
  3. Launch a mobile e-commerce app.
  4. Break into social commerce.

If you’re looking for the perfect hosting platform to launch an online store, DreamHost offers a broad range of plans to suit any type of e-commerce project. Our Virtual Private Servers for WordPress offer a highly scalable option for growing WooCommerce stores!

Start Growing with VPS Hosting

Here’s how DreamHost’s VPS offering stands apart: 24/7 customer support, an intuitive panel, scalable RAM, unlimited bandwidth, unlimited hosting domains, and SSD storage.

VPS hosting provider

The post The Rise of Mobile Shopping: A Beginner’s Guide to M-Commerce appeared first on Website Guides, Tips & Knowledge.


source https://www.dreamhost.com/blog/mobile-shopping-m-commerce/

Monday 16 May 2022

How to Choose the Perfect Domain Name (12 Pro Tips)

Choosing a domain name is one of the biggest decisions you’ll make as a website owner. If you choose poorly, it can negatively impact your brand’s reputation. So, what’s the secret to finding the perfect domain name? We hope you’ll have a better idea by the end of this post.

Fortunately, picking a winning domain isn’t overly complicated. As long as you do your research, stay on brand, and make sure you go with something user-friendly, you’re likely to make a good impression.

This post will discuss the importance of choosing the right domain name. Then, we’ll share some tips to help you make the right decision. Finally, we’ll provide some advice on domain registrars and even tell you how to get a free domain with your web host. Let’s get started!


Why Choosing the Perfect Domain Name is Crucial

A domain name is your website’s address. It is a part of a larger Domain Name System (DNS) that enables internet users to input a combination of words instead of a lengthy set of numbers.

Your domain name serves a highly practical function, but it’s so much more than that. In many cases, your domain is the first impression a customer will have of your brand. This is true whether you’re a freelance photographer, a small business, or an international corporation, this is true. Therefore, your domain is nearly as important as your logo and brand name.

A lengthy URL may seem like a red flag to customers. Moreover, if it’s hard to remember, users might be less likely to revisit your site. Therefore, your domain name should be short and memorable.

Note that changing your domain name can be challenging. It’s not impossible, but it can lead to unwanted outcomes such as a loss of traffic and unnecessary downtime. With this in mind, you’d be wise to carefully consider your domain name from the get-go.

How to Choose the Perfect Domain Name (14 Tips) 

Now that you know why picking the right domain name is essential, let’s go over some key tips to help you do just that. Keep in mind that you can check for domain availability in various places, such as DreamHost Domains.

1. Choose Your Top Level Domain Extension Carefully

A Top-Level Domain (TLD) extension is the last part of your URL that comes directly after the name of your site. Some of the most popular TLDs are .com, .org, and .net.

Among all the TLDs, .com is often a popular choice. However, if .com is taken, it’s not the end of the world.

Other popular TLDs such as .xyz, .shop, .club, .online, .art, .inc, and even .party are becoming increasingly common. TLDs like .marketing and .technology allow you to go with something more relevant to your industry. The usage of ccTLDs (Country Codes) is also an extremely popular option. In recent years, more technology startups are using .io (Indian Ocean), .ai (Anguilla Island), and .co (Colombia), for example. Ultimately, you’ll want to choose a domain name extension that is cohesive with your website and signals credibility.

2. Incorporate Targeted Keywords

Keywords aren’t just for content. Search engines use your domain name to understand what your site is about and help determine search rankings. Therefore, it’s essential to include keywords where possible.

The keywords you choose for your domain name should be relevant to your website and targeted to your audience. If you’re having trouble thinking of good ideas, you can give Google Keyword Planner a try:

Google Ads Keyword Planner Google Ads - Keyword Planner homepage

This free tool lets you explore keywords by search volume and other factors to identify terms people actually use. However, a domain name doesn’t offer a lot of space to work with, so you’ll only want to incorporate keywords when they fit in naturally.

3. Make Sure Your Domain is Easy to Pronounce and Spell

You probably want your domain name to be original and memorable. However, novelty isn’t always a good thing. If you modify the spelling of a common word to get that .com extension (or simply to be cute), you might confuse your audience.

While word-of-mouth advertising is powerful, it only works when people can actually pronounce your domain. This also makes the name easier to remember, increasing the odds that people will visit and pass the site along to their networks.

In recent years, more businesses have opted for 4-letter combinations of easily pronounceable domains. In addition to being incredibly memorable, this is also due to the ability for domains to hold aftermarket value. That is, if the business fails, the domain(s) can still be sold. One very  popular 4-letter pattern is c-v-c-v (consonant-vowel-consonant-vowel), exemplified by Snap and Meta.

Skip the line and get tips right in your inbox

Click below to sign up for more how-to's and tutorials just like this one, delivered to your inbox.

marketing tips

4. Avoid Hyphens and Doubled Letters

Using hyphens may seem like a creative way to get the domain name you want and is admittedly still popular in some European countries (www.deutsche-bank.com). Unfortunately, they’re tough to express verbally (imagine yourself saying “dash” or “hyphen” out loud). They also make the domain more difficult to type. This can create a poor User Experience (UX) from the start, leaving a user frustrated. Even worse, they may give up entirely and end up on someone else’s website.

While there are exceptions, when you’re brainstorming domain name ideas, it’s best to avoid anything that isn’t a letter. This includes replacing letters with numbers, which make the name a lot easier for people to mistype.

The same goes for doubled letters – it’s asking for typos. Doubled letters are hard to read and even harder to type correctly. If mistakes happen often enough, you may end up with someone typosquatting and stealing your traffic.

5. Keep Your Domain Name Short

There are several reasons short domains work better. First, they’re easier to remember and faster to type. Therefore, they are more likely to support a positive UX.

This is especially important as more and more people are browsing the internet on mobile devices. A short domain name means fewer opportunities for mobile users to get blindsided by autocorrect.

Furthermore, an overly long URL is yet another way to scare off visitors. If you’re overcomplicating your domain with unnecessary keywords, your users might get suspicious.

6. Stay Unique and On Brand

A unique domain name can help your website stand out and potentially help you avoid legal trouble. It can also contribute to your marketing efforts. In fact, if your site represents a larger brand, you would be wise to consider your domain name as you’re creating the brand name itself.

If you’re a self-employed individual, you can still consider your body of work and your website as part of your personal brand. For instance, if you run a private therapy practice, an original yet branded domain name might include your full name and field. In this scenario, a strong URL might read something like: janesmithpsychology.com.

Another powerful way for businesses to reach a local audience is by including geolocation within the domain name (e.g., laautoshow.com).

7. Pick a Domain Name That’s Flexible

Your domain name is one area where you don’t want to put yourself into a box. While you should be specific enough to attract an audience, you don’t want to be so precise that there’s no room for your website to grow.

For example, “shutter.photography” might be perfect for a photography blog. However, if you decide to write about other art forms in the future, you’ll be stuck with an inaccurate domain name.

Therefore, it’s smart to consider how your site or business may expand over time. You’ll want to make this decision with a long-term vision.

8. Use a Domain Name Generator

Chances are you have brainstormed a list of potential domain names by now. You may have even thought of the ideal one. However, sometimes your perfect domain name might not be available.

Once again, there’s no need to panic. You can always get creative and slightly modify your domain. If you’re having trouble finding inspiration, you can use a domain name generator like Domain Wheel:

DomainWheel domain name generator

This tool prompts you to enter a few keywords and then provides you with an extensive list of possible domains. These options may include TLDs that you haven’t even heard of. For example, you might see .biz or .info.

Be wary of some suggestions, though, as they often contain hyphens or other elements that you should avoid. Even if you don’t find the right domain name with a generator, one of the recommended options may give you a new idea.

However, if you’re brimming with your own ideas, you may find https://instantdomainsearch.com/ useful as well.

9. Check the Domain History

You might have your sights set on a completely fresh domain name. However, there’s also a possibility that the domain you’d like to purchase had a previous owner.

It’s best to investigate the domain’s history as this could affect your site’s search engine rankings. There are a few tools you can use to check on past owners, including Wayback Machine and Whoxy:

Wayback Machine

This is useful information to know. For instance, you wouldn’t want to buy a domain name that was previously running an unethical business, as it might hurt your reputation.

10. Research Social Media Handles

If you have plans to engage with your visitors or customers, chances are you’ll want to create social media accounts that are linked to your domain name and website. Therefore, it’s wise to check your preferred social media sites to see if your domain name is available in handle form.

Alternatively, you can check to see if a variation of your domain name is available. This is a common practice.

If you’re not planning to use too many different social media networks, you can easily do this manually. However, if you want a bit of help, https://www.namecheckr.com/ is a great way to see all available social media handles at a glance.

This handy tool can provide you with useful information about trademarks. It can also help you manage dozens of social media accounts.

11. Don’t Miss Out on a Deal

The reality is that no matter how big or small your business is, you likely have a budget. What’s more, if you’re launching a small business or you’re self-employed, it’s probably pretty tight.

Domain prices can vary depending on how popular an option is perceived to be. In most cases, your chosen domain will qualify for a low introductory price. In other cases, your desired domain could be considered “Premium” and go for hundreds to tens of thousands of dollars.

If you think you’ve stumbled across a “premium” domain at a deep discount, don’t hesitate to act!

12. Protect Your Brand with Multiple Domains

Even if you manage to snag a coveted .com address, you might consider purchasing other TLD variations and setting up redirects. You can even go a step further and buy common misspellings of your domain name — that way, you’re not missing out on traffic lost due to “user error.”

You can apply this strategy to social media as well. Even if you don’t think you’ll use Twitter, you might want to grab a decent handle if one is available. That way, you’ll be ready if you ever decide to tweet, and you’ll prevent anyone else from taking that username.

Picking the Best Domain Registrar for Your Website

Once you’ve picked out a domain name, you’ll need to choose a domain registrar, which is the company where you’ll purchase it. When shopping around for a registrar, here are a few things to keep an eye on:

  • Domain transfers. Check out the registrar’s transfer policy. If it’s complicated or expensive, keep looking.
  • Pricing. Some companies offer lower prices for the first year and then increase them when it’s time for renewal. You may even be locked into a multi-year contract.
  • Expiration policy. If you forget to renew the lease, someone else can take it from you. Therefore, look for a registrar that offers automatic renewals and a grace period.
  • Domain privacy protection. As a website owner, you’re required to add your personal information to a public database. Domain privacy protection hides your primary contact information to help keep your identity secure.
  • Subdomains. You don’t have to register subdomains separately. However, you’ll want to ensure that your registrar makes it easy to add subdomains to your site.

There are plenty of registrars you can use. However, sometimes it makes sense to register your domain through your hosting provider.

How to Get a Free Domain With Your Web Hosting

Some web hosts offer a free domain name when you sign up for a hosting plan. You may have to pay for renewal at the end of the first year, but it’s not typically expensive. Additionally, you won’t have to worry about migrating your domain if you register it through your hosting provider.

At DreamHost, we offer a free domain name when you sign up for one of our Shared or DreamPress hosting plans. Once you’ve selected the right option for you, just click on Register a new domain.

shared hosting with existing domain

Then, you’ll be prompted to search for your desired domain name. Then, simply add your domain to your cart and complete the checkout process!

A Strategic Approach to Choosing the Perfect Domain Name

Your URL offers a chance to leave a good first impression. That’s why a strong domain name is essential for the success of your website. So, if you’re ready to land that perfect domain name, remember these handy tips and click below to start your search today.

Your Great Idea Starts with a Domain Name

Don’t let someone else register your URL. Search DreamHost’s 400+ TLDs to find the perfect fit for your website.

buy a domain name

The post How to Choose the Perfect Domain Name (12 Pro Tips) appeared first on Website Guides, Tips & Knowledge.


source https://www.dreamhost.com/blog/how-to-choose-the-right-domain-name/

Friday 13 May 2022

WordCamp Europe 2022: Welcome Back & What to Expect

When WordCamp Europe (WCEU) 2022 is held June 2 – 4 in Porto, Portugal, it will be a long time coming as it returns as an in-person event following two years in a virtual format during the peak of the COVID-19 pandemic. And the DreamHost team is eagerly anticipating an exciting and collaborative time!

About WordCamp Europe

WordCamp Europe 2022

Image Credit: WordCamp Europe

WordCamp was first organized in San Francisco by Matt Mullenweg in 2006. His idea took off, and, in the years since, 1,104 WordCamps have been held in 375 cities in 65 countries on six continents.

As stated on its website, the 10th annual “WordCamp Europe is an informal, community-organised gathering of WordPress enthusiasts – from casual users to Core developers – where we discuss all things WordPress, share ideas and get to know each other.”

A Full Schedule

The three-day convention boasts a full schedule of talks, hands-on sessions and workshops, and opportunities for networking. And since the WordPress topics of the programming are diverse and inclusive, there will be content suitable for all skill levels, knowledge, and experience. To make it easier for WCEU attendees to plot their participation, and because multiple talks and sessions will be occurring simultaneously, the event will be organized into tracks.

WordCamp conferences are casual, locally organized events held around the world, so each one is unique based on its volunteer organizers (who are users, developers, and enthusiasts), its speakers, and even its geographical location or community. With that said, however, programming in a variety of formats that attendees may typically experience, including at WCEU, can include:

  • Lectures and presentations
  • Q&As
  • Workshops
  • Ignite-style lightning presentations
  • Panels
  • Interviews
  • Meet-and-greets with representatives from sponsoring companies, on hand to answer questions and present product demos

For the Love of WordPress

WordCamp is, first and foremost, all about WordPress. Its topics can encompass anything from beginning plugin and theme development to advanced techniques and security. But if you’re a WordPress novice, no worries! All of the people at WordCamp, even the folks up on stage, were WordPress novices at one point or another. Don’t be too intimidated! Ask questions and open yourself up to admitting when you don’t know, and you’ll have a much better time at the event.

Ethos of Inclusivity

One of the core hallmarks of every conference, regardless of the organizers or location, is its inclusive, non-discriminatory ethos. That means users, developers, designers, and anyone who is interested in WordPress are welcomed wholeheartedly, regardless of experience or skill level – or lack thereof.

And because WordCamps have such a welcoming and inclusive philosophy with an emphasis on camaraderie and fun, they’re conducive to meeting and chatting with new people – and making new friends – from all walks of life and WordPress communities, sharing ideas, planning collaborations, learning, getting feedback on projects in progress, professional and job networking, and more.

Recent & Upcoming WordPress Updates

WordPress 5.9 & Full Site Editing

Two topics are sure to be the buzzworthy centers of conversation at WCEU and other WordCamps this year. First is WordPress 5.9, nicknamed “Josephine,” which was released on January 25. This version was a monumental leap forward, with hot new features – including full-site editing, global styles, and a new default block theme called Twenty Twenty-Two – that took the functionality and user-friendliness of the world’s largest and most popular open-source content management platform to a whole new level.

Other WordPress 5.9 Features

  • Navigation menu blocks
  • Refining editing flows and controls for block themes
  • WordPress Pattern Directory and Pattern Explorer
  • Revamped List View
  • Improved Gallery Block
  • Theme.json for child themes
  • And more

Looking Ahead to WordPress 6.0

Another big event is WordPress 6.0, which released Beta 1 on April 12 and will have its general release on May 24. Key features of this release will include editor refinement, pattern expansion, navigation block refinement, block exploration, and design tooling.

Since WordCamp Europe 2022 is organized by volunteers, that includes Contributors. Contributors are individuals of all WordPress skill and experience levels and areas of specialization hailing from 21 Make WordPress teams who attend WordCamp. Many of those teams are represented at each conference, including Europe 2022.

Get Tickets for WordCamp Europe 2022

Anyone who purchases a ticket to WordCamp Europe 2022 may also elect to separately register to attend the free Contributor Day, which is held one day before the main WCEU and is designated for contributing to WordPress. Event organizers stress that WordCamp Contributor Day is not a day reserved exclusively for gurus and individuals with advanced expertise. It’s a great chance for folks from all walks of life and levels of experience to pitch in and shape things like training, documentation, and even user testing.

For more information on the inclusive fun of being a Contributor, head over to the official WordCamp Europe Contributor Day page.

To purchase WordCamp Europe 2022 tickets and register, click here.

More Info:

The post WordCamp Europe 2022: Welcome Back & What to Expect appeared first on Website Guides, Tips & Knowledge.


source https://www.dreamhost.com/blog/wordcamp-europe-2022/

Wednesday 11 May 2022

The Ultimate Guide to WordPress User Roles

WordPress is a powerful, flexible Content Management System (CMS) that can be an excellent solution for collaboration. However, to make the most of the CMS, it’s important to understand how to navigate and leverage its user roles and permissions features.

WordPress user roles let you assign certain levels of access to people who are registered to your website. This can help you manage and control what tasks are possible and can ultimately help strengthen your site’s security and performance.

In this post, we’ll explain what WordPress user roles and permissions are. Then, we’ll provide you with advice for assigning them and cover some helpful troubleshooting tips and useful plugins to help you manage your users. Let’s get started!

An Introduction to WordPress User Roles and Permissions (And Why They’re Important)

WordPress user roles and permissions are two different but interdependent concepts. User roles determine what a user can and can’t do on your WordPress site, based on their user type. These limitations are generalized for anyone who carries a certain user role status.

Permissions, on the other hand, are more individualized. You can create custom permissions for specific users, and control exactly what they are allowed to do on your site. Moreover, you can give different users distinct permissions depending on their role.

With this double-layered system, you can ensure that each user only sees and accesses the features that are appropriate for them. Furthermore, you can create custom roles with unique capabilities, which is a great way to provide additional functionality for advanced users or clients who need certain abilities not available in the default roles.

Both user roles and permissions are set by the Administrator, which is typically the WordPress site owner. By default, there are six different user roles: Super Admin, Administrator, Editor, Author, Contributor, and Subscriber. Each role has its own set of capabilities, which we’ll discuss in more detail below.

User roles and permissions play an important role in ensuring that your WordPress website is secure and runs smoothly. By managing these settings, you can control who has access to what areas of your site, and what they can do there.

If someone has too many privileges, they can end up publishing low-quality content or changing settings that impact the functionality or appearance of your site. The good news is that when you implement user roles and capabilities, you can have peace of mind knowing that only trusted parties have full admin access.

An Overview of the Default User Roles in WordPress

Now that you know a bit about the importance of user roles, let’s take a closer look at the six default user roles you can choose from when managing your WordPress website. Keep in mind that as an Administrator, you have the ability to create new user roles and assign them to specific users on your site. You can also manage permissions for existing user roles.

Super Admin

The Super Admin is the highest level of user on a WordPress site. This user has complete control over the site, including the ability to add and delete users, install and activate plugins, manage themes, and more. Super Admins are typically only found on multisite installations of WordPress.

Super Admins can manage every setting and feature for each site within a multi-site network. They can add and delete other Administrators, create new sites, and control content across each site.

Administrator

Administrators have complete control over a single WordPress site. They can add and delete users, install and activate plugins, manage themes, etc. Usually, they are the site owners or main authors:


WordPress Dashboard

This powerful role has complete access to content, features, and site settings. They can update the CMS as well as plugins and themes. The Admin is also responsible for assigning user roles and capabilities to other registered users. Ideally, you should only have one Administrator per website.

Editor

Editors can manage and publish posts and pages, as well as moderate comments. They can also schedule content and edit categories. However, they cannot install or activate plugins, or manage themes:

WordPress Dashboard

In a nutshell, an editor can modify content created by themselves and other users with a lower status, such as Authors and Contributors. They can’t change content for users with permissions higher than theirs, such as an Administrator. Typically, this role is reserved for content managers or similar titles.

Author

As you may have guessed, authors can write and publish their own posts and pages. They can also delete their own posts.  However, they cannot publish, edit, or delete anyone else’s posts. Additionally, authors cannot add or delete users, install or activate plugins, or manage themes:

WordPress Dashboard

Unlike Contributors, Authors have access to the WordPress Media Library. While they can edit reader comments, they can only do so on their own posts.

Contributor

WordPress Contributors can write and submit their own posts for review by an Administrator or Editor. Once a post is published, they cannot edit it. Furthermore, contributors cannot add or delete users, install or activate plugins, or manage themes.

Contributors are usually roles assigned to freelance writers or guest bloggers. This role is also commonly used for new hires whose content needs editing or reviewing before it can be published on the site.

Once submitted for review, only the Editor or Administrator can publish their posts. Contributors cannot access the Media Library.

Subscriber

Subscribers can manage their own profiles and read posts and pages on a WordPress site. They cannot write or publish their own posts or pages, nor can they add or delete users, install or activate plugins, or manage themes:

WordPress User Profile Personal Options screen

Subscribers have the fewest permissions and capabilities of all the WordPress roles. It is the default user role set for new registrations.

There are a few additional user role options available on some WordPress sites. For example, if you’re running a WooCommerce site, Shop Managers have similar capabilities to Administrators, but with some added features specifically for managing WooCommerce stores. For instance, they can add and delete products, manage orders, and more.

How to Manage User Roles in WordPress 

Now that you have a better sense of what each user role can do, let’s get into how to manage them. Below, you’ll find instructions for how to add, delete, and update users and user roles in WordPress.

1. Creating and Deleting Users in WordPress

Before you assign a user role in WordPress, you first need to have a user to attach it to. To add a new user in WordPress, you can navigate to Users > Add New, then fill in the information. This will include details such as username, email, and password:

WordPress add new User

Note that, by default, the Role is automatically set to Subscriber. When you’re done, you can click on the Add New User button at the bottom of the screen.

Alternatively, you can create a new user through your database. To do this, you can navigate to phpMyAdmin from your cPanel dashboard (or whichever system your host uses), then select your WordPress database.

Next, locate the wp_users table (name may vary depending on your database prefix):

phpMyAdmin user database

Once you click on the users table, you can select the Insert tab:

phpMyAdmin user database

On this screen, you can enter the following credentials:

  • user_login: The username you want to assign the user.
  • user_pass: The password for the user’s account; you can select MD5 in the Function drop-down.
  • user_email: The email address you want to use.
  • user_registered: The date and time for when the user will be registered.
  • user_status: You can set this value to “0”.

When you’re done filling out the details, you can click on the Go button at the bottom of the screen. Next, navigate back to your WordPress database, then select the wp_usermeta table, followed by the Insert tab:

phpMyAdmin user database

You can insert the following details in the form:

  • unmeta_id: This is autogenerated, so you can leave it blank.
  • User_id: The id of the user you created.
  • Meta_key: You can set this as “wp_capabilities”.
  • meta_value: Add this as “a:1:{s:13:”administrator”;b:1;}”

Finally, you can add another row. Then, input the following information:

  • Unmeta_id: You can leave this blank.
  • User_id: The id of the user you created.
  • Meta_key: You can make this “wp_user_level”.
  • Meta_value: You can put this as “10”.

When you’re finished, you can click on the Go button to save your changes.

To find a full list of your users, you can go to Users > All Users from your admin interface:

WordPress Users screen

To delete a user from your WordPress dashboard, you can hover your mouse over the name of the user, then click on the Delete link. That’s it!

You can delete a user from your WordPress database as well. To do so, log into phpMyAdmin, then navigate to the wp_users table:

phpMyAdmin user database

Next to each user, you’ll find an Edit, Copy, and Delete option. Simply select Delete to remove the user.

Skip the line and get tips right in your inbox

Click below to sign up for more how-to's and tutorials just like this one, delivered to your inbox.

marketing tips

2. Adding a User Role 

There are a few ways to create a new user role in WordPress. The easiest way is to go through the admin interface. As you may have noticed in the last section, you can assign a user role at the time of creating a new user.

To assign or update a role to an existing user, you can navigate to User from your WordPress dashboard, then select the Edit link under the user name:

WordPress User Editor

At the bottom of the screen, you can select an option from the Role drop-down menu:

WordPress select User Role Administrator

When you’re done, you can simply select the Add New User or Update User button at the bottom of the screen.

Another way you can add a new user role in WordPress is by manually editing your code. For instance, you can add a custom user role, such as Moderator, with the add_role() function.

To do so, you can add the following code to your theme’s functions.php file:

add_role( 'new_user_role', __( 'Moderator' ), array( 'read' => true, 'edit_posts' => true, 'delete_posts' => true ) );

When you’re done, be sure to update the file to save your changes. It’s as simple as that!

3. Deleting a User Role in WordPress

If you want to delete a user role in WordPress so that it is no longer an option, you can do so by editing your theme’s files. Keep in mind that modifying theme files can be risky, so it’s best to create a backup of your site before you continue on.

To get started, go to Appearance > Theme File Editor in your WordPress dashboard. Next, locate and open the Theme Functions file:

WordPress Theme Editor

In this file, you can add one (or all) of the following code snippets, depending on which user role(s) you want to remove:

remove_role( 'subscriber' );
remove_role( 'editor' );
remove_role( 'contributor' );
remove_role( 'author' );

When you’re done, select the Update File to save your changes.

4. Updating Existing User Roles and Permissions

If you want to update an existing user’s permissions, you can select the Edit link from the User list. You can then scroll to the bottom of the screen and modify the role by selecting a new one from the User Role drop-down menu. Remember to save your changes.

Another option is to use a plugin, such as User Role Editor:

WordPress User Role editor plugin

This free version of this tool lets you easily change user roles and capabilities. Once installed and activated on your site, you can browse to Users > User Role Editor:

WordPress User Role Editor

Next, you can select the checkboxes of the capabilities you want to allow the selected role to have. When you’re done, click on the Update button at the bottom of the screen to save your changes.

The plugin also lets you add new roles or delete ones that you aren’t using. It even lets you assign capabilities on a per-user basis.

Tips for Picking the Right User Roles and Permissions

As a general rule of thumb, it’s a smart idea to set the user role as low as possible. In other words, you want to give users as few permissions as possible that won’t interfere with or impact their ability to do their assigned tasks.

Selecting the roles for your users should be based on the level of access that’s necessary.There are also specific roles for certain use cases.

For example, if you have a full-time writer for your WordPress website, you can assign them the Author role. They’ll be able to write, draft, and publish posts on your site, as well as access the Media Library. However, they won’t be able to access, edit, or delete other pages and posts. Therefore, if this is a necessary capability, you may want to assign them the Editor role.

On the other hand, if you have a freelance writer or a new hire that you don’t want to give publishing privileges to, you can make them a Contributor. This will let them write pages and posts, but they won’t be able to publish them. They can only submit it to the Editor (or Admin) for review.

Consider assigning the Contributor role to anyone that doesn’t work in-house. We also recommend having as few Administrators as possible. This can help safeguard your site and prevent errors.

If you have a multi-site installation, it’s a good idea to have one Super Admin. That way, they can handle any security or site issues that arise on any of the sites without interference or confusion from other admins. However, you could assign a single Administrator or Editor for each of the sites within your multisite network.

Troubleshooting WordPress User Role and Permission Issues

WordPress user roles and permissions are relatively straightforward and easy to use. However, sometimes issues arise, which can make it difficult for users with certain roles or permissions to carry out their tasks properly.

One of the most common is being locked out of your WordPress admin and encountering a page with the message “Sorry, you are not allowed to access this page”. This error can be frustrating because it can be challenging to nail down the cause of it.

However, if you see this message it’s likely because there’s a permission setting that is preventing you from accessing a certain area for security purposes. If you’re an Administrator or should have access, there are a few potential solutions you can try out.

If this issue occurred directly after a WordPress update, restore the previous version of your site. Next, you can try disabling all of your plugins and re-enabling them one-by-one. You can also try activating a default WordPress theme. These steps can help you narrow down the source of the notification.

Alternatively, you can check to ensure that you have the necessary Administrator privileges. To do this, navigate to phpMyAdmin then to the wp_users table.

Next, locate your username and make a note of your ID. Browse to the wp_usermeta table and locate your metauser ID:

phpMyAdmin user database

Under the Metavalue column, it should read as the following:

A:1:{s:13:"administrator";s:1:"1";}

If there is something else in this field, we recommend editing it to replace it with the above. Simply save your changes when you’re done.

Useful WordPress User Role and Permissions Plugins

At this point, you likely understand the various settings and options you have for changing user roles and permissions in WordPress. However, to make the process even easier, you might consider using a plugin.

We already discussed the User Role Editor plugin, but there are a handful of additional options to choose from. Below, we’ll take a look at some of the most popular ones and explain what you can use them for.

Members

Members is a plugin that lets you manage the permissions of registered users:

MemberPress

It’s beginner-friendly, boasting an intuitive interface that is easy to navigate. You can use it to create new roles and add permissions to each one. You can also clone user roles and customize the permissions for blog content.

PublishPress Capabilities

PublishPress Capabilities is another useful tool that can help you gain more control over your user roles:

PublishPress

It lets you add new roles, clone existing ones, and add individual permissions for each role. You can also backup, migrate, and restore the permissions. It can be used for single websites or on multisite networks. The plugin also integrates seamlessly with WooCommerce, which is helpful for store and product management.

WPFront User Role Editor

WPFront User Role Editor is a popular plugin you can use for managing user roles in WordPress:

WPFront

You can use it to create, delete, and modify user permissions. You can add new names for roles and clone existing ones. It also lets you assign multiple roles to users.

Take Control of User Role Management on Your WordPress Site

If you’re looking to manage WordPress user roles and permissions, it’s important to understand the different capabilities associated with each role. With this information, you can better manage your site and ensure that users have the appropriate level of access to your content and features.

Whether you’re managing a simple blog or creating a complex website with multiple authors, user permissions are an important part of WordPress. With the right set of permissions in place, you can ensure that your site remains secure and runs smoothly.

Are you interested in learning about more ways you can make managing your WordPress site as simple as possible? Check out our Managed WordPress Hosting solutions to learn about DreamPress!

Do More with DreamPress

DreamPress' automatic updates, caching, and strong security defenses take server management off your hands so you can focus on content creation.

Managed WordPress Hosting - DreamPress

The post The Ultimate Guide to WordPress User Roles appeared first on Website Guides, Tips & Knowledge.


source https://www.dreamhost.com/blog/wordpress-user-roles/

Creating and Mastering GA4 Explorations

In the switch from Universal Analytics (UA) to Google Analytics 4 (GA4) — which will go fully into effect July 2023 — a lot of things have...