Wednesday 29 September 2021

How to Fix the Missed Scheduled Post Error in WordPress (2 Methods)

Scheduling your posts in advance on your WordPress site can be a lifesaver. Writing multiple blog posts and scheduling them out should give you peace of mind knowing they’ll be published on time. However, sometimes this feature doesn’t work as expected, and you might end up with the missed scheduled post error.

Fortunately, there are a few ways to troubleshoot this common issue. Whether you prefer to use a plugin or get under the hood yourself, you should be able to fix the missed scheduled post error and get back to business in no time.

In this article, we’ll explain what the missed scheduled post error is and look at a few possible causes. Then we’ll share three easy ways to troubleshoot the error and two simple methods for fixing it. Let’s get started!

What the Missed Scheduled Post Error Is (And What Causes It)

When you schedule a post in advance, WordPress uses a “cron job” to publish it. “Cron” is a software utility that schedules tasks, while a cron job is the task itself. Typically, you’ll see cron used to handle repetitive tasks.

Since WordPress is expected to run in a variety of environments, it can’t rely on traditional cron, which is intended to work in Unix-like operating systems. Instead, WordPress has WP-cron, which can simulate a system cron. When something goes wrong with the cron job publishing your scheduled posts, you’ll see the missed schedule error.

There are a few potential causes of this error. One possible scenario is that your server or a plugin could be affecting your cron jobs. Common culprits include caching plugins. While these plugins are valuable for improving your site’s performance, they can also interfere with WP-cron.

Another cause stems from the fact that WordPress uses simulated cron jobs. These simulations require someone to visit your website at the same time that the task is supposed to be run. If no one lands on your website at the right time, your post won’t be published.

Obviously, if your site has experienced some downtime, then no one can visit it. This could prevent a cron job from running as expected.

Skip the Stress

Avoid troubleshooting when you sign up for DreamPress. Our friendly WordPress experts are available 24/7 to help solve website problems — big or small.

How to Troubleshoot the Missed Scheduled Post Error (3 Ways)

If you’ve encountered the missed scheduled post error, there are a few simple ways to go about troubleshooting it. Let’s take a closer look at them.

1. Check Your Timezone Settings

If the timezone you’ve set in WordPress doesn’t match the timezone you use for publishing posts, it’s unlikely that these posts will go live as expected. Fortunately, there is a simple fix for this timezone issue, so it’s a good place to start.

To check your timezone settings, go to your admin dashboard and navigate to Settings > General. Scroll down, and you should see a dropdown menu where you can select your timezone.

Adjusting the timezone in General Settings.

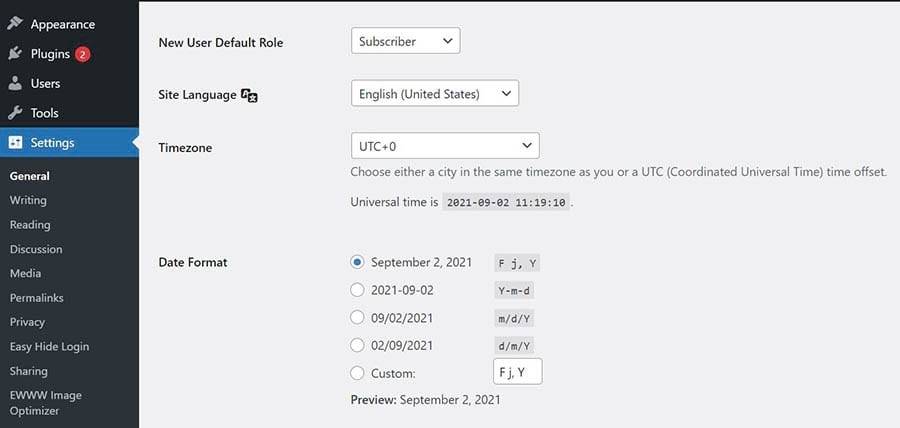
Using the dropdown, select the timezone you want to use for your WordPress website. Then, click on the Save Changes button, and you’re all set!

2. Clear the WordPress Cache

As we mentioned earlier, occasionally a WordPress plugin can interfere with the cache being cleared. So while caching can help to speed up your website, sometimes it can make it difficult for changes to take effect the way they should. Fortunately, clearing the WordPress cache manually is a simple process.

The first step is to clear your browser’s cache. The steps you’ll need to follow will differ depending on which browser you use. If you’re still not seeing your scheduled posts, try clearing the WordPress cache as well.

If you’re using a caching plugin, you’ll need to clear your cache through it. For example, if you’re using the WP Super Cache, go to Settings > WP Super Cache and select the Easy tab. Next, click on the Delete Cache button.

How to delete the cache using WP Super Cache.

Even if you use a different caching plugin, chances are the steps will be similar. Most of these plugins feature one-click cache deletion.

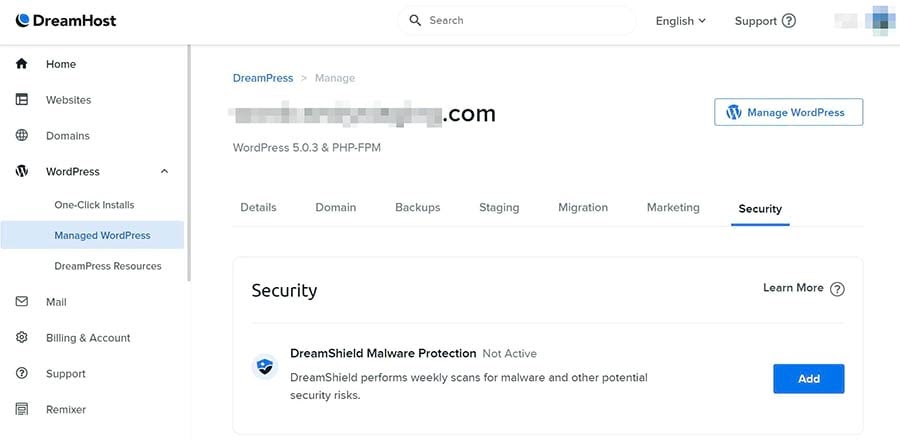
Managed hosting plans tend to work a little differently. If you’re a DreamPress customer, you should already have the Proxy Cache Purge plugin installed to handle this for you. However, you can also purge the cache manually.

To clear the entire cache, you just need to hover over the Cache icon in your dashboard menu and select Purge Cache (All Pages).

Purging all pages using the Proxy Cache Purge plugin.

You can also purge the cache for an individual post or page. To do this, you’ll need to navigate to the desired post either by entering the URL or by locating it in your dashboard and clicking on the View option.

Once again, you’ll need to hover over the Cache icon in your dashboard menu, but this time you’ll have the option to Purge Cache (This Page).

Purging a single page using the Proxy Cache Purge plugin.

Don’t worry if your scheduled posts still aren’t showing up. There is one more troubleshooting method to try.

3. Increase the WordPress Memory Limit

Finally, it’s possible that your WordPress site needs more memory than what is currently allocated. An easy way to increase the memory limit is by editing the wp-config.php file.

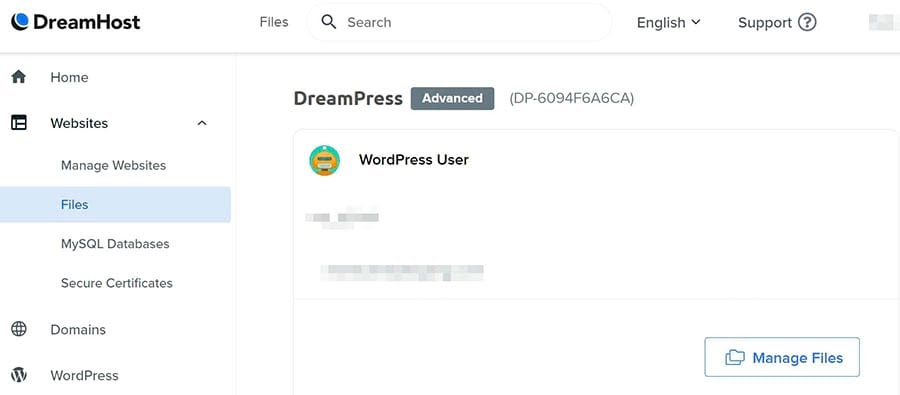
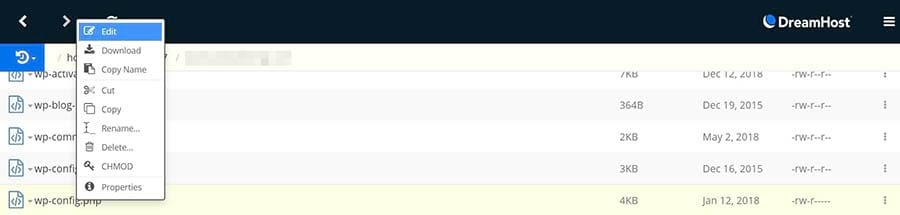
To access this file, you’ll need to use a Secure File Transfer Protocol (SFTP) client, such as FileZilla. Alternatively, you can use the file manager in your hosting account.

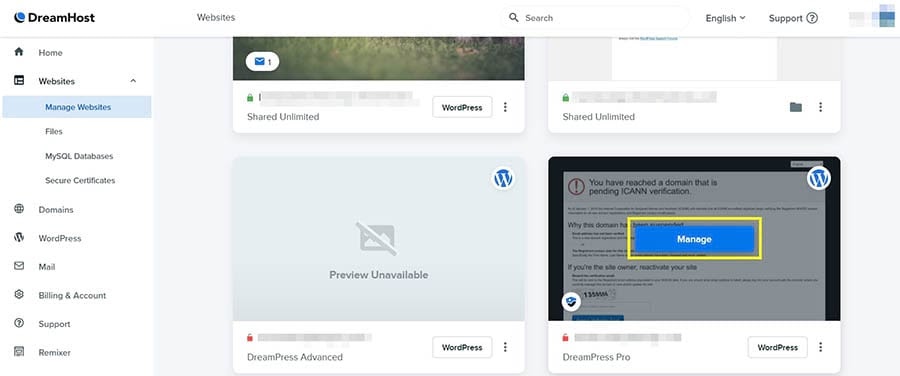
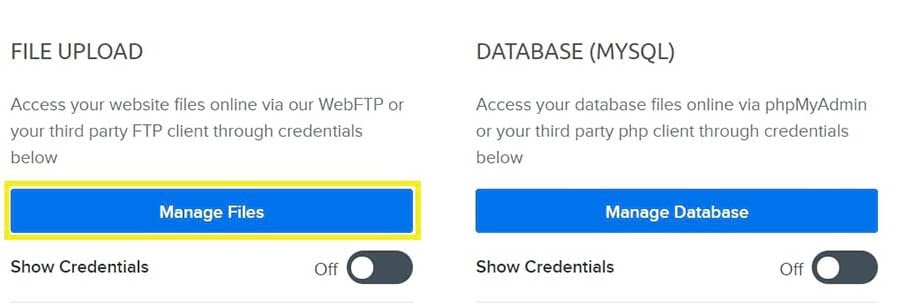
If you have a DreamHost account, start by navigating to Websites > Files in the sidebar. Next, locate your domain and click on the Manage Files button.

Accessing the file manager through your DreamPress hosting account.

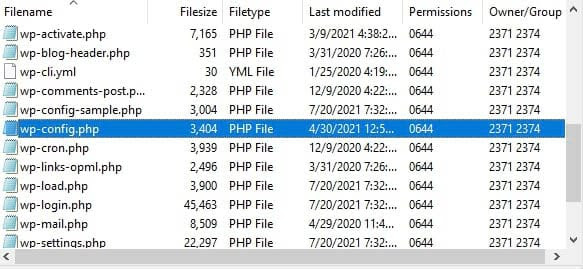
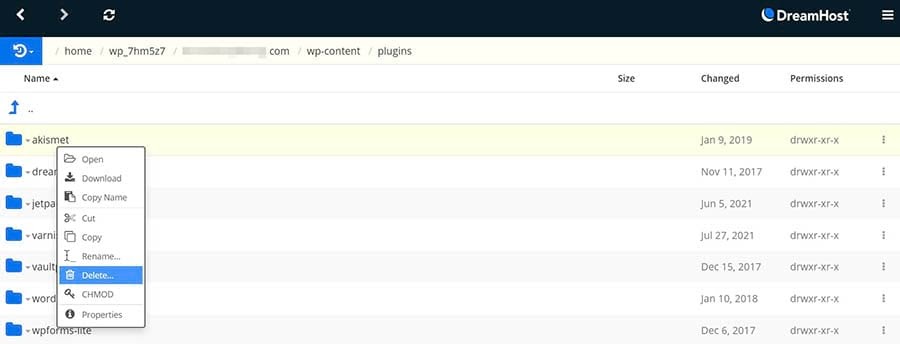
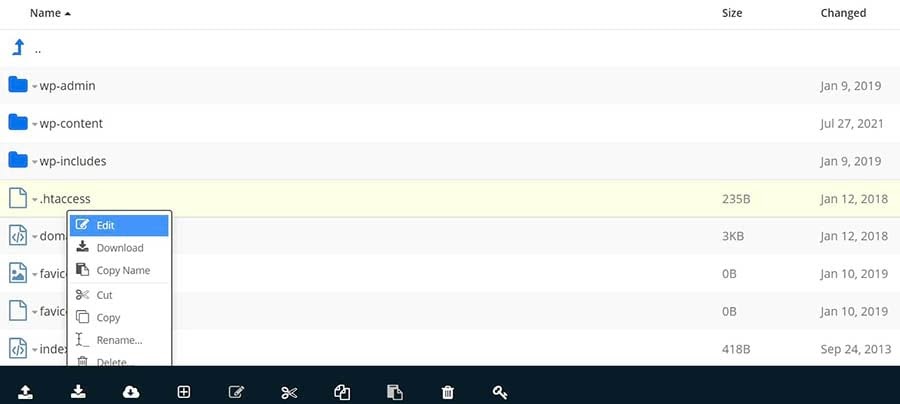
This will take you to the file manager. To access your site’s directory, you’ll need to open the folder labeled with your domain name. Inside it, you should find the wp-config.php file.

If you’re using FileZilla, the first step is to connect to your website. You may need to obtain your credentials from your web host if this is your first time using it. Once connected, locate the wp-config.php file.

Locating the wp-config.php file using FileZilla.

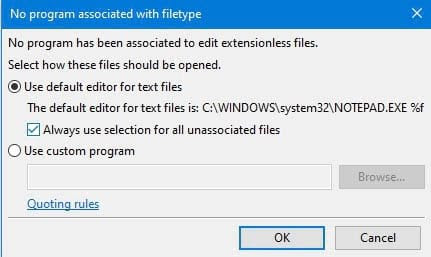
Next, right-click on this file to download it. Now you can use a text editor to open and edit the file. Add the following line of code anywhere before the line that reads /* That’s all, stop editing! Happy blogging. */:

define( 'WP_MEMORY_LIMIT', 'XXXM' );

You’ll want to replace the “XXX” with the amount of memory you’d like allocated to PHP, such as “96MB”. Remember to save your file before closing it. You can then use FileZilla to re-upload your updated wp-config.php file.

How to Fix the WordPress Missed Scheduled Post Error in WordPress (2 Methods)

If none of the above troubleshooting methods worked or if the error keeps happening, you might want to try a more advanced fix. Let’s look at two effective ways to resolve the missed scheduled post issue.

1. Use a Plugin

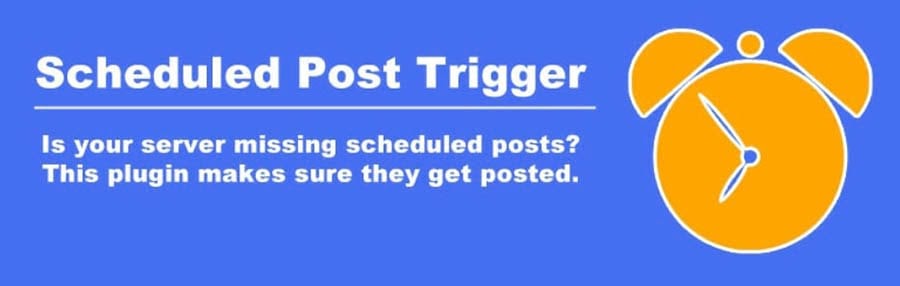
Scheduled Post Trigger is a free plugin that you can use to ensure that your cron job runs properly. It works by checking if any scheduled posts have been missed each time a visitor lands on your website.

The Scheduled Post Trigger plugin.

When it comes to plugins, setup doesn’t get much easier than this. Simply install and activate the plugin, and you’re ready to go.

However, it’s best not to rely on this plugin for a permanent solution. Like with WP-cron, caching plugins can interfere with the Scheduled Post Trigger. If you experience any compatibility issues with this plugin, you might want to troubleshoot by disabling your other plugins one at a time to find the culprit.

2. Manage Cron Jobs Directly Through Your Server

Another option is to manage cron jobs directly through your server. This takes a couple of steps, but we’ll walk you through them.

Step 1: Disable WordPress’ Crons

The first step is to disable WordPress’ default crons. Otherwise, any new cron jobs you create may not function properly.

To do this, you’ll once again need to access your wp-config.php file via SFTP or the file manager in your hosting account. This time, you can add this line of code to stop WordPress’ crons. You can add it anywhere above the /* That’s all, stop editing! Happy blogging. */ comment:

define(‘DISABLE_WP_CRON’,true);

Finally, save your changes. You can then re-upload your wp-config.php file and move on to adding your own cron job.

Step 2: Add a New Cron Job

Start at the DreamHost panel. Log in to your hosting account, then go to More > Cron Jobs. Click on the Add New Cron Job button.

Adding a new cron job from the DreamHost panel.

From here, you can fill in the required fields to set up your custom cron job. Having some knowledge of UNIX commands will be helpful to do this, but we’ll show you the basics that should get the job done.

Adding a cron job manually.

First, choose a User. It’ll need to be a shell user since they’re the only ones that can run cron jobs. You can also add a title to help you remember this job, such as Scheduled Post Trigger.

Next, you can add an email to send the output to. If you don’t need an alert every time your site checks for scheduled posts – which you probably don’t – simply leave it blank.

Now you’ll need to enter the command. First, take a look at this sample command from Zero Point Development:

/usr/bin/php -q /home/zpd/public_html/wp-cron.php

You can copy and paste the first part (/usr/bin/php -q) as is. However, the second part will take some customizing. You’ll need to write your own unique path to the wp-cron.php file. For example, the following code represents DreamHost’s server standard:

/usr/bin/php -q /home/username/domainname/wp-cron.php

If you’re not sure what that looks like, check out our support article on creating cron jobs. You can also reach out to our support team if you need further assistance.

Once you’ve set up your cron job, you can schedule when it’ll run. We recommend somewhere around five minutes. Then, click on the Add button. That’s it! You can always return to the Crontab if you need to troubleshoot your cron job in the future.

Have Another Error? We’ve Got a WordPress Tutorial for That

Do you want to learn how to resolve other technical problems on your site? We’ve put together a number of guides to help you troubleshoot every common WordPress error:

And if you’re looking for more information and best practices for running a WordPress site, check out our WordPress Tutorials section. This is a collection of expert-written guides designed to help you navigate the WordPress dashboard like a pro.

Take Your WordPress Website to the Next Level

Whether you need help navigating the WordPress dashboard, fixing incorrect database credentials, or finding the plugins folder, we can help! Subscribe to our monthly digest so you never miss an article.

WP Scheduled Post Made Easy

The WordPress missed scheduled post error typically occurs when something goes wrong with the cron job that publishes your content. Starting out with a few basic troubleshooting methods, such as checking timezone settings or clearing the WordPress cache, may be enough to get your posts published reliably.

In this post, we’ve also looked at two ways to resolve the WordPress missed schedule error:

  1. Use a plugin such as Scheduled Post Trigger to ensure that your cron jobs run properly.
  2. Manage cron jobs directly through your server.

Thanks to DreamHost’s intuitive, user-friendly panel, managing your cron jobs and other maintenance tasks is a straightforward process. Check out our WordPress-optimized hosting plans to get started!

The post How to Fix the Missed Scheduled Post Error in WordPress (2 Methods) appeared first on Website Guides, Tips & Knowledge.


source https://www.dreamhost.com/blog/how-to-fix-wordpress-missed-scheduled-post-error/

Wednesday 22 September 2021

The Complete Website Maintenance Checklist (20 Things You NEED to Do This Year)

Your site may be running smoothly now. However, there’s no guarantee that it will perform at this optimal level forever.

Similar to a vehicle, your website requires ongoing work to keep it in tip-top condition. That’s why we’ve created this complete website maintenance checklist for your WordPress site.

In this post, we’ll discuss why maintenance is the key to a high-performing, secure, and profitable online presence. We’ll then share a whopping 20 maintenance tasks that you need to do this year. We’ve organized the tasks based on how often you need to complete them to keep your site spick and span:

Let’s get started!

Why Site Maintenance Matters

If you neglect important maintenance tasks, then the consequences can be disastrous. During the first six months of 2021, the Wordfence Web Application Firewall blocked over 4 billion malicious requests. With people actively trying to break into WordPress websites, even a small lapse in security could put your site at serious risk.

WordPress maintenance isn’t just about spotting the big issues, though.

Over time, small problems can gradually diminish your site’s performance and search engine rankings. By pinpointing and addressing these minor errors early, you can reduce the negative impact they can have on your site.

Maintenance also involves evaluating various aspects of your site. This puts you in a strong position to identify opportunities to optimize your content and drive more conversions. In this way, you can keep your site ahead of the pack.

Get Your Site Up to Date

Technology is constantly moving forward and keeping up can be a chore. We'll upgrade your outdated, insecure software to get you back on track.

Weekly Tasks

Let’s start with regular maintenance tasks. Here are five things we recommend you perform every single week.

1. Review Your Metrics

Most successful websites record a range of data. This includes tracking how visitors behave, your best traffic sources, and the content that drives the most conversions.

By regularly analyzing your metrics, you can pinpoint problems that need to be addressed. Here, speed is everything. To remain competitive, it helps to review this data weekly.

The Google Analytics dashboard.

When viewed in isolation, you may struggle to properly evaluate your performance. If this is the case, you might also want to review your competitor’s metrics.

2. Back Up Your Site

Creating regular backups is one of the most important items on your to-do list. If you fall behind, then you risk losing all of your recent work — or even your entire website.

While you can create backups manually, some hosting providers can perform this vital maintenance task for you. For example, at DreamHost, we offer automated daily backups.

If you need to back up on-demand, you can also create a copy of your site with a single click. We store all of your backups in a central location and offer easy one-click restore for added convenience.

3. Moderate Comments

A lively comment section encourages visitors to interact with your site. However, comment sections can have a dark side. Attackers may try to trick you into publishing malicious content in the form of comment spam.

Some comments may also contain irrelevant or offensive content. This can reflect poorly on your website. For this reason, you may want to use a comment moderation plugin such as Akismet Anti-Spam.

The Akismet Anti-Spam plugin.

You can also hold all submissions in an approval queue, using WordPress’ default settings. Visitors will expect their comments to appear on your site within a reasonable timeframe. If you withhold comments for review, it’s smart to check this queue at least once per week.

4. Update Your Themes and Plugins

According to research, 86% of hacked WordPress websites contain an outdated plugin or theme or even an outdated version of WordPress. This makes sense, as updates often contain fixes for known vulnerabilities or new security features.

To keep the bad guys out, it’s smart to regularly check the WordPress dashboard for any available updates.

The WordPress updates dashboard.

While we’re including this task in our maintenance checklist, you may want to consider enabling auto-updates for your themes and plugins for added security. Assuming that you’re running WordPress 5.6 or higher, you can also enable auto-updates for WordPress core in the Dashboard > Updates menu.

5. Scan for Malware

WordPress has a good reputation as a secure platform, but no software is perfect. To keep your site in tip-top shape, it’s important to check for malware. Our DreamShield add-on can automatically scan your site for malicious code on a weekly basis.

Activating the DreamShield add-on.

If DreamShield detects an issue, it’ll notify you via the DreamHost panel and via email. This email will contain step-by-step instructions that show you how to resolve this problem and restore your site to optimal health.

Protect Your Website with DreamShield

For just $3/month, our premium security add-on scans your site weekly to ensure it is free of malicious code.

Monthly Tasks

By monitoring your site’s speed and search engine performance, you can stay one step ahead of the competition. With that in mind, here’s your monthly website maintenance checklist.

6. Test Your Site’s Speed

Your site’s performance has a huge impact on its success. Studies suggest that 40% of people abandon a site that takes longer than three seconds to load. Even if visitors do stick around, a sluggish website is unlikely to impress potential customers.

Page speed can also impact your SEO, particularly with the launch of the Core Web Vitals project.

You can test your site’s speed using a tool such as Google PageSpeed Insights or GTmetrix.

The GTmetrix performance monitoring tool.

If you’re concerned about your Core Web Vitals performance, Google has also created a dedicated reporting tool. This evaluates your site against the specific Core Web Vitals metrics.

7. Create New Content

Regularly publishing interesting, relevant content is a tried-and-tested way to convert one-off visitors into loyal repeat customers. Content can also position you as an expert in your industry, which is great for conversions.

It isn’t just people who read your posts and pages. Search engines will also use this content to understand what your site is about. So by regularly publishing materials such as blog posts and articles, you can maximize your chances of appearing in relevant search engine results.

To ensure that you’re winning the Search Engine Optimization (SEO) game, you may want to consider partnering with an experienced SEO team. Our experts can create and publish a stream of five-star content tailormade to support your keyword strategy.

8. Improve Your Site’s SEO

With 40–60 billion searches happening on Google in the U.S. every single month, SEO is one maintenance task that you can’t afford to overlook. As an established site, chances are you’ve already identified the keywords that you want to rank for. However, keyword popularity can change over time, so it helps to check whether you need to adjust your approach.

You can view the current search volume using a tool such as Semrush’s Keyword Overview or Keyword Magic tools. We’re so confident that you’ll love using Semrush, we’ve partnered with them to give you a 14-day pro trial for free. [f]

Semrush & DreamHost Start your free 14-day trial

Once you’ve made any necessary changes to your keyword strategy, you’ll need to review every part of your site to ensure that it’s helping you rank for those terms. That’s no easy feat!

To help you out, we’ve created the DreamHost SEO Toolkit. With over 100 automated checks and verifications, you can use this add-on to create a personalized SEO plan. It can also help you implement your SEO strategy via powerful on-page optimization tools. You can add SEO Toolkit to your hosting plan for just $4.99/mo per site.

Quarterly Tasks

Let’s take a look at some website elements that are too often overlooked. Here are seven tasks to perform every quarter.

9. Change Your Passwords

A strong, complex password is essential for preventing unauthorized access to your website. When creating your password, it’s essential that you follow all the latest best practices, such as using two-factor authentication.

Even if you’re following the rules, it’s still smart to change your password every quarter. Then, even if your password does get compromised, it will minimize the time the hacker remains inside your hacked account.

Hacked Site? We'll Fix It Fast

With our Hacked Site Repair service, we'll remove any malicious code and restore your website so it's back up and running fast.

10. Check and Fix Broken Links

Broken links can occur for many reasons. For example, you might delete a page or implement a redirect incorrectly.

They may be common, but these URLs are disastrous for the User Experience (UX) and your SEO. When search engine bots encounter a broken URL, they’ll crawl that link to verify that it’s broken. This wastes precious crawl budget.

You can scan for broken URLs using tools such as Semrush.

Semrush’s Site Audit feature.

Semrush will scan your site and display any broken URLs in the Crawled pages section.

Sometimes, you may be able to fix a broken link by manually adjusting the URL. Alternatively, you can use a plugin such as Redirection.

11. Delete Unnecessary Plugins and Themes

Every theme or plugin adds code to your website, which is a potential loophole for hackers to exploit. In fact, themes and plugins account for 96% of WordPress vulnerabilities.

It’s a good idea to regularly take stock of the themes and plugins installed on your site and delete any you no longer require.

You may be tempted to simply disable the software in question, just in case you need to reactivate it at a later date. However, hackers may still be able to access deactivated code, so deletion is always the safest option.

The WordPress plugin management page.

You can further reduce your attack surface by removing any images, videos, or audio files that you no longer require. To achieve this, connect to your site using a Secure File Transfer Protocol (SFTP) client, then head to the wp-content directory to locate and delete those unnecessary files.

12. Optimize Your Database

WordPress stores all of your data and content in a database. The larger your database, the longer it will take the server to retrieve information from your tables.

By optimizing your database, you can reduce the server load and boost your page load times. You can optimize your database using phpMyAdmin. DreamHost customers can access this tool via their hosting account.

Logging into phpMyAdmin through your DreamHost panel.

In phpMyAdmin, navigate to Databases. You can then select the database that you want to optimize.

13. Test Your Site’s Forms

Many websites use forms to capture leads and drive conversions. Some forms also deliver core functionality, including login forms.

An example of a login form.

Since they’re so important, it’s wise to check that your forms are functioning correctly. We recommend reviewing the entire submission process, including ensuring that you’re logging user input correctly.

14. Test Your Checkout Process

If you accept payments via your website, then the checkout process is at the heart of your business. If there’s an issue with this process, then you could be missing out on countless sales. In the worst-case scenario, your system may be completely broken, which will bring your revenue to zero.

With this in mind, we recommend verifying that your checkout is working as expected. Most payment solutions have a dedicated testing mode, including the popular WooCommerce platform.

During testing, it’s smart to look for any opportunities to improve the purchasing process. A complex payment process can prevent customers from crossing that finish line. In fact, 34% of shoppers will abandon their carts if they’re forced to create an account.

If you can streamline the payment process as part of your review, it may do wonders for your bottom line.

15. Check Your Social Media Links

Social media is a powerful tool for reaching a wider audience and retaining your existing one. By frequently posting across social platforms, you can keep your company at the forefront of your followers’ minds and ensure that they remain engaged over the long term. Many websites feature prominent social media buttons, including links to follow your accounts and share your content.

Social sharing buttons on the DreamHost blog.

However, when dealing with third-party tools, there’s always a chance they may change how they process your requests. They may even implement technological changes that affect your site’s social content.

If your social URLs are broken, then you could be missing out on countless followers and shares. Therefore, it’s important to check them once in a while to make sure that they work.

You’re Cordially Invited

Join DreamHost’s Facebook group to connect with like-minded website owners and get advice from peers and experts alike!

Annual Tasks

You don’t have to perform these tasks multiple times a year. However, we recommend setting aside the time to perform them annually.

16. Schedule User Testing

This is where you evaluate how intuitive your website is by testing it on real-life users. Chances are you performed at least one round of usability testing when you first designed your website.

However, the way people interact with websites has a tendency to evolve over time. New technical innovations, devices, or browser updates can dramatically change how your typical internet user interacts with your website.

To ensure that you continue to provide a good experience, we recommend scheduling annual usability testing.

17. Review Your Domain and Hosting Renewals

Choosing a domain name is one of the most important decisions you can make. A good domain will become an integral part of your branding.

Now, imagine losing this essential part of your online identity. If you fall behind on your renewals, then you might try to access your site one day, only to discover that your domain has expired. Therefore, it’s smart to check your domain and hosting renewal status.

Even if you activate auto-renewals, we still recommend manually verifying that everything is set up correctly, particularly your payment information. If your credit card has expired, the renewal will fail, and you may lose access to your domain or web hosting.

18. Update Your Header, Footer, and Legal Policies

Your header and footer are prime digital real estate. Typically, you’ll use these elements to display useful information, such as your contact details or opening hours. If this information is out of date, then you may lose out on conversions.

The DreamHost footer.

If you make any significant changes to your operations, you must immediately update the header and footer. However, it never hurts to perform an annual check just to ensure that no changes have slipped through the cracks.

The header and footer also appear across your website. This makes them perfect for putting your most important pages at the audience’s fingertips.

While reviewing these elements, consider removing any links that are no longer relevant. There may also be some new content that deserves a top spot in your header or footer.

Most websites feature various legal policies, including a privacy policy and copyright information. Laws can evolve over time, so it’s always worth verifying that you’re in line with the latest regulations.

19. Review Your ‘About’ Page

A compelling About page can convince customers that you’re a company worth doing business with. It can also give people a sense of who you are as individuals.

The DreamHost About Us page.

Despite its importance, too many companies write their About page and then never revisit it. To ensure that this page is always representative of your company, it’s worth performing an annual review.

An example of an About Us page.

You can look for opportunities to add exciting developments, such as a major new client. You might also update any outdated information, such as changing an employee’s bio to reflect their new job title.

20. Perform a Content Audit

Publishing engaging, relevant content signals to visitors that your site is active and that you’re an expert in your field. This content can also help you improve your search engine rankings.

To ensure that you’re getting maximum value from this content, we recommend performing an annual content audit. This is where you catalog all of your site’s content and evaluate its performance.

This way, you can identify the topics and formats that attract the largest traffic and drive the most conversions. Conversely, you can pinpoint the content that doesn’t appear to resonate with your target audience. This is invaluable information that you can use to refine your content strategy.

Ready to try the WordPress Website Maintenance Checklist?

The hard work doesn’t end just because you’ve published your website. Running a successful WordPress site requires ongoing effort — and regular maintenance.

By breaking this challenge into 20 tasks, you can keep your site in tip-top shape without becoming overwhelmed. In addition, if you add the right tools and services to the mix, you may be able to further reduce your workload.

Running a website isn’t always easy, so why not let us lighten the load?

Our DreamCare Service puts a team of DreamHost experts at your fingertips. With our 24/7 professional website monitoring, managed updates, and monthly security reviews, you can be confident that you’re smashing every item on your maintenance checklist.

The post The Complete Website Maintenance Checklist (20 Things You NEED to Do This Year) appeared first on Website Guides, Tips & Knowledge.


source https://www.dreamhost.com/blog/complete-website-maintenance-checklist/

Wednesday 15 September 2021

How to Hire a Developer for Your Website

An attractively designed and well-coded website will help you convert customers, rank high on Google, and avoid frustrating errors and downtime.

You can build and maintain your website using a website builder or a WordPress theme and plugins. However, working with a developer has lots of advantages, especially for business owners: you will have greater flexibility over your website’s appearance and functionality, you can rest assured that everything will function as it should, and you will also cut down on your own workload.

Whether you are creating a new website, updating it, or simply maintaining it, hiring a developer can save you time and ensure your site runs smoothly.

We’ve previously looked at how to hire a developer for a custom WordPress theme, and today, we’ll take you through how to hire one for any website project. We will look at how to outline your project and identify the type of developer you need, where to find and hire developers, and what your budget should be.

Already know the answers to some of these questions? Use the links below to skip ahead to the information you need:

How to Determine the Scope of Your Project

Outlining the project requirements will help you choose the right web developer and budget appropriately. It will also help you communicate exactly what you need, so you are more likely to have a positive working relationship with the developer.

One of the biggest things to consider is whether the project relates to the website’s design, coding and functionality, or both.

  • Design projects: These are normally tied to branding and user experience. Perhaps you want a new homepage layout, a more accessible color scheme, or different fonts.
  • Coding and functionality projects: These typically relate to the features your website has and how it functions. Maybe you want a chat box or a less time-consuming way to add new products to your online store.

Sometimes, projects require both design work and coding. Your new homepage layout, for example, might need new code to embed videos or collapse and expand text.

What Kind of Developer Do I Need?

There are many different kinds of website developers, but now that you know the scope of your project, you can work out which one you should work with.

1. Designer vs. Developer

If you just need design work, then a web designer is your best option. However, if it is a functionality-based project, you will need a developer. If the project touches on both, you have a couple options: you can hire both a website designer and developer, or you can work with an agency.

You might wonder if a graphic designer could do the job instead of a web designer. While both graphic designers and web designers create brand imagery such as logos and color schemes, a web designer also uses CSS, HTML, and potentially other programming languages to bring the designs to life on your web page.

Plus, and perhaps even more importantly, they design with user experience in mind. This means they consider accessibility for screen readers, SEO best practices, and what your website will look like on different screens and systems.

We’ve written a guide to hiring a designer to create a custom website, so if you decide a designer is what you’re really looking for, check that out. However, if you need a developer, keep reading.

2. Front-end vs. Back-end Developers

The front end of your website is the visible part the reader interacts with. The back end is the part that you use to upload new content, do security updates, and more. Sometimes, these are also called client side (front end) and server side (back end).

These two parts of your website are built with different programming languages, so many developers specialize in either one or the other. Before you start speaking to developers, you will want to work out if this is a front-end or back-end project — or both.

Bear in mind that some back-end developers describe themselves by the programming languages they specialize in, e.g. PHP developer or Ruby developer. If you’re looking for a back-end developer online and know what language you need, try searching for that instead.

3. Full-Stack Developer

Let’s say that your project involves both the front end and back end of your site. You have two options: you could either work with two developers or hire a full-stack developer.

A full-stack developer can work on both ends of the website. They are proficient in all the main languages and frameworks and tend to be more expensive as a result.

It’s a particularly good idea to work with a full-stack developer when you are designing a completely new website build because they can advise you on the bigger picture.

4. Freelance vs. Full Time

Depending on the complexity and duration of your project, you might find it best to work with a freelancer or hire a full-time web developer. Both options have their pros and cons, but it shouldn’t be too hard to work out what’s best for you and your company.

For one-off projects with no maintenance required, a freelance website developer will likely suit your needs best. Similarly, if minimal maintenance is required, an agency or freelancer will help you keep your website running smoothly and your costs low.

However, if you think your website will need regular and time-consuming maintenance or updates, then you could find hiring a full-time employee works out better. It can be a pricey investment: Indeed.com calculated that the average website developer salary listed on their website was $72,000 per year. However, it also means you have someone on-hand ready to fix anything that goes wrong. Larger businesses with more complex websites, such as banks and streaming services, often have an in-house development team.

Alternatively, you could bring on an independent contractor full-time for the duration of your project. This works well when your project is particularly large or urgent, but you don’t foresee significant long-term maintenance. You benefit from having a dedicated web developer on the team, but you don’t have to commit to a long-term hire.

Where to Hire a Developer

There are lots of places where you can hire a professional developer or even a web development team online. The best option for you will depend on your priorities and amount of time. Here are some of your options:

DreamHost’s Web Development Services

With our web development services, you’ll have a dedicated project manager and access to a host of professional developers. It doesn’t matter if you need website design work, WordPress development, page speed optimization, or anything else: your project manager will always allocate a specialist to work on your website. Most jobs are completed within 72 hours.

You Dream It, We Code It

Tap into 20+ years of coding expertise when you opt for DreamHost’s Web Development service. Just let us know what you want for your site — we take it from there.

Freelance Platforms

Online platforms and job boards will let you outsource your web design needs to freelance developers. Some of the most popular ones include Upwork, Freelancer.com, PeoplePerHour, Guru, and Stack Overflow.

While the exact process can vary from one site to another, it tends to be pretty similar. You either create a job listing and wait for freelancers to contact you, or you review available freelancers and message them directly.

There are often thousands of freelancers to pick from, so there is always someone with the right skills and experience. However, reviewing all the options and selecting someone can be time-consuming. Public reviews and work samples will help you narrow down your options.

Agencies

If you are looking for a team of professional developers, then you could try an agency. It’s a particularly good option if you know you’ll need a designer and a developer, for example.

Unlike individual website developers, agencies don’t tend to be on freelance platforms (although there are exceptions). Instead, you have to find them by searching online or by word of mouth.

Recommendations

If you are unsure who to work with, try asking your professional network or friends for recommendations. You’ll not only get a shortlist of developers who impressed people you know, but you will also be able to ask questions about their style and view their previous work.

Budgeting: How Much Does a Web Developer Cost?

You’ve identified what you need, who you should work with, and how to find them. Now it’s time to discuss your needs and negotiate costs.

Freelance web designers normally charge by the project or the hour, although independent contractors may give you a day rate instead. If they charge hourly, they should also be able to give you a loose estimate of the required number of hours before you begin.

The hourly rate of a professional web developer can vary dramatically based on their skills and experience. If you need the project completed urgently, some may also charge rush fees.

According to Upwork, one of the most well-known platforms for hiring freelancers, the average rate of a full-stack developer in the US is $55+ per hour. An intermediate-level front-end developer, meanwhile, charges on average $35 per hour.

However, these numbers can rise significantly if you want experienced developers. Many of Upwork’s freelance web developers charge over $100 per hour, which is in line with our experience, too.

If you need regular web development services, you may find that signing up for a retainer is more cost-effective. This means that you purchase a set number of hours per week or month, and you normally receive them at a discounted rate.

Let’s use DreamHost’s Web Development Services as an example. If you only sporadically need a web developer or designer, you can buy an on-demand bundle for $99–$129 per hour. However, if you purchase a monthly retainer, the per-hour rate falls to $89–$109.

Bear in mind, however, that you may lose any hours you don’t use with retainers. Check the terms and conditions, as they can vary. For example, at DreamHost, unused hours roll over, but you can’t accrue more than double the value of your plan.

How to Evaluate the Quality of a Web Developer

programmer focused on code

When hiring a web developer, it is worth taking your time to find the right one. You should look for someone who is not only within your budget but also understands your vision for your website and provides quality service.

It can be hard to judge a web developer’s skills, especially if you don’t have a tech background. However, there are some things you should look for.

Technical Requirements

Simply put, is the developer proficient with all the necessary languages and applications?

Generally speaking, if they are a front-end developer, they should know CSS, HTML, JavaScript, and common frameworks such as jQuery and Bootcamp.

You are unlikely to come across a front-end developer who doesn’t meet these minimum technical requirements. However, you should also check that they are familiar with best practices for website accessibility and SEO.

Back-end developers, meanwhile, will be proficient with PHP, Python, Ruby, and more. Depending on your project, you may find it is worth searching for a specialist in a particular programming language.

You might also want to search for a WordPress developer, Shopify developer, app developer, or even a mobile developer.

Response Time

It’s not just a website developer’s technical skills that matter. Response time is also important, especially if you are bringing them on at the creative planning stage or to fix bugs.

Pay attention to how quickly the developer responds when you first contact them and then negotiate the details. While freelancers generally do not reply as quickly as employees, they should still respond within a reasonable timeframe.

Communication Skills

Good communication isn’t only about quick response times. Ask yourself: Are they a clear communicator? Do they seem to understand what you want, and do they clarify and confirm as needed?

When negotiating, are they direct and professional? Do they explain what you can expect, and are they transparent about budgets, timelines, pricing, and any potential complications? Do they let you know what they will need from you to get the work done?

Are they flexible? When you express preferences or uncertainty, do they listen and then either explain or adapt?

You’re hiring a web developer, not a marketing manager, but communication skills are still critical. They will help the project run smoothly and ensure that there are no unpleasant surprises caused by miscommunications.

Experience

A more experienced web developer typically has higher rates, although they might work out less expensive than you would think. That’s because they also tend to work more efficiently and produce cleaner, better code than inexperienced developers.

It’s more than just the years or the number of projects that count, however. Pay attention to the type of work the developer has previously taken on, and what kinds of companies they have worked with. Ideally, they will have similar experiences to draw on when working on your website.

Previous Projects

Looking at the work they’ve done previously will give you an idea of their skill and — especially for front-end developers — style.

Most professional website developers will have a portfolio on their website, and you can also ask to see samples that are similar to your project. Typically, developers will carefully curate their portfolio to only show their most impressive work. So, if you let them know what you are looking for, you might be surprised by how many extra samples they can show you.

Don’t be afraid to ask if you have any questions about their previous projects, but remember that some details may be confidential.

Customer Ratings and Testimonials

There is no better way to see what a developer is like to work with than by reading customer ratings and testimonials. Most developers will have some on their website, while platforms like Upwork feature customer reviews by default.

When reading reviews, especially public ones, try to read between the lines. Someone else’s ideal developer might not be a good fit for you. However, paying attention to the things that are praised will give you an idea of their work and communication style.

You’re Cordially Invited

Join DreamHost’s Facebook group to connect with like-minded website owners and get advice from peers and experts alike!

Hiring a Developer: Summed Up

Working with a developer can help you keep your website looking professional and running smoothly. Whether you’re editing the WordPress theme, removing malware, or adding new features such as a shopping cart, a developer can help you achieve your goals quickly and easily — meaning you can focus on your website’s services instead of its code.

Ready to bring a developer onto your team?

Consider DreamHost’s Web Development Service. You’ll instantly gain access to our comprehensive team of professional developers and designers. And the process is simple: Submit your request to our team for an estimate and then we’ll get to work implementing the changes on a staged version of your site. Once you approve, we push the changes live. You dream it, we code it! Check out plans today.

The post How to Hire a Developer for Your Website appeared first on Website Guides, Tips & Knowledge.


source https://www.dreamhost.com/blog/how-to-hire-web-developer/

Wednesday 8 September 2021

How to Fix Fatal Error: Maximum Execution Time Exceeded in WordPress (6 Methods)

Updating your plugins and themes regularly is necessary to keep your site running at full capacity. However, the fatal WordPress error “maximum execution time exceeded” can prevent updates and leave you feeling concerned about your website’s performance.

Fortunately, you can use a few methods to remove the error or increase the maximum execution time: You can uninstall the problem software, use a plugin, or edit your site’s code directly to solve the issue in no time.

In this article, we’ll look at what the WordPress maximum execution time error is and why it happens. Then we’ll walk you through six methods you can use to solve the problem and keep your site running smoothly:

  1. Uninstall problem software
  2. Use a plugin
  3. Adjust the wp-config.php file
  4. Update the php.ini file
  5. Edit the .htaccess file
  6. Contact your hosting provider

Let’s get started!

What the WordPress Max Execution Time Error Is (And Why It Happens)

The maximum execution time error is one of the most common WordPress errors. It can appear when you are trying to update your WordPress plugins or themes.

The maximum execution time exceeded error in WordPress.

It alerts you that your site was unable to perform the updates you requested.

This error happens because of the PHP scripts on your website. PHP is a scripting language that is the foundation of WordPress sites. It is made up of code that controls how the website functions and shows different elements to users. As such, the maximum execution error directly relates to how long a PHP script takes to run.

PHP scripts have a maximum execution time to keep your site functional and secure. For example, if there were no limit, a hacker or malicious software could use neverending scripts to dismantle your website’s server and make your data vulnerable. Furthermore, PHP scripts running for a long time can divert resources from your server.

Plugins are more likely to trigger the error because they come with a lot of code from external sources. WordPress is an open-source platform, so any developer can design and upload plugins for it. If you install content from lesser-known developers, it may come with flawed code and cause issues in your site’s PHP scripts.

Themes and general WordPress updates can also cause the problem. However, this is less common.

What the Standard Max Execution Time Is

At DreamHost, we set the maximum execution time on our end. As with most other hosting providers, it usually has a duration of 30 seconds. This is typically enough time for most PHP scripts to run successfully. If you’re using a different hosting provider, you should be able to contact them directly to find out what your site’s maximum execution time is.

However, large websites with multiple resources may need slightly longer maximum execution times. Otherwise, they may not be able to complete their processes before the clock runs out.

Additionally, some developers may use very long execution times of more than 300 seconds. However, we don’t recommend this for most websites because of the security issues that we discussed previously.

How to Figure Out if the Error Has Occurred

It is usually obvious that the maximum execution time error has happened because you will see a notification in your WordPress dashboard.

But it may not always have the same wording. For example, it may read as “fatal error” or ‘critical error.” The notification also might not reference the maximum execution time. However, all of the warnings share similar components that can alert you to the source of the problem.

Front-end users may also be able to see the error. If they visit the site when the update process has failed, they might see a message telling them that your website is experiencing technical difficulties.

Wikipedia experiencing technical difficulties.

However, this error message doesn’t only appear because your maximum execution time has been exceeded. As such, you’ll want to check and see if it shows up in your WordPress dashboard as well.

Finally, you may receive an email from WordPress alerting you that the maximum execution time has been exceeded. This happens because of the WordPress 5.2 update, which introduced PHP error protection that automatically notifies you when your site has problems with its themes or plugins. As such, you will almost immediately know that there is an issue with your updates.

Skip the Stress

Avoid troubleshooting when you sign up for DreamPress. Our friendly WordPress experts are available 24/7 to help solve website problems — big or small.

How to Fix the Max Execution Time WordPress Error (6 Methods)

There are a few different methods you can use to eliminate the max execution time error or increase your site’s maximum execution time.

You may first want to consider your comfort level with directly editing your site’s files and adding new code. If this method sounds beyond your technical abilities, there are fortunately other options available.

1. Uninstall the Problem Software

One of the simplest ways to fix the maximum execution time error is to uninstall the software causing the issue. One of your plugins or your site’s theme is likely the culprit, so you can start there.

We recommend using this method if you have a hunch that a specific application is causing the problem. For example, you may have recently added a new plugin or updated an old one.

If the error locks you out of your site, you can access the dashboard via Recovery Mode. If you received an email from WordPress about the failed updates, it usually includes a link to Recovery Mode and may even tell you which plugin caused the problem.

Then, navigate to Plugins > Installed Plugins and click on Deactivate underneath the relevant item. Click on Delete to remove it.

If you don’t know what is causing the maximum execution time exceeded error, you can deactivate all of your plugins and reactivate them one by one. Refresh each time and see if you can find the one that triggered the problem.

You can use Secure File Transfer Protocol (SFTP) to remove the plugin. Alternatively, if you have a fully hosted DreamHost account, you can do it with your control panel file manager.

Navigate to Websites > Manage Websites, and hover over the preview above your domain name. Then click on Manage.

How to manage websites on DreamHost.

Scroll down and select Manage Files.

How to reach the file manager on DreamHost.

Then navigate to your website’s directory folder. Enter the Plugins folder, right-click on the plugin you want to remove, and select Delete.

Deleting a plugin using the DreamHost file manager.

Hopefully, this will resolve the error. If not, you can move on to the following methods.

2. Use the WP Maximum Execution Time Exceeded Plugin

One of the easiest ways to increase the maximum execution time is by using the WP Maximum Execution Time Exceeded plugin.

The WP Maximum Execution Time Exceeded plugin home page.

This tool enables you to increase the maximum execution time to 300 seconds (five minutes) while you have it activated.

You may prefer to use this instead of the previous method because it can increase your maximum execution time globally. This can be beneficial if you want to give functional plugins and themes a little more time to complete their updates.

To use the plugin, you can download the .zip file and head to your WordPress dashboard. Navigate to Plugins > Add New and click on Upload File > Choose File.

Adding a new plugin on the WordPress dashboard.

Click on Install Now. Once the plugin is installed, select Activate Plugin to complete the process.

The plugin automatically increases your site’s maximum execution time right away, so you don’t need to do anything else. If you ever want to remove it and revert to the original settings, you can head to Plugins > Installed Plugins and click on Deactivate.

How to deactivate the WP Maximum Execution Time Exceeded plugin.

This is a straightforward fix for the maximum execution time exceeded error. However, it does not enable you to choose a custom duration. If that’s something you’re looking for, you may prefer to use one of the following more intensive methods.

3. Increase the Maximum Execution Time via wp-config.php

You can increase the maximum execution time in your site’s wp.config.php file. This is a core file that contains a lot of important information about your site. For example, it has your website’s name, host name, login username, and password.

We recommend this method if you want to customize your maximum execution time. It enables you to add code directly into your WordPress directory file. Furthermore, it’s relatively quick and easy to do.

Before you start editing the file, we recommend backing up your entire WordPress site. The wp-config.php file is essential for your website, so you don’t want to make a critical and irreversible mistake. With a backup on file, you can revert to your original settings with minimal effort.

You can find the file by using the DreamPress file manager or your SFTP application and looking for wp-config.php. Right-click on it and select Edit.

How to edit the wp-config.php file in the DreamHost file manager.

Alternatively, you can click on Download and edit the file with a simple text editor like Notepad. Once you’re in the wp-config.php file, scroll to the bottom and insert the following code:

set_time_limit(X);

“X” represents the maximum execution time in seconds. For example, you can replace it with “300”, and it will extend the duration to five minutes.

Now you can save the file, and you’ve successfully changed the maximum execution time!

4. Increase the Maximum Execution Time in php.ini

You can also increase the maximum execution time by creating a new php.ini file. This is a document that controls your PHP settings, such as resource limits, upload sizes, and file timeouts.

This method can be an excellent option if you use a Content Management System (CMS) like WordPress. php.ini affects all the scripts in your system, so you won’t have to edit each one individually.

Not all servers support php.ini files, so you’ll need to check first to make sure yours does. Then you can increase the PHP execution time with this method.

In the DreamHost server, php.ini files are called phprc. First, you’ll need to create a new phprc file. Go to your SFTP dashboard and navigate to your user directory.

Locate the phprc file in your site’s version of PHP. Then right-click on it and select View/Edit to add your new code. You may see this warning.

A warning message in FileZilla.

Click on the check box next to Always use selection for all unassociated files and select OK. This will open the file with your text editor. Next, you can enter the following code to change the maximum execution time:

max_execution_time = 500

This will change the max execution time to 500 seconds. Then you need to kill the existing PHP processes to update the phprc file and make the changes take effect.

5. Increase the Maximum Execution Time in .htaccess

The .htaccess file is another place where you can adjust the maximum execution time. This file controls changes across the different directories of your WordPress site. However, not all servers use it, and it is most commonly found in Apache servers.

You may prefer to use this method if you don’t want to play around with the wp-config.php file and if your server doesn’t support php.ini files.

Before starting, we recommend backing up your .htaccess file. By doing so, you can reinstate it if you make any major mistakes. Simply make a copy of it and save it elsewhere on your computer.

Then use your chosen SFTP to edit the original .htaccess file. If you’re using the DreamHost file manager, you can right-click on it and select Edit.

How to edit the .htaccess file with DreamHost.

Otherwise, you can open it with your text editor. Then enter this code to change the maximum execution time:

php_value max_execution_time 300

You can substitute the “300” for any other amount you prefer. Finally, save the changes, and the file will apply them to your site.

6. Contact Your Hosting Provider to Request an Increase in Maximum Execution Time

If you would prefer not to change your site’s files yourself, you have another option. You can contact your hosting provider directly, and they can increase the maximum execution time on your behalf.

This method could be an excellent option if you’re short on time or have limited technical skills. However, it may cost extra depending on your hosting provider.

With a DreamHost account, you can contact our Professional Services team to make these changes for you. Navigate to the Contact Support page in your account dashboard and submit a ticket.

How to contact the DreamHost support team.

There, you can outline your desired changes and add any details about your site. Our team may ask for more details, and then we’ll get to work on making the changes!

Bonus WordPress Error Articles

Need to resolve other technical issues on your website? We’ve got you covered! Our team has put together several guides to help you troubleshoot the most common WordPress errors:

And if you’d like a soup-to-nuts walkthrough on running a successful WordPress site, be sure to check out our WordPress Tutorials. It’s a collection of 42 guides written by our WordPress experts that’ll help you navigate the WordPress dashboard like a pro.

Take Your WordPress Website to the Next Level

Whether you need help navigating the WordPress dashboard, fixing incorrect database credentials, or choosing a web host, we can help! Subscribe to our monthly digest so you never miss an article.

Fixing the Fatal Error: Maximum Execution Time Exceeded

The maximum execution time exceeded error in WordPress can get in the way of updating your plugins and themes. Although it can be frustrating when it happens, there are several ways to solve the problem quickly.

You can fix the maximum execution time WordPress error with the following strategies:

  1. Uninstall the problem item.
  2. Increase the maximum execution time with a plugin like WP Maximum Execution Time Exceeded.
  3. Adjust the maximum execution time by editing the wp-config.php file.
  4. Increase the maximum execution time in the php.ini file.
  5. Edit the .htaccess file to increase the maximum execution time.
  6. Contact your hosting provider to change the file on your behalf.

Are you looking for a hosting provider that can take care of all your site’s technical issues? Check out our DreamPress packages and leave the troubleshooting to the experts!

Image credit: Wikimedia Commons.

The post How to Fix Fatal Error: Maximum Execution Time Exceeded in WordPress (6 Methods) appeared first on Website Guides, Tips & Knowledge.


source https://www.dreamhost.com/blog/fix-wordpress-fatal-error-maximum-execution-time-exceeded/

Creating and Mastering GA4 Explorations

In the switch from Universal Analytics (UA) to Google Analytics 4 (GA4) — which will go fully into effect July 2023 — a lot of things have...