Tuesday, 19 October 2021

How to Fix the “Too Many Redirects” Error in WordPress (13 Methods)

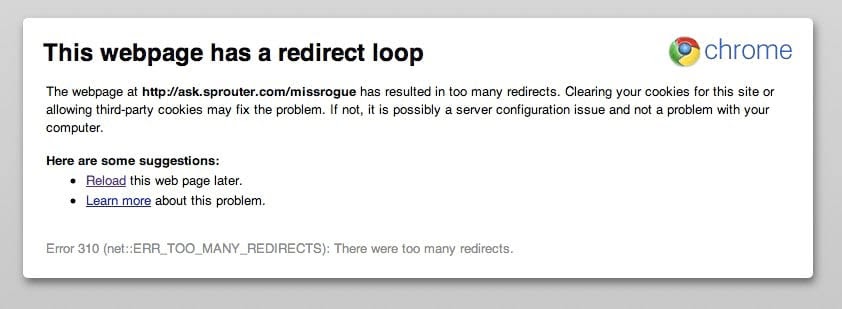
URL redirection is necessary when pages have changed their addresses permanently or temporarily. However, sometimes your website can get stuck in a redirection loop. If this happens, you may face the “too many redirects” error that prevents you from accessing web pages.

Fortunately, you can use several methods to fix this redirection issue. The problem usually lies within your website, browser, server, or third-party plugins or programs. By taking the time to diagnose the cause of the error, you can solve it relatively quickly.

In this article, we’ll look at common causes of the “too many redirects” error in WordPress and how to fix them. We’ll also explain how to prevent the problem from happening again in the future. Let’s get started!

What Causes the “Too Many Redirects” Error in WordPress

The “too many redirects” error happens when your WordPress website gets stuck in redirection loops. For example, it may try to send you to another URL that points to an entirely different link. If this process continues, your browser may trigger the error and fail to load the site.

This error looks different depending on the browser you use. For example, in Google Chrome, it usually displays as “ERR_TOO_MANY_REDIRECTS” or “This webpage has a redirect loop.”

The “too many redirects” error in Google Chrome. 

If you use Mozilla Firefox, the error usually reads as “The page isn’t redirecting properly.” Alternatively, it displays as “This page isn’t working right now” in Microsoft Edge. Finally, Safari users may encounter “Safari Can’t Open the Page.”

Unlike some other common WordPress errors, the “too many redirects” issue doesn’t usually solve itself. As such, you’ll need to troubleshoot the origins of the problem to fix it.

Skip the Stress

Avoid troubleshooting when you sign up for DreamPress. Our friendly WordPress experts are available 24/7 to help solve website problems — big or small.

How to Fix the “Too Many Redirects” Error in WordPress (13 Methods)

Various factors can cause the  “too many redirects” error in WordPress. Therefore, you may need to try a few different methods to solve it. Let’s take a look at a comprehensive list of all the possible solutions.

1. Force the Page to Refresh

The first solution is a very simple one. You can force your browser to refresh and retrieve a new version of the page. This method overrides any stored data and displays the latest information available for the WordPress website.

You might like to try this method first because it’s quick and won’t interfere with any other strategies. You’ll also know straight away if it has fixed the problem or not.

You can use the following keyboard shortcuts to force a refresh in your browser:

  • Google Chrome (Windows): Ctrl + F5
  • Google Chrome (Mac): Command + Shift + R
  • Safari: Command + Option + R
  • Firefox (Windows): Ctrl + F5
  • Firefox (Mac): Command + Shift + R
  • Microsoft Edge: Ctrl + F5

That’s all you need to do. However, if this simple method doesn’t work, you can continue through the troubleshooting guide.

2. Delete Cookies on the Site

Cookies are small blocks of data that enable websites to remember information about your visit. Then, the sites use that data to customize your experiences.

For example, an e-commerce platform might send you on-site recommendations based on your previous purchases and searches. This way, you’ll be able to save time when looking for related products.

However, cookies can sometimes hold onto incorrect data. In turn, this can cause the “too many redirects” error. As such, you can try deleting cookies from the WordPress site.

In Google Chrome, navigate to the three dots at the top of your menu. Then, click on Settings.

How to access the Settings in Google Chrome.

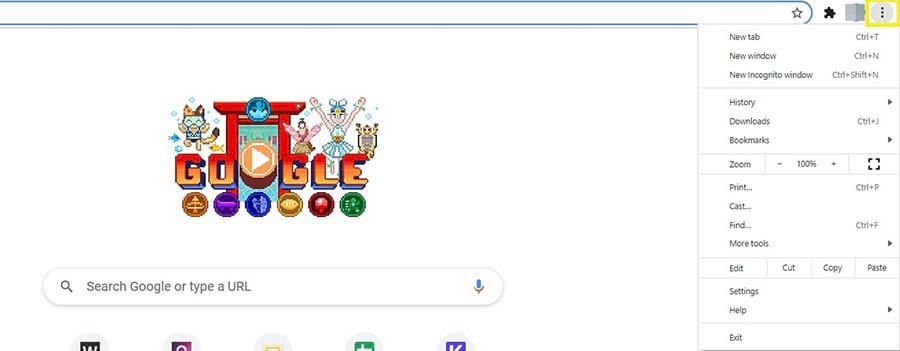
Scroll down to Privacy and security and select Cookies and other site data.

Finding cookies and other site data in Google Chrome.

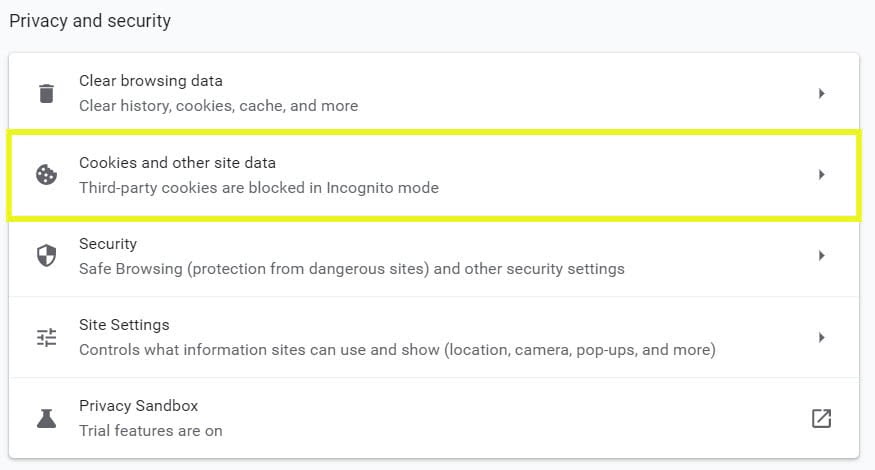
Move down the page and select See all cookies and site data. This will open a list of all the cookies that different sites hold with your data.

A list of the cookies in a Google Chrome browser.

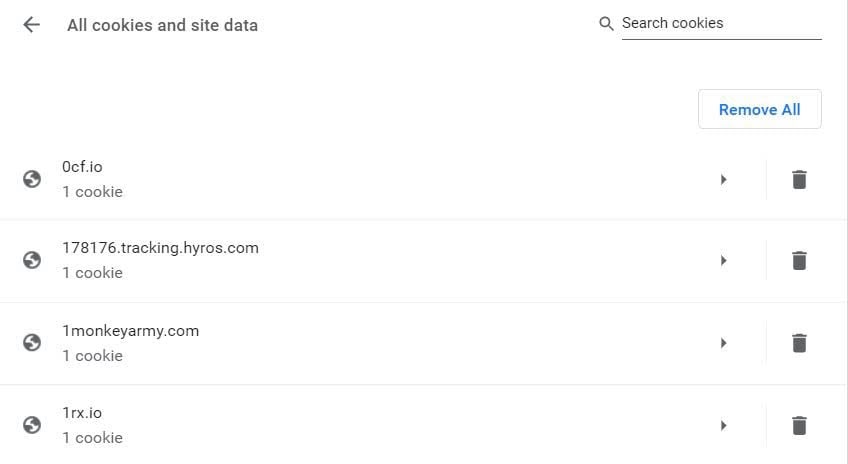
Scroll down to find the site that is throwing the “too many redirects” error. Then, click on the trashcan icon next to its corresponding cookie to delete it.

There is a slightly different method if you’re using Safari, Microsoft Edge, or Firefox. Once you’re done, try refreshing the WordPress site to see if the error is fixed.

3. Clear Your WordPress Site or Server Cache

Caching stores information about your site so that it can load faster the next time you access it. However, your cache may be holding outdated data and causing a redirection error. Therefore, you can try clearing out the stored information to see if it fixes the problem.

If you can access your WordPress site, you can try clearing the cache with a dedicated caching plugin. For example, you could use WP Super Cache.

The WP Super Cache plugin. 

However, the redirection error will likely prevent you from getting to your dashboard. Therefore, you might need to try clearing your server cache.

If you’re a DreamPress customer and have a shell account, you’ll need to log into your domain with Secure Shell (SSH) protocol. Then, you can enter the following code to purge your cache:

curl -X PURGE “http://yourwebsite.com/.*” ; wp cache flush

Alternatively, you can use the following command if you don’t use the WP Super Cache plugin:

wp vanish purge --wildcard

Once you’ve cleared out the cache, try reloading your site. If that doesn’t work, you may need to try another method.

4. Clear Your Browser Cache

Your browser also stores cached information about the websites you visit, including your own. If your browser is holding onto outdated data, you may need to clear it out to fix the redirection error in WordPress.

If you’re working with Chrome, you can head back to Settings and scroll down to Privacy and security. Here, click on Clear browsing data.

Clear browsing data in Google Chrome.

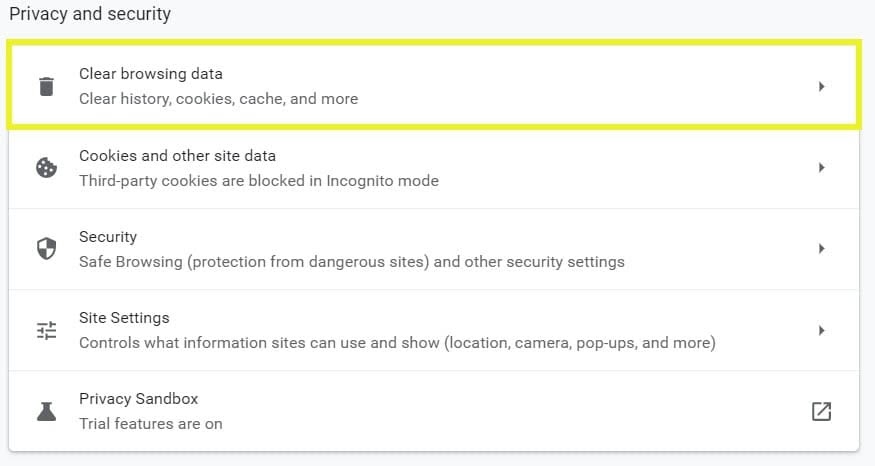
This will bring up a new window that enables you to choose the data you want to delete. Select each item by checking the box next to it and then click on Clear data.

Clearing data in Google Chrome.

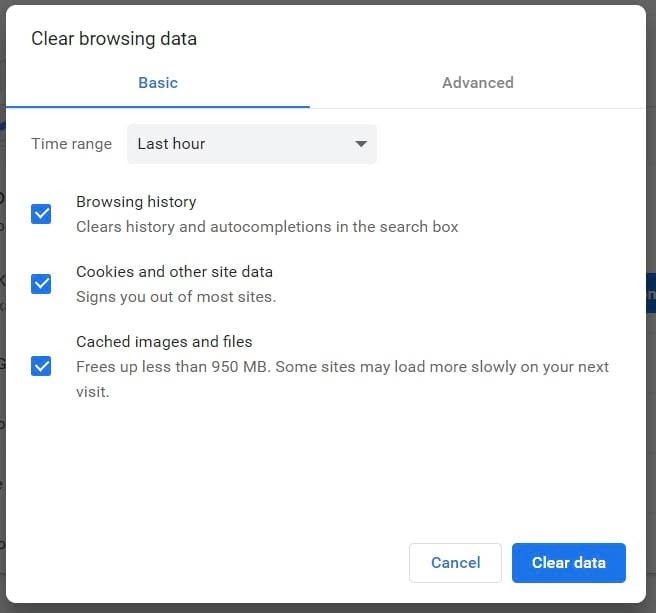
You’ll need to use slightly different methods if you’re working with a different browser. When you’re done, try reloading your site to see if the “too many redirects” error has gone.

5. Determine the Cause of the Redirect Loop

If the earlier methods didn’t solve the redirection error, you might like to try to diagnose the problem. Otherwise, you might spend a lot of effort on more time-consuming strategies that may not fix the error.

There are a couple of different methods that can determine the cause of redirect loops. Firstly, you can enter your site’s URL into the Redirect Checker tool.

The Redirect Checker tool from httpstatus. 

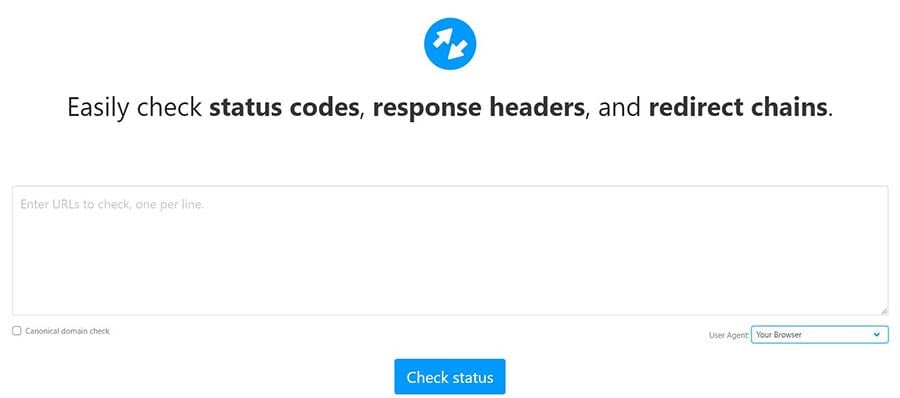
This free online application enables you to enter multiple URLs and check their statuses. You can also specify the user agent, such as your browser, search engine bots, and mobile devices.

Once you enter your URL, you’ll be able to see any status or error codes associated with your site at the bottom of the page.

Status codes associated with the DreamHost URL. 

Alternatively, some browser add-ons can show you the nature of redirects on different sites. For example, the Redirect Path Chrome extension flags redirect error messages in real-time.

The Redirect Path Chrome extension.

However, these tools might not always tell you why your redirect error is happening. If this is the case, you can continue with the other strategies in this troubleshooting guide.

6. Temporarily Disable Your WordPress Plugins

WordPress plugins are helpful tools that can introduce new functionalities to your website. However, these add-ons can also cause many issues, such as the “too many redirects” error.

Anyone can develop and share WordPress plugins. As such, you may accidentally download one that contains faulty code. These add-ons also have frequent updates. If you haven’t updated your plugins, they may also be causing problems on your site.

You may like to try this method if you recently added new plugins to your WordPress site. If so, you’ll probably have a good idea of the one causing the problem. Even if you don’t suspect a particular plugin, you can use the following steps to address the issue.

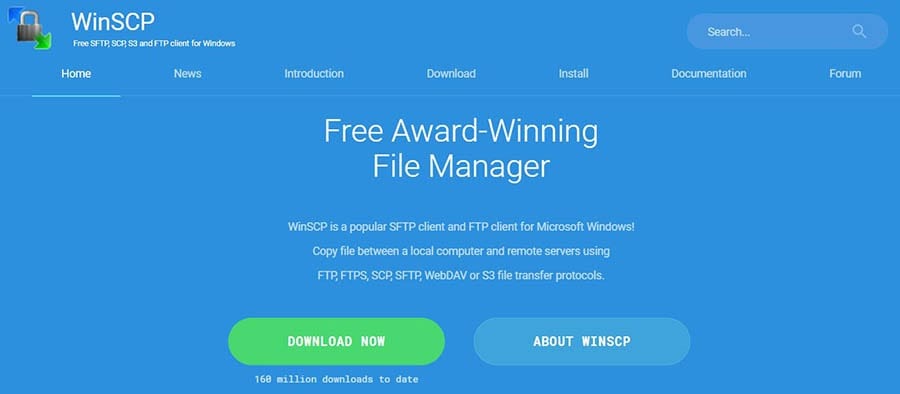
If you can’t access your WordPress site, you’ll need to access the plugin files via a Secure File Transfer Protocol (SFTP) application such as WinSCP.

The WinSCP SFTP client.

Once you’ve connected the SFTP client to your site, you’ll need to find the folder that holds your plugins. You’ll usually find it under wp-content > plugins. Here, you’ll see a series of folders with the names of your installed plugins.

Plugin folders for WordPress sites.

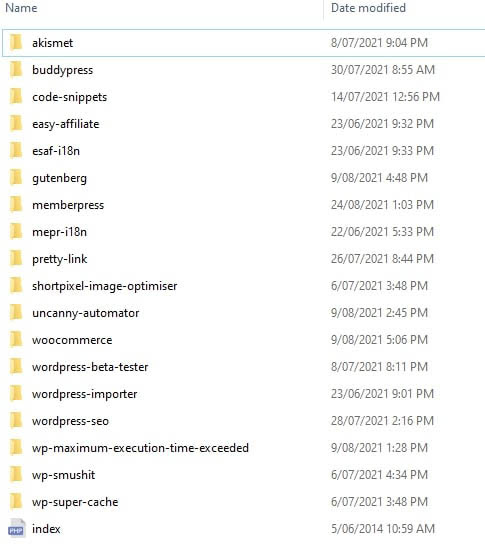
Rename the plugins folder to “plugins-off”. This will deactivate all of your plugins. You should now be able to access your WordPress dashboard.

Next, rename your plugins folder to its original title. Then go through the process of reactivating each add-on from your WordPress dashboard to see which one throws the “too many redirects” error.

If you find a problem plugin, you’ll need to keep it deactivated. You’ll also need to find an alternative option for your website.

7. Check Your WordPress Site Settings

Sometimes an error in your WordPress site settings can cause redirect loops. For example, your website might be pointing to the wrong domain name for your site files. This more commonly happens if you’ve recently migrated your website.

You can check your site settings in your WordPress dashboard. If you can access it, log in and head to Settings > General. You’ll then see two fields for WordPress Address (URL) and Site Address (URL).

Accessing URL settings in WordPress.

These two addresses should be identical unless you want WordPress to have its own directory. If the URLs don’t match, and they should, you can change the settings manually. You’ll need to edit your site’s wp-config.php file.

Access your website using SFTP as you did previously. Then, locate and open the wp-config.php file in a text editor.

Next, you’re going to paste the following code into the file:

define( 'WP_HOME', 'http://example.com' );

define( 'WP_SITEURL', 'http://example.com' );

Replace the example URLs with the correct ones and save the file. Then reload your website and see if this solved the problem.

8. Check Your SSL Certificate

If you’ve recently migrated your site to HTTPS, there are various steps you need to complete. Unfortunately, if you miss some of them or misconfigure some settings, you could trigger the “too many redirects” error in WordPress.

For example, if you didn’t install your Secure Sockets Layer (SSL) certificate correctly, it could be causing problems. If you didn’t add it at all, your site would automatically get stuck in a redirect loop.

However, there might also be some minor issues with your SSL certificate installation. For example, you might have incorrectly installed the intermediate certificates that work together with your main one.

You can check if your SSL certificate is correctly installed using a tool such as the Qualys SSL Server Test.

The SSL Server Test from Qualys.

This application scans your domain to find any associated SSL issues. This process can take a few minutes, but it will alert you to any problems with your certificate installation.

9. Update Your Hard-Coded Links

If you’ve just switched from HTTP to HTTPS, you’ll need to redirect your links. Otherwise, these URLs will point to locations that no longer exist on your website.

Many users utilize plugins that can change these links automatically. For example, you could use Better Find and Replace.

The Better Find and Replace plugin.

However, it can be risky to use an add-on. If your chosen plugin has any issues with its code or updates, it can misconfigure your redirects and trigger the “too many redirects” error.

As such, we recommend that you manually update your hard-coded links. You can do this with the search and replace method in WordPress.

We have a complete guide on how to change your WordPress URLs. If you’re a DreamHost customer, you can also reach out to our technical support team for assistance.

10. Check for HTTPS Redirects on Your Server

HTTPS redirect server rules can also cause the “too many redirects” error in WordPress. These settings may have been misconfigured when you migrated your site.

For example, the settings may not be correctly redirecting your links to HTTPS. As such, you’ll need to amend them.

If your host uses an Apache server, you’ll need to edit your .htaccess file. Locate it within your SFTP client and open the file in a text editor. Then, you can enter the following code:

RewriteEngine On

RewriteCond %{HTTPS} off

RewriteRule ^(.*)$ https://%{HTTP_HOST}%{REQUEST_URI} [L,R=301]

This code will cause all HTTP links to redirect to HTTPS automatically. Save the .htaccess file and try to reload your WordPress site. If it still triggers the redirect error, you’ll need to try another solution.

Alternatively, you can adjust your HTTPS redirects on Nginx servers. If you’re not sure which server type your host uses, you might like to double-check with the company first.

In Nginx, you’ll need to adjust the config file. Open it with your SFTP client as usual, and then locate the file. Insert the following code to set up your redirects:

server { listen 80; server_name domain.com www.domain.com; return 301 https://domain.com$request_uri; }

Save the file and reload your WordPress site. If it doesn’t fix the problem, keep moving through this troubleshooting guide.

11. Check Your Third-Party Service Settings

Suppose you use a third-party service such as a Content Delivery Network (CDN). In that case, its settings may cause the “too many redirects” error. For example, Cloudflare is a popular option that can improve your website’s performance and security.

The Cloudflare Content Delivery Network (CDN).

Cloudflare can trigger the “too many redirects” error if you have the Flexible SSL setting enabled and an SSL certificate from another source (such as your hosting provider).

In this scenario, your hosting server requests are already redirecting URLs from HTTP to HTTPS. However, with the Flexible SSL setting, all server requests are being sent in HTTP. As such, there are redirection loops happening between the different processes.

As such, we don’t recommend using the Flexible SSL setting if you have an SSL certificate from a third-party source. Instead, change your Cloudflare Crypto settings and choose either Full or Full (strict). Doing so will automatically send requests in HTTPS.

Additionally, you may like to enable the Always Use HTTPS rule in Cloudflare. This forces your site to send all requests in HTTPS. Therefore, it avoids causing a redirect loop and triggering the WordPress error.

Finally, you might like to double-check that you’ve correctly configured your redirects in Cloudflare. For example, you’ll want to ensure that your domain doesn’t redirect to itself. Otherwise, it can trigger a redirect error.

12. Check Redirects on Your Server

We already covered how to check for HTTPS redirects on your server. However, other redirects can trigger an error when loading your WordPress website.

For example, you might have a 301 redirect misconfigured. It might be pointing to the original link, triggering a redirect loop that prevents your site from loading. You can usually find redirects such as this one by checking your config files.

If your host uses an Apache server, you may have issues with your .htaccess file. We recommend creating a new one with default settings.

First, you’ll need to access your site via SFTP. Find the .htaccess file and save a copy of it in case you make a mistake. You can do this by renaming it to something like “.htaccess_old”.

Next, you’ll need to make a new .htaccess file. Put the following code into it to establish default settings:

# BEGIN WordPress

RewriteEngine On

RewriteRule .* - [E=HTTP_AUTHORIZATION:%{HTTP:Authorization}]

RewriteBase /

RewriteRule ^index.php$ - [L]

RewriteCond %{REQUEST_FILENAME} !-f

RewriteCond %{REQUEST_FILENAME} !-d

RewriteRule . /index.php [L]

# END WordPress

Save the file and try reloading your WordPress site. If this process worked, you can delete the old .htaccess file and keep working with the new one.

However, if your host uses an Nginx server, you’ll need to follow a slightly different process. This server type uses a variety of different config files, depending on the hosting provider. We recommend reaching out to your host to see which one applies to your situation.

13. Contact Your Web Hosting Provider

If you’ve tried all of these methods and you can’t fix the “too many redirects” error, it might be time to get some help. You might be missing a crucial step, or there could be a deeper issue with your WordPress site.

By contacting your web hosting provider, you can get fast assistance with the error. For example, DreamHost customers can contact our technical support team.

The DreamHost technical support landing page.

You’ll need to log in to your account. You may also need to provide some information, such as your domain name and customer details.

How to Prevent the “Too Many Redirects” Error in the Future (3 Methods)

If you want to prevent the “too many redirects” error, there are a few steps you can take within your browser and site. Let’s take a look at a few different methods.

1. Keep Your Plugins and WordPress Files Up to Date

Outdated or faulty plugins are some of the leading causes of the “too many redirects” error. We already covered how you can deactivate any add-ons that may be triggering the issue. However, you can also take preventative steps with your current plugins and theme files.

For example, you should update your plugins and WordPress theme frequently. You can tell if the software has a new release because you’ll see an alert in your WordPress dashboard. You can also navigate to Plugins > Installed Plugins.

Updating plugins in WordPress.

You can update any plugin by clicking on update now or Enable auto-updates. However, if you prefer to do the process manually, we recommend checking this page on a regular basis. Doing so will enable you to stay on top of any new releases and bug fixes.

Additionally, you can report any faulty plugins if they cause the “too many redirects” error. Find the corresponding plugin support forum and document your issue to see if there is a known solution. Moreover, this action could prompt the plugin developers to fix the problem.

2. Clear Out Your Cache and Stored Cookies Regularly

Earlier in the guide, we explained how to clear out your cache and your saved cookies. These methods prevent your browser or WordPress site from trying to access outdated data.

It’s likely that you won’t need to use these methods as most browsers are smart enough to remove outdated cookies and cache items. However, you can streamline the process by using a WordPress plugin to clear your site’s cache. An add-on such as this one can make sure that the most current version of your site is always available to your users.

For example, if you’re using WP Super Cache, you can set up automatic processes. In your WordPress dashboard, navigate to Settings > WP Super Cache.

Configuring settings in WP Super Cache. 

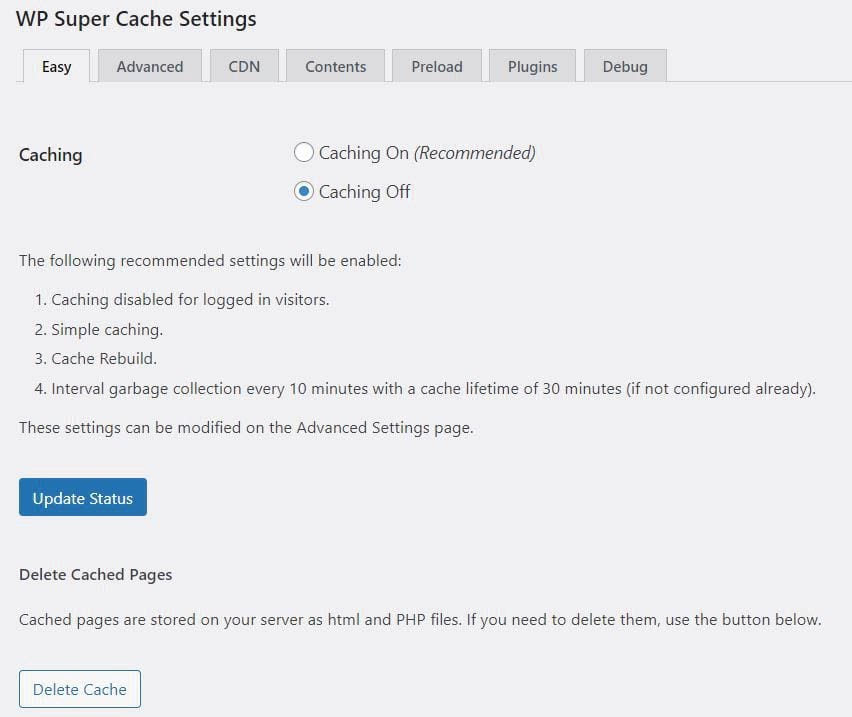
If you want to remove cached files manually, you can click on Delete Cache. You can also navigate to the Advanced tab and scroll down to Expiry Time & Garbage Collection. Here, you can control how long cached files remain active on your site.

Configuring the WP Super Cache settings.

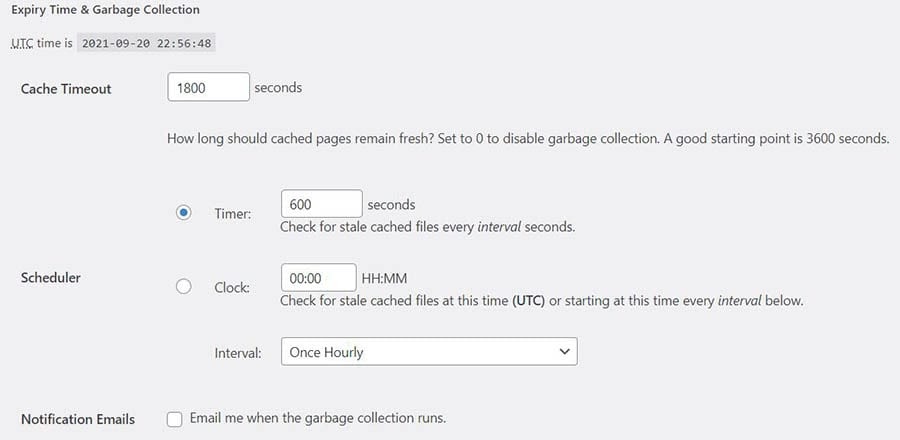
Here you can choose a custom cache timeout duration in seconds. Alternatively, you can select a custom time and interval to scan your site for outdated cache files. You can even elect to receive emails when this process happens.

You likely won’t be able to access the plugin if you’re already receiving the “too many redirects” error. However, using this add-on can be a sound preventative measure.

3. Use a Checklist or Company for Website Migrations

Many of the causes for redirect errors in WordPress arise from migrations from HTTP to HTTPS. If you’re not familiar with migrating a site, you may miss some of the essential processes needed to make your website redirect and function correctly.

Therefore, we recommend using a dedicated migration service to take care of the process. Professionals have experience with every aspect of migrating a site. As such, they’re less likely to make mistakes.

If you prefer to do the migration yourself, you might like to use a checklist during the process:

  1. Prepare for the migration. First, you’ll need to make a copy of your site as a backup. You’ll also need to block access to your new site until you can check it for errors and migrate all your content.
  2. Create a URL mapping. You’ll need to create a redirect map for all your site’s URLs. Then, you’ll need to update them and create sitemaps so that you can transition the links easily.
  3. Create backups. Before starting the migration, you’ll probably want to back up all your individual content. Otherwise, you could lose it if something goes wrong during the process.
  4. Update your DNS settings. You’ll need to change your domain settings so that the URL points to your new address. Usually, your new host can take care of this for you.
  5. Set up your redirects. This step is crucial because misconfiguring your redirects can trigger the “too many redirects” error. Make sure you test each link to see that it works.
  6. Send your URLs to Google Search Console. You’ll need to verify your new site and send sitemaps with your new URLs indexed. This process is essential for Search Engine Optimization (SEO).
  7. Update your links. If other websites link to your site, you might like to ask them to update those URLs. Additionally, you should ensure that any ad campaigns contain the correct links for your new website address.
  8. Check for problems. Finally, you might like to run a site audit. This process can test all your links and identify any issues.

If you’re migrating to a different server, the process might be slightly different. It pays to do your research before the migration to avoid any errors.

Have Another Error Message to Fix?

If you need to resolve other technical problems on your site, we’ve put together several comprehensive tutorials to help you troubleshoot every common WordPress error:

And if you’re looking for more information and best practices for running a WordPress site, check out our WordPress Tutorials section. This is a collection of expert-written guides designed to help you navigate the admin dashboard like a pro.

Take Your WordPress Website to the Next Level

Whether you need help logging into the WordPress admin area, fixing a redirect issue, or finding the plugins folder, we can help! Subscribe to our monthly digest so you never miss an article.

No More Redirect Loop Error

The “too many redirects” error can happen in WordPress when the site gets stuck in a redirection loop. Although the problem can be frustrating, you should be able to solve it pretty quickly.

You can usually fix the error by clearing out your cache or cookies. Additionally, there may be solvable issues with your server, third-party platforms, or plugins. Finally, if you still can’t troubleshoot the redirection error, your hosting provider may be able to help you out.

Are you looking for a WordPress hosting provider that can help you with redirection issues and other common errors? Check out our DreamHost packages today! We provide personalized technical support to assist you with any WordPress problems.

Image source: Flickr

The post How to Fix the “Too Many Redirects” Error in WordPress (13 Methods) appeared first on Website Guides, Tips & Knowledge.


source https://www.dreamhost.com/blog/how-to-fix-redirect-loop-wordpress-error/

Wednesday, 13 October 2021

How to Fix the Facebook Incorrect Thumbnail Issue in WordPress (4 Methods)

When it comes to marketing your WordPress website, sharing posts to Facebook can be a powerful method. However, sometimes this social media platform can wrongly display your images. If you’ve been struggling to fix the Facebook incorrect thumbnail issue, you probably understand what a headache that can be.

Fortunately, this issue isn’t anything that a little troubleshooting can’t solve. By applying a few tried-and-true solutions, you can fix Facebook’s habit of displaying the wrong thumbnail when you share a post.

In this article, we’ll cover a few reasons why you might be running into the Facebook incorrect thumbnail problem. Then, we’ll walk you through four different methods for resolving it. So let’s dive right in!

Facebook Link Preview Problems? Skip the Stress

Avoid troubleshooting when you sign up for DreamPress. Our friendly WordPress experts are available 24/7 to help solve website problems — big or small.

Why You Might Be Seeing the Facebook Incorrect Thumbnail Error

Having your own website is only the beginning of a solid marketing strategy. Social media platforms can help you meet countless goals. For example, they can assist you in reaching new markets, increasing your traffic, and growing your business.

With a projected 307.34 million users by 2022, Facebook offers a huge potential audience. As such, you’ve probably shared a few WordPress posts on the platform. We do it, too:

An image of a DreamHost blog article with a thumbnail image shared on Facebook.

However, Facebook isn’t perfect. You may notice that the image you’ve carefully selected isn’t the one showing up in your post. That’s right: you’ve run into the dreaded Facebook incorrect thumbnail error.

There are a few reasons why you might encounter this issue. Firstly, there might be a problem with your post’s Open Graph (OG) tag. It tells Facebook which parts of your WordPress content it should share.

Thus, an incorrect or missing tag could make Facebook share the wrong image. This error is more common if your featured photo is smaller than the other pictures in the same post.

You might also be looking at a caching problem. If the program is calling up outdated information, it might be grabbing an old image that’s no longer relevant.

Lastly, there may be an issue with your Content Delivery Network (CDN). Errors with CDNs are behind countless WordPress problems, including the 403 forbidden error.

Whatever the underlying cause, rest assured that you’re not powerless. There are a few steps you can take to correct your Facebook image.

How to Fix the Facebook Incorrect Thumbnail Issue in WordPress (4 Methods)

You can try a few of the following methods to troubleshoot how Facebook displays your media elements. Let’s take a look!

1. Use Yoast SEO to Adjust Your Social Settings

First up, we’ll be using a popular plugin to correct your thumbnail: Yoast SEO. A dedicated social media tab provides a simple way to fix this error. You can also use it to improve your Search Engine Optimization (SEO).

The WordPress banner for the Yoast SEO plugin.

With such practical features, it’s no wonder that Yoast SEO is one of the most popular WordPress plugins. The SEO options are particularly powerful, but we’ll only be focusing on how the program can fix your thumbnail error for now.

First, make sure you’ve installed and activated the Yoast plugin. After that, you can write your post as usual. Next, scroll down to the bottom of the page and click through to Yoast’s Social tab. There, you’ll find an option to Select Image.

The Yoast SEO social tab, with the option to ‘Select image’ highlighted.

Click on that button. You’ll then be able to upload an image or choose one from your gallery. Update the post, and the problem should be fixed.

2. Use AIOSEO to Calibrate Your SEO

If Yoast SEO hasn’t solved the issue (or you prefer a different SEO plugin), you can also try AIOSEO. It is a powerful platform that can help you fix the incorrect thumbnail error and climb to the top of search results.

The AIOSEO WordPress banner.

Just like with Yoast SEO, you’ll want to start by installing and activating AIOSEO. Then, write your post like you usually would, and scroll down to the bottom when you’re done.

Click through to AIOSEO’s Social tab. Then, find the field labeled Image Source. Click on it to see the dropdown menu.  

The option to select a featured image in AIOSEO.

From here, you have two options: Featured Image or Image from Custom Field. Choosing the first selection will present your post’s featured image as the thumbnail. On the other hand, picking a custom image will allow you to use whichever media element you want. Either option should fix the problem.

When you’re done, remember to save your work. Then, check your Facebook post one more time. It should now be showing the correct thumbnail. If you’re still having trouble, move on to the following method.

Search Engine Optimization Made Easy

We take the guesswork (and actual work) out of growing your website traffic with SEO.

3. Use the Facebook Debug Tool

Let’s go back to those OG tags we mentioned earlier. They are part of a Facebook-centric problem, so we’ll need to dig into the platform itself and clear the cache. Fortunately, the Facebook debugger makes this easy.

Before we begin, take a second to make sure your WordPress cache is cleared. If you need help, check out step one of our article on fixing the WordPress login page refresh error.

Next, navigate over to the Facebook Sharing Debugger site. Enter the URL of the malfunctioning WordPress post into the box. Then, click on Debug.

You should then see a list of post metrics. After that loads, find the Scrape Again button near the top.

An image of the Facebook debug results for a DreamHost article, with the ‘scrape again’ button highlighted.

Clicking on it will cause the platform to re-check your post for the updated thumbnail image. Remember that you might have to do this twice to fully resolve the Facebook incorrect thumbnail error.

4. Manually Upload Your Facebook Thumbnail

We’ll wrap things up with a quick-fix method. Let’s be clear about this one: It’s not going to solve the underlying issue.

If you need to fix a post, it’ll get the job done. Nevertheless, if you’re dedicated to promoting your blog on social media, we highly recommend you go back and try the other methods afterward.

First, share the post to Facebook as normal. Once you spot the incorrect thumbnail, edit the post. Then, click on the green photo icon on the editing screen.

The screen for editing a Facebook post, with the option to add a photo highlighted.

You’ll then be able to choose the correct image. After you’ve decided, it should automatically replace the old one.

Have Another Error to Fix?

To help you resolve other technical problems on your site, we’ve put together several comprehensive tutorials to help you troubleshoot common WordPress errors:

And if you’re looking for more information and best practices for running a WordPress site, check out our WordPress Tutorials section. This is a collection of expert-written guides designed to help you navigate the WordPress dashboard like a pro.

Take Your WordPress Website to the Next Level

Whether you need help using the Facebook Debugger Tool, finding the right WordPress plugin, or promoting your site on YouTube, we can help! Subscribe to our monthly digest so you never miss an article.

Displaying the Correct Thumbnail Image

An incorrect Facebook thumbnail may not seem like a big deal to some. However, marketing your WordPress site with your chosen media can be vital for your brand strategy. Fortunately, fixing this Facebook error is simple with troubleshooting.

In this article, we showed you four methods for fixing the Facebook thumbnail issue:

  1. Use Yoast SEO to select your Facebook thumbnail manually.
  2. Install and activate AIOSEO to choose a custom image.
  3. Use Facebook’s native debugging tool.
  4. Directly edit your Facebook post as a quick fix.

You may have noticed that there’s no method for fixing the CDN issue. Unfortunately, this is primarily a hosting issue. If you want a reliable service that can prevent these errors in the first place, check out our DreamPress hosting plans.

The post How to Fix the Facebook Incorrect Thumbnail Issue in WordPress (4 Methods) appeared first on Website Guides, Tips & Knowledge.


source https://www.dreamhost.com/blog/how-to-fix-facebook-incorrect-thumbnail-wordpress/

Thursday, 7 October 2021

Best Password Managers for Website Owners to Use in 2021

Password security is key to keeping your website safe from hackers, but creating a strong and unique password can be difficult. Unfortunately, remembering it can be even harder — unless you use a password manager.

We’ve previously looked at 10 ways to keep your WordPress website secure, and today, we’re expanding on that with concrete recommendations of the best password managers to use.

As well as sharing the password managers that most impress us, we’ll explore why password security is critical for website owners, what to look for in a password manager, and some password best practices.

Want to go straight to the recommendations? No problem! Just click on one of the links below to skip ahead:

Why Password Security Matters for Website Owners

According to IBM’s Data Breach Report 2021, compromised login details are responsible for one out of every five data hacks and breaches. What’s more, it can take months to discover a hack and resolve it.

A hacked website can have devastating effects. In extreme cases, you may find you can no longer sign in to WordPress or your preferred Content Management System (CMS). Instead, you will have to log in to your DreamHost panel or cPanel manually and, from there, identify malicious files that need deleting. Sometimes, website owners find they have no option but to reinstall WordPress and rebuild their site — a time-consuming and expensive solution.

In most cases, however, hacking is harder to spot — and yet no less damaging. For example, hackers may redirect visitors from your page to spam sites, harvest visitor information and credit card data, rewrite your website content, mine cryptocurrency, and much more.

Since these hacks aren’t always easy for website owners to discover, they can be live for months. In that time, they can cause reputational damage, expose sensitive data that could then lead to identity theft and liability, and cause long-term damage to your SEO work. Plus, of course, you’ll miss out on potential sales, conversions, and ad revenue during that time because of your website’s reduced quality.

Many website owners assume that they won’t be targeted by hackers, especially if they’re a small business owner or have limited web traffic. Yet a 2019 Verizon report found that small businesses were the victims of over 40% of data breaches. Entrepreneur calculates that this adds up to over 150,000 small businesses in the US alone.

For many hackers, smaller websites are low-hanging fruit. They are often easier to hack because the website security isn’t as rigorously set up. There’s also rarely a full-time web developer on the team who can spot and fix issues quickly. In other words: no matter how small or big your website is, you are at risk of being hacked.

Fortunately, improving password security is a quick and easy way to better protect your website.

Hacked Site? We'll Fix It Fast

With our Hacked Site Repair service, we'll remove any malicious code and restore your website so it's back up and running fast.

Important Features to Look for in a Password Manager

A password manager will help you use a different secure password for everywhere you log in, from your website to online banking.

Most people reuse the same weak password for everything because of the difficulty of remembering multiple passwords. It’s not hard to understand why: The average person has a whopping 100 passwords to remember.

That’s where a password manager comes into play. It’s an app that will generate and store passwords and usernames for you. The only one you actually need to remember (or write down in a secure place) is the one that unlocks your password manager.

100 secure passwords? That’s a tall order. Just one, however? It’s doable.

That said, not all password managers are made equal. Make sure your password manager has the following features.

End-to-End Encryption

End-to-end encryption is the most secure type of encryption available, and in a password manager, it’s non-negotiable.

When your passwords are encrypted, they are converted into code. So in order to discover your passwords, a hacker would first need to get access to them, and then they would need to decipher the code. Without the key, that second step is almost impossible to do.

Conversely, any time your passwords are unencrypted, they are vulnerable to hackers. Traditionally, data was encrypted in transit. This meant that you and any recipients could view the uncoded data, but it was also unencrypted (read: vulnerable) at the server where it was stored.

In contrast, with end-to-end encryption, your passwords remain encrypted even when they’re stored on a server. Not even the staff working at the password manager can discover the unencrypted versions.

The only times your passwords are unencrypted and vulnerable are when you access them yourself or choose to share them with another person (which, ideally, you will do via the app’s password sharing feature for extra security). This makes end-to-end encryption the gold standard for security.

Multi-Factor Authentication

Although end-to-end encryption will protect your passwords from server attacks, it won’t stop the most traditional of hacks: someone discovering your login details for the password manager or simply stealing the cell phone the app is stored on.

That’s where multi-factor authentication (MFA) will protect you. With MFA, you need not only your username and password but also additional identification to log in. Some common MFA identifiers include:

  • A one-time password (OTP): a unique code that’s typically sent via SMS or viewable on an authenticator app
  • Your fingerprint or other biometric authentication
  • Security questions

Selecting a password manager with MFA — and making sure you enable it! — will help keep your website secure. Don’t forget you can also set up MFA for your website for an extra level of protection.

Role-Based Permissions

Chances are multiple people have access to the back end of your website, where you upload content, install plugins, and customize the code and theme.

To ensure website security, people should only be able to access the areas they need to fulfill their role. For example, you don’t want the marketing intern to be able to edit your website code because they could accidentally delete your whole bookings system or take the online store offline.

With role-based permissions, this is easy to manage. You can simply assign roles to every user and then set it so that passwords are only shared with people who hold certain roles.

Dark Web Monitoring System

Sometimes, no matter how careful you are, login credentials will get hacked. Perhaps someone at your company uses the same login for the website they do their online shopping or social media. Maybe someone emailed login info to a new team member, and then their email got hacked.

Password managers with dark web monitoring systems will alert you if any of your passwords appear in a data breach. While you can manually check this on the Have I Been Pwned database, a built-in dark web monitoring system will let you know as soon as the breach is discovered online.

Dark web monitoring systems are an increasingly common feature in password managers, although some big-name brands still don’t offer it, such as RoboForm and Sticky Password.

Protect Your Website with DreamShield

For just $3/month, our premium security add-on scans your site weekly to ensure it is free of malicious code.

4 Best Password Managers in 2021

With numerous password manager apps on the market and at a wide range of prices, it can be hard to choose between them.

Don’t worry: We’ve compared the major brands to select our top four based on security features, compatibility, ease of use, additional features, and pricing. No matter your budget or requirements, we’re sure one of these will suit you.

1. Best Overall Password Manager: 1Password

1Password homepage.

1Password stands out not only for its excellent features but also for its ease of use. Everything is intuitive and beginner-friendly, with clear explanations.

It looks slightly slicker on Mac and iOS than on Windows and Android, but what most impressed us was its compatibility with different browsers, operating systems, and apps. Combine this with unlimited devices and password autofill features, and you should find that filling in forms and passwords is quicker than ever.

The only downside to 1Password is that there isn’t a free version. However, there are often discounts available for new subscribers.

Features:

  • Unlimited devices
  • Two-factor authentication
  • End-to-end AES-256 encryption
  • Apps for Mac, iOS, Windows, Android, Linux, and Chrome OS
  • Browser extensions for most popular browsers
  • Unlimited password storage
  • Role-based permissions (business accounts only)
  • 1Password Watchtower, a dark web monitoring system
  • Digital wallet
  • Guest accounts (business and teams accounts only)
  • Password autofill
  • Password sharing via password vaults
  • Travel Mode, a temporary delete feature for sensitive information when you travel internationally

Price: $36 per year for a personal account, or $60 for a family of up to five people. Business accounts start at $96 per user per year, but you can sign 10 users up for $240 a year with a Teams Starter Pack. Each account comes with a 14-day free trial.

2. Best Freemium or Free Password Manager: Bitwarden

Bitwarden homepage.

Using a free password manager means compromising on some functions, but the open-source app Bitwarden includes an impressive array of features for free.

Should you decide you want additional functions, the premium version is also affordable. It comes in at just $10 a year for a personal account, while premium business accounts start at $36 per user per year.

Bitwarden isn’t as beginner-friendly as some of the other options on our list, but you will find some great tutorials on YouTube. And once you’ve got the hang of it, there’s plenty to like about this cheap-and-cheerful password manager. If you don’t want to pay for a premium password manager, Bitwarden is an excellent choice.

Features:

  • Secure password generator
  • Two-factor authentication
  • Enhanced two-factor login (premium feature)
  • End-to-end encryption
  • Unlimited devices
  • Browser, mobile, and desktop apps
  • Secure text sharing
  • Secure file sharing (premium feature)
  • Multiple users (max. 2 with a free account)
  • Can also store credit card information

Price: Free for up to two users. $10 a year for a premium personal account, $40 for a family account of up to six people, and $36–$60 per user for a premium business account.

3. Best Password Manager for Businesses: Dashlane

Dashlane homepage.

For personal use, we prefer 1Password and Bitwarden. Bitwarden’s free version offers significantly more features than Dashlane’s, the most important being multiple devices. Meanwhile, 1Password is both more affordable and left us slightly more impressed overall.

For businesses, however, Dashlane is worth considering. The Admin Console is user-friendly and great for managing larger teams. Meanwhile, the dark web monitoring system is widely praised by users for how many compromised passwords it finds.

Features:

  • Limited free version (one device, maximum of 50 passwords)
  • End-to-end encryption
  • Two-factor authentication
  • Unlimited devices (premium, family, and business accounts only)
  • Compatible with Windows, Mac, Android, iPhone, and iPad
  • Dark web monitoring system
  • Single sign-on (SSO) authentication for ease of use
  • Form and payment autofill
  • Role-based permissions (business accounts only)
  • Free VPN (premium, family, and business accounts only)

Price: Freemium. Premium personal plans range from $36 to $60 a year, family plans are $90 a year for up to six users, and business plans start from $60 per user per year.

4. Best for Additional Security Features: Keeper

Keeper homepage.

For most users, 1Password or Dashlane’s password management features will be sufficient. If you’re looking for something with additional security features, however, Keeper might suit you better.

Its KeeperChat secure messaging app, for example, means that all messages are stored in a secure vault. Unlike WhatsApp or Slack, any photos or videos sent to someone’s mobile device won’t be downloaded to the phone’s main image folder, where they can easily be viewed by other people.

However, there are some downsides to Keeper’s high security levels. For example, you can’t bulk change passwords, and Keeper won’t automatically update your passwords either.

There is a free version of Keeper, but it can be hard to find via the website. We found it easier to search Google for “Keeper free account.” Bear in mind that the free version doesn’t include the desktop app or a web browser extension.

Features:

  • Free version (limited to one mobile device)
  • End-to-end encryption
  • Two-factor authentication
  • Unlimited passwords
  • Unlimited devices
  • Digital wallet with unlimited payments
  • Android, Mac, PC, and iOS apps
  • Autofill feature for forms
  • Secure file storage
  • KeeperChat secure messaging app
  • BreachWatch dark web monitoring system
  • Deleted password recuperation via the Trash Bin
  • Keeper Concierge 24-hour support and training
  • Single sign-on authentication (Enterprise accounts only)

Price: Keeper Unlimited is $34.99 a year, $74.99 a year for family accounts with a maximum of five users, and $45 per user per year for business accounts. The Plus Bundle is $58.47 a year for a personal account or $103.48 a year for family accounts. In addition, students get 50% off.

Password Best Practices

With your password manager, you’ll never need to manually create a password again — with one very important exception. To log in to your password manager, you’ll need to provide a password. This is called a master password.

To keep that master password secure, follow these best practices:

  1. Create a strong password. We’ve already written about 11 ways to create solid passwords, but here’s a quick recap: don’t reuse it or use common phrases. Make it at least 8-16 characters long. Complex passwords are best, so include numbers and symbols. Consider using a string of seven (or more) random words from the dictionary. And avoid anything that’s meaningful to you.
  2. Don’t share it with anybody. You might trust them, but do you trust the messaging app you’re using?
  3. Use multiple-factor authentication. This way, even if someone does hack your password, they still won’t be able to access your password manager.
  4. Don’t save it in your browser or in a computer file. If you need to record it somewhere, you’re better off writing it down than saving it in a digital format. Just don’t be like the British Ministry of Defence and publish photos with your password in the background. Instead, keep it somewhere safe, secure, and not immediately visible.
  5. Don’t lose or forget it. This might sound obvious, but it’s surprisingly easy to do, especially if your phone normally lets you use your fingerprint instead. Unfortunately, most password managers won’t let you recover a lost master password, so forgetting it means losing access to every single one of your passwords.

You’re Cordially Invited

Join DreamHost’s Facebook group to connect with like-minded website owners and get advice from peers and experts alike!

Protect Your Website from Being Hacked

Being hacked is a nightmare situation for any website owner. Nobody wants to discover hackers have installed malware or SEO spam on their site or, perhaps even worse, that they can no longer access the back end.

DreamHost’s Hacked Site Repair service.

Although our Hacked Site Repair Service will get your site back to normal in just one to two days, prevention is far better than cure. That’s why security is key for websites of all sizes.

Fortunately, some website security upgrades are easier than others — like using strong passwords. A password manager will make using strong passwords much easier, which in turn will help you protect your website (and all your other accounts) from being hacked.

The post Best Password Managers for Website Owners to Use in 2021 appeared first on Website Guides, Tips & Knowledge.


source https://www.dreamhost.com/blog/best-password-managers-for-website-owners/

Tuesday, 5 October 2021

JCakes Bakery: How a Longtime Connecticut Staple Flourished over the Pandemic

Most kids ask for new coloring books or a bike when they’re growing up. But unlike most kids, Hope Looney wanted fancy cake decorating books — and that’s what her mother and grandmother bought her. Despite her love for making fancy cakes as a kid, it wasn’t what Looney became when she grew up . . . at first.

After earning a degree in finance, Looney realized she wasn’t happy in her career in the healthcare industry. So, she decided to make a change and went to culinary school instead. She enrolled in Norwalk Community College, where her professors knew her passion for cakes, so they tailored her education to it.

“I took all the pastry courses,” Looney says. “When it came to presentation projects, I was able to just use cakes, instead of having to make croissants and bread.”

Baking a Better Future

Yet after she earned her culinary certificate, Looney was frustrated that she couldn’t find a job at a bakery. She needed healthcare and ended up working as a software trainer.

“Originally, I hoped to open up a bakery in California — that’s where I went to college.”

A year later, however, in February of 2007, an opportunity came up. It was true kismet: JCakes, a bakery in North Branford, Connecticut (where she was raised) was for sale.

“This is a bakery that I had grown up with as a kid,” Looney says. “We got all our cakes from it. I kept in contact with the owner while I was in culinary school, and then she decided she wanted to sell it. The bakery I idolized as a kid growing up was even more exciting for us. We didn’t want to let the bakery close either, because that’s probably what would have happened. I had never really worked in a bakery before. I did stuff on my own, but it was never in that environment, so it was a fast learning curve.”

JCakes bakery location in Connecticut

Ready for the challenge, Looney bought JCakes and dove right in. The first hurdle to cross: How to retain the bakery’s loyal customers while putting her spin on the business?

“I basically kept the same menu, formulas, and recipes,” Looney recalls. “I added new cakes to the menu one at a time, along with cupcakes. But I didn’t want to veer too far off from what she was doing.”

The prior owner was a one-woman show, so Looney grew production and brought on staff. She’s now up to 12 employees. “It’s rewarding supplying jobs to people in the community,” she says.

Love at First Site

But growing the team wasn’t the way Looney chose to grow the business. She knew the bakery needed a digital presence too. So in 2007, she launched JCakes.com, and a Facebook page followed in 2008.

“It started out as a one-page website,” Looney says. “Slowly, we would add to it, piece by piece. It was definitely a work in progress. We’ve changed things, and we’ve upgraded. We’ve probably redone the site five times now.”

JCakes.com homepage

To spearhead the technical aspects of the website, Looney enlisted her good friend, Pete Kuhn.

“When Hope needed something quickly, I naturally recommended DreamHost,” he says. “We started on their affordable-yet-reliable shared hosting and in time moved on to a higher-level DreamPress plan seamlessly. DreamHost offers honest, quality hosting. They never try to upsell, yet offer great perks and top-notch support. I cannot say enough about DreamHost support.”

Today, JCakes.com primarily uses WordPress as its CMS. “We employ a variety of customizations and plugins and extended this further during the pandemic,” Kuhn says. “The need for online ordering became urgent, and the WordPress platform offered the most cost-effective solution in WooCommerce.”

We’ll Support Your Dream

Whatever your online goals, we’ll be right there with you, making sure your site is fast, secure, and always up. Plans start at $2.59/mo.

Since the wedding industry is so competitive, it’s crucial to have a website that gives you an edge. “JCakes.com is the virtual store front and lead generation engine for the shop,” Kuhn says. “We showcase products and can share exciting press, news, and seasonal releases. Online ordering streamlines some of the back and forth of custom orders.”

JCakes online ordering form for custom cakes.

Like the menu, the JCakes website has evolved over the years.

“JCakes started with a single page, non-interactive website,” Kuhn says. “Over time, as content and imagery was accumulated, we were able to move into a more catalog-type site. Soon after, powerful forms were employed to allow for easier conversation and custom orders. The latest evolution was the deployment of true online ordering.”

Spreading the Word

To grow brand awareness for JCakes, Kuhn is always pushing for better search engine optimization.

“Google’s suite of tools helps keep this all in line,” he says. “Google has been a key partner, in fact, as the photos, reviews, and local information features of search results have been critical to success. It helps power those ‘cake near me’ type searches, as well as creating a virtual ‘word of mouth’ type recognition. We also employ Google’s suite of productivity tools, so our email is cleanly integrated and from the correct domain.”

Having a functional and mobile-friendly website obviously helps drive growth, Kuhn notes.

“This requires steady maintenance and considerations for improvement,” he says. “Does our theme still do what we want? Are the forms reporting properly? Are the galleries dragging down our site speed? There are many things to be on top of! Without vigilance, websites can break down — or worse, fall behind the times.”

When it comes to marketing the site, Looney admits she doesn’t have a formal social media strategy. “I wish I did; unfortunately that gets put on the backburner,” Looney says. “The biggest thing is posting pictures — that’s what draws attention and keeps everyone engaged.” She posts about new flavors or holiday treats, for example.

“For the pandemic, I focused heavily on cupcake sales. That certainly kept us busy, when people could order online and pick up right away, because I would keep the inventory in real time so you could always see what we had at the store.”


View this post on Instagram


A post shared by JCakes (@jcakesct)

This year, however, there has been a huge uptick in wedding cake orders, so Looney is scaling back her of-the-moment cupcake offerings.

Want to Meet More Inspiring Business Owners?

Subscribe to the DreamHost Digest for inside scoops, expert tips, and exclusive deals.

Living the Sweet Life

With a huge surge in wedding cake orders this year, business is booming, so Looney is focused on refining systems and processes at the bakery.

“Especially since the pandemic, everything just got jumbled,” she says. “My goals have been recovering from all of that, rebuilding and retraining the staff, and getting things to operate more efficiently.”


View this post on Instagram


A post shared by JCakes (@jcakesct)

About half of JCakes’ orders are for wedding cakes, while the rest are other special celebrations: birthdays, bridal showers, baby showers, anniversaries, graduations, and communions. But whatever the occasion, each scrumptious cake is made from scratch.

“We make a butter cream that is European style; it’s not as sweet as an American-style butter cream, so that sets us apart from the rest,” Looney explains. “We are known for our hand-whipped fillings, such as our chocolate mousse and our white chocolate mousse. And our cannoli filling is really, really yummy. We’re lucky that we have good sources for ricotta cheese around here with the local Italian cheese factory. Our fresh fruit fillings are also really popular. Nothing is out of the tub or pre-made.”

View this post on Instagram


A post shared by JCakes (@jcakesct)

Running the bakery is a culinary dream realized. But for Looney, ensuring that JCakes continues delighting the community with over-the-top confections is the real cherry on top.

“There are some people who have been having JCakes for close to 30 years,” she says. “Their kid turns 30, and they’re like, ‘You did their first birthday cake.’ They kept it up every year, which is amazing. The feeling you get when a customer sees their cake and they start crying over it because it brings up this emotion of the time in their life, that’s really rewarding.”

The post JCakes Bakery: How a Longtime Connecticut Staple Flourished over the Pandemic appeared first on Website Guides, Tips & Knowledge.


source https://www.dreamhost.com/blog/customer-spotlight-jcakes-bakery/

Creating and Mastering GA4 Explorations

In the switch from Universal Analytics (UA) to Google Analytics 4 (GA4) — which will go fully into effect July 2023 — a lot of things have...